@water
2015-11-09T01:23:40.000000Z
字数 15895
阅读 3750
用Theano进行LeNet实验
Deeplearning Theano 字符识别
1 LeNet简介
传统的神经网络,神经元之间全连接,用sigmoid,tanh等非线性函数将输入数据的线性组合wx+b进行多层的非线性变换,把输入数据变换到一个可以用传统的分类器(如SVM, Logistic Regression),较好区分的空间,进行类别的划分。LeNet保留了传统神经网络的主要思想,并受生物视觉皮层处理图像的启发,对传统的神经网络进行了改进。
1.1 传统视觉皮层的两点启发
视觉皮层处理中,每个神经元,只处理一定范围(它所在的接收域)内的输入数据,是一个层次化的处理过程。处于底层的简单神经元,对在其接收域内,特定的边有最大的反馈,如图1所示;位于高层的复杂神经元,与底层神经元相比,对最底层的输入有更宽的接收域,并且对某一模式的识别,和其在局部区域的具体位置无关。

图1 底层的神经元对最左侧图的反馈类似右侧的两张图,右侧的图通过单层LeNet卷积层实现,见图4。这表明单层LeNet卷积层实现了视觉神经元底层对特定边反馈的工作。
1.2 LeNet卷积层的稀疏连接和权值共享特性
基于上述的特性,LeNet卷积层在传统的全连接神经网络基础上做了改进,主要表现在稀疏连接和权值共享两方面。这也使得LeNet的参数更少,对于图像这类高维度数据的处理有更好的适应性。
1.2.1 LeNet卷积层的稀疏连接

图2 LeNet卷积层的稀疏连接。每个神经元对应一定范围的接收域,图例中神经元对于相邻的底层输入的接收域为3。m层对m-1层的接收域为3,m+1层对m-1层的接收域为5。
1.2.2 LeNet卷积层的权值共享

图3 LeNet卷积层的权值共享。图中相同颜色的边权值相同,即第m层的神经元,对m-1层的各接收域之间,采用相同权值的边连接。所有采用相同权值的m层神经元构成了一个特征映射(feature map),即相同的权值边构成的特征过滤器(filter)提取了m-1层输入的相同特征。
1.2.3 单层LeNet卷积层

图4 单层LeNet卷积层。
结合前面两点特性,将输入层和输出层变成二维图像矩阵就构成了单层LeNet卷积层。图例中,输入层m-1层有4个feature map,即左侧四个大的矩形。隐含层 m中有2个feature map: 和
和 。
。 表示,连接m层第k个feature map与m-1层的第l个feature map的filter中,坐标(i,j)对应的权值。图示中最左侧的的4个写着不同
 的小方块,表示4个filter,代表了
 与m-1层的4个feature map间的卷积filter,也是二者之间的连接权值。每一对(m-1层的feature map,m层的feature map)对应着一个卷积filter,它们间连接以卷积filter的大小为单位。在图4中对应2x2的卷积filter,m-1层的第一个feature map 中每个卷积filter大小的区域,以灰色的卷积filter的值为权值,连接
 中的某个神经元。
 中所有的神经元与m-1层第一个feature map 的所有2x2区域的连接,对应的权值都为灰色卷积filter的值,从而实现了
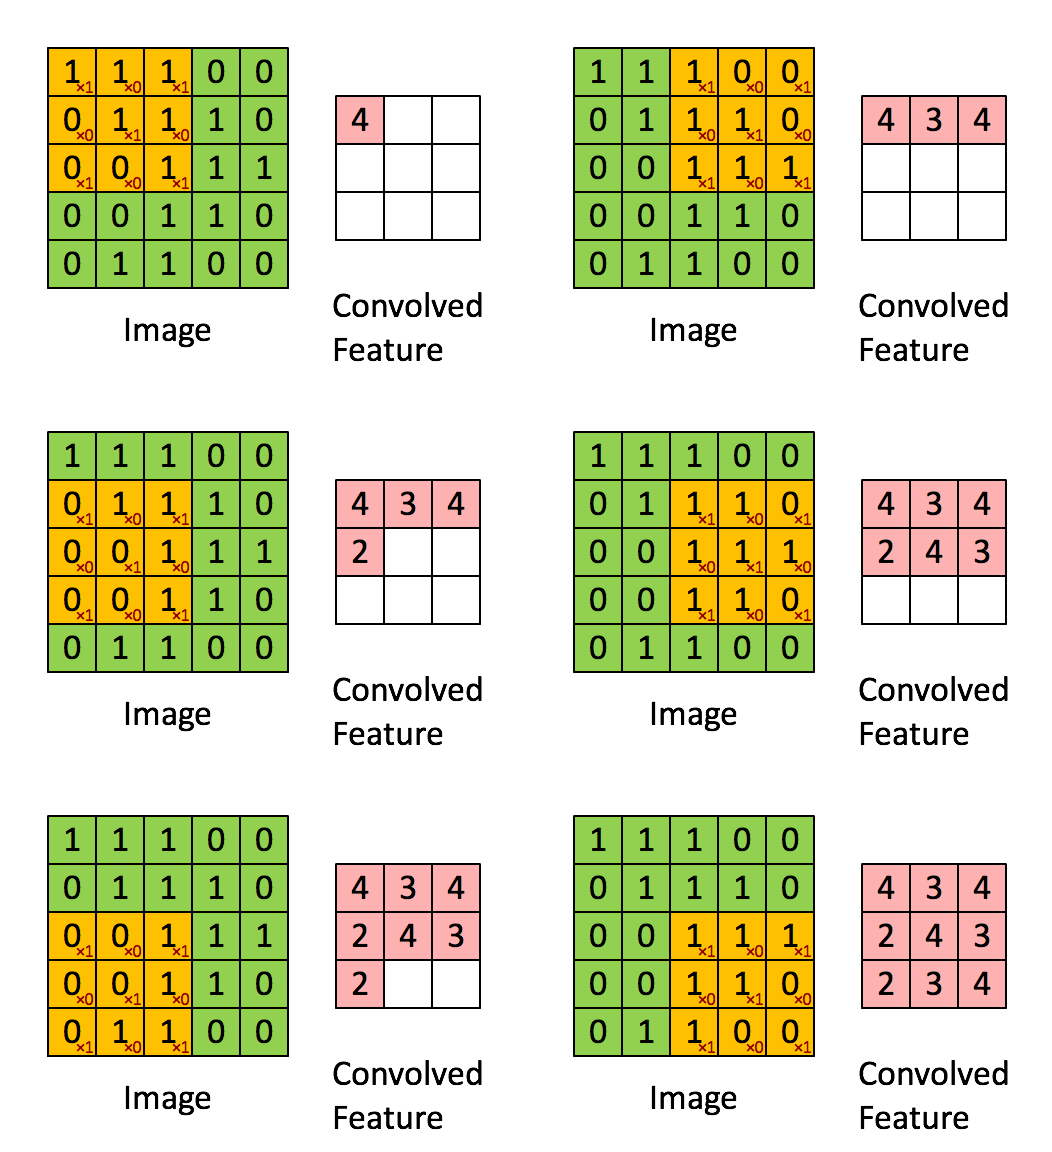
权值共享。m-1层的feature map中每个2x2的卷积filter大小的区域,在LeNet中,是紧邻而不相交的关系,如图5所示。m层中的每个神经元/像素(图示中的红色和蓝色的方块)由卷积filter与卷积filter对应的m-1层的feature map做卷积运算后,加上bias,并进行非线性变换后得到。每个像素只与一块卷积filter大小的输入连接,实现了稀疏连接。这些filter也叫做convolutional filters,得到的feature map也称为convolved feature map,或者卷积层。
1.2.3.1 filter与feature map的卷积运算

图5 卷积运算过程。
输入的feature map大小为5x5,卷积filter大小为3x3的矩阵
得到的卷积层的大小为(5-3+1)x(5-3+1),即3x3的矩阵。
注: 真实的隐含层单元的值,还需要将convolved feature的值加上bias后,再进行非线性变换才算得到。非线性变换后的隐含单元值相当于隐含单元上的一个分数。
1.2.3.2 单层LeNet卷积层的Theano代码实现
以下是对图1所示的示例的代码实现。对theano.shared的解释见2.1数据准备
#use ssh -X username@servername#the -X will get rid of the no display name and no $DISPLAY environment variable error# $THEANO_FLAGS=mode=FAST_RUN,device=cpu,floatX=float32 pythonimport theanofrom theano import tensor as Tfrom theano.tensor.nnet import convimport numpyimport pylabfrom PIL import Image"""begin processing procedure definition"""# param rng: To randomelize weight filter w# 23455 random seed, to ensure the generated rng stabilityrng = numpy.random.RandomState(23455)# instantiate 4D tensor for input# [mini-batch size, number of input feature maps, image height, image width]input = T.tensor4(name='input')# initialize shared variable for weights.# [ number of feature maps at layer m,number of feature maps at layer m-1, filter height, filter width]# input image consists of 3 feature maps (RGB), use 2 9*9 convolutional filtersw_shp = (2, 3, 9, 9)w_bound = numpy.sqrt(3 * 9 * 9)W = theano.shared( numpy.asarray(rng.uniform(low=-1.0 / w_bound,high=1.0 / w_bound,size=w_shp),dtype=input.dtype), name ='W')# initialize shared variable for bias (1D tensor) with random values. IMPORTANT: biases are usually initialized to zero. initialize them to random values to "simulate" learning.b_shp = (2,)b = theano.shared(numpy.asarray(rng.uniform(low=-.5,high=.5,size=b_shp),dtype=input.dtype), name='b')# build symbolic expression that computes the convolution of input with filter in wconv_out = conv.conv2d(input,W)# build symbolic expression to add bias and apply activation functionoutput = T.nnet.sigmoid(conv_out + b.dimshuffle ('x',0,'x','x') )#create theano function to compute filtered imagesf = theano.function([input],output)"""end processing procedure definition""""""begin specific image processing"""# open random image of dimensions 639x516img = Image.open(open('3wolfmoon.jpg'))# dimensions are (height, width, channel), after /256 the input image scales to the range [0,1]img = numpy.asarray(img, dtype='float32')/256.# put image in 4D tensor of shape (1, 3, height, width), 1 mini-batch, 3 feature maps# why should we use transpose(2,0,1) here???img_ = img.transpose(2, 0, 1).reshape(1, 3, 639, 516)filtered_img = f(img_)# plot original image and first and second components of outputpylab.subplot(1, 3, 1); pylab.axis('off'); pylab.imshow(img)pylab.gray();# recall that the convOp output (filtered image) is actually a "minibatch" of size 1 here, so we take index 0 in the first dimension:# [mini-batch size, number of input feature maps, image height, image width]pylab.subplot(1, 3, 2); pylab.axis('off'); pylab.imshow(filtered_img[0,0,:,:])pylab.subplot(1, 3, 3); pylab.axis('off'); pylab.imshow(filtered_img[0,1,:,:])pylab.show()"""end specific image processing"""
图1中第二幅和第三幅图分别代表了由一层LeNet卷积层对图像进行提取后得到的特征信息,它们与视觉皮层的底层神经元提取的边界信息非常近似。
1.2.4 Maxpooling最大池化
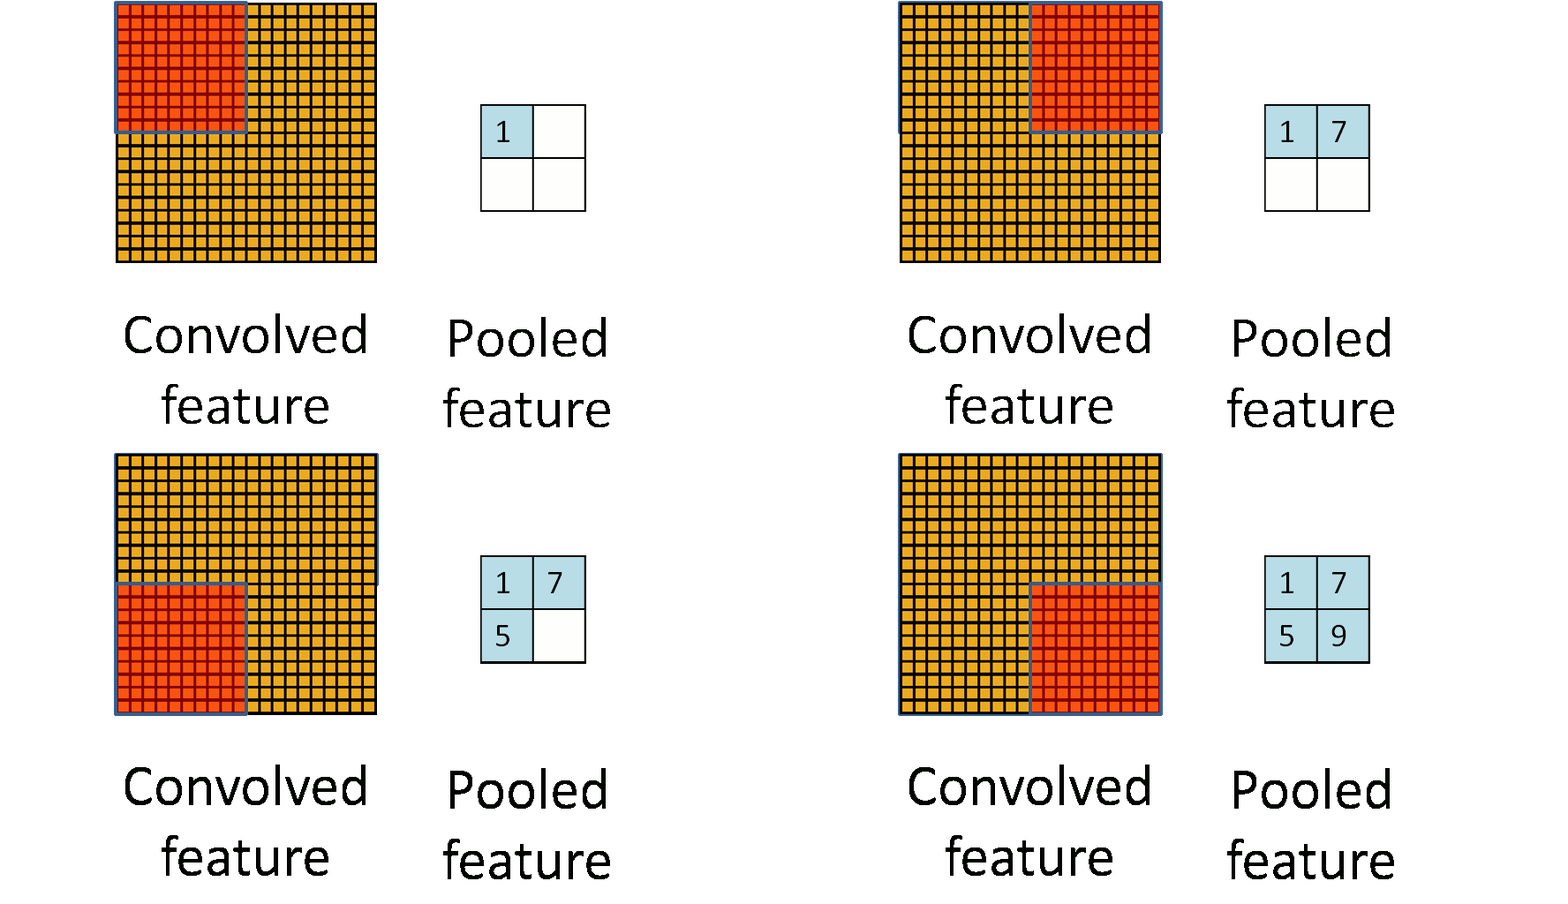
为了更进一步地让高层的神经元与最底层输入的模式的位置无关,并进一步减少模型参数,在卷积层后引入了最大池化[1],即将卷积层划分为互不重叠的几个区域,用各区域的最大值作为各区域的表示,形成最大池化层。如图6所示。

图6 池化过程。
最大池化函数定义的Theano代码如下:
from theano.tensor.signal import downsampleinput = T.dtensor4('input')maxpool_shape = (2, 2)pool_out = downsample.max_pool_2d(input, maxpool_shape, ignore_border=True)f = theano.function([input],pool_out)
1.3 LeNet 5的结构
通过卷积和最大池化层的不断交替连接,与最后1-2层中的神经元间采用传统的全连接神经网络一起组成了如图7所示的LeNet5神经网络。
Todo: 在代码中将此结构反应出来。

图7: LeNet 5。连接信息见图示。来源LeNet5原文,LeNet5原文2
简要的解释:输入图像32x32的灰度图像,第一层卷积层C1由6个feature map组成,卷积fitler的大小为5x5,共有六个卷积filter,这样卷积层feature map的大小为(32-5+1)x(32-5+1)=28x28。第一个池化层S2有6个feature map,与6个C1中的feature map 一一对应。池化的区域为2x2,池化层的大小为(28/2)x(28/2)=14x14。
S2和C3间的连接,对应的卷积filter的大小仍为5x5,但它们并没有采用所有feature maps 互连的方式,而是只将双方一部分的feature map 连接了起来,一是可以减少参数个数,二是保证不同的feature map 提取出的图像特征是不同的。S2与C3之间的连接用一个connection map来表示,connection map表示如下:

图8 S2和C3之间的connection map,行表示S2的feature map,列表示C3的feature map。画x的表示feature map之间有连接。C3前面6个feature map分别与S2中的3个连接,7-15个与S2中的4个连接,第16个与S2中全部的feature map连接。
C3中的第0个feature map计算如下:
依次往后,S4与C5之间,通过5x5的卷积filter刚好实现了全连接。
F6和C5之间是全连接的方式。F6和output的连接,原文中采用了输入与权值间的距离的平方和表示,即
在Theano的实例代码中,各层的feature map是全连接的,神经元的值的计算方法依然同上。全联接最重要的原因在于目前硬件设备计算性能上的提升。
1.4 反向传播算法
1.4.1 概述
构建好模型后,就需要对模型的参数根据数据进行推断了。推断的结果,即参数的值,由最优化训练数据的某一标准得到。对于监督的神经网络,需要调整整个模型的参数,将输出层的误差最小化。调整参数得到最小化误差时,我们这里利用了梯度下降的方法,将权重参数按误差函数对权重的梯度的方向和倍数进行递减。在使用梯度下降法,进行最优化的过程中,需要得到误差函数分别对各权重的偏导数
理解反向传播算法有重要意义,首先,它的应用广泛。反向传播计算误差函数对各权重对偏导数,只需一次反向传播即可得到,而若从输入连接的权重开始正向递推到输出,每次只能计算一个输出误差对连接权重的偏导。反向传播极大地减少了计算众多参数对应的偏导数的计算时间。其次,反向传播算法能让我们更加清楚,权重和bias的改变,如何改变整个神经网络的效果。
对于反向传播方法个人觉得最好的博客介绍来自一位Googler的博客,他的每篇博客都会花上很多时间来写,非常清晰易懂,内容循序渐进,加入了自身对技术对看法,很有启发意义[2]。请移步http://colah.github.io/posts/2015-08-Backprop/更详细的教程参见http://neuralnetworksanddeeplearning.com/chap2.html#warm_up_a_fast_matrix-based_approach_to_computing_the_output_from_a_neural_network
同时,为了时模型具有较好的扩展性,在应用梯度下降方法更新权重时,我们引入了测试集,使得模型参数对不在训练集中的数据也能达到最优。具体见2.2.1 验证数据集对模型训练的考量。
在用代码计算各偏导时,用到了向量化来计算,能极大地提高计算效率。
简要介绍:
在神经网络第
反向传播算法的目的在于计算误差函数分别对各权重和偏置的偏导数
1.4.2与单个神经元误差有关的四大公式
定义误差
注:对误差定义http://neuralnetworksanddeeplearning.com/chap2.html#the_four_fundamental_equations_behind_backpropagation 难理解的地方:
1)将权重输入zlj 改变Δzlj ,最终cost funtion的改变量为∂Cost∂zljΔzlj 。理解。
2)https://www.evernote.com/shard/s661/sh/8828d79b-4eda-4479-ae66-45c180a42a1e/84a24dfc9798083fa247172596a3dcfc
四大公式如下,各公式在反向传递偏导时都有自身的意义:
1
2
3
4
四大公式的直观意义:
1.最后一层的误差怎么由最后一层的数值计算。
2.误差怎么往前递推。
3.cost funtion 对偏置的偏导怎么计算。
4.怎么由误差计算得到cost funtion 对权重的偏导。
从这四个式子还可以看出偏导的大小与激活函数
下面推导一下传说中的四大公式,更好地掌握反向传播方法。
1.
2.
而
所以有
所以
3.
4.
而
所以
所以
1.4.3反向传播算法过程
见http://neuralnetworksanddeeplearning.com/chap2.html#the_backpropagation_algorithm
Loss function:
再求cost对参数的导数,将导数乘学习率,用随机梯度下降法进行权值更新。
2 实验过程
2.1 数据准备
输入数据格式的定义:a tuple of 3 lists : the training set, the validation set and the testing set. Each of the three lists is a pair formed from a list of images and a list of class labels for each of the images. An image is represented as numpy 1-dimensional array of 784 (28 x 28) float values between 0 and 1 (0 stands for black, 1 for white). The labels are numbers between 0 and 9 indicating which digit the image represents.
training set: 是一个pair,这个pair的格式为(N个(N为训练集个数)784列vetor组成的list,N个label组成的list) 。
归一化图像vector时,直接除以255。
2.1.1 数据预处理
对任何数据只要用脚本转换为上述的输入数据格式即可。
原始数据格式:
数据包含在一个大的文件夹下,运行转换格式的脚本时,需要输入该文件夹的位置。大文件夹内包含以数字命名的文件夹,代表各类类标号对应的类别。见:https://github.com/waterofphysics/LearningTheano/tree/master/data/t10k-images-bmp/t10k-images
训练集与验证集来源于同一个数据源,按训练集90%与验证集10%对原数据进行了划分。
测试集自成一个数据源,格式与上面一样。
转换数据结构
写的这个脚本最大的瓶颈在于没有考虑大型数据集,存成pkl时,需要先在内存中存一个三元组组成的tuple;
第二个瓶颈在彩色图像的处理。后续解决了新图像分类的问题后,会回过头来解决这两个问题的.
正确性的验证一方面是代码的逻辑,不过我不确定都考虑全了。
另一方面,把MNIST数据集转成了图像,放在tk10-images中,再用自己的脚本转化成了testMnist.pkl,实验的结果在code下的test.txt中,如果误差率在0.92%左右,则是正确的。
训练数据和验证数据的生成:
https://github.com/waterofphysics/LearningTheano/blob/master/LeNet/imagestopkl.py
测试数据的生成:
https://github.com/waterofphysics/LearningTheano/blob/master/LeNet/imagestopklFTestset.py
2.1.2 考虑GPU时数据处理的注意项
2.1.2.1 theano.shared的使用
""" Function that loads the dataset into shared variables

The reason we store our dataset in shared variables is to allow
Theano to copy it into the GPU memory (when code is run on GPU).
Since copying data into the GPU is slow, copying a minibatch everytime is needed (the default behaviour if the data is not in a shared variable) would lead to a large decrease in performance.
"""
一句话:直接将数据立马拷贝到GPU内存中,避免后续训练过程中每次都要将minibatch的数据从内存拷贝到GPU内存。
反应在代码中就是下列函数:
def shared_dataset(data_xy, borrow=True):""" Function that loads the dataset into shared variablesThe reason we store our dataset in shared variables is to allowTheano to copy it into the GPU memory (when code is run on GPU).Since copying data into the GPU is slow, copying a minibatch everytimeis needed (the default behaviour if the data is not in a sharedvariable) would lead to a large decrease in performance."""data_x, data_y = data_xyshared_x = theano.shared(numpy.asarray(data_x,dtype=theano.config.floatX),borrow=borrow)shared_y = theano.shared(numpy.asarray(data_y,dtype=theano.config.floatX),borrow=borrow)# When storing data on the GPU it has to be stored as floats# therefore we will store the labels as ``floatX`` as well# (``shared_y`` does exactly that). But during our computations# we need them as ints (we use labels as index, and if they are# floats it doesn't make sense) therefore instead of returning# ``shared_y`` we will have to cast it to int. This little hack# lets ous get around this issuereturn shared_x, T.cast(shared_y, 'int32')
2.1.2.2 GPU的内存大小限制
GPU的内存大小是有限制的,若训练,验证和测试加起来超过了GPU内存的大小,则需要对数据的输入代码进行改变。
You can however store a sufficiently small chunk of your data (several minibatches) in a shared variable and use that during training. Once you got through the chunk, update the values it stores. This way you minimize the number of data transfers between CPU memory and GPU memory.
To Do: 将上述思想转为代码
2.1.2.3 floatX的使用
When storing data on the GPU it has to be stored as floats therefore we will store the labels as floatX as well (shared_y does exactly that). But during our computations we need them as ints (we use labels as index, and if they are floats it doesn't make sense) therefore instead of returning shared_y we will have to cast it to int. This little hack lets us get around this issue.
在运行代码时定义floatX的类型
$ THEANO_FLAGS=mode=FAST_RUN,device=gpu,floatX=float32 python check1.py
$ python imagestopkl.py
$ python imagestopklFTest.py
$(THEANO_FLAGS=mode=FAST_RUN,device=gpu,floatX=float32 python convolutional_mlp.py > test.txt&)
2.1.2.4
2.2 代码分析
建立LeNet
论文: Object recognition with Gradient-Based learning
1.actual training and early-stopping需要参考建立MLP,更细化和全面地理解,以便按需写出自己的代码。2.参数的存储,和对新数据的分类参考LeNet trainded model for prediction。
代码参见:
https://github.com/waterofphysics/LearningTheano/blob/master/LeNet/convolutional_mlp.py
2.2.1 验证数据集对模型的优化
1epoch表示将所有的训练数据都过1遍。
3 扩展
3.1 多块GPU并行加速
目前的数据量还不必使用,不过有Theano的改进版本了。用到了多线程编程和网络通信编程的知识。不太懂。但这是训练平台搭建后期需要解决的事情。
举例:https://github.com/Theano/Theano/wiki/Using-Multiple-GPUs
3.2 对不在训练集中数据的识别
是否真的需要把所有的字符数据都放到训练集中?可否用非参模型的方法,让模型自动地为新类别数据生成新类别?
http://rinuboney.github.io/2015/10/18/theoretical-motivations-deep-learning.html
Why not classical non-parametric algorithms?
唯一想创新的点都走不通。
非参本来就难。
[1] 在原模型中,并没有采用如1.2.4所述的最大池化的方法,而是每次将输入层中在池化范围内的4个值相加,乘以一个权值再加上bias,并对结果进行非线性变换后得到池化层某个神经元的值。 后续的理论和实验都表明max pooling的效果更好。 ↩
[2] 看过Nat and Lo对作者对采访http://googleresearch.blogspot.com/2015/09/a-beginners-guide-to-deep-neural.html,非常nice的一个人,榜样。 ↩
