@TangWill
2019-12-16T05:59:43.000000Z
字数 13448
阅读 1208
基于(基于实时视频分析的入侵监测系统设计与实现)的git学习
git
一、Git是什么
Git是一个开源的分布式版本控制系统,用于敏捷高效地处理任何或小或大的项目。
Git是 Linus Torvalds 为了帮助管理 Linux 内核开发而开发的一个开放源码的版本控制软件。
Git与常用的版本控制工具 CVS, Subversion 等不同,它采用了分布式版本库的方式,不必服务器端软件支持。
二、Git安装
三、Git工作流程
一般工作流程如下:
1. 克隆 Git 资源作为工作目录。
2. 在克隆的资源上添加或修改文件。
3. 如果其他人修改了,你可以更新资源。
4. 在提交前查看修改。
5. 提交修改。
6. 在修改完成后,如果发现错误,可以撤回提交并再次修改并提交。
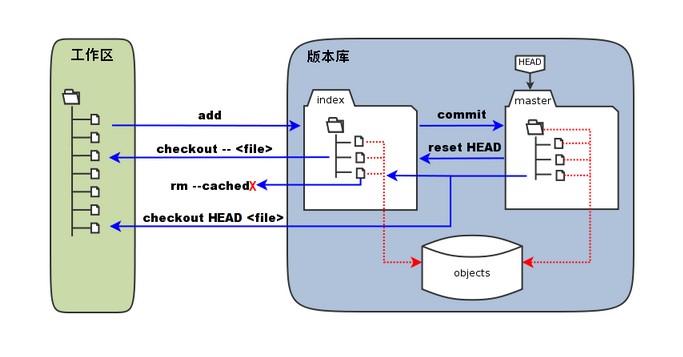
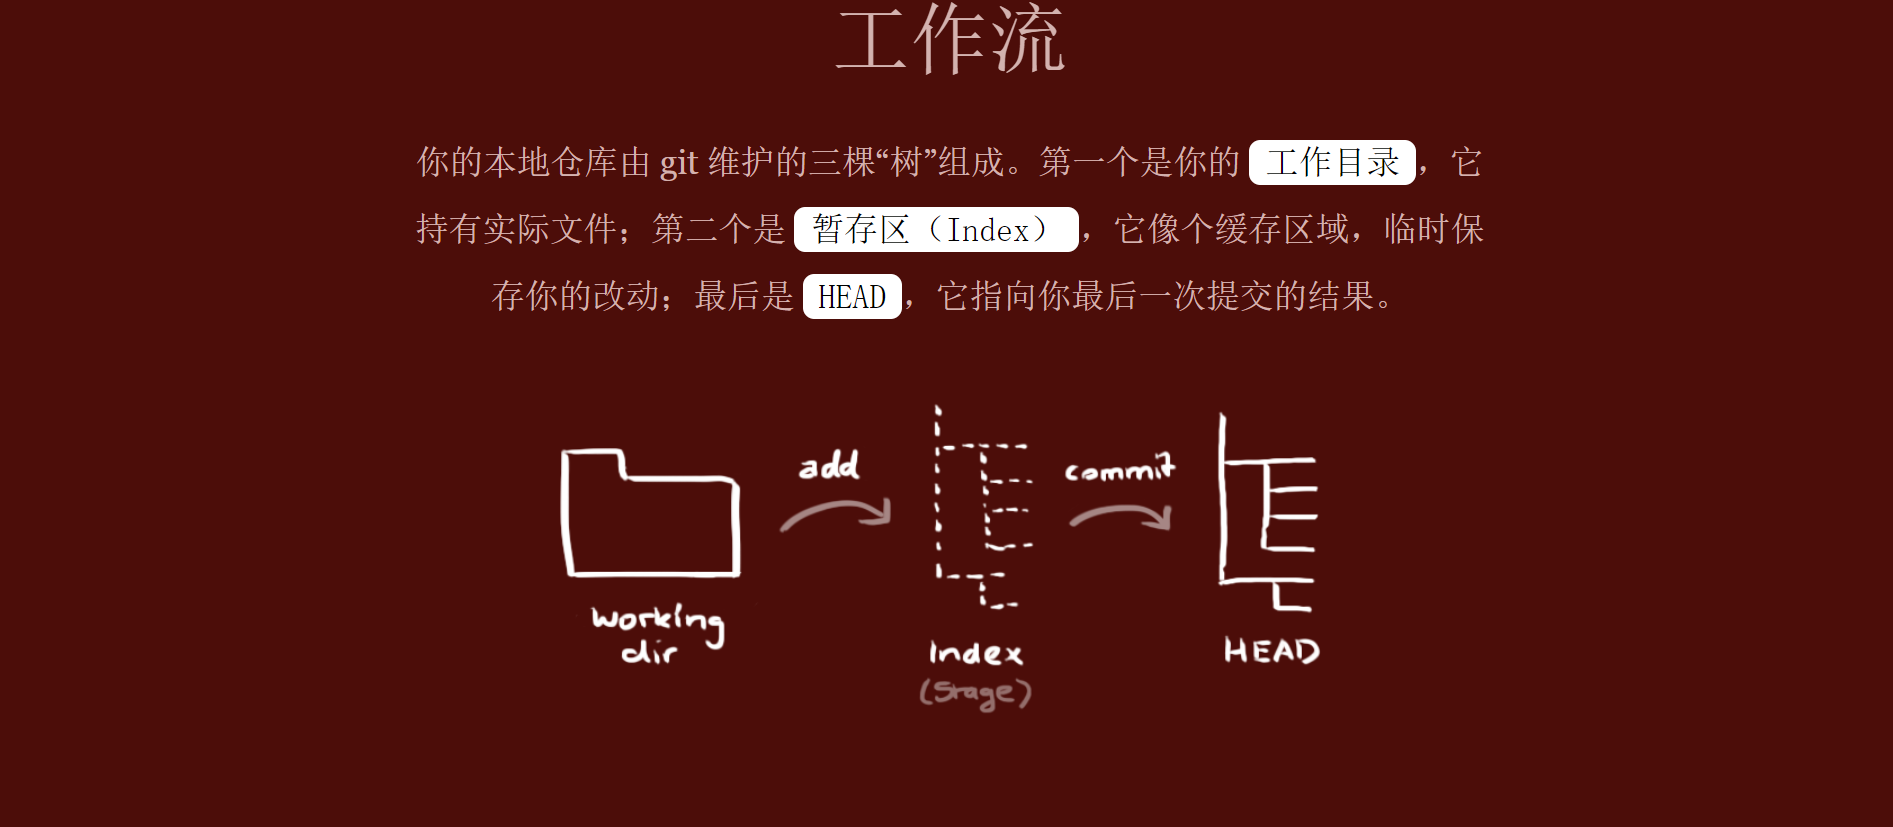
四、Git 工作区、暂存区和版本库
基本概念
我们先来理解下Git 工作区、暂存区和版本库概念
- 工作区:就是你项目的目录(可见目录)。
- 缓存区:英文叫stage, 或index。一般存放在”git目录”下的index文件(.git/index)中,所以我们把暂存区有时也叫作索引(index)。
- 版本库:工作区有一个隐藏目录.git,这个不算工作区,而是Git的版本库。
下面这个图展示了工作区、版本库中的暂存区和版本库之间的关系:
五、创建新仓库
git init

新建本地仓库 git init
Git 使用 git init 命令来初始化一个 Git 仓库,Git 的很多命令都需要在 Git 的仓库中运行,所以 git init 是使用 Git 的第一个命令。
在执行完成 git init 命令后,Git 仓库会生成一个 .git 目录,该目录包含了资源的所有元数据,其他的项目目录保持不变。
- 使用当前目录作为Git仓库,我们只需使它初始化。
$ git init1
该命令执行完后会在当前目录生成一个 .git 目录。
- 使用我们指定目录作为Git仓库。
$ mkdir wyndam$ cd wyndam/$ git initInitialized empty Git repository in C:/Users/lion/Desktop/wyndam/.git/# 在 桌面/wyndam/ 目录初始化空 Git 仓库完毕。
初始化后,会在 wyndam 目录下会出现一个名为 .git 的目录,所有 Git 需要的数据和资源都存放在这个目录中。
如果当前目录下有几个文件想要纳入版本控制,需要先用 git add 命令告诉 Git 开始对这些文件进行跟踪,然后提交:
$ git add *.java$ git add README.md$ git commit -m "inital commit"123
以上命令将目录下以 .java 结尾及 README.md 文件提交到仓库中。
四、检出仓库
git clone username@host:/path/torepository

复制远程仓库 git clone
我们使用 git clone 从现有 Git 仓库中拷贝项目。
克隆仓库的命令格式为:
$ git clone <repo> //$ git clone [url]
如果我们需要克隆到指定的目录,可以使用以下命令格式:
$ git clone <repo> <directory>1
- 参数说明:
repo:Git: 仓库。
directory:本地目录。
比如,要克隆 Ruby 语言的 Git 代码仓库 Grit,可以用下面的命令:
$ git clone git://github.com/schacon/grit.git1
执行该命令后,会在当前目录下创建一个名为grit的目录,其中包含一个 .git 的目录,用于保存下载下来的所有版本记录。
如果要自己定义要新建的项目目录名称,可以在上面的命令末尾指定新的名字:
$ git clone git://github.com/schacon/grit.git mygrit
五、工作流
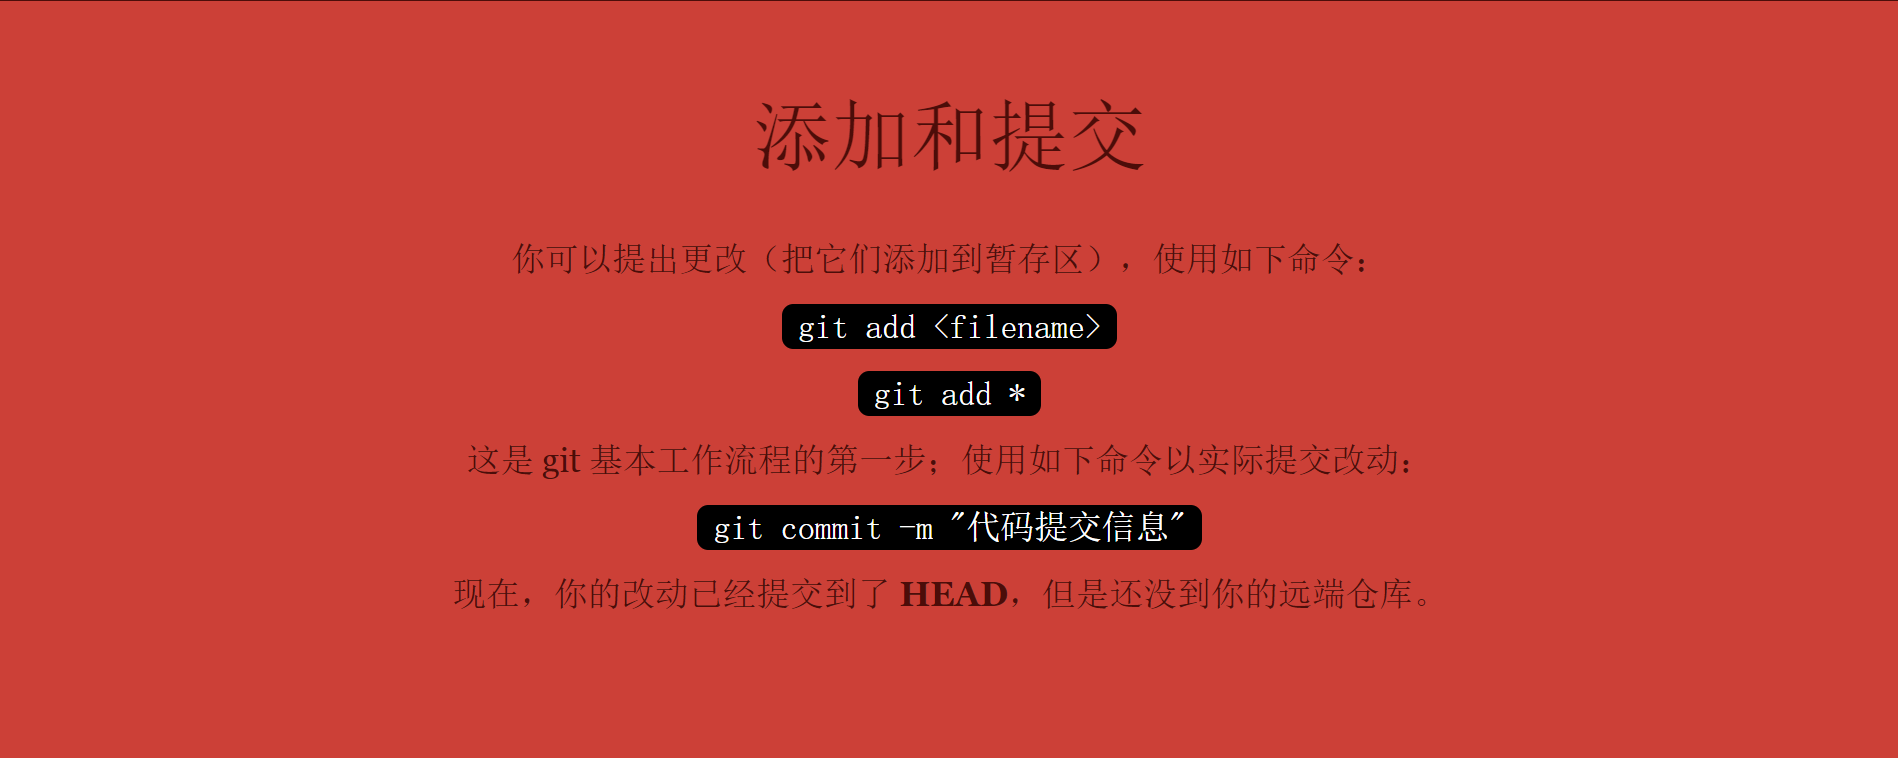
六、添加和提交
git add <filename>git add *git commit -m "代码提交信息"
Git 的工作就是创建和保存你的项目的快照及与之后的快照进行对比。
添加文件到缓存 git add
git add 命令可将该文件添加到缓存,如我们添加以下两个文件:
$ touch README.md$ touch HelloWorld.java$ lsHelloWorld.java README.md$ git status -s?? HelloWorld.java?? README.md
git status 命令用于查看项目的当前状态。
接下来我们执行 git add 命令来添加文件:
$ git add README.md HelloWorld.java
现在我们再执行 git status,就可以看到这两个文件已经加上去了。
$ git status -sA HelloWorld.javaA README.md
新项目中,添加所有文件很普遍,我们可以使用 git add . 命令来添加当前项目的所有文件。
现在我们修改 README 文件:
$ vim README#README.mdThis is readme markdown file.$ git status -sA HelloWorld.javaAM README.md
当你要将你的修改包含在即将提交的快照里的时候,需要执行 git add。
git status 以查看在你上次提交之后是否有修改。
我演示该命令的时候加了 -s 参数,以获得简短的结果输出。如果没加该参数会详细输出内容:
$ git statusOn branch masterInitial commitChanges to be committed:(use "git rm --cached <file>..." to unstage)new file: HelloWorld.javanew file: README.md
对比改动 git diff
执行 git diff 来查看执行 git status 的结果的详细信息。
git diff 命令显示已写入缓存与已修改但尚未写入缓存的改动的区别。git diff 有两个主要的应用场景。
- 尚未缓存的改动:
git diff - 查看已缓存的改动:
git diff –cached - 查看已缓存的与未缓存的所有改动:
git diff HEAD - 显示摘要而非整个
diff:git diff –stat
在 HelloWorld.java 文件中输入以下内容:
public class HelloWorld {public static void main(String[] args) {System.out.println("Hello World!");}}
$ git status -sAM HelloWorld.javaA README.md$ git diffdiff --git a/HelloWorld.java b/HelloWorld.javaindex e69de29..68271e5 100644--- a/HelloWorld.java+++ b/HelloWorld.java@@ -0,0 +1,7 @@+public class HelloWorld {++ public static void main(String[] args) {+ System.out.println("Hello World!");+ }++}
git status 显示你上次提交更新后的更改或者写入缓存的改动, 而 git diff 一行一行地显示这些改动具体是啥。
接下来我们来查看下 git diff –cached 的执行效果:
$ git add HelloWorld.java$ git status -sA HelloWorld.javaA README.md$ git diff --cacheddiff --git a/HelloWorld.java b/HelloWorld.javanew file mode 100644index 0000000..68271e5--- /dev/null+++ b/HelloWorld.java@@ -0,0 +1,7 @@+public class HelloWorld {++ public static void main(String[] args) {+ System.out.println("Hello World!");+ }++}diff --git a/README.md b/README.mdnew file mode 100644index 0000000..8123762--- /dev/null+++ b/README.md@@ -0,0 +1,3 @@+#README.md++This is readme markdown file.
提交代码到本地仓库 git commit
使用 git add 命令将想要快照的内容写入缓存区, 而执行 git commit 将缓存区内容添加到仓库中。
Git 为你的每一个提交都记录你的名字与电子邮箱地址,所以第一步需要配置用户名和邮箱地址。
$ git config --golbal user.name 'wyndam'$ git config --golbal user.email 'only.night@qq.com'12
接下来我们写入缓存,并提交对 hello.php 的所有改动。在首个例子中,我们使用 -m 选项以在命令行中提供提交注释。
$ git add README.md$ git add HelloWorld.java$ git status -sA HelloWorld.javaA README.md$ git commit -m 'inital commit'[master (root-commit) fdd5c53] inital commit2 files changed, 10 insertions(+)create mode 100644 HelloWorld.javacreate mode 100644 README.md12345678910
现在我们已经记录了快照。如果我们再执行git status:
$ git statusOn branch masternothing to commit, working directory clean123
以上输出说明我们在最近一次提交之后,没有做任何改动,是一个”working directory clean:干净的工作目录”。
如果你没有设置 -m 选项,Git 会尝试为你打开一个编辑器以填写提交信息。 如果 Git 在你对它的配置中找不到相关信息,默认会打开 vim。屏幕会像这样:
# Please enter the commit message for your changes. Lines starting# with '#' will be ignored, and an empty message aborts the commit.# On branch master# Changes to be committed:# (use "git reset HEAD <file>..." to unstage)## modified: HelloWorld.java#~~".git/COMMIT_EDITMSG" 9L, 257C1234567891011
如果你觉得 git add 提交缓存的流程太过繁琐,Git 也允许你用 -a 选项跳过这一步。命令格式如下:
$ git commit -a1
我们先修改 HelloWorld.java 文件为以下内容:
public class HelloWorld {public static void main(String[] args) {System.out.println("Hello World!!!");}}1234567
再执行以下命令:
$ git commit -am "修改HelloWorld.java文件"[master c2c167c] 修改HelloWorld.java文件1 file changed, 1 insertion(+), 1 deletion(-)
从缓存中移除文件 git reset HEAD
git reset HEAD 命令用于取消已缓存的内容。
我们先改动文件 README 文件,内容如下:
#README.md##This is readme markdown file123
HelloWorld.java 文件修改为:
public class HelloWorld {public static void main(String[] args) {System.out.println("Hello World!");}}1234567
现在两个文件修改后,都提交到了缓存区,我们现在要取消其中一个的缓存,操作如下:
$ git status -sM HelloWorld.javaM README.md$ git add .$ git status -sM HelloWorld.javaM README.md$ git reset HEAD -- HelloWorld.javaUnstaged changes after reset:M HelloWorld.java$ git status -sM HelloWorld.javaM README.md12345678910111213
现在你执行 git commit,只会将 README.md 文件的改动提交,而 HelloWorld.java 是没有的。
$ git commit -m "修改"[master ad5f6fe] 修改1 file changed, 1 insertion(+), 1 deletion(-)$ git status -sM HelloWorld.java12345
可以看到 HelloWorld.java 文件的修改并为提交。
这时我们可以使用以下命令将 HelloWorld.java 的修改提交:
$ git commit -am "修改 HelloWorld.java 文件"[master a055c08] 修改 HelloWorld.java 文件1 file changed, 1 insertion(+), 1 deletion(-)$ git statusOn branch masternothing to commit, working directory clean123456
简而言之,执行 git reset HEAD 以取消之前 git add 添加,但不希望包含在下一提交快照中的缓存。
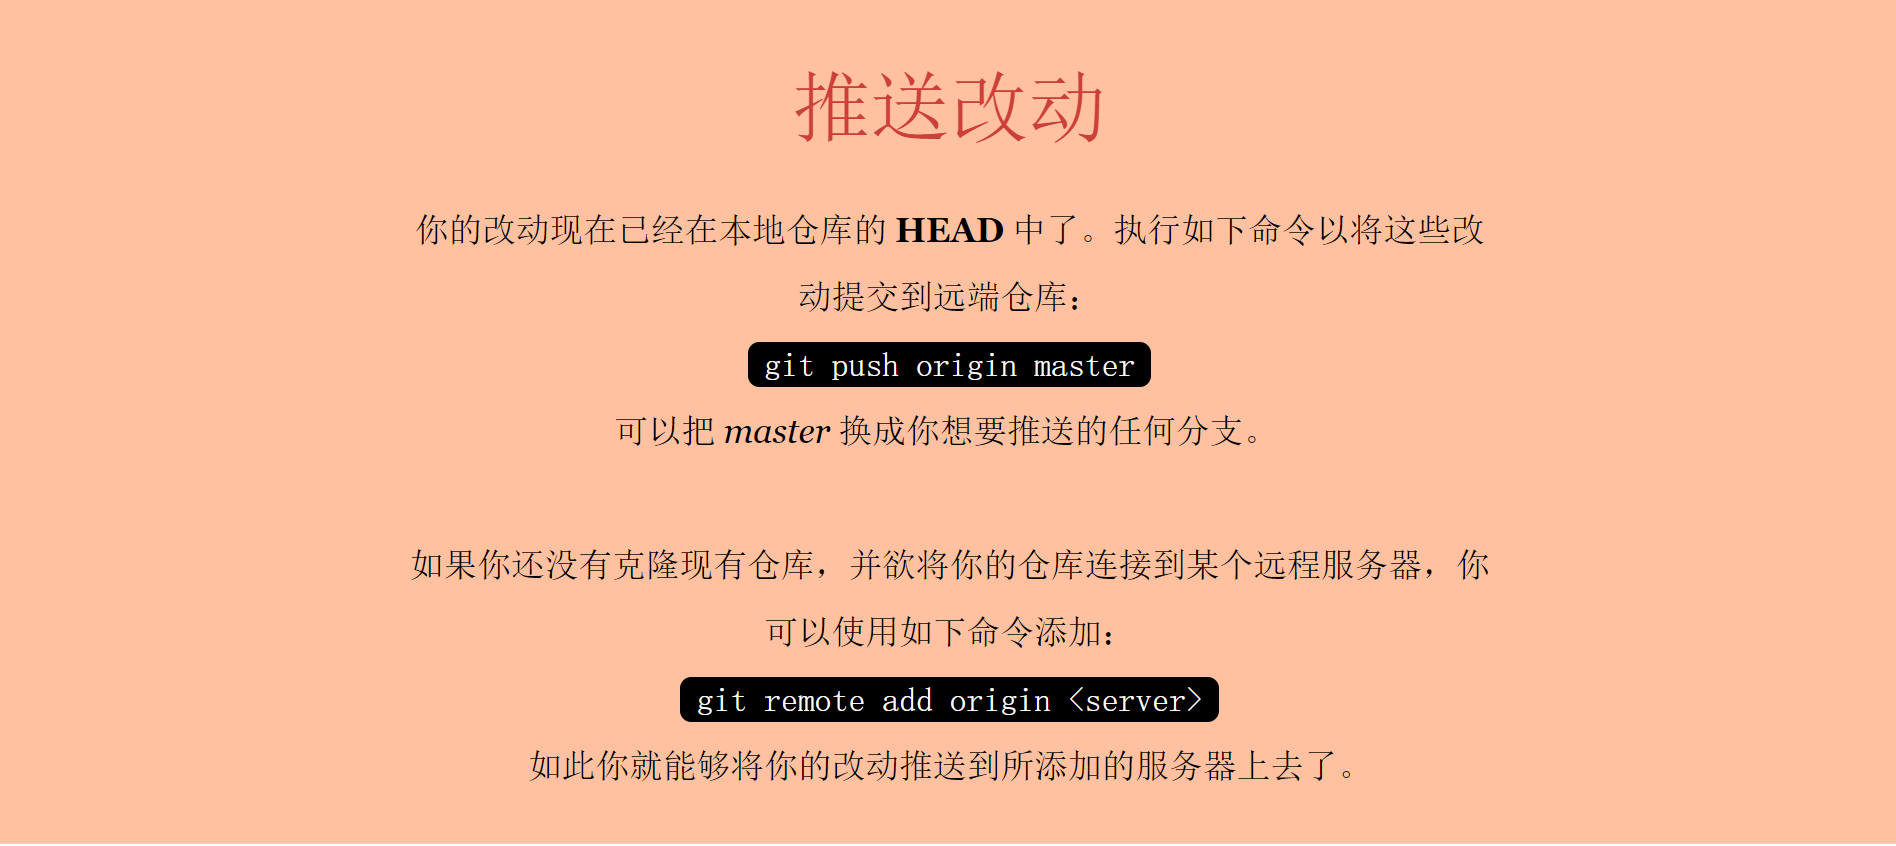
七、推送改动
git push
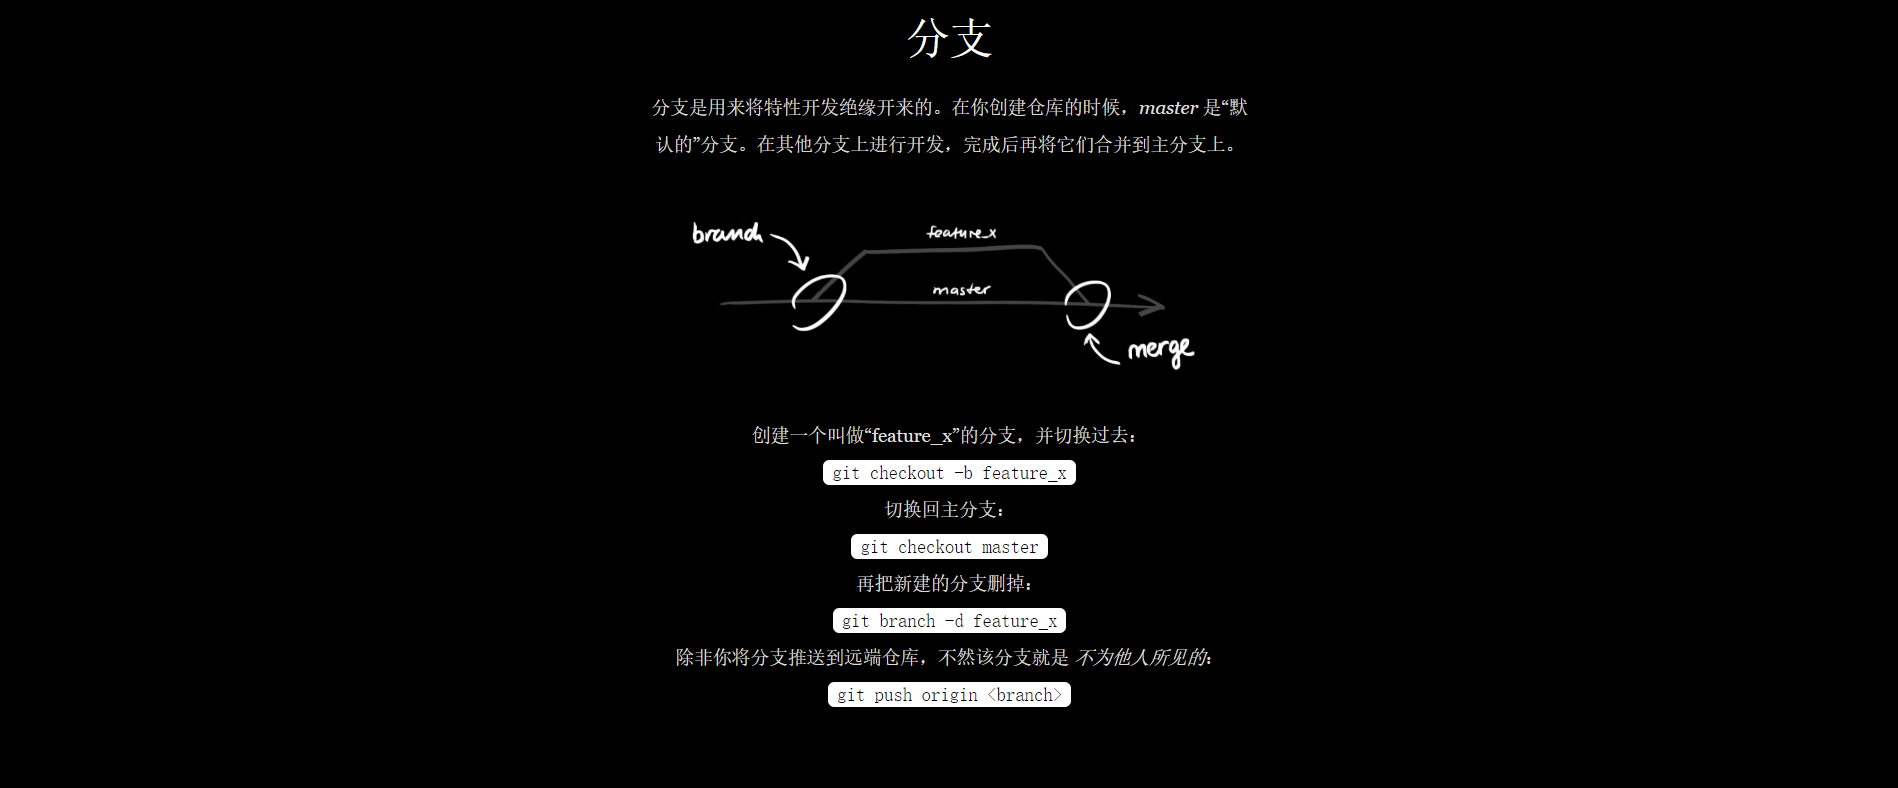
八、分支
git checkout -b feature_xgit checkout mastergit branch -d feature_xgit push origin <branch>
列出分支 git branch
列出分支基本命令:
git branch1
没有参数时,git branch 会列出你在本地的分支。
$ git branch* master12
此例的意思就是,我们有一个叫做master的分支,并且该分支是当前分支。
当你执行 git init 的时候,缺省情况下 Git 就会为你创建”master”分支。
如果我们要手动创建一个分支,并切换过去。执行 git branch (branchname) 即可。
$ git branch testing$ git branch* mastertesting1234
现在我们可以看到,有了一个新分支 testing。
当你以此方式在上次提交更新之后创建了新分支,如果后来又有更新提交, 然后又切换到了”testing”分支,Git 将还原你的工作目录到你创建分支时候的样子
接下来我们将演示如何切换分支,我们用 git checkout (branch) 切换到我们要修改的分支。
$ lsREADME$ echo 'w3cschool.cc' > test.txt$ git add .$ git commit -m 'add test.txt'[master 048598f] add test.txt2 files changed, 1 insertion(+), 3 deletions(-)delete mode 100644 hello.phpcreate mode 100644 test.txt$ lsREADME test.txt$ git checkout testingSwitched to branch 'testing'$ lsREADME.md HelloWorld.java123456789101112131415
当我们切换到testing分支的时候,我们添加的新文件test.txt被移除了, 原来被删除的文件hello.php文件又出现了。切换回master分支的时候,它们有重新出现了。
$ git checkout masterSwitched to branch 'master'$ lsREADME test.txt1234
首先我们在master分支中在添加一个新文件test2.txt:
$ touch test2.txt$ git add test2.txt$ git commit -m 'add test2.txt'$ lsREADME test.txt test2.txt12345
我们也可以使用 git checkout -b (branchname) 命令来创建新分支并立即切换到该分支下,从而在该分支中操作。
$ git checkout -b newtestSwitched to a new branch 'newtest'$ git rm test2.txtrm 'test2.txt'$ lsREADME test.txt$ git commit -am 'removed test2.txt'[newtest 556f0a0] removed test2.txt1 file changed, 1 deletion(-)delete mode 100644 test2.txt$ git checkout masterSwitched to branch 'master'$ lsREADME test.txt test2.txt1234567891011121314
如你所见,我们创建了一个分支,在该分支的上下文中移除了一些文件,然后切换回我们的主分支,那些文件又回来了。
使用分支将工作切分开来,从而让我们能够在不同上下文中做事,并来回切换。
删除分支:
git branch -d
删除分支命令
git branch -d [branch name]1
例如我们要删除testing分支:
$ git branch* masternewtesttesting$ git branch -D testingDeleted branch testing (was 84b13b9).$ git branch* masternewtest123456789
分支合并 git merge
一旦某分支有了独立内容,你终究会希望将它合并回到你的主分支。 你可以使用以下命令将任何分支合并到当前分支中去:
git merge1
$ git branch* masternewtest$ lsREADME test.txt test2.txt$ git merge newtestUpdating a055c08..202199dFast-forwardHelloWorld.java | 7 -------README.md => README | 0test.txt | 1 +3 files changed, 1 insertion(+), 7 deletions(-)delete mode 100644 HelloWorld.javarename README.md => README (100%)create mode 100644 test.txt$ lsREADME test.txt1234567891011121314151617
以上实例中我们将 newtest 分支合并到主分支去,test2.txt 文件被删除。
九、更新与合并
git pull

合并冲突
合并并不仅仅是简单的文件添加、移除的操作,Git 也会合并修改。
$ git branch* masternewtest$ cat test.txtw3cschool.cc12345
首先,我们创建一个叫做change_site的分支,切换过去,我们将内容改为 www.w3cschool.cc 。
$ git checkout -b change_siteSwitched to a new branch 'change_site'$ vim test.txt$ head -1 test.txtwww.w3cschool.cc$ git commit -am 'changed the site'[change_site d7e7346] changed the site1 file changed, 1 insertion(+), 1 deletion(-)12345678
将修改的内容提交到 change_site 分支中。 现在,假如切换回 master 分支我们可以看内容恢复到我们修改前的,我们再次修改test.txt文件。
$ git checkout masterSwitched to branch 'master'$ head -1 test.txtw3cschool.cc$ vim test.txt$ cat test.txtw3cschool.cc新增加一行$ git diffdiff --git a/test.txt b/test.txtindex 704cce7..f84c2a4 100644--- a/test.txt+++ b/test.txt@@ -1 +1,2 @@w3cschool.cc+新增加一行$ git commit -am '新增加一行'[master 14b4dca] 新增加一行1 file changed, 1 insertion(+)12345678910111213141516171819
现在这些改变已经记录到我的 master 分支了。接下来我们将 change_site 分支合并过来。
$ git merge change_siteAuto-merging test.txtCONFLICT (content): Merge conflict in test.txtAutomatic merge failed; fix conflicts and then commit the result.$ cat test.txt<<<<<<< HEADw3cschool.cc新增加一行=======www.w3cschool.cc>>>>>>> change_site1234567891011
我们将前一个分支合并到 master 分支,一个合并冲突就出现了,接下来我们需要手动去修改它。
$ vim test.txt$ cat test.txtwww.w3cschool.cc新增加一行$ git diffdiff --cc test.txtindex f84c2a4,bccb7c2..0000000--- a/test.txt+++ b/test.txt@@@ -1,2 -1,1 +1,2 @@@- w3cschool.cc+ www.w3cschool.cc+新增加一行12345678910111213
在 Git 中,我们可以用 git add 要告诉 Git 文件冲突已经解决
$ git status -sUU test.txt$ git add test.txt$ git status -sM test.txt$ git commit[master 88afe0e] Merge branch 'change_site'
难点
指示符:<<<<<<< HEAD//此行下方的所有内容(直到下个指示符)显示了当前分支上的行||||||| merged common ancestors//此行下方的所有内容(直到下个指示符)显示了原始行的内容=======//表示原始行内容的结束位置,之后的所有行(直到下个指示符)是被合并的当前分支上的行的内容>>>>>>> heading-update//是要被合并的分支(此例中是 heading-update 分支)上的行结束指示符
解决冲突后应将文件重新添加到暂存区。并进行提交。
十、替换本地变动
git reset --hard origin/master

十一、Git 查看提交历史 git log
在使用 Git 提交了若干更新之后,又或者克隆了某个项目,想回顾下提交历史,我们可以使用 git log 命令查看。
针对我们前一章节的操作,使用 git log 命令列出历史提交记录如下:
$ git logcommit 2b5970dc2a936649791afc8cedb6dbaee46d2176Merge: e2714c9 d17a0a0Author: Wyndam <only.night@qq.com>Date: Thu Oct 20 17:00:57 2016 +0800Merge branch 'change_site'commit e2714c9ecf376efefc8d149ac219a6e98c80790bAuthor: Wyndam <only.night@qq.com>Date: Thu Oct 20 16:58:09 2016 +0800新增加一行commit d17a0a0065e1e1d1c1078cfabf18f2c8491f0b7cAuthor: Wyndam <only.night@qq.com>Date: Thu Oct 20 16:54:13 2016 +0800change the sitecommit 202199d023f307e74229e46ee90fc351d2e6d4f6Author: Wyndam <only.night@qq.com>Date: Thu Oct 20 15:50:55 2016 +0800add test.txt filecommit a055c0816bc94a9abe21ffe4a4014851943ea139Author: Wyndam <only.night@qq.com>Date: Thu Oct 20 15:35:50 2016 +0800修改 HelloWorld.java 文件commit ad5f6fe0474c52c464e94cd41faf45e705445847Author: Wyndam <only.night@qq.com>Date: Thu Oct 20 15:34:16 2016 +0800修改commit c2c167c36533768be8fc91e4cb3ba0b7d328a074Author: Wyndam <only.night@qq.com>Date: Thu Oct 20 15:24:41 2016 +0800修改HelloWorld.java文件commit f9393bf0e7f701248b56c97827a9d101e74b3952Author: Wyndam <only.night@qq.com>Date: Thu Oct 20 15:21:02 2016 +0800third commit``commit 316fafcf38bb2eb600f4226345ea09a4e37d9ec4Author: Wyndam <only.night@qq.com>Date: Thu Oct 20 15:18:58 2016 +0800second commitcommit fdd5c53457270c10a163a0cf3fcfd9027e6e1ecbAuthor: Wyndam <only.night@qq.com>Date: Thu Oct 20 15:10:43 2016 +0800inital commit1234567891011121314151617181920212223242526272829303132333435363738394041424344454647484950515253545556575859606162
我们可以用 –oneline 选项来查看历史记录的简洁的版本。
$ git log --oneline2b5970d Merge branch 'change_site'e2714c9 新增加一行d17a0a0 change the site202199d add test.txt filea055c08 修改 HelloWorld.java 文件ad5f6fe 修改c2c167c 修改HelloWorld.java文件f9393bf third commit ``316fafc second commitfdd5c53 inital commit1234567891011
这告诉我们的是,此项目的开发历史。
我们还可以用 –graph 选项,查看历史中什么时候出现了分支、合并。以下为相同的命令,开启了拓扑图选项:
$ git log --oneline --graph* 2b5970d Merge branch 'change_site'|\| * d17a0a0 change the site* | e2714c9 新增加一行|/* 202199d add test.txt file* a055c08 修改 HelloWorld.java 文件* ad5f6fe 修改* c2c167c 修改HelloWorld.java文件* f9393bf third commit ``* 316fafc second commit* fdd5c53 inital commit12345678910111213
现在我们可以更清楚明了地看到何时工作分叉、又何时归并。
你也可以用 –reverse参数来逆向显示所有日志。
$ git log --oneline --reversefdd5c53 inital commit316fafc second commitf9393bf third commit ``c2c167c 修改HelloWorld.java文件ad5f6fe 修改a055c08 修改 HelloWorld.java 文件202199d add test.txt filed17a0a0 change the sitee2714c9 新增加一行2b5970d Merge branch 'change_site'1234567891011
如果只想查找指定用户的提交日志可以使用命令:git log –author , 例如,比方说我们要找 Git 源码中 Linus 提交的部分:
$ git log --author=Linus --oneline -581b50f3 Move 'builtin-*' into a 'builtin/' subdirectory3bb7256 make "index-pack" a built-in377d027 make "git pack-redundant" a built-inb532581 make "git unpack-file" a built-in112dd51 make "mktag" a built-in123456
如果你要指定日期,可以执行几个选项:–since 和 –before,但是你也可以用 –until 和 –after。
例如,如果我要看 Git 项目中三周前且在四月十八日之后的所有提交,我可以执行这个(我还用了 –no-merges 选项以隐藏合并提交):
$ git log --oneline --before={3.weeks.ago} --after={2010-04-18} --no-merges5469e2d Git 1.7.1-rc2d43427d Documentation/remote-helpers: Fix typos and improve language272a36b Fixup: Second argument may be any arbitrary stringb6c8d2d Documentation/remote-helpers: Add invocation section5ce4f4e Documentation/urls: Rewrite to accomodate transport::address00b84e9 Documentation/remote-helpers: Rewrite description03aa87e Documentation: Describe other situations where -z affects git diff77bc694 rebase-interactive: silence warning when no commits rewritten636db2c t3301: add tests to use --format="%N"
十二、git及GitHub在pycharm中的使用
PyCharm克隆github上开源的项目
- 确保PyCharm正确的配置了Git
打开PyCharm
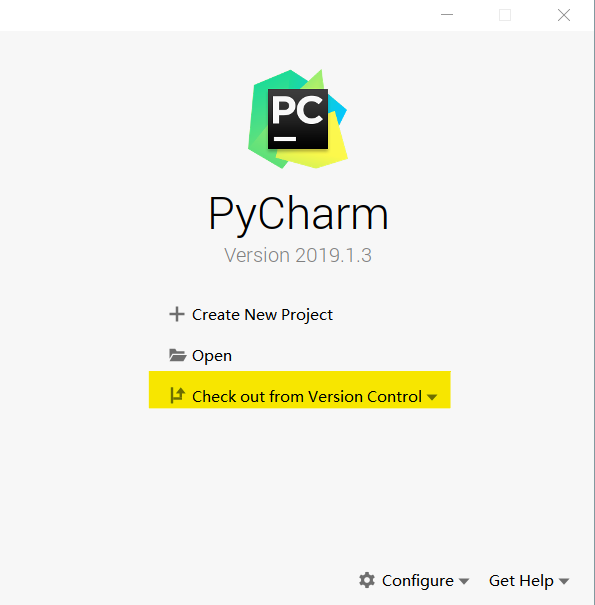
点击Check out from Version Control-> Git

本次项目克隆地址https://github.com/Tang1705/Camera.git
点击右侧的"Test"按钮,如果弹出Connection successful
则说明三个参数设置没用问题,点击"Clone"按钮,就可以Clone项目了。
- 在PyCharm上添加GitHub账户
在第一幅图的右下角,点击Configure或在其他项目中点击File->Setting->Version Control->GitHub->Add account,输入GitHub的账号和密码。
另外需添加git.exe的路径,同样在之前的操作中,点击File->Setting->Version Control->Git,在右侧Path to Git executable中添加路径,如
C:\Program Files\Git\bin\git.exe
找到你安装好的git.exe,然后test一下。
- 提交
有多种方式,不再赘述,可见参靠文档。
