@blueGhost
2017-08-15T03:57:52.000000Z
字数 16009
阅读 15408
HTTPS系列2——证书的信任链校验:certificate trust chain
encrypt
参考文献:
1. Verify the Signature of a X.509 Certificate
2. SSL各种证书格式介绍
3. PEM文件介绍
4. 证书文件编码格式介绍
5.rfc5280
关键词:CA证书信任链,https,CA证书校验的原理,CA证书校验的实现
说在前面
最近公司在外接一个新功能,客户端需直连外部公司服务端,因此涉及到客户端/服务端证书校验安全问题,顺带研究了一下https证书的信任链,以及如何校验一个证书。本文将拿百度网站的https证书为例子,手工教你如何模拟浏览器对https证书进行校验:利用openssl工具,手工进行https证书的校验。
一、证书及相关概念简介
- SSL/TLS:一种加密协议,提供了计算机网络通信的安全规范和方案。
- OpenSSL:它是SSL/TLS的一个实现,而且包括了一批非常棒的工具软件。
- X.509:是由ITU-T为了公开密钥基础建设(PKI)与授权管理基础建设(PMI)提出的产业标准,规范了公开密钥认证、证书吊销列表、授权证书、证书路径验证算法、证书内容及格式等(https的证书就是遵循这个标准)。X.509的证书基于ASN.1来描述,按照rfc5280规范,X509 V3版本的证书基本语法如下(只列举了Certificate和TBSCertificate,其它更详细的请参考rfc5280)。其中tbsCertificate的数据段被拿来做信息摘要,并且用上级证书的私钥加密后形成签名置入https证书中。
Certificate ::= SEQUENCE {tbsCertificate TBSCertificate,signatureAlgorithm AlgorithmIdentifier,signatureValue BIT STRING }TBSCertificate ::= SEQUENCE {version [0] EXPLICIT Version DEFAULT v1,serialNumber CertificateSerialNumber,signature AlgorithmIdentifier,issuer Name,validity Validity,subject Name,subjectPublicKeyInfo SubjectPublicKeyInfo,issuerUniqueID [1] IMPLICIT UniqueIdentifier OPTIONAL,-- If present, version MUST be v2 or v3subjectUniqueID [2] IMPLICIT UniqueIdentifier OPTIONAL,-- If present, version MUST be v2 or v3extensions [3] EXPLICIT Extensions OPTIONAL-- If present, version MUST be v3}
- ASN.1(Abstract Syntax Notation One),一种描述数字对象的方法和标准。ASN.1提供了多种数据编码方法。包括了BER、DER、PER和XER等。这些编码方法规定了将数字对象转换成应用程序能够处理、保存和网络传输的二进制编码形式的一组规则。
- DER编码(Distinguished Encoding Rules):属于ASN.1下的BER(Basic Encode Rules)编码派生出来的编码规则,这种编码规则下,一个相同的ASN.1对象编码后能得到唯一的编码数据(BER编码不能保证这一点,即一个对象编码后可能产生多个不同的编码数据)
- PEM编码(Privacy Enhanced Mail):是一种保密邮件的编码标准,在rfc1421规范中规定。X.509的证书在DER编码的基础上进行base64编码,然后添加一些头、尾标志就是PEM格式编码了,头尾的标志也是PEM的一部分,不要随意改动。比如baidu.com.cer经过下面命令转成PEM后:
//转换命令openssl x509 -inform der -in <.cer file> -out <.pem output file>//PEM格式的文件如下,头和尾告诉我们这是一个certificate:-----BEGIN CERTIFICATE-----MIIG0DCCBbigAwIBAgIMGNoar9s9QTCfF9MLMA0GCSqGSIb3DQEBCwUAMGYxCzAJ这里省略一堆类似的符号Qht29ZyGrAAdgJfW/9iFD+Kg5jsj0KyGxxzB3i4QHOjkftpQZrCYAvLWQuZu4vTX8daTPwJTcfR/R6MAweYUJUcuS98=-----END CERTIFICATE-----
另外,感兴趣的话,你可以直接将baidu.com.cer直接base64编码,可以看到编码出来的内容除了没有PEM的头尾标志,其它内容是一致的。附带几个base64命令:
openssl base64 -d -in <infile> -out <outfile>openssl base64 -in <infile> -out <outfile>openssl enc -base64 <<< <sting to encode>openssl enc -base64 -d <<< <string to decode>
二、获取证书
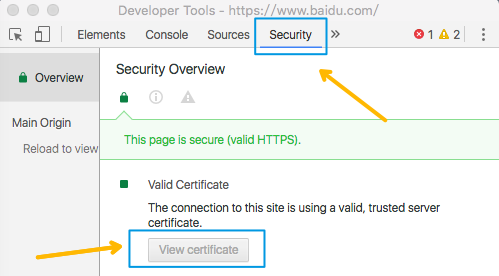
chrome打开百度,MAC下command+option+j呼出调试工具,找到security栏目,点击“View certificate”可以看到证书
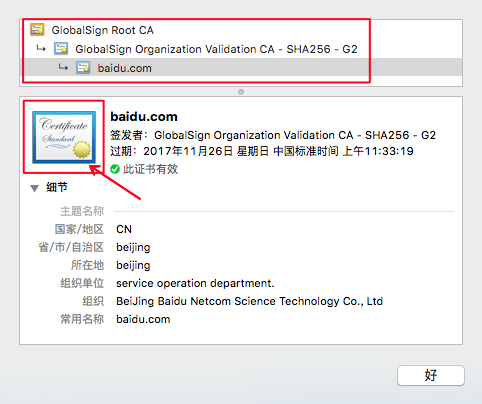
依次点击三个证书,直接将证书图标拖出来即可保存成.cer格式
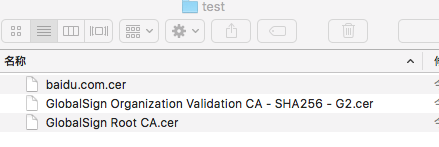
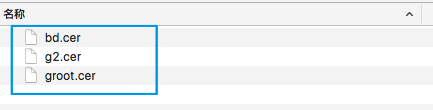
保存在文件夹中:为了方便操作,我将其重命名了:
"baidu.cer"->"bd.cer","GlobalSign Organization Validation CA - SHA256 - G2.cer"->"g2.cer","GlobalSign Root CA.cer"->"groot.cer"
重命名后如下:
三、开始庖丁解牛
1.初步判断是什么格式,CER or PEM
打开bd.cer可以看到内容,一眼就知道不是PEM编码(没有头尾信息说明),所以应该是DER编码了:
3082 06d0 3082 05b8 a003 0201 0202 0c18da1a afdb 3d41 309f 17d3 0b30 0d06 092a8648 86f7 0d01 010b 0500 3066 310b 30090603 5504 0613 0242 4531 1930 1706 0355040a 1310 476c 6f62 616c 5369 676e 206e762d 7361 313c 303a 0603 5504 0313 3347此处省略多行类似的符号e2a0 e63b 23d0 ac86 c71c c1de 2e10 1ce8e47e da50 66b0 9802 f2d6 42e6 6ee2 f4d7f1d6 933f 0253 71f4 7f47 a300 c1e6 1425472e 4bdf
2.把DER转化成给人看的信息
使用以下命令将der格式的证书信息提取出来
//-inform der告诉openssl,要转换的文件格式为der,如果是pem则无需指明//-noout,不要同时生成该证书的pem内容,如果没有这个选项,会同时在输出文件的末尾附带上证书的pem,你可以去掉试一下openssl x509 -in bd.cer -inform der -text -noout >> bd.cer.noout.txt
执行后,打开bd.cer.noout.txt,可以看到内容如下(建议先看RSA的加密算法RSA算法原理)
- Public Key Algorithm: rsaEncryption,表明证书公钥是RSA公钥
- Modulus (2048 bit):指出RSA的模(即RSA算法一开始选的两个质数的乘积)
- Exponent: 65537 (0x10001),指出RSA的指数
- Signature Algorithm: sha256WithRSAEncryption,指出证书的签名,以及其签名算法,先用sha256做信息摘要,再对摘要内容做RSA加密。
Certificate:Data:Version: 3 (0x2)Serial Number:18:da:1a:af:db:3d:41:30:9f:17:d3:0bSignature Algorithm: sha256WithRSAEncryptionIssuer: C=BE, O=GlobalSign nv-sa, CN=GlobalSign Organization Validation CA - SHA256 - G2ValidityNot Before: Nov 25 03:33:19 2016 GMTNot After : Nov 26 03:33:19 2017 GMTSubject: C=CN, ST=beijing, L=beijing, OU=service operation department., O=BeiJing Baidu Netcom Science Technology Co., Ltd, CN=baidu.comSubject Public Key Info:Public Key Algorithm: rsaEncryptionRSA Public Key: (2048 bit)Modulus (2048 bit):00:c8:99:0f:0b:42:de:bf:a2:f4:b2:13:58:dc:e4:ce:e4:9c:0e:f2:0c:73:9b:65:40:3c:3a:01:bc:72:29:a5:dd:a3:ca:0d:bb:95:43:42:4b:72:e1:64:44:16:fb:e2:75:71:7b:d1:00:c2:03:7b:34:ca:d2:2f:47:52:4e:5d:a9:62:89:cc:7e:49:63:ef:29:9f:af:e2:ca:52:28:28:3b:c4:a8:d5:72:94:b2:7b:6a:e8:a5:3b:fe:a5:d1:23:84:e9:77:dc:e8:5a:84:d7:51:23:20:33:70:6f:8c:df:6d:ca:8c:2c:f4:64:a6:bf:67:e8:31:44:6c:9c:ed:34:6b:3e:18:21:39:cc:d9:b5:6e:92:5b:a2:ea:3e:13:7e:44:6e:03:fb:b2:a5:c2:cf:46:b6:4c:e9:79:f1:46:f1:eb:ce:7b:0c:09:9e:4d:c2:aa:4e:41:e0:d0:b9:00:86:68:5a:a4:28:f1:65:6e:2f:11:6f:e2:cf:14:02:02:52:69:aa:16:99:62:b7:a6:9c:ee:0b:d0:78:b0:4d:dc:17:89:c7:53:ee:e0:99:a0:a1:24:cf:29:4d:0e:b5:1b:50:b6:e5:da:63:af:a8:aa:91:86:3f:d8:2a:bc:4e:5e:59:8c:b6:60:f0:36:01:ea:23:9a:23:6c:48:fa:f3:7f:c6:c3Exponent: 65537 (0x10001)X509v3 extensions:X509v3 Key Usage: criticalDigital Signature, Key EnciphermentAuthority Information Access:CA Issuers - URI:http://secure.globalsign.com/cacert/gsorganizationvalsha2g2r1.crtOCSP - URI:http://ocsp2.globalsign.com/gsorganizationvalsha2g2X509v3 Certificate Policies:Policy: 1.3.6.1.4.1.4146.1.20CPS: https://www.globalsign.com/repository/Policy: 2.23.140.1.2.2X509v3 Basic Constraints:CA:FALSEX509v3 CRL Distribution Points:URI:http://crl.globalsign.com/gs/gsorganizationvalsha2g2.crlX509v3 Subject Alternative Name:DNS:baidu.com, DNS:baifubao.com, DNS:www.baidu.cn, DNS:www.baidu.com.cn, DNS:click.hm.baidu.com, DNS:log.hm.baidu.com, DNS:cm.pos.baidu.com, DNS:wn.pos.baidu.com, DNS:update.pan.baidu.com, DNS:mct.y.nuomi.com, DNS:*.baidu.com, DNS:*.baifubao.com, DNS:*.baidustatic.com, DNS:*.bdstatic.com, DNS:*.bdimg.com, DNS:*.hao123.com, DNS:*.nuomi.com, DNS:*.chuanke.com, DNS:*.trustgo.com, DNS:*.bce.baidu.com, DNS:*.eyun.baidu.com, DNS:*.map.baidu.comX509v3 Extended Key Usage:TLS Web Server Authentication, TLS Web Client AuthenticationX509v3 Subject Key Identifier:39:D9:85:D3:0A:F4:B6:F5:2D:96:19:B7:E3:E8:A4:50:E3:6F:8F:5CX509v3 Authority Key Identifier:keyid:96:DE:61:F1:BD:1C:16:29:53:1C:C0:CC:7D:3B:83:00:40:E6:1A:7CSignature Algorithm: sha256WithRSAEncryption4b:73:ec:2d:d7:ec:ca:08:f3:9d:bd:95:54:b1:00:22:59:48:29:92:48:10:8d:31:cb:c6:6a:22:d8:19:44:d0:25:76:51:1d:c1:8d:88:3f:de:60:50:9c:a8:5a:16:96:1e:8a:c5:8f:59:77:8d:97:03:82:6f:3a:b7:f1:48:90:c5:21:bc:84:7a:af:2a:56:3c:05:0a:70:76:55:00:07:69:2d:44:22:8f:32:4b:34:05:9c:8c:21:de:40:18:8f:63:c2:71:cc:db:c3:8e:52:28:3a:fe:26:75:0d:69:15:66:c8:7a:b4:49:6a:ef:dc:08:9a:32:bf:5b:7b:21:57:11:0c:f3:eb:94:02:7c:6d:af:81:54:59:4e:ab:8a:11:ec:82:70:75:75:92:88:a6:1f:2c:5c:30:a1:f3:31:81:8c:52:86:93:1d:4a:8f:6a:ef:25:f1:6f:ea:1e:96:92:13:ca:05:0c:19:8e:13:12:6d:6e:79:9f:42:1b:76:f5:9c:86:ac:00:1d:80:97:d6:ff:d8:85:0f:e2:a0:e6:3b:23:d0:ac:86:c7:1c:c1:de:2e:10:1c:e8:e4:7e:da:50:66:b0:98:02:f2:d6:42:e6:6e:e2:f4:d7:f1:d6:93:3f:02:53:71:f4:7f:47:a3:00:c1:e6:14:25:47:2e:4b:df
四.校验证书(trust chain)
1.校验方法概述
校验方法基于证书信任链的结构,可以自行回顾一下证书的trust chain知识
- 取上级证书的公钥,对下级证书的签名进行解密得出下级证书的摘要digest1
- 对下级证书进行信息摘要digest2
- 判断digest1是否等于digest2,相等则说明下级证书校验通过
- 依次对各个相邻级别证书实施1~3步骤,直到根证书(或者可信任锚点[trusted anchor])

2.以bd.cer与g2.cer校验为例
1)首先取出下级证书的签名
即取出“bd.cer”证书的“Signature Algorithm”字段的内容,我们把数字中间的冒号去掉后得到:
Signature:(可以看到这是一个十六进制数,即HEX)
4b73ec2dd7ecca08f39dbd9554b100225948299248108d31cbc66a22d81944d02576511dc18d883fde60509ca85a16961e8ac58f59778d9703826f3ab7f14890c521bc847aaf2a563c050a7076550007692d44228f324b34059c8c21de40188f63c271ccdbc38e52283afe26750d691566c87ab4496aefdc089a32bf5b7b2157110cf3eb94027c6daf8154594eab8a11ec827075759288a61f2c5c30a1f331818c5286931d4a8f6aef25f16fea1e969213ca050c198e13126d6e799f421b76f59c86ac001d8097d6ffd8850fe2a0e63b23d0ac86c71cc1de2e101ce8e47eda5066b09802f2d642e66ee2f4d7f1d6933f025371f47f47a300c1e61425472e4bdf
2)取出上级证书的公钥
具体来讲,即取出g2.cer的公钥的模“Modulus”和指数“Exponent”(当然,要先把g2.cer转化成“给人看的信息”)
Modulus:(可以看到这是一个十六进制数,即HEX)
00c70e6c3f23937fcc70a59d20c30e533f7ec04ec29849ca47d523ef03348574c8a3022e465c0b7dc9889d4f8bf0f89c6c8c5535dbbff2b3eafbe356e74a46d91322ca36d59bc1a8e3964393f20cbce6f9e6e899c86348787f5736691a191d5ad1d47dc29cd47fe18012ae7aea88ea57d8ca0a0a3a1249a262197a0d24f737ebb473927b05239b12b5ceeb29dfa41402b901a5d4a69c436488def87efee3f51ee5fedca3a8e46631d94c25e918b9895909aee99d1c6d370f4a1e352028e2afd4218b01c445ad6e2b63ab926b610a4d20ed73ba7ccefe16b5db9f80f0d68b6cd908794a4f7865da92bcbe35f9b3c4f927804eff9652e60220e10773e95d2bbdb2f1
Exponent:(十进制数)
65537
3)使用上级证书的公钥解密下级证书的签名
具体来讲,就是取g2.cer的公钥解密bd.cer的签名,使用公式:
M表示明文,C表示密文,E表示Exponent,N表示Modulus
我们使用python的pow(x,y,z)方法进行计算,直接算出明文M,注意这里
>>> Modulus = 0x00c70e6c3f23937fcc70a59d20c30e533f7ec04ec29849ca47d523ef03348574c8a3022e465c0b7dc9889d4f8bf0f89c6c8c5535dbbff2b3eafbe356e74a46d91322ca36d59bc1a8e3964393f20cbce6f9e6e899c86348787f5736691a191d5ad1d47dc29cd47fe18012ae7aea88ea57d8ca0a0a3a1249a262197a0d24f737ebb473927b05239b12b5ceeb29dfa41402b901a5d4a69c436488def87efee3f51ee5fedca3a8e46631d94c25e918b9895909aee99d1c6d370f4a1e352028e2afd4218b01c445ad6e2b63ab926b610a4d20ed73ba7ccefe16b5db9f80f0d68b6cd908794a4f7865da92bcbe35f9b3c4f927804eff9652e60220e10773e95d2bbdb2f1>>> Signature = 0x4b73ec2dd7ecca08f39dbd9554b100225948299248108d31cbc66a22d81944d02576511dc18d883fde60509ca85a16961e8ac58f59778d9703826f3ab7f14890c521bc847aaf2a563c050a7076550007692d44228f324b34059c8c21de40188f63c271ccdbc38e52283afe26750d691566c87ab4496aefdc089a32bf5b7b2157110cf3eb94027c6daf8154594eab8a11ec827075759288a61f2c5c30a1f331818c5286931d4a8f6aef25f16fea1e969213ca050c198e13126d6e799f421b76f59c86ac001d8097d6ffd8850fe2a0e63b23d0ac86c71cc1de2e101ce8e47eda5066b09802f2d642e66ee2f4d7f1d6933f025371f47f47a300c1e61425472e4bdf>>> print "%x" % pow(Signature, 65537, Modulus)1ffffffffffffffffffffffffffffffffffffffffffffffffffffffffffffffffffffffffffffffffffffffffffffffffffffffffffffffffffffffffffffffffffffffffffffffffffffffffffffffffffffffffffffffffffffffffffffffffffffffffffffffffffffffffffffffffffffffffffffffffffffffffffffffffffffffffffffffffffffffffffffffffffffffffffffffffffffffffffffffffffffffffffffffffffffffffffffffffffffffffffffffffffffffffffffffffffffffffffffffffffff003031300d0609608648016503040201050004202aca8fbdefe8056d66a6dbd4da61453884c929a62d209f46b00d43896fddcd80
所以,解密出来的串是如下(十六进制表示),该串就是证书bd.cer的摘要,能够顺利解密,说明bd.cer的签名确实是使用中级机构g2.cer的私钥加密的。
1ffffffffffffffffffffffffffffffffffffffffffffffffffffffffffffffffffffffffffffffffffffffffffffffffffffffffffffffffffffffffffffffffffffffffffffffffffffffffffffffffffffffffffffffffffffffffffffffffffffffffffffffffffffffffffffffffffffffffffffffffffffffffffffffffffffffffffffffffffffffffffffffffffffffffffffffffffffffffffffffffffffffffffffffffffffffffffffffffffffffffffffffffffffffffffffffffffffffffffffffffffff003031300d0609608648016503040201050004202aca8fbdefe8056d66a6dbd4da61453884c929a62d209f46b00d43896fddcd80
4)对下级证书做信息摘要
在第一节,“证书及相关概念简介”中,X.509规范规定了,tbsCertificate的数据段被拿来做信息摘要,并且用上级证书的私钥加密后形成签名置入https证书中,所以我们需要取出bd.cer证书中的tbsCertificate数据做信息摘要。
a. 第一步,先取出bd.cer的asn1描述信息
//这个命令将bd.cer证书的asn1信息输出到bd.cer.ans1文件中openssl asn1parse -inform der -in bd.cer > bd.cer.ans1
使用文本编辑器打开bd.cer.ans1,可以看到如下信息:
0:d=0 hl=4 l=1744 cons: SEQUENCE4:d=1 hl=4 l=1464 cons: SEQUENCE8:d=2 hl=2 l= 3 cons: cont [ 0 ]10:d=3 hl=2 l= 1 prim: INTEGER :0213:d=2 hl=2 l= 12 prim: INTEGER :18DA1AAFDB3D41309F17D30B27:d=2 hl=2 l= 13 cons: SEQUENCE29:d=3 hl=2 l= 9 prim: OBJECT :sha256WithRSAEncryption后面的内容省略
按照rfc5280规范,可以知道bd.cer.ans1第二行描述的就是tbsCertificate存在bd.cer文件中的位置。
Certificate ::= SEQUENCE {tbsCertificate TBSCertificate,signatureAlgorithm AlgorithmIdentifier,signatureValue BIT STRING }
第二行取出来就是下面这个,4:d=1中的4表示偏移量为4byte,hl=4表示头信息长度为4byte,l=1464表示内容长度1464byte,所以我们就可以使用dd命令从bd.cer中取出tbsCertificate的内容了,其总长度为1464+4=1468
4:d=1 hl=4 l=1464 cons: SEQUENCE
b. 第二步,取出tbsCertificate
//if表示源文件,of表示输出文件,skip表示跳过多少单位,bs表示单位数量(即多少byte),count表示截取多少单位数据dd if=bd.cer of=bd.cer.tbsCertificate skip=4 bs=1 count=1468
c. 第三步,计算tbsCertificate的摘要
openssl dgst -sha256 bd.cer.tbsCertificateSHA256(bd.cer.tbsCertificate)= 2aca8fbdefe8056d66a6dbd4da61453884c929a62d209f46b00d43896fddcd80
5) 对比两个摘要
好了,终于到最后一步了,将第3)步得到bd.cer的摘要与4)得到的摘要进行对比。
即,将从bd.cer中的签名进行解密得到的摘要,与我们从bd.cer中取出的tbsCertificate数据进行摘要得到的结果,进行比较。如果相同,则证书校验通过,否则表示bd.cer证书被攥改了。
解密signature得到的:
//1f~003031300d060960864801650304020105000420这一串是RSA解密时填充上去的,需要忽略掉1ffffffffffffffffffffffffffffffffffffffffffffffffffffffffffffffffffffffffffffffffffffffffffffffffffffffffffffffffffffffffffffffffffffffffffffffffffffffffffffffffffffffffffffffffffffffffffffffffffffffffffffffffffffffffffffffffffffffffffffffffffffffffffffffffffffffffffffffffffffffffffffffffffffffffffffffffffffffffffffffffffffffffffffffffffffffffffffffffffffffffffffffffffffffffffffffffffffffffffffffffffff003031300d0609608648016503040201050004202aca8fbdefe8056d66a6dbd4da61453884c929a62d209f46b00d43896fddcd80
对tbsCertificate进行摘要得到的:
SHA256(bd.cer.tbsCertificate)= 2aca8fbdefe8056d66a6dbd4da61453884c929a62d209f46b00d43896fddcd80
可以看到,去掉1f~003031300d060960864801650304020105000420这一串是RSA解密时的填充项,两个摘要完全一致,因此从bd.cer到g2.cer这一信任链校验通过。接下去,只要将g2.cer作为下级证书,groot.cer作为上级证书,重复上面步骤,即可继续校验下去,直到根证书或者可信任锚点,若其中有一环校验不过,则认为证书不可信。
附录:
一、建议读的文章:
1. 证书体系
2. 基于Node.js的HTTPS MITM(中间人)代理的原理和实现
2. 使用openssl校验签名
3. 如何从证书中提取公钥
4. 建议的证书链校验命令
5. 强烈建议看此教程:如何使用Openssl
openssl x509 -in baidu.com.cer -inform DER -pubkey -noout >> baidu.pubkey
二. serverfault上看到大牛介绍各种证书的,怕将来链接没了,特抄录如下
SSL has been around for long enough you'd think that there would be agreed upon container formats. And you're right, there are. Too many standards as it happens. So this is what I know, and I'm sure others will chime in.
- .csr This is a Certificate Signing Request. Some applications can generate these for submission to certificate-authorities. The actual format is PKCS10 which is defined in RFC 2986. It includes some/all of the key details of the requested certificate such as subject, organization, state, whatnot, as well as the public key of the certificate to get signed. These get signed by the CA and a certificate is returned. The returned certificate is the public certificate (which includes the public key but not the private key), which itself can be in a couple of formats.
- .pem Defined in RFC's 1421 through 1424, this is a container format that may include just the public certificate (such as with Apache installs, and CA certificate files /etc/ssl/certs), or may include an entire certificate chain including public key, private key, and root certificates. Confusingly, it may also encode a CSR (e.g. as used here) as the PKCS10 format can be translated into PEM. The name is from Privacy Enhanced Mail (PEM), a failed method for secure email but the container format it used lives on, and is a base64 translation of the x509 ASN.1 keys.
- .key This is a PEM formatted file containing just the private-key of a specific certificate and is merely a conventional name and not a standardized one. In Apache installs, this frequently resides in /etc/ssl/private. The rights on these files are very important, and some programs will refuse to load these certificates if they are set wrong.
- .pkcs12 .pfx .p12 Originally defined by RSA in the Public-Key Cryptography Standards, the "12" variant was enhanced by Microsoft. This is a passworded container format that contains both public and private certificate pairs. Unlike .pem files, this container is fully encrypted. Openssl can turn this into a .pem file with both public and private keys: openssl pkcs12 -in file-to-convert.p12 -out converted-file.pem -nodes
A few other formats that show up from time to time:- .der A way to encode ASN.1 syntax in binary, a .pem file is just a Base64 encoded .der file. OpenSSL can convert these to .pem (openssl x509 -inform der -in to-convert.der -out converted.pem). Windows sees these as Certificate files. By default, Windows will export certificates as .DER formatted files with a different extension. Like...
- .cert .cer .crt A .pem (or rarely .der) formatted file with a different extension, one that is recognized by Windows Explorer as a certificate, which .pem is not.
- .p7b Defined in RFC 2315, this is a format used by windows for certificate interchange. Java understands these natively. Unlike .pem style certificates, this format has a defined way to include certification-path certificates.
- .crl A certificate revocation list. Certificate Authorities produce these as a way to de-authorize certificates before expiration. You can sometimes download them from CA websites.
In summary, there are four different ways to present certificates and their components:- PEM Governed by RFCs, it's used preferentially by open-source software. It can have a variety of extensions (.pem, .key, .cer, .cert, more)
- PKCS7 An open standard used by Java and supported by Windows. Does not contain private key material.
- PKCS12 A private standard that provides enhanced security versus the plain-text PEM format. This can contain private key material. It's used preferentially by Windows systems, and can be freely converted to 12. PEM format through use of openssl.
- DER The parent format of PEM. It's useful to think of it as a binary version of the base64-encoded PEM file. Not routinely used by much outside of Windows.
