@flyouting
2014-07-02T17:13:07.000000Z
字数 5614
阅读 6065
Android 设计模式--建造者模式
Android 设计模式
简述
建造者模式可以将一个产品的内部表象与产品的生成过程分割开来,从而可以使一个建造过程生成具有不同的内部表象的产品对象。
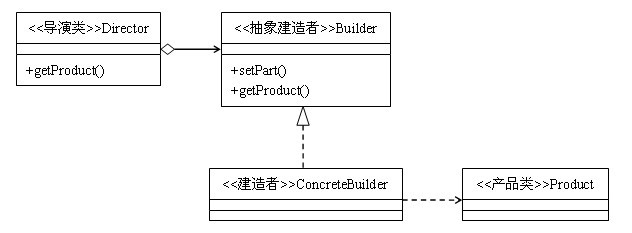
- 建造者(Builder)角色:给出一个抽象接口,以规范产品对象的各个组成成分的建造。一般而言,此接口独立于应用程序的商业逻辑。模式中直接创建产品对象的是具体建造者(Concrete Builder)角色。具体建造者类必须实现这个接口所要求的方法:一个是建造方法,另一个是结果返还方法。
- 具体建造者(Concrete Builder)角色:担任这个角色的是于应用程序紧密相关的类,它们在应用程序调用下创建产品实例。这个角色主要完成的任务包括:实现Builder角色提供的接口,一步一步完成创建产品实例的过程。在建造过程完成后,提供产品的实例。
- 指导者(Director)角色:担任这个角色的类调用具体建造者角色以创建产品对象。导演者并没有产品类的具体知识,真正拥有产品类的具体知识的是具体建造者对象。
- 产品(Product)角色:产品便是建造中的复杂对象。指导者角色是于客户端打交道的角色。导演者角色将客户端创建产品的请求划分为对各个零件的建造请求,再将这些请求委派给具体建造者角色。具体建造者角色是做具体建造工作的,但却不为客户端所知。
综合网上各类文章的描述,较为通俗的一种是房屋建造的例子:我的目的是要一座房子,可是我不知道怎么盖,也不知道怎么样设计(建几个房间,几个门),于是我需要找一帮民工,他们会基本的工作,即砌墙,装门等,,还得找个设计师,他知道怎么设计,我需要确保民工听设计师的领导,而设计师本身不干活,只是指挥民工,这里砌一堵墙,这里砌一扇门,这样民工开始建设,最后,我可以向民工要房子了。在这个过程中,设计师是什么也没有,除了他在脑子里的设计和命令,所以要房子也是跟民工要。
代码描述
// 产品(Product)角色// 首先是房子类,主要是需要描述一下房屋属性public class Room{private String window;private String floor;}
// 建造者(Builder)角色// 工人接口,定义了各个工人所要进行的工作。负责进行具体部件如窗户,地板的建造。// 同时因为房子是民工建的,因此建设完成后由他把房子递交回房主public interface Builder {public void makeWindow();public void makeFloor();public Room getRoom();}
// 指导者(Director)角色// 设计师。他知道房子应该怎么设计,但他不会自己去建造,而是指挥工人建造。public class Designer {// 指挥民工进行工作public void order(Builder builder) {builder.makeWindow();builder.makeFloor();}}
// 具体建造者(Concrete Builder)角色// 工人, 负责进行具体部件如窗户,地板的建造。public class Worker implements Builder {private Room room = new Room();public void makeWindow() {room.window =new String("window");}public void makeFloor(){room.floor = new String("floor");}// 回交房子给房主public Room getRoom() {return room;}}
// 我获取房子的流程public class Client {public static void main(String[] args) {Builder worker = new Worker(); //获取工人对象Designer designer = new Designer(); //获取设计师对象designer.order(worker); //设计师指挥工人工作worker.getRoom(); //工人交房}}
Android中的体现
在Android中的体现,常见是就是AlertDialog.buider, Notification.builder。简单看下AlertDialog的部分代码:
// AlertDialogpublic class AlertDialog extends Dialog implements DialogInterface {// Controller, 接受Builder成员变量P中的各个参数private AlertController mAlert;// 构造函数protected AlertDialog(Context context, int theme) {this(context, theme, true);}// 4 : 构造AlertDialogAlertDialog(Context context, int theme, boolean createContextWrapper) {super(context, resolveDialogTheme(context, theme), createContextWrapper);mWindow.alwaysReadCloseOnTouchAttr();mAlert = new AlertController(getContext(), this, getWindow());}// 实际上调用的是mAlert的setTitle方法@Overridepublic void setTitle(CharSequence title) {super.setTitle(title);mAlert.setTitle(title);}// 实际上调用的是mAlert的setCustomTitle方法public void setCustomTitle(View customTitleView) {mAlert.setCustomTitle(customTitleView);}public void setMessage(CharSequence message) {mAlert.setMessage(message);}// AlertDialog其他的代码省略// ************ Builder为AlertDialog的内部类 *******************public static class Builder {// 1 : 存储AlertDialog的各个参数, 例如title, message, icon等.private final AlertController.AlertParams P;// 属性省略/*** Constructor using a context for this builder and the {@link AlertDialog} it creates.*/public Builder(Context context) {this(context, resolveDialogTheme(context, 0));}public Builder(Context context, int theme) {P = new AlertController.AlertParams(new ContextThemeWrapper(context, resolveDialogTheme(context, theme)));mTheme = theme;}// Builder的其他代码省略 ......// 2 : 设置各种参数public Builder setTitle(CharSequence title) {P.mTitle = title;return this;}public Builder setMessage(CharSequence message) {P.mMessage = message;return this;}public Builder setIcon(int iconId) {P.mIconId = iconId;return this;}public Builder setPositiveButton(CharSequence text, final OnClickListener listener) {P.mPositiveButtonText = text;P.mPositiveButtonListener = listener;return this;}public Builder setView(View view) {P.mView = view;P.mViewSpacingSpecified = false;return this;}// 3 : 构建AlertDialog, 传递参数public AlertDialog create() {// 调用new AlertDialog构造对象, 并且将参数传递个体AlertDialogfinal AlertDialog dialog = new AlertDialog(P.mContext, mTheme, false);// 5 : 将P中的参数应用的dialog中的mAlert对象中P.apply(dialog.mAlert);dialog.setCancelable(P.mCancelable);if (P.mCancelable) {dialog.setCanceledOnTouchOutside(true);}dialog.setOnCancelListener(P.mOnCancelListener);if (P.mOnKeyListener != null) {dialog.setOnKeyListener(P.mOnKeyListener);}return dialog;}}}
可以看到,通过Builder来设置AlertDialog中的title, message, button等参数, 这些参数都存储在类型为AlertController.AlertParams的成员变量P中,AlertController.AlertParams中包含了与之对应的成员变量。在调用Builder类的create函数时才创建AlertDialog, 并且将Builder成员变量P中保存的参数应用到AlertDialog的mAlert对象中,即P.apply(dialog.mAlert)代码段。我们看看apply函数的实现 :
public void apply(AlertController dialog) {if (mCustomTitleView != null) {dialog.setCustomTitle(mCustomTitleView);} else {if (mTitle != null) {dialog.setTitle(mTitle);}if (mIcon != null) {dialog.setIcon(mIcon);}if (mIconId >= 0) {dialog.setIcon(mIconId);}if (mIconAttrId > 0) {dialog.setIcon(dialog.getIconAttributeResId(mIconAttrId));}}if (mMessage != null) {dialog.setMessage(mMessage);}if (mPositiveButtonText != null) {dialog.setButton(DialogInterface.BUTTON_POSITIVE, mPositiveButtonText,mPositiveButtonListener, null);}if (mNegativeButtonText != null) {dialog.setButton(DialogInterface.BUTTON_NEGATIVE, mNegativeButtonText,mNegativeButtonListener, null);}if (mNeutralButtonText != null) {dialog.setButton(DialogInterface.BUTTON_NEUTRAL, mNeutralButtonText,mNeutralButtonListener, null);}if (mForceInverseBackground) {dialog.setInverseBackgroundForced(true);}// For a list, the client can either supply an array of items or an// adapter or a cursorif ((mItems != null) || (mCursor != null) || (mAdapter != null)) {createListView(dialog);}if (mView != null) {if (mViewSpacingSpecified) {dialog.setView(mView, mViewSpacingLeft, mViewSpacingTop, mViewSpacingRight,mViewSpacingBottom);} else {dialog.setView(mView);}}}
实际上就是把P中的参数挨个的设置到AlertController中, 也就是AlertDialog中的mAlert对象。从AlertDialog的各个setter方法中我们也可以看到,实际上也都是调用了mAlert对应的setter方法。在这里,Builder同时扮演了上文中提到的builder、ConcreteBuilder、Director的角色,简化了Builder模式的设计。
优点
- 良好的封装性, 使用建造者模式可以使客户端不必知道产品内部组成的细节。
- 每一个Builder都相对独立,而与其它的Builder无关。
- 可使对构造过程更加精细控制。
- 将构建代码和表示代码分开。
