@jiehanwang
2017-11-25T12:23:49.000000Z
字数 11423
阅读 1632
Tensorflow Memo
tensorflow memo
坑(和一些说明)
densenet 耗费显存的解释:
不少人跟我们反映过 DenseNet 在训练时对内存消耗非常厉害。这个问题其实是算法实现不优带来的。当前的深度学习框架对 DenseNet 的密集连接没有很好的支持,我们只能借助于反复的拼接(Concatenation)操作,将之前层的输出与当前层的输出拼接在一起,然后传给下一层。对于大多数框架(如 Torch 和 TensorFlow),每次拼接操作都会开辟新的内存来保存拼接后的特征。这样就导致一个 L 层的网络,要消耗相当于 L(L+1)/2 层网络的内存(第 l 层的输出在内存里被存了 (L-l+1) 份)。来自这里
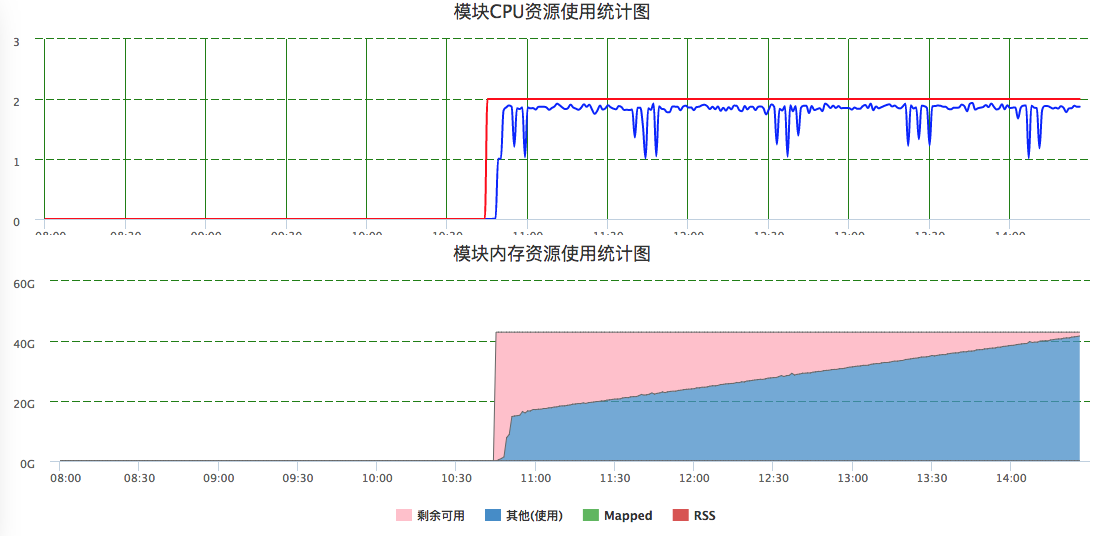
tfrecord数据过大,导致训练迟迟不能运行(减少训练数据确实可以运行)。tfrecord为何需要如此巨大的cpu内存???
densenet 随着计算进行,CPU内存也逐渐增大,如下图:
在densenet_small代码中,用Momentum可以达到90%以上,而GD只能到80%左右。
opt = tf.train.MomentumOptimizer(lr, 0.9, use_nesterov=True)# opt = tf.train.GradientDescentOptimizer(lr)
七个小贴士,顺利提升TensorFlow模型训练表现。链接
hello world
tfrecord的数据必须保持完整,不然训练的时候会发生截断错误,导致退出
retrain 报错:模型大小不能超过67M,新版的tf据说已经解决了这个问题,mac上运行也没有问题。但是yard估计没有更新。加入以下语句即可解决。
export PROTOCOL_BUFFERS_PYTHON_IMPLEMENTATION=pythonA placeholder generates an error if it is executed without a feed, so you won't forget to feed it. 如果用feeding输入数据的话,最好用placeholder,这样,如果没有输入,在编译的时候就会报错。
sv = tf.train.Supervisor(logdir=log_path, init_op=init) 会判断模型是否存在.如果存在,会自动读取模型.不用显式地调用restore。如果训练程序shut down或者crash了,那么它最近的checkpoint以及事件文件就被留到了logdir里。当你重启程序的时候,managed_session会从最近的checkpoint中加载图,并且从中止的地方恢复训练。
再youtube-8m的train代码中就是这种方式。如果模型包含一个标量整型变量名字为global_step,则该变量的值会被添加到checkpoint文件名中。例如,在global step 1234,checkpoint 文件名就是 “model.ckpt-1234”。【youtube-8m中的模型保存方式】
深度学习theano/tensorflow多显卡多人使用问题集: https://zhuanlan.zhihu.com/p/23250782 里面提到,多人用同一块卡的时候容易出现一方的内存不足。TF默认会占用所有的显存。以及,如何设置TF占用显存的百分比。
当保存的模型带有设备信息时,可以用以下方法去除,这样在gpu上训练的模型就可以在只有cpu的机器上运行。
When importing such models, it's useful to be able to clear the device settings in the graph so that we can run it on locally available devices. This can be achieved by calling import_meta_graph with the clear_devices option set to True.
解决“device specification '/device:GPU:3' because no supported kernel for GPU devices is available.”问题的方法(这是一个坑)有些操作只能在cpu进行,不按照以下方式进行,可能会出错
I just follow mrry's suggestion here, adding "allow_soft_placement=True" as follows:
config = tf.ConfigProto(allow_soft_placement = True) sess = tf.Session(config = config)Then it works. I reviewed the Using GPUs in tutorial. It mentions adding "allow_soft_placement" under the error "Could not satisfy explicit device specification '/gpu:X' ". But it not mentions it could also solve the error "no supported kernel for GPU devices is available". Maybe it's better to add this in tutorial text in order to avoid confusing future users.densenet并行化中,出现过的问题汇总:
1). ValueError: No variables to save。这是因为没有用同一个graph的命名空间。
2). ValueError: Variable BatchNorm/beta does not exist, or was not created with tf.get_variable(). Did you mean to set reuse=None in VarScope?
3). ValueError: Variable block_1/weight_conv_1 already exists, disallowed. Did you mean to set reuse=True in VarScope?
4). Variable conv2d/weight_conv_0/ExponentialMovingAverage/ does not exist, or was not created with tf.get_variable(). Did you mean to set reuse=None in VarScope?下面的这篇并行方式值得参考:http://geek.csdn.net/news/detail/191567
如果想要达到重复利用变量的效果, 我们就要使用 tf.variable_scope(), 并搭配 tf.get_variable() 这种方式产生和提取变量. 不像 tf.Variable() 每次都会产生新的变量, tf.get_variable() 如果遇到了同样名字的变量时, 它会单纯的提取这个同样名字的变量(避免产生新变量). 而在重复使用的时候, 一定要在代码中强调 scope.reuse_variables(), 否则系统将会报错, 以为你只是单纯的不小心重复使用到了一个变量.
Tensorflow cifar10_multi_gpu问题:"Variable conv1/weights/ExponentialMovingAverage/ does not exist". you can find the answer to your problem here: Issue 6220
You need to put:
with tf.variable_scope(tf.get_variable_scope())in front of the loop which runs over your devices ... so, do that:with tf.variable_scope(tf.get_variable_scope()):for i in xrange(FLAGS.num_gpus):with tf.device('/gpu:%d' % i):
The explanation is given in the link... Here the quote: When you do tf.get_variable_scope().reuse_variables() you set the current scope to reuse variables. If you call the optimizer in such scope, it's trying to reuse slot variables, which it cannot find, so it throws an error. If you put a scope around, the tf.get_variable_scope().reuse_variables() only affects that scope, so when you exit it, you're back in the non-reusing mode, the one you want.Hope that helps, let me know if I should clarify more.
如果要在tfrecord 上加上limit epoch数值如下:
filename_queue = tf.train.string_input_producer(file_, num_epochs = FLAGS.num_epoch)
需要初始化如下,否则会报错
session.run(tf.global_variables_initializer())session.run(tf.local_variables_initializer())coord = tf.train.Coordinator()threads = tf.train.start_queue_runners(sess=session, coord=coord)
train 和 test的数据流切换实现training的时候eval。参考这下面的链接。主要用到了tf.cond() 和 tf.QueueBase.from_list()函数【我没有搞定】
tfrecord 清点里面的数据数量
c = 0for fn in tf_records_filenames:for record in tf.python_io.tf_record_iterator(fn):c += 1
Densenet 采用内存优化的代码,其实就是给每个block加了一层1*1的卷积?这个理解有误,需要进一步查看文献
基础知识
学习地址:http://wiki.jikexueyuan.com/project/tensorflow-zh/tutorials/mnist_pros.html
相对于Tensorflow的快速发展,这个网站的内容比较陈旧。
TensorFlow后台计算依赖于高效的C++,与后台的连接称为一个会话(session)。TensorFlow中的程序使用,通常都是先创建一个图(graph),然后在一个会话(session)里运行它。
莫烦python tensorflow 教程: https://morvanzhou.github.io/tutorials/machine-learning/tensorflow/4-2-tensorboard2/
安装
运行acgun需要PIL,但是PIL安装总是失败,不如安装pip install Pillow
Install Xcode and Xcode Command Line Tools as mentioned.
Use Pillow instead, as PIL is basically dead. Pillow is a maintained fork of PIL.
https://pypi.python.org/pypi/Pillow/2.2.1
pip install Pillow
If you have both Pythons installed and want to install this for Python3:
$ python3 -m pip install Pillow虽然安装的是pillow,但是引用如下;
import PIL
from PIL import Image升级tensorflow
$ pip install --upgrade tensorflow # for Python 2.7
$ pip3 install --upgrade tensorflow # for Python 3.n
$ pip install --upgrade tensorflow-gpu # for Python 2.7 and GPU
$ pip3 install --upgrade tensorflow-gpu # for Python 3.n and GPU
Getting Started
- 使用图 (graph) 来表示计算任务.
- 在被称之为 会话 (Session) 的上下文 (context) 中执行图.
- 使用 tensor 表示数据.
- 通过 变量 (Variable) 维护状态.
- 使用 feed 和 fetch 可以为任意的操作(arbitrary operation) 赋值或者从其中获取数据.
如果机器上有超过一个可用的 GPU, 除第一个外的其它 GPU 默认是不参与计算的. 为了让 TensorFlow 使用这些 GPU, 你必须将 op 明确指派给它们执行. with...Device 语句用来指派特定的 CPU 或 GPU 执行操作:
with tf.Session() as sess:with tf.device("/gpu:1"):matrix1 = tf.constant([[3., 3.]])matrix2 = tf.constant([[2.],[2.]])product = tf.matmul(matrix1, matrix2)...
tf.truncated_normal:一种正态分布取值规则。从截断的正态分布中输出随机值。
http://blog.csdn.net/u013713117/article/details/65446361
另外有一种, tf.random_normal(shape, mean=0.0, stddev=1.0, dtype=tf.float32, seed=None, name=None)从正态分布中输出随机值tf.nn.conv2d(input, filter, strides, padding, use_cudnn_on_gpu=None, name=None)
除去name参数用以指定该操作的name,与方法有关的一共五个参数:- 第一个参数input:指需要做卷积的输入图像,它要求是一个Tensor,具有[batch, in_height, in_width, in_channels]这样的shape,具体含义是[训练时一个batch的图片数量, 图片高度, 图片宽度, 图像通道数],注意这是一个4维的Tensor,要求类型为float32和float64其中之一
- 第二个参数filter:相当于CNN中的卷积核,它要求是一个Tensor,具有[filter_height, filter_width, in_channels, out_channels]这样的shape,具体含义是[卷积核的高度,卷积核的宽度,图像通道数,卷积核个数],要求类型与参数input相同,有一个地方需要注意,第三维in_channels,就是参数input的第四维
- 第三个参数strides:卷积时在图像每一维的步长,这是一个一维的向量,长度4
- 第四个参数padding:string类型的量,只能是"SAME","VALID"其中之一,这个值决定了不同的卷积方式(后面会介绍)
- 第五个参数:use_cudnn_on_gpu:bool类型,是否使用cudnn加速,默认为true
结果返回一个Tensor,这个输出,就是我们常说的feature map
tf.nn.max_pool(value, ksize, strides, padding, name=None)
参数是四个,和卷积很类似:- 第一个参数value:需要池化的输入,一般池化层接在卷积层后面,所以输入通常是feature map,依然是[batch, height, width, channels]这样的shape
- 第二个参数ksize:池化窗口的大小,取一个四维向量,一般是[1, height, width, 1],因为我们不想在batch和channels上做池化,所以这两个维度设为了1
- 第三个参数strides:和卷积类似,窗口在每一个维度上滑动的步长,一般也是[1, stride,stride, 1]
- 第四个参数padding:和卷积类似,可以取'VALID' 或者'SAME'
- 返回一个Tensor,类型不变,shape仍然是[batch, height, width, channels]这种形式
tf.reshape(tensor, shape, name=None)
函数的作用是将tensor变换为参数shape的形式。其中shape为一个列表形式,特殊的一点是列表中可以存在-1。-1代表的含义是不用我们自己指定这一维的大小,函数会自动计算,但列表中只能存在一个-1。(当然如果存在多个-1,就是一个存在多解的方程了):# tensor 't' is [1, 2, 3, 4, 5, 6, 7, 8, 9]# tensor 't' has shape [9]reshape(t, [3, 3]) ==> [[1, 2, 3],[4, 5, 6],[7, 8, 9]]# tensor 't' is [[[1, 1], [2, 2]],# [[3, 3], [4, 4]]]# tensor 't' has shape [2, 2, 2]reshape(t, [2, 4]) ==> [[1, 1, 2, 2],[3, 3, 4, 4]]# tensor 't' is [[[1, 1, 1],# [2, 2, 2]],# [[3, 3, 3],# [4, 4, 4]],# [[5, 5, 5],# [6, 6, 6]]]# tensor 't' has shape [3, 2, 3]# pass '[-1]' to flatten 't'reshape(t, [-1]) ==> [1, 1, 1, 2, 2, 2, 3, 3, 3, 4, 4, 4, 5, 5, 5, 6, 6, 6]# -1 can also be used to infer the shape# -1 is inferred to be 9:reshape(t, [2, -1]) ==> [[1, 1, 1, 2, 2, 2, 3, 3, 3],[4, 4, 4, 5, 5, 5, 6, 6, 6]]# -1 is inferred to be 2:reshape(t, [-1, 9]) ==> [[1, 1, 1, 2, 2, 2, 3, 3, 3],[4, 4, 4, 5, 5, 5, 6, 6, 6]]# -1 is inferred to be 3:reshape(t, [ 2, -1, 3]) ==> [[[1, 1, 1],[2, 2, 2],[3, 3, 3]],[[4, 4, 4],[5, 5, 5],[6, 6, 6]]]# tensor 't' is [7]# shape `[]` reshapes to a scalarreshape(t, []) ==> 7
TensorFlow的tf.nn.dropout操作除了可以屏蔽神经元的输出外,还会自动处理神经元输出值的scale。所以用dropout的时候可以不用考虑scale。
TensorFlow中已经有相关脚本,来自动下载和加载MNIST数据集。(脚本会自动创建MNIST_data文件夹来存储数据集)。下面是mnist一个轻量级的类文件,存储了NumPy格式的训练集、验证集和测试集,它同样提供了数据中mini-batch迭代的功能。下面是脚本程序:
from tensorflow.examples.tutorials.mnist import input_datamnist = input_data.read_data_sets('MNIST_data', one_hot=True)
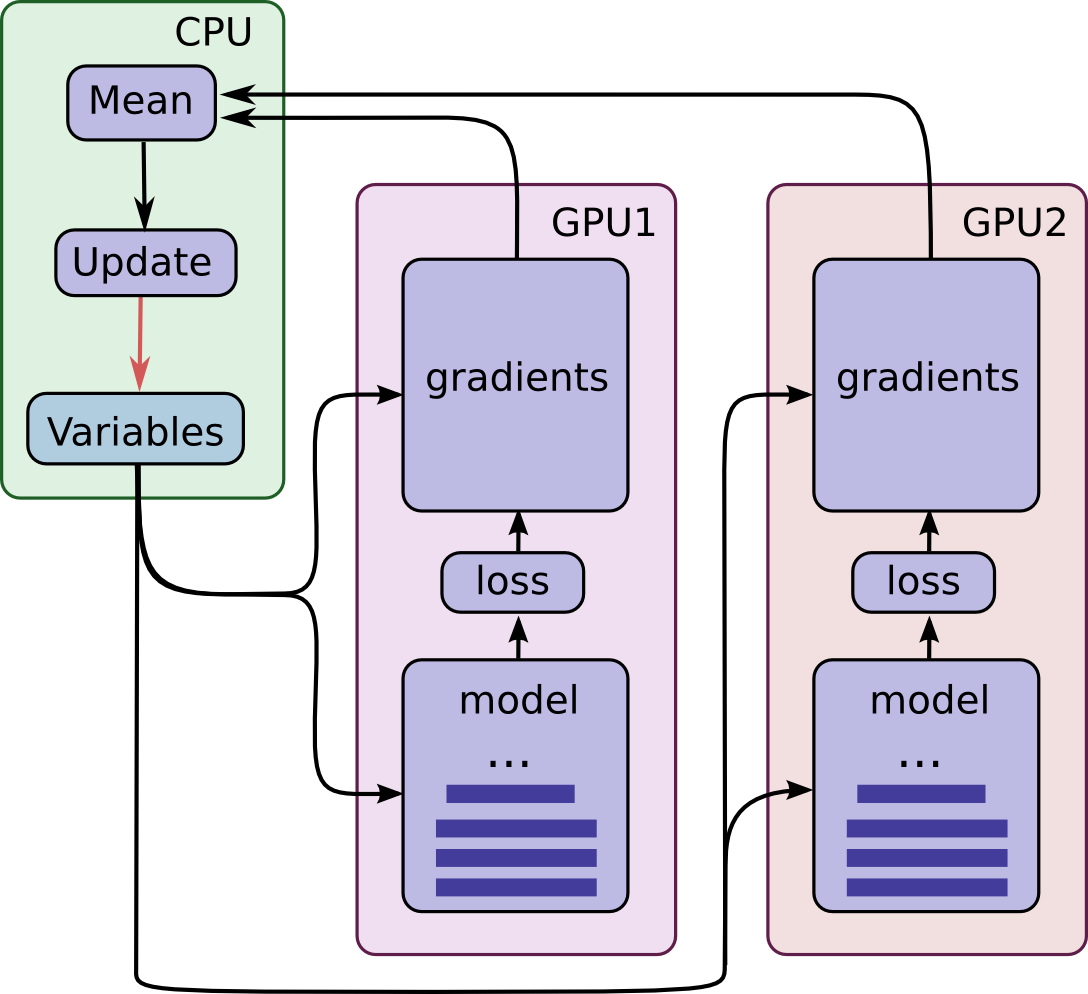
这一机制要求所有GPU能够共享模型参数。但是众所周知在GPU之间传输数据非常的慢,因此我们决定在CPU上存储和更新所有模型的参数(对应图中绿色矩形的位置)。这样一来,GPU在处理一批新的数据之前会更新一遍的参数。图中所有的GPU是同步运行的。所有GPU中的梯度会累积并求平均值(绿色方框部分)。模型参数会利用所有模型副本梯度的均值来更新。
TensorFlow的高级机器学习API(tf.contrib.learn)使得各种机器学习模型的配置、训练和评估都变得简单。
TF-slim is a new lightweight high-level API of TensorFlow (tensorflow.contrib.slim) for defining, training and evaluating complex models. https://github.com/tensorflow/models/tree/master/slim
tensorboard --logdir=training:/tmp/tensorflow/mnist/logs
在Initial之前加入这一句,train_writer = tf.summary.FileWriter('tfboard', sess.graph),即可实现tensorboard的网络结构显示。数据方面还需要设置。
用其它变量的值初始化一个新的变量时,使用其它变量的initialized_value()属性。你可以直接把已初始化的值作为新变量的初始值,或者把它当做tensor计算得到一个值赋予新变量。
# Create a variable with a random value.weights = tf.Variable(tf.random_normal([784, 200], stddev=0.35),name="weights")# Create another variable with the same value as 'weights'.w2 = tf.Variable(weights.initialized_value(), name="w2")# Create another variable with twice the value of 'weights'w_twice = tf.Variable(weights.initialized_value() * 0.2, name="w_twice")
步长strides=[1,1,1,1]值,strides[0]和strides[3]的两个1是默认值,中间两个1代表padding时在x方向运动一步,y方向运动一步
tf.mul, tf.sub and tf.neg are deprecated in favor of tf.multiply, tf.subtract and tf.negative.
Tensorflow的命令行参数
import tensorflow as tfflags = tf.flags #flags是一个文件:flags.py,用于处理命令行参数的解析工作logging = tf.logging# 调用flags内部的DEFINE_string函数来制定解析规则flags.DEFINE_string("para_name_1","default_val", "description")flags.DEFINE_bool("para_name_2","default_val", "description")# FLAGS是一个对象,保存了解析后的命令行参数FLAGS = flags.FLAGSdef main(_):FLAGS.para_name #调用命令行输入的参数if __name__ = "__main__":# 使用这种方式保证了,如果此文件被其它文件import的时候,不会执行main中的代码tf.app.run() #解析命令行参数,调用main函数 main(sys.argv)
tensorflow的model zoo中的inception模型示例了imagenet的读取方法。
建立TFRecord文件集只需要略微修改build_image_data或者build_imagenet_data 就好了,他们的主体部分实现了多线程读取图像、转换和输出,前提是图像以dir/label/xxx.jpg 的命名规则存放。关键代码就是每幅图像创建tf.train.Example以及多次调用tf.python_io.TFRecordWriter的write方法写入磁盘。
读取的代码在image_processing中,imagenet_train和imagnet_distributed_train都是调用了这个文件的- Softmax
Si=eXi∑j(eXj)Si=eXi∑j(eXj)
这里的 X 就是 logits,S 表示一次判断,Si 表示一次判断中的第i个选项。 - Cross Entropy
D=−∑i(Li⋅log(Si))D=−∑i(Li⋅log(Si))
这里 D 表示一次判断,Li 是一次判断中一个 label 的第 i 个选项。log 是以 e 为底。 - loss
loss=1N∑k(Dk)loss=1N∑k(Dk)
这里的 Dk 表示第 k 次判断,N 表示总次数,也就是取平均值。
- Softmax
经典的训练框架,多线程读取
# Create the graph, etc.init_op = tf.global_variables_initializer()# Create a session for running operations in the Graph.sess = tf.Session()# Initialize the variables (like the epoch counter).sess.run(init_op)# Start input enqueue threads.coord = tf.train.Coordinator()threads = tf.train.start_queue_runners(sess=sess, coord=coord)try:while not coord.should_stop():# Run training steps or whateversess.run(train_op)except tf.errors.OutOfRangeError:print('Done training -- epoch limit reached')finally:# When done, ask the threads to stop.coord.request_stop()# Wait for threads to finish.coord.join(threads)sess.close()
Meta data
- model.ckpt.meta文件保存了TensorFlow计算图的结构,可以理解为神经网络的网络结构
- model.ckpt文件保存了TensorFlow程序中每一个变量的取值,这个文件是通过SSTable格式存储的,可以大致理解为就是一个(key,value)列表。model.ckpt文件中列表的第一行描述了文件的元信息,比如在这个文件中存储的变量列表。列表剩下的每一行保存了一个变量的片段,变量片段的信息是通过SavedSlice Protocol Buffer定义的。SavedSlice类型中保存了变量的名称、当前片段的信息以及变量取值。TensorFlow提供了tf.train.NewCheckpointReader类来查看model.ckpt文件中保存的变量信息。如何使用tf.train.NewCheckpointReader类这里不做说明,自查
slim
这个网址给出了比较详细的介绍
http://blog.csdn.net/mao_xiao_feng/article/details/73409975
下面是其翻译来源
https://github.com/tensorflow/tensorflow/tree/master/tensorflow/contrib/slim
slim.conv2d(x, filters, [size, size], stride, 'VALID', 1, activation)
