@adamhand
2019-01-05T13:59:49.000000Z
字数 39744
阅读 1410
Java——I/O
一、概览
Java 的 I/O 大概可以分成以下几类:
- 字节操作:InputStream 和 OutputStream
- 字符操作:Reader 和 Writer
- 磁盘操作:File
- 对象操作:Serializable
- 网络操作:Socket
- 新的输入/输出:NIO
二、字节操作和字符操作——字节流和字符流

流的概念和作用
流是一组有顺序的,有起点和终点的字节集合,是对数据传输的总称或抽象。即数据在两设备间的传输称为流,流的本质是数据传输,根据数据传输特性将流抽象为各种类,方便更直观的进行数据操作。
IO流的分类
- 根据处理数据类型的不同分为:字符流和字节流
- 根据数据流向不同分为:输入流和输出流
字符流和字节流
字节流的两个顶层父类:InputStream、OutputStream.
字符流的两个顶层父类:Reader、Writer。
这些体系的子类都以父类名作为后缀,而且子类名的前缀就是该对象的功能
字符流的由来: 因为数据编码的不同,而有了对字符进行高效操作的流对象。本质其实就是基于字节流读取时,去查了指定的码表,简单来说,字符流=字节流+编码表。 字节流和字符流的区别:
- 读写单位不同:字节流以字节(8bit)为单位,字符流以字符为单位,根据码表映射字符,一次可能读多个字节。
- 处理对象不同:字节流能处理所有类型的数据(如图片、avi等),而字符流只能处理字符类型的数据。
设备上的数据无论是图片或者视频,文字,它们都以二进制存储的。二进制的最终都是以一个8位为数据单元进行体现,所以计算机中的最小数据单元就是字节。意味着,字节流可以处理设备上的所有数据,所以字节流一样可以处理字符数据。
结论:只要是处理纯文本数据,就优先考虑使用字符流。 除此之外都使用字节流。
字节流
输入字节流 InputStream
- InputStream 是所有的输入字节流的父类,它是一个抽象类。
- ByteArrayInputStream、StringBufferInputStream、FileInputStream 是三种基本的介质流,它们分别从Byte 数组、StringBuffer、和本地文件中读取数据。
- PipedInputStream 是从与其它线程共用的管道中读取数据,与Piped 相关的知识后续单独介绍。
- ObjectInputStream 和所有FilterInputStream 的子类都是装饰流(装饰器模式的主角)。
输出字节流 OutputStream
- OutputStream 是所有的输出字节流的父类,它是一个抽象类。
- ByteArrayOutputStream、FileOutputStream 是两种基本的介质流,它们分别向Byte 数组、和本地文件中写入数据。
- PipedOutputStream 是向与其它线程共用的管道中写入数据。
- ObjectOutputStream 和所有FilterOutputStream 的子类都是装饰流。
常用字节流——FileInputStrem和FileOutPutStrem
FileInputStrem和FileOutPutStrem的写入和读取方式有4中,如下:
- 直接读取和写入单个字节。这种方式效率很低,应该避免使用。
- 使用FileInputStrem的available方法估计流的大小,从而创建缓冲区数组。这种方法会创建一个和流文件大小相同的数组,如果流文件很大,缓冲区会很大,所以在文件比较大的时候不建议使用。
- 创建固定大小的缓冲区。推荐使用。
- 使用BufferedInputStream和BufferedOutputStream。推荐使用。
下面看具体的例子:
- 例子1:FileInputStrem读取文本文件中的内容并打印到控制台上。
public class FileInputStreamDemo {public static String demoRead(String filePath){FileInputStream fis = null;String result = null;try {//1.根据path路径数实例化一个输入流对象fis = new FileInputStream(filePath);//2.返回这个流中可以被读的剩下的bytes字节的估计值int size = fis.available();//3.根据估计值创建缓冲数组byte[] buf = new byte[size];//4.将数据读入缓冲数组fis.read(buf);//5.将读到的数据创建成一个字符串,用于返回result = new String(buf);} catch (FileNotFoundException e) {e.printStackTrace();} catch (IOException e) {e.printStackTrace();} finally {if(fis != null){try {fis.close();} catch (IOException e) {e.printStackTrace();}}}return result;}public static void main(String[] args) {String filePath = "D:\\Prom\\testAll\\src\\IO\\FileInputStreamDemo\\demoRead.txt";String result = demoRead(filePath);System.out.println(result);}}
- 例子2:FileOutputStrem写入文本文件。
public class FileOutputStreamDemo {public static void WriteDemo(String filePath, String data){FileOutputStream fos = null;try {//1.根据文件路径创建输出流fos = new FileOutputStream(filePath);//2.将字符串转化为数组并写入fos.write(data.getBytes());} catch (FileNotFoundException e) {e.printStackTrace();} catch (IOException e) {e.printStackTrace();} finally {if(fos != null){try {fos.close();} catch (IOException e) {e.printStackTrace();}}}}public static void main(String[] args) {String filePath = "D:\\Prom\\testAll\\src\\IO\\FileOutPutSreamDemo\\WriteDemo.txt";WriteDemo(filePath, "FileOutPutStream:" + "WriteDemo");}}
- 例子3:使用四种方式复制mp3文件。
public class CopyMp3Demo {//D:\Prom\testAll\src\IO\CopyMp3Demopublic static void main(String[] args) {String fromPath = "D:\\Prom\\testAll\\src\\IO\\CopyMp3Demo\\0.mp3";String toPath = "D:\\Prom\\testAll\\src\\IO\\CopyMp3Demo\\1.mp3";// copyMp3Demo_1(fromPath, toPath);// copyMp3Demo_2(fromPath, toPath);// copyMp3Demo_3(fromPath, toPath);copyMp3Demo_4(fromPath, toPath);}/*** 一个字节一个字节读取,效率很慢,不要用。* @param fromPath* @param toPath*/public static void copyMp3Demo_1(String fromPath, String toPath){FileInputStream fis = null;FileOutputStream fos = null;try {fis = new FileInputStream(fromPath);fos = new FileOutputStream(toPath);//一个字节一个字节读取int ch = 0;while ((ch = fis.read()) != -1){fos.write(ch);}} catch (FileNotFoundException e) {e.printStackTrace();} catch (IOException e) {e.printStackTrace();} finally {if(fis != null){try {fis.close();} catch (IOException e) {e.printStackTrace();}}if(fos != null){try {fos.close();} catch (IOException e) {e.printStackTrace();}}}}/*** 使用available定义缓冲区,当文件很大的时候,缓冲区会很大,不建议使用。* @param fromPath* @param toPath*/public static void copyMp3Demo_2(String fromPath, String toPath){FileInputStream fis = null;FileOutputStream fos = null;try {fis = new FileInputStream(fromPath);fos = new FileOutputStream(toPath);byte[] buf = new byte[fis.available()];fis.read(buf);fos.write(buf);} catch (FileNotFoundException e) {e.printStackTrace();} catch (IOException e) {e.printStackTrace();} finally {if(fis != null){try {fis.close();} catch (IOException e) {e.printStackTrace();}}if(fos != null){try {fos.close();} catch (IOException e) {e.printStackTrace();}}}}/*** 使用BufferedInputStream和BufferedOutputStream缓冲区。建议使用。* @param fromPath* @param toPath*/public static void copyMp3Demo_3(String fromPath, String toPath){BufferedInputStream bufis = null;BufferedOutputStream bufos = null;try {bufis = new BufferedInputStream(new FileInputStream(fromPath));bufos = new BufferedOutputStream(new FileOutputStream(toPath));int ch = 0;while((ch = bufis.read()) != -1){bufos.write(ch);}} catch (FileNotFoundException e) {e.printStackTrace();} catch (IOException e) {e.printStackTrace();} finally {if(bufis != null){try {bufis.close();} catch (IOException e) {e.printStackTrace();}}if(bufos != null){try {bufos.close();} catch (IOException e) {e.printStackTrace();}}}}/*** 使用自定义的数组缓冲区,建议使用。* @param fromPath* @param toPath*/public static void copyMp3Demo_4(String fromPath, String toPath){FileInputStream fis = null;FileOutputStream fos = null;try {fis = new FileInputStream(fromPath);fos = new FileOutputStream(toPath);byte[] buf = new byte[1024];int len = 0;while((len = fis.read(buf)) != -1){fos.write(buf, 0, len);}} catch (FileNotFoundException e) {e.printStackTrace();} catch (IOException e) {e.printStackTrace();} finally {if(fis != null){try {fis.close();} catch (IOException e) {e.printStackTrace();}}if(fos != null){try {fos.close();} catch (IOException e) {e.printStackTrace();}}}}}
装饰者模式
装饰设计模式,可以在原有技能的基础上,新增技能,降低继承所带来的耦合性。装饰者和被装饰者必须实现同一个接口或者继承自同一个父类。
一个装饰者模式的例子如下:
public class DecratorPattern {public static void main(String[] args) {Coder coder = new Coder(new Student());coder.code();}}//编码技能接口interface coding{public void code();}//学生会的编程语言:java和Cclass Student implements coding{public void code() {System.out.println("java");System.out.println("C");}}//学生变成程序员之后又学会了一些编程语言。这个类就是装饰类。class Coder implements coding{private Student student;public Coder(Student student) {this.student = student;}public void code() {student.code();System.out.println("C#");System.out.println("C++");}}
Java I/O 使用了装饰者模式来实现。以 InputStream 为例,
- InputStream 是抽象组件;
- FileInputStream 是 InputStream 的子类,属于具体组件,提供了字节流的输入操作;
- FilterInputStream 属于抽象装饰者,装饰者用于装饰组件,为组件提供额外的功能。例如 BufferedInputStream 为 FileInputStream 提供缓存的功能。
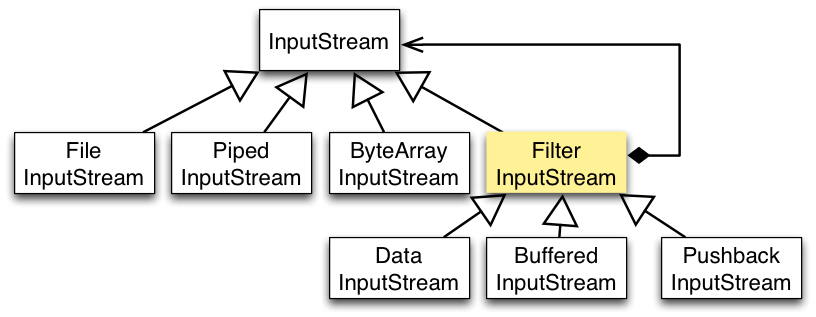
实例化一个具有缓存功能的字节流对象时,只需要在 FileInputStream 对象上再套一层 BufferedInputStream 对象即可。
FileInputStream fileInputStream = new FileInputStream(filePath);BufferedInputStream bufferedInputStream = new BufferedInputStream(fileInputStream);
DataInputStream 装饰者提供了对更多数据类型进行输入的操作,比如 int、double 等基本类型。
其他字节流
打印流——PrintSream
PrintStream 继承于FilterOutputStream,用来装饰其它输出流。它能为其他输出流添加了功能,使它们能够按照原格式进行打印。System.out对应的类型就是PrintStream。
PrintStream 永远不会抛出 IOException;它产生的IOException会被自身的函数所捕获并设置错误标记。
它的构造函数函数可以接收三种数据类型的值。
- 字符串路径。
- File对象。
- OutputStream。
public static void printStreamDemo() throws IOException {File file = new File("/usr/Prom/eclipse/testAll/src/FileFilter/printstream.txt");if(!file.exists())file.createNewFile();PrintStream out = new PrintStream(file);out.write(610); //接受的是一个byte数组,只写最低8位,结果是将b写入到文件中out.println(97); //97out.println('a'); //aout.println("hello world"); //hello worldout.println(true); //trueout.println(3.14); //3.14//out.println(new Student("酒香逢")); //姓名:酒香逢}
序列流,也称为合并流——SequenceInputStream:
特点:可以将多个读取流合并成一个流。这样操作起来很方便。
原理:其实就是将每一个读取流对象存储到一个集合中。最后一个流对象结尾作为这个流的结尾。
public static void sequenceInputStreamDemo() throws IOException {/** 需求:将1.txt 2.txt 3.txt文件中的数据合并到一个文件中。*///不推荐使用Vector对象,因为效率比较低。// Vector<FileInputStream> v = new Vector<FileInputStream>();// v.add(new FileInputStream("1.txt"));// v.add(new FileInputStream("2.txt"));// v.add(new FileInputStream("3.txt"));// Enumeration<FileInputStream> en = v.elements();File file1 = new File("/usr/Prom/eclipse/testAll/src/FileFilter/1.txt");File file2 = new File("/usr/Prom/eclipse/testAll/src/FileFilter/2.txt");File file3 = new File("/usr/Prom/eclipse/testAll/src/FileFilter/3.txt");// 如果没有目标文件就创建if (!file1.exists()) {file1.createNewFile();}if (!file2.exists()) {file2.createNewFile();}if (!file3.exists()) {file3.createNewFile();}//将流对象放入集合中,便于合并。ArrayList<FileInputStream> al = new ArrayList<FileInputStream>();al.add(new FileInputStream(file1));al.add(new FileInputStream(file2));al.add(new FileInputStream(file3));//获取迭代器Enumeration<FileInputStream> en = Collections.enumeration(al);//通过序列流将三个流串起来SequenceInputStream sis = new SequenceInputStream(en);FileOutputStream fos = new FileOutputStream("/usr/Prom/eclipse/testAll/src/FileFilter/1234.txt");byte[] buf = new byte[1024];int len = 0;while((len=sis.read(buf))!=-1){fos.write(buf,0,len);}fos.close();sis.close();}
字符流
编码与解码
编码就是把字符转换为字节,而解码是把字节重新组合成字符。
如果编码和解码过程使用不同的编码方式那么就出现了乱码。
- GBK 编码中,中文字符占 2 个字节,英文字符占 1 个字节;
- UTF-8 编码中,中文字符占 3 个字节,英文字符占 1 个字节;
- UTF-16be 编码中,中文字符和英文字符都占 2 个字节。
UTF-16be 中的 be 指的是 Big Endian,也就是大端。相应地也有 UTF-16le,le 指的是 Little Endian,也就是小端。
Java 使用双字节编码 UTF-16be,这不是指 Java 只支持这一种编码方式,而是说 char 这种类型使用 UTF-16be 进行编码。char 类型占 16 位,也就是两个字节,Java 使用这种双字节编码是为了让一个中文或者一个英文都能使用一个 char 来存储。
补充:大端和小端:
小端字节序:低字节存于内存低地址;高字节存于内存高地址。如一个long型数据0x12345678
0x0029f458 0x780x0029f459 0x560x0029f45a 0x340x0029f45b 0x12
在以上数据存放于内存中的表现形式中,0x0029f458 < 0x0029f459 < 0x0029f45a < 0x0029f45b,可以知道内存的地址是由低到高的顺序;而数据的字节也是由低到高的,故以上字节序是小端字节序。
大端字节序:高字节存于内存低地址;低字节存于内存高地址。
0x0029f458 0x120x0029f459 0x340x0029f45a 0x560x0029f45b 0x79
在以上数据存放于内存中的表现形式中,0x0029f458 < 0x0029f459 < 0x0029f45a < 0x0029f45b,可以知道内存的地址是由低到高的顺序;而数据的字节却是由高到低的,故以上字节序是大端字节序。
Java提供了方法测试平台的大小端,程序如下:
public class EndianTest {public static void endianTest() {if(ByteOrder.nativeOrder() == ByteOrder.BIG_ENDIAN)System.out.println("big endian");elseSystem.out.println("little endian");}public static void main(String[] args) {EndianTest.endianTest();}}
ByteOrder属于java.nio.ByteOrder,它的原理如下:
public static ByteOrder nativeOrder() {return Bits.byteOrder();}
static ByteOrder byteOrder() {if (byteOrder == null)throw new Error("Unknown byte order");return byteOrder;}static {long a = unsafe.allocateMemory(8);try {unsafe.putLong(a, 0x0102030405060708L);byte b = unsafe.getByte(a);switch (b) {case 0x01: byteOrder = ByteOrder.BIG_ENDIAN; break;case 0x08: byteOrder = ByteOrder.LITTLE_ENDIAN; break;default:assert false;byteOrder = null;}} finally {unsafe.freeMemory(a);}}
可以模仿着自己写一个:
public class TestEndian{private static final int a = 0x12345678;public static void test(){char ch = (char)a;if(0x12 == ch){System.out.println("大端!");}else{assert(ch == 0x78);System.out.println("小端!");}}public static void main(String[] args){TestEndian.test();}}
String 的编码方式
String 可以看成一个字符序列,可以指定一个编码方式将它编码为字节序列,也可以指定一个编码方式将一个字节序列解码为 String。
String str1 = "中文";byte[] bytes = str1.getBytes("UTF-8");String str2 = new String(bytes, "UTF-8");System.out.println(str2);
在调用无参数 getBytes() 方法时,默认的编码方式不是 UTF-16be。双字节编码的好处是可以使用一个 char 存储中文和英文,而将 String 转为 bytes[] 字节数组就不再需要这个好处,因此也就不再需要双字节编码。getBytes() 的默认编码方式与平台有关,一般为 UTF-8。
byte[] bytes = str1.getBytes();
常用字符流——FileReader和FileWriter
与FileInputStrem和FileOutPutStrem类似,FileReader和FileWriter的写入和读取方式有3中,如下:
- 直接读取和写入单个字节。这种方式效率很低,应该避免使用。
- 创建固定大小的缓冲区。推荐使用。
- 使用BufferedInputStream和BufferedOutputStream。推荐使用。
具体如下所示:
/*** 将一个文本文件中的数据写入另一个文本文件。*/public class FileReaderWriterDemo {public static void main(String[] args) {String fromPath = "D:\\Prom\\testAll\\src\\IO\\FileReaderWriterDemo\\0.txt";String toPath = "D:\\Prom\\testAll\\src\\IO\\FileReaderWriterDemo\\1.txt";// readWriteDemo_1(fromPath, toPath);// readWriteDemo_2(fromPath, toPath);readWriteDemo_3(fromPath, toPath);}/*** 直接读取写入的方式,效率低下,不建议使用。* @param fromPath* @param toPath*/public static void readWriteDemo_1(String fromPath, String toPath){FileReader fr = null;FileWriter fw = null;try {fr = new FileReader(fromPath);fw = new FileWriter(toPath);//直接读取int ch = 0;while((ch = fr.read()) != -1){fw.write(ch);}} catch (FileNotFoundException e) {e.printStackTrace();} catch (IOException e) {e.printStackTrace();} finally {if(fr != null){try {fr.close();} catch (IOException e) {e.printStackTrace();}}if(fw != null){try {fw.close();} catch (IOException e) {e.printStackTrace();}}}}/*** 自定义字符数组作为缓冲区,建议使用。* @param fromPath* @param toPath*/public static void readWriteDemo_2(String fromPath, String toPath){FileReader fr = null;FileWriter fw = null;try {fr = new FileReader(fromPath);fw = new FileWriter(toPath);//注意和FileInputStream不同的是,这里读取的是字符,所以要新建字符数组做缓冲区。char[] buf = new char[1024];int len = 0;while((len = fr.read(buf)) != -1){fw.write(buf, 0, len);}} catch (FileNotFoundException e) {e.printStackTrace();} catch (IOException e) {e.printStackTrace();} finally {if(fr != null){try {fr.close();} catch (IOException e) {e.printStackTrace();}}if(fw != null){try {fw.close();} catch (IOException e) {e.printStackTrace();}}}}/*** 使用BufferedReader和BufferedWriter,建议使用。* @param fromPath* @param toPath*/public static void readWriteDemo_3(String fromPath, String toPath){BufferedReader bufr = null;BufferedWriter bufw = null;try {bufr = new BufferedReader(new FileReader(fromPath));bufw = new BufferedWriter(new FileWriter(toPath));String line = null;while((line = bufr.readLine()) != null){bufw.write(line);bufw.newLine();bufw.flush();}} catch (FileNotFoundException e) {e.printStackTrace();} catch (IOException e) {e.printStackTrace();} finally {if(bufr != null){try {bufr.close();} catch (IOException e) {e.printStackTrace();}}if(bufw != null){try {bufw.close();} catch (IOException e) {e.printStackTrace();}}}}}
其他字符流
字符打印流——PrintWriter(类比PrintStream)
构造函数可以接收四种类型的值。
- 字符串路径(可以指定编码表);
- File对象(可以指定编码表);
- OutputStream(可以指定自动刷新);
- Writer(可以指定自动刷新);
public static void printWriterDemo() throws IOException {BufferedReader bufr = new BufferedReader(new InputStreamReader(System.in));PrintWriter out = new PrintWriter(new FileWriter("/usr/Prom/eclipse/testAll/src/FileFilter/out.txt"), true); //true表示自动刷新String line = null;while((line = bufr.readLine()) != null) {if("over".equals(line))break;out.println(line);}out.close();bufr.close();}
LineNumberReader
LineNumberReader是BufferedReader的子类,也是一个装饰类。它可以允许我们从文件的任一行读到任一行,还可以通过setLineNumber()方法改变当前行号。但是这个方法只是改变私有变量lineNumber的值,并不能改变文件物理的指针位置。
public class LineNumberReaderDemo {public static void main(String[] args) throws IOException {FileReader fr = null;LineNumberReader lnr = null;int i;try{// create new readerfr = new FileReader("/usr/Prom/eclipse/testAll/src/FileFilter/test.txt");lnr = new LineNumberReader(fr);// set current line numberlnr.setLineNumber(100);System.out.println("setLineNumber(100) is invoked");// get current line numberi = lnr.getLineNumber();System.out.println("Current line number: "+i);String line = null;while((line = lnr.readLine()) != null) {System.out.println(lnr.getLineNumber()+":"+line);}}catch(Exception e){// if any error occurse.printStackTrace();}finally{// closes the stream and releases system resourcesif(fr!=null)fr.close();if(lnr!=null)lnr.close();}}}
打印结果为:
setLineNumber(100) is invokedCurrent line number: 100101:abcde102:fghij103:klmno
以下实现了从任一行读到任一行的功能:
public class Ex7 {public void dataReader(String nameFile, int start, int finish) {if (start > finish) {System.out.println("Error start or finish!");return;}InputStream inputStream = null;LineNumberReader reader = null;try {inputStream = new FileInputStream(new File(nameFile));reader = new LineNumberReader(new InputStreamReader(inputStream));int lines = getTotalLines(new File(nameFile));if (start < 0 || finish < 0 || finish > lines || start > lines) {System.out.println("Line not found!");return;}String line = reader.readLine();lines = 0;while (line != null) {lines++;if(lines >= start && lines <= finish){System.out.println(line);}line = reader.readLine();}inputStream.close();reader.close();} catch (FileNotFoundException e) {e.printStackTrace();} catch (IOException e) {System.err.println("IO Error");System.exit(0);}}private int getTotalLines(File file) throws IOException{FileReader in = new FileReader(file);LineNumberReader reader = new LineNumberReader(in);String line = reader.readLine();int lines = 0;while (line != null) {lines++;line = reader.readLine();}reader.close();in.close();return lines;}public static void main(String[] args) {new Ex7().dataReader("/usr/Prom/eclipse/testAll/src/FileFilter/data.txt", 2, 4);System.out.println();new Ex7().dataReader("/usr/Prom/eclipse/testAll/src/FileFilter/data.txt",3,8);}}
转换流——InputStreamReader 、OutputStreamWriter
InputStreamReader 、OutputStreamWriter要InputStream或OutputStream作为参数,实现从字节流到字符流的转换。
构造函数如下:
InputStreamReader(InputStream); //通过构造函数初始化,使用的是本系统默认的编码表GBK。InputStreamReader(InputStream,String charSet); //通过该构造函数初始化,可以指定编码表。OutputStreamWriter(OutputStream); //通过该构造函数初始化,使用的是本系统默认的编码表GBK。OutputStreamwriter(OutputStream,String charSet); //通过该构造函数初始化,可以指定编码表。
例子如下:
- 将键盘录入的信息写入到一个文本文件中。
public class InputStreamReaderDemo {public static void main(String[] args) {String toPath = "/usr/Prom/eclipse/testAll/src/IO/to.txt";inputStreamReaderDemo_1(toPath);}public static void inputStreamReaderDemo_1(String toPath) {BufferedReader bufr = null;BufferedWriter bufw = null;try {//将字节流转化为字符流。bufr = new BufferedReader(new InputStreamReader(System.in));bufw = new BufferedWriter(new OutputStreamWriter(new FileOutputStream(toPath)));String line = null;while((line = bufr.readLine()) != null) {if("over".equals(line)){break;}bufw.write(line.toUpperCase());bufw.newLine();bufw.flush();}} catch (FileNotFoundException e1) {e1.printStackTrace();} catch (IOException e) {e.printStackTrace();} finally {if(bufr != null) {try {bufr.close();} catch (IOException e) {e.printStackTrace();}}if(bufw != null) {try {bufw.close();} catch (IOException e) {e.printStackTrace();}}}}}
- 将一个文本文件内容显示在控制台上。其实这个功能用前面的FileInputStrem和FileOutPutStrem或者FileWriter和FileReader可以实现,先读到缓冲区中,再将缓冲区转化成字符串打印出来,可以看前面具体的例子。
但是前面的方式不能指定编码类型。
public class OutputStreamWriterDemo {public static void main(String[] args) {String toPath = "/usr/Prom/eclipse/testAll/src/IO/to.txt";outputStreamWriterDemo(toPath);}public static void outputStreamWriterDemo(String fromPath) {BufferedReader bufr = null;BufferedWriter bufw = null;try {//将字节流转化为字符流。//相比上面的程序,改变了这两行,并且加上使用“GBK”编码的限制。bufr = new BufferedReader(new InputStreamReader(new FileInputStream(fromPath)));bufw = new BufferedWriter(new OutputStreamWriter(System.out, "GBK"));String line = null;while((line = bufr.readLine()) != null) {bufw.write(line.toUpperCase());bufw.newLine();bufw.flush();}} catch (FileNotFoundException e1) {e1.printStackTrace();} catch (IOException e) {e.printStackTrace();} finally {if(bufr != null) {try {bufr.close();} catch (IOException e) {e.printStackTrace();}}if(bufw != null) {try {bufw.close();} catch (IOException e) {e.printStackTrace();}}}}}
- 将一个文本文件中的内容以“GBK”编码的格式复制到另一个文本文件中。同样的,这个功能用前面的FileInputStrem和FileOutPutStrem或者FileWriter和FileReader可以实现,但是前面的方式不能指定编码类型。
public class ReadAndWriterDemo {public static void main(String[] args) {String fromPath = "/usr/Prom/eclipse/testAll/src/IO/from.txt";String toPath = "/usr/Prom/eclipse/testAll/src/IO/to.txt";readAndWriterDemo(fromPath, toPath);}public static void readAndWriterDemo(String fromPath, String toPath) {BufferedReader bufr = null;BufferedWriter bufw = null;try {//将字节流转化为字符流。//相比上面的程序,改变了这两行,并且加上使用“GBK”编码的限制。bufr = new BufferedReader(new InputStreamReader(new FileInputStream(fromPath), "GBK"));bufw = new BufferedWriter(new OutputStreamWriter(new FileOutputStream(toPath), "GBK"));String line = null;while((line = bufr.readLine()) != null) {bufw.write(line.toUpperCase());bufw.newLine();bufw.flush();}} catch (FileNotFoundException e1) {e1.printStackTrace();} catch (IOException e) {e.printStackTrace();} finally {if(bufr != null) {try {bufr.close();} catch (IOException e) {e.printStackTrace();}}if(bufw != null) {try {bufw.close();} catch (IOException e) {e.printStackTrace();}}}}}
三、磁盘操作——File
File 类可以用于表示文件和目录的信息,但是它不表示文件的内容。
基本操作
文件或文件夹的创建
主要涉及到三个方法:
- createNewFile():创建文件,这句话后,才真正在磁盘上创建了文件。
- mkdir()://创建目录,如果新建的目录的上级目录不存在会报异常不能成功创建文件夹。
- mkdirs()://创建目录,如果新建的目录的上级目录不存在则会将目录与上级目录一起创建。
public static void createFile() throws IOException {//创建了file对象并不是创建了真实的文件,执行这句话后,如果文件不存在,并没有创建File file = new File("/usr/Prom/eclipse/testAll/src/FileTest/createFile.txt");File dir = new File("/usr/Prom/eclipse/testAll/src/FileTest/dir");File dir_1 = new File("/usr/Prom/eclipse/testAll/src/FileTest/dir_1/a.txt");if(!file.exists())file.createNewFile(); //创建文件,这句话后,才真正在磁盘上创建了文件if(!dir.exists())dir.mkdir(); //创建目录,如果新建的目录的上级目录不存在会报异常不能成功创建文件夹if(!dir_1.exists())dir_1.mkdirs(); //创建目录,如果新建的目录的上级目录不存在则会将目录与上级目录一起创建。}
判断文件或文件夹属性
isFile()和isDirectory()分别用于判断是不是文件和是不是文件夹,canRead(),canWrite(),isHidden(),分别用于判断文件是否可读,可写,是否隐藏。
public static void judgeFile(File file) {file.setReadable(true); //设置文件可读file.setWritable(false); //设置文件不可写System.out.println(file.isFile()); //判断是不是文件System.out.println(file.isDirectory()); //判断是不是路径System.out.println(file.isHidden()); //判断是不是隐藏文件System.out.println(file.canRead()); //判断是不是可读System.out.println(file.canWrite()); //判断是不是可写}
文件或文件夹的删除
删除一个文件比较简单,直接判断文件是否存在,如果存在的话就删除,如果文件不存在可以不用操作。但是删除一个文件夹比较麻烦,我们不能够直接的删除一个文件夹,删除文件夹时必须保证该文件夹为空,也就是说文件夹里面的文件和文件夹要全部被删除之后才能够删除该文件夹。
递归删除一个文件或路径
/*** 删除文件或路径,参数为File* @param file*/public static void removeFiles(File file) {File[] files = file.listFiles();for(File f : files) {if(f.isDirectory())removeFiles(f);elseSystem.out.println(f+":"+f.delete());}System.out.println(file+":"+file.delete());}/*** 删除文件或路径,参数为路径的字符串表示* @param dir*/public static void deleteFiles(String dir) {File file = new File(dir);if(!file.exists())return;if(file.isFile())System.out.println(file+":"+file.delete());else if(file.isDirectory()) {File[] files = file.listFiles();for(File f : files) {System.out.print(":"+f.getAbsolutePath());deleteFiles(f.getAbsolutePath());}}System.out.println(file+":"+file.delete());}
和流的联合使用
将一个文件中的内容复制到另一个文件中。
public class FileTest {public static void main(String[] args) throws IOException {String fromPath = "/usr/Prom/eclipse/testAll/src/IO/from.txt";String toPath = "/usr/Prom/eclipse/testAll/src/IO/to.txt";readWriteDemo(fromPath, toPath);}public static void readWriteDemo(String fromPath, String toPath) throws IOException{File fileFrom = new File(fromPath);File fileTo = new File(toPath);if(!fileFrom.exists())fileFrom.createNewFile();if(!fileTo.exists())fileTo.createNewFile();FileReader fr = null;FileWriter fw = null;try {fr = new FileReader(fileFrom);fw = new FileWriter(fileTo);//注意和FileInputStream不同的是,这里读取的是字符,所以要新建字符数组做缓冲区。char[] buf = new char[1024];int len = 0;while((len = fr.read(buf)) != -1){fw.write(buf, 0, len);}} catch (FileNotFoundException e) {e.printStackTrace();} catch (IOException e) {e.printStackTrace();} finally {if(fr != null){try {fr.close();} catch (IOException e) {e.printStackTrace();}}if(fw != null){try {fw.close();} catch (IOException e) {e.printStackTrace();}}}}}
文件过滤器
在java中,专门提供了文件过滤器接口.
public interface FilenameFilter accept(File dirs,String name)public interface FileFilter accept(File pathname);
下面看具体的应用。
需要注意list方法和listFiles方法的两点区别:
- 返回值类型不同:前者为String数组,后者为File对象数组
- 数组中元素内容不同:前者为string类型的【文件名】(包含后缀名),后者为File对象类型的【完整路径】。
因此,遍历文件夹中所有文件,包括子文件夹中的文件时,必须用listFiles()方法
/*** 后缀名过滤*/public static void fileFilterDemo() {File dir = new File("/usr/Prom/eclipse/testAll/src/FileFilter/11");if(!dir.exists())dir.mkdirs();//list方法的参数不能为FileFlterFile[] fileList = dir.listFiles(new FileFilter() {@Overridepublic boolean accept(File pathname) {return !pathname.isHidden();}});for(File f : fileList) {System.out.println(f);}}/*** 隐藏文件过滤*/public static void fileNameFilterDemo() {File dir = new File("/usr/Prom/eclipse/testAll/src/FileFilter/11");if(!dir.exists())dir.mkdirs();//使用listFiles方法也行String[] fileList = dir.list(new FilenameFilter() {@Overridepublic boolean accept(File dir, String name) {return name.endsWith(".java");}});for(String f : fileList) {System.out.println(f);}}
File和Properties
Properties继承自Hashtable,属于Map体系,主要用于生产配置文件与读取配置文件的信息。它可以和IO流结合,从流中读取配置文件的信息加载到Properties对象中,在对象中完成对配置文件中信息的修改后再通过流将信息写入到文件中,相当于是一个中间的操作过程。Properties中的键和值都是字符串类型。
看一下具体的例子:
public static void main(String[] args) throws IOException {String filePath = "/usr/Prom/eclipse/testAll/src/FileFilter/test.properties";//创建File对象,配置文件的后缀名一般也叫propertiesFile file = new File(filePath);if(!file.exists())file.createNewFile();creatProperties(file);readProperties(file);}//读取配置文件的信息public static void readProperties(File file) throws IOException{if(!file.exists())return;//创建Properties对象Properties properties = new Properties();//加载配置文件信息到Properties中properties.load(new FileReader(file));//遍历Set<Entry<Object, Object>> entrys = properties.entrySet();for(Entry<Object, Object> entry :entrys){System.out.println("键:"+ entry.getKey() +" 值:"+ entry.getValue());}//修改狗娃的密码properties.setProperty("狗娃", "007");//把修改后的Properties写回配置文件properties.store(new FileWriter(file), "info");}//保存配置文件文件的信息。public static void creatProperties(File file) throws IOException{if(!file.exists())return;//创建PropertiesProperties properties = new Properties();properties.setProperty("狗娃", "123");properties.setProperty("狗剩","234");properties.setProperty("铁蛋","345");//第一个参数是一个输出流对象,第二参数是使用一个字符串描述这个配置文件的信息。properties.store(new FileWriter(file), "info");}
另一个例子:定义功能,获取一个应用程序运行的次数,如果超过3次,给出使用次数已到请注册的提示。并不要在运行
程序。
public class GetCounts {public static void main(String[] args) throws IOException {String filePath = "/usr/Prom/eclipse/testAll/src/FileFilter/times.properties";getCounts(filePath);}public static void getCounts(String filePath) throws IOException {File file = new File(filePath);if(!file.exists()){//如果配置文件不存在,则创建该配置文件file.createNewFile();}//创建Properties对象。Properties properties = new Properties();//把配置文件的信息加载到properties中properties.load(new FileInputStream(file));FileOutputStream fileOutputStream = new FileOutputStream(file);int count = 0; //定义该变量是用于保存软件的运行次数的。//读取配置文件的运行次数String value = properties.getProperty("count");if(value!=null){count = Integer.parseInt(value);}//判断使用的次数是否已经达到了三次,if(count==3){System.out.println("你已经超出了试用次数,请购买正版软件!!");System.exit(0);}count++;System.out.println("你已经使用了本软件第"+count+"次");properties.setProperty("count",count+"");//使用Properties生成一个配置文件properties.store(fileOutputStream,"runtime");fileOutputStream.close();}}
流和File综合练习
实现两个函数,一个实现文件切割功能,一个实现文件合并功能。
private static final int SIZE = 1024 * 1024;public static void main(String[] args) throws IOException {File file = new File("/usr/Prom/eclipse/testAll/src/FileFilter/fate.mp3");File dir = new File("/usr/Prom/eclipse/testAll/src/");if(!file.exists())file.createNewFile();if(!dir.exists())dir.mkdirs();spiliteFile(file);mergeFile(dir);}/*** 切割文件* @param file* @throws IOException*/public static void spiliteFile(File file) throws IOException {if(!file.exists())return;// 用读取流关联源文件。FileInputStream fis = new FileInputStream(file);// 定义一个1M的缓冲区。byte[] buf = new byte[SIZE];// 创建目的。FileOutputStream fos = null;int len = 0;int count = 1;/** 切割文件时,必须记录住被切割文件的名称,以及切割出来碎片文件的个数。 以方便于合并。* 这个信息为了进行描述,使用键值对的方式。用到了properties对象*/Properties prop = new Properties();File dir = new File("/usr/Prom/eclipse/testAll/src");if (!dir.exists())dir.mkdirs();while ((len = fis.read(buf)) != -1) {fos = new FileOutputStream(new File(dir, (count++) + ".part"));fos.write(buf, 0, len);fos.close();}//将被切割文件的信息保存到prop集合中。prop.setProperty("partcount", count+"");prop.setProperty("filename", file.getName());fos = new FileOutputStream(new File(dir,count+".properties"));//将prop集合中的数据存储到文件中。prop.store(fos, "save file info");fos.close();fis.close();}/*** 合并文件* @param dir* @throws IOException*/public static void mergeFile(File dir) throws IOException {/** 获取指定目录下的配置文件对象。*/File[] files = dir.listFiles(new SuffixFilter(".properties"));if(files.length != 1)throw new RuntimeException(dir+",该目录下没有properties扩展名的文件或者不唯一");//记录配置文件对象。File confile = files[0];//获取该文件中的信息Properties prop = new Properties();FileInputStream fis = new FileInputStream(confile);prop.load(fis);String filename = prop.getProperty("filename");int count = Integer.parseInt(prop.getProperty("partcount"));//获取该目录下的所有碎片文件File[] partFiles = dir.listFiles(new SuffixFilter(".part"));if(partFiles.length!=(count-1)){throw new RuntimeException(" 碎片文件不符合要求,个数不对!应该"+count+"个");}//将碎片文件和流对象关联 并存储到集合中。ArrayList<FileInputStream> al = new ArrayList<FileInputStream>();for(int x=0; x<partFiles.length; x++){al.add(new FileInputStream(partFiles[x]));}//将多个流合并成一个序列流。Enumeration<FileInputStream> en = Collections.enumeration(al);SequenceInputStream sis = new SequenceInputStream(en);FileOutputStream fos = new FileOutputStream(new File(dir,filename));byte[] buf = new byte[1024];int len = 0;while((len=sis.read(buf))!=-1){fos.write(buf,0,len);}fos.close();sis.close();}/*** 后缀名过滤器* @author adamhand*/static class SuffixFilter implements FilenameFilter{private String suffix;public SuffixFilter(String suffix) {this.suffix = suffix;}public boolean accept(File dir, String name) {return name.endsWith(suffix);}}
四、对象操作
序列化
序列化就是将一个对象转换成字节序列,方便存储和传输。
- 序列化:ObjectOutputStream.writeObject()
- 反序列化:ObjectInputStream.readObject()
不会对静态变量进行序列化,因为序列化只是保存对象的状态,静态变量属于类的状态。
Serializable
序列化的类需要实现 Serializable 接口,它只是一个标准,没有任何方法需要实现,但是如果不去实现它的话而进行序列化,会抛出异常。
public static void main(String[] args) throws IOException, ClassNotFoundException {A a1 = new A(123, "abc");String objectFile = "file/a1";ObjectOutputStream objectOutputStream = new ObjectOutputStream(new FileOutputStream(objectFile));objectOutputStream.writeObject(a1);objectOutputStream.close();ObjectInputStream objectInputStream = new ObjectInputStream(new FileInputStream(objectFile));A a2 = (A) objectInputStream.readObject();objectInputStream.close();System.out.println(a2);}private static class A implements Serializable {private int x;private String y;A(int x, String y) {this.x = x;this.y = y;}@Overridepublic String toString() {return "x = " + x + " " + "y = " + y;}}
transient
transient 关键字可以使一些属性不会被序列化。
ArrayList 中存储数据的数组 elementData 是用 transient 修饰的,因为这个数组是动态扩展的,并不是所有的空间都被使用,因此就不需要所有的内容都被序列化。通过重写序列化和反序列化方法,使得可以只序列化数组中有内容的那部分数据。
private transient Object[] elementData;
五、网络操作
Java 中的网络支持:
- InetAddress:用于表示网络上的硬件资源,即 IP 地址;
- URL:统一资源定位符;
- Sockets:使用 TCP 协议实现网络通信;
- Datagram:使用 UDP 协议实现网络通信。
InetAddress
没有公有的构造函数,只能通过静态方法来创建实例。
InetAddress.getByName(String host);InetAddress.getByAddress(byte[] address);
URL
可以直接从 URL 中读取字节流数据。
public static void main(String[] args) throws IOException {URL url = new URL("http://www.baidu.com");/* 字节流 */InputStream is = url.openStream();/* 字符流 */InputStreamReader isr = new InputStreamReader(is, "utf-8");/* 提供缓存功能 */BufferedReader br = new BufferedReader(isr);String line;while ((line = br.readLine()) != null) {System.out.println(line);}br.close();}
openConnection()方法会返回一个 URLConnection 对象,它表示到 URL 所引用的远程对象的连接。
每次调用此 URL 的协议处理程序的 openConnection 方法都打开一个新的连接。如果 URL 的协议(例如,HTTP 或 JAR)存在属于以下包或其子包之一的公共、专用 URLConnection 子类:java.lang、java.io、java.util、java.net,返回的连接将为该子类的类型。例如,对于 HTTP,将返回 HttpURLConnection,对于 JAR,将返回 JarURLConnection。
public class URLConnDemo{public static void main(String [] args){try{URL url = new URL("http://www.baidu.com");URLConnection urlConnection = url.openConnection();HttpURLConnection connection = null;if(urlConnection instanceof HttpURLConnection){connection = (HttpURLConnection) urlConnection;}else{System.out.println("请输入 URL 地址");return;}BufferedReader in = new BufferedReader(new InputStreamReader(connection.getInputStream()));String urlString = "";String current;while((current = in.readLine()) != null){urlString += current;}System.out.println(urlString);}catch(IOException e){e.printStackTrace();}}}
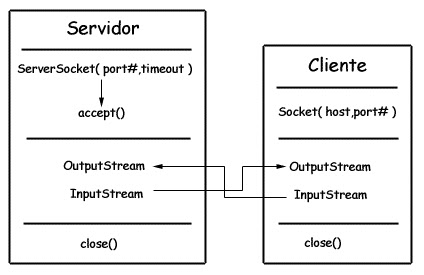
TCP——Sockets
- ServerSocket:服务器端类
- Socket:客户端类
- 服务器和客户端通过 InputStream 和 OutputStream 进行输入输出。
下面是一个上传图片的案例:
/*** 上传任务*/public class UploadTask implements Runnable {private static final int _2MB = 1024 * 1024 * 2;private Socket s;public UploadTask(Socket s) {this.s = s;}@Overridepublic void run() {int count = 0;String ip = s.getInetAddress().getHostAddress();System.out.println(ip + "connected");try{// 读取客户端发来的数据。InputStream in = s.getInputStream();// 将读取到数据存储到一个文件中。File dir = new File("/usr/Prom/eclipse/testAll/src/TCP/pic");if (!dir.exists()) {dir.mkdirs();}File file = new File(dir, ip + ".jpeg");//如果文件已经存在于服务端while(file.exists()){file = new File(dir,ip+"("+(++count)+").jpeg");}FileOutputStream fos = new FileOutputStream(file);byte[] buf = new byte[1024];int len = 0;while ((len = in.read(buf)) != -1) {fos.write(buf, 0, len);if(file.length() > _2MB){System.out.println(ip+"文件体积过大");fos.close();s.close();System.out.println(ip+"...."+file.delete());return ;}}// 获取socket输出流, 将上传成功字样发给客户端。OutputStream out = s.getOutputStream();out.write("上传成功".getBytes());fos.close();s.close();}catch(IOException e){}}}
/*** 上传客户端*/public class UploadPicClient {public static void main(String[] args) throws IOException{//1,创建客户端socket。Socket s = new Socket("192.168.10.128",10006);//2,读取客户端要上传的图片文件。FileInputStream fis = new FileInputStream("/usr/Prom/eclipse/testAll/src/TCP/naruto.jpeg");//3,获取socket输出流,将读到图片数据发送给服务端。OutputStream out = s.getOutputStream();byte[] buf = new byte[1024];int len = 0;while((len=fis.read(buf))!=-1){out.write(buf,0,len);}//告诉服务端说:这边的数据发送完毕。让服务端停止读取。s.shutdownOutput();//读取服务端发回的内容。InputStream in = s.getInputStream();byte[] bufIn = new byte[1024];int lenIn = in.read(buf);String text = new String(buf,0,lenIn);System.out.println(text);fis.close();s.close();}}
/*** 上传服务端*/public class UploadPicServer {public static void main(String[] args) throws IOException {//创建tcp的socket服务端。ServerSocket ss = new ServerSocket(10006);while(true){Socket s = ss.accept();new Thread(new UploadTask(s)).start();}}}
UDP——Datagram
- DatagramSocket:通信类
- DatagramPacket:数据包类
使用UDP实现发送和接受端:
public class Send {public static void main(String[] args) throws IOException {System.out.println("send starts");//1.建立udpsocket服务。使用DatagramSocket对象DatagramSocket ds = new DatagramSocket();//2.建立流从键盘读取数据BufferedReader bufr = new BufferedReader(new InputStreamReader(System.in));String line = null;while((line = bufr.readLine()) != null) {byte[] buf = line.getBytes();//3.将要发送的数据封装到数据包中。1000是绑定的本地端口。DatagramPacket dp = new DatagramPacket(buf, buf.length, InetAddress.getByName("192.168.10.128"), 10000);//4.发送数据包ds.send(dp);if(line.equals("886"))break;}//5.关闭服务ds.close();}}
public class Receive {public static void main(String[] args) throws IOException {System.out.println("receive starts");//1,建立udp socket服务。注意绑定端口DatagramSocket ds = new DatagramSocket(10000);while(true){//2,创建数据包。byte[] buf = new byte[1024];DatagramPacket dp = new DatagramPacket(buf,buf.length);//3,使用接收方法将数据存储到数据包中。ds.receive(dp);//阻塞式的。//4,通过数据包对象的方法,解析其中的数据,比如,地址,端口,数据内容。String ip = dp.getAddress().getHostAddress();int port = dp.getPort();String text = new String(dp.getData(),0,dp.getLength());System.out.println(ip+":"+port+":"+text);}//5,关闭资源。// ds.close();}}
练习:模拟浏览器(客户端)和Tomcat服务器(服务端)
public class MyBrowser {public static void main(String[] args) throws IOException{Socket s = new Socket("192.168.10.128",8080);//模拟浏览器,给tomcat服务端发送符合http协议的请求消息。PrintWriter out = new PrintWriter(s.getOutputStream(),true);out.println("GET /myweb/1.html HTTP/1.1");out.println("Accept: */*");out.println("Host: 192.168.10.128:8080");out.println("Connection: close");out.println();out.println();InputStream in = s.getInputStream();byte[] buf = new byte[1024];int len = in.read(buf);String str =new String(buf,0,len);System.out.println(str);s.close();//http://192.168.10.128:8080/myweb/1.html}}
public class MyTomcat {public static void main(String[] args) throws IOException {ServerSocket ss = new ServerSocket(8080);Socket s = ss.accept();System.out.println(s.getInetAddress().getHostAddress()+".....connected");InputStream in = s.getInputStream();byte[] buf = new byte[1024];int len = in.read(buf);String text = new String(buf,0,len);System.out.println(text);//给客户端一个反馈信息。PrintWriter out = new PrintWriter(s.getOutputStream(),true);out.println("<font color='red' size='7'>欢迎光临</font>");s.close();ss.close();}}
补充
网络结构:
- C/S client/server
- 特点:
该结构的软件,客户端和服务端都需要编写。
可发成本较高,维护较为麻烦。- 好处:
客户端在本地可以分担一部分运算。- B/S browser/server
- 特点:
该结构的软件,只开发服务器端,不开发客户端,因为客户端直接由浏览器取代。
开发成本相对低,维护更为简单。- 缺点:所有运算都要在服务端完成。
六、NIO
综述
新的输入/输出 (NIO) 库是在 JDK 1.4 中引入的,弥补了原来的 I/O 的不足,提供了高速的、面向块的 I/O。
nio 底层就是 epoll 是同步非阻塞的。
在NIO中有几个比较关键的概念:Channel(通道),Buffer(缓冲区),Selector(选择器)。可以将NIO 中的Channel同传统IO中的Stream来类比,但是要注意,传统IO中,Stream是单向的,比如InputStream只能进行读取操作,OutputStream只能进行写操作。而Channel是双向的,既可用来进行读操作,又可用来进行写操作。
Buffer(缓冲区),是NIO中非常重要的一个东西,在NIO中所有数据的读和写都离不开Buffer。在NIO中,读取的数据只能放在Buffer中。同样地,写入数据也是先写入到Buffer中。
Selector可以说它是NIO中最关键的一个部分,Selector的作用就是用来轮询每个注册的Channel,一旦发现Channel有注册的事件发生,便获取事件然后进行处理。
流与块
I/O 与 NIO 最重要的区别是数据打包和传输的方式,I/O 以流的方式处理数据,而 NIO 以块的方式处理数据。
面向流的 I/O 一次处理一个字节数据:一个输入流产生一个字节数据,一个输出流消费一个字节数据。为流式数据创建过滤器非常容易,链接几个过滤器,以便每个过滤器只负责复杂处理机制的一部分。不利的一面是,面向流的 I/O 通常相当慢。
面向块的 I/O 一次处理一个数据块,按块处理数据比按流处理数据要快得多。但是面向块的 I/O 缺少一些面向流的 I/O 所具有的优雅性和简单性。
I/O 包和 NIO 已经很好地集成了,java.io.* 已经以 NIO 为基础重新实现了,所以现在它可以利用 NIO 的一些特性。例如,java.io.* 包中的一些类包含以块的形式读写数据的方法,这使得即使在面向流的系统中,处理速度也会更快。
通道与缓冲区
1. 通道
通道 Channel 是对原 I/O 包中的流的模拟,可以通过它读取和写入数据。
通道与流的不同之处在于,流只能在一个方向上移动(一个流必须是 InputStream 或者 OutputStream 的子类),而通道是双向的,可以用于读、写或者同时用于读写。
通道包括以下类型:
- FileChannel:从文件中读写数据;
- DatagramChannel:通过 UDP 读写网络中数据;
- SocketChannel:通过 TCP 读写网络中数据;
- ServerSocketChannel:可以监听新进来的 TCP 连接,对每一个新进来的连接都会创建一个 SocketChannel。
2. 缓冲区
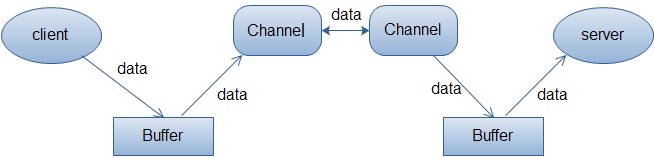
发送给一个通道的所有数据都必须首先放到缓冲区中,同样地,从通道中读取的任何数据都要先读到缓冲区中。也就是说,不会直接对通道进行读写数据,而是要先经过缓冲区,如下图所示:
缓冲区实质上是一个数组,但它不仅仅是一个数组。缓冲区提供了对数据的结构化访问,而且还可以跟踪系统的读/写进程。
缓冲区包括以下类型:
- ByteBuffer
- CharBuffer
- ShortBuffer
- IntBuffer
- LongBuffer
- FloatBuffer
- DoubleBuffer
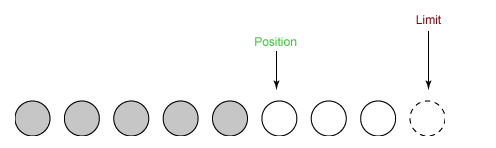
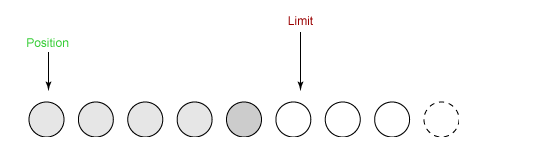
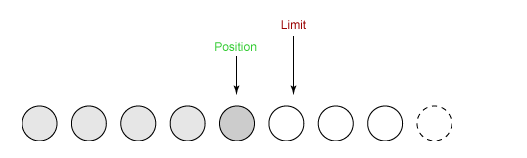
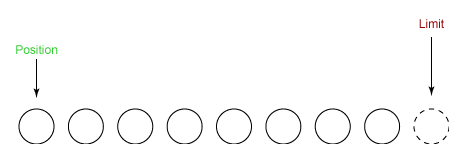
缓冲区状态变量
- capacity:最大容量;
- position:当前已经读写的字节数;
- limit:还可以读写的字节数。
状态变量的改变过程举例:
① 新建一个大小为 8 个字节的缓冲区,此时 position 为 0,而 limit = capacity = 8。capacity 变量不会改变,下面的讨论会忽略它。
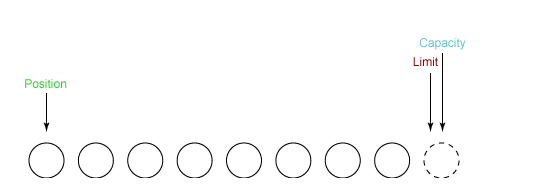
② 从输入通道中读取 5 个字节数据写入缓冲区中,此时 position 为 5,limit 保持不变。
③ 在将缓冲区的数据写到输出通道之前,需要先调用 flip() 方法,这个方法将 limit 设置为当前 position,并将 position 设置为 0。
④ 从缓冲区中取 4 个字节到输出缓冲中,此时 position 设为 4。
⑤ 最后需要调用 clear() 方法来清空缓冲区,此时 position 和 limit 都被设置为最初位置。
文件 NIO 实例
以下展示了使用 NIO 快速复制文件的实例:
public static void fastCopy(String src, String dist) throws IOException {/* 获得源文件的输入字节流 */FileInputStream fin = new FileInputStream(src);/* 获取输入字节流的文件通道 */FileChannel fcin = fin.getChannel();/* 获取目标文件的输出字节流 */FileOutputStream fout = new FileOutputStream(dist);/* 获取输出字节流的文件通道 */FileChannel fcout = fout.getChannel();/* 为缓冲区分配 1024 个字节 */ByteBuffer buffer = ByteBuffer.allocateDirect(1024);while (true) {/* 从输入通道中读取数据到缓冲区中 */int r = fcin.read(buffer);/* read() 返回 -1 表示 EOF */if (r == -1) {break;}/* 切换读写 */buffer.flip();/* 把缓冲区的内容写入输出文件中 */fcout.write(buffer);/* 清空缓冲区 */buffer.clear();}}
选择器
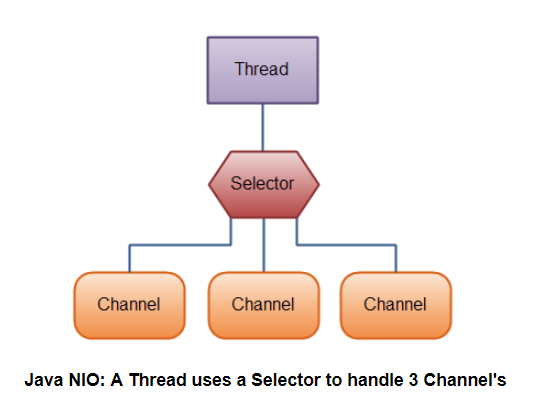
NIO 常常被叫做非阻塞 IO,主要是因为 NIO 在网络通信中的非阻塞特性被广泛使用。
NIO 实现了 IO 多路复用中的 Reactor 模型,一个线程 Thread 使用一个选择器 Selector 通过轮询的方式去监听多个通道 Channel 上的事件,从而让一个线程就可以处理多个事件。
通过配置监听的通道 Channel 为非阻塞,那么当 Channel 上的 IO 事件还未到达时,就不会进入阻塞状态一直等待,而是继续轮询其它 Channel,找到 IO 事件已经到达的 Channel 执行。
因为创建和切换线程的开销很大,因此使用一个线程来处理多个事件而不是一个线程处理一个事件,对于 IO 密集型的应用具有很好地性能。
应该注意的是,只有套接字 Channel 才能配置为非阻塞,而 FileChannel 不能,为 FileChannel 配置非阻塞也没有意义。
用单线程处理一个Selector,然后通过Selector.select()方法来获取到达事件,在获取了到达事件之后,就可以逐个地对这些事件进行响应处理:
1. 创建选择器
Selector selector = Selector.open();
2. 将通道注册到选择器上
ServerSocketChannel ssChannel = ServerSocketChannel.open();ssChannel.configureBlocking(false);ssChannel.register(selector, SelectionKey.OP_ACCEPT);
通道必须配置为非阻塞模式,否则使用选择器就没有任何意义了,因为如果通道在某个事件上被阻塞,那么服务器就不能响应其它事件,必须等待这个事件处理完毕才能去处理其它事件,显然这和选择器的作用背道而驰。
在将通道注册到选择器上时,还需要指定要注册的具体事件,主要有以下几类:
- SelectionKey.OP_CONNECT
- SelectionKey.OP_ACCEPT
- SelectionKey.OP_READ
- SelectionKey.OP_WRITE
它们在 SelectionKey 的定义如下:
public static final int OP_READ = 1 << 0;public static final int OP_WRITE = 1 << 2;public static final int OP_CONNECT = 1 << 3;public static final int OP_ACCEPT = 1 << 4;
可以看出每个事件可以被当成一个位域,从而组成事件集整数。例如:
int interestSet = SelectionKey.OP_READ | SelectionKey.OP_WRITE;
3. 监听事件
int num = selector.select();
使用 select() 来监听到达的事件,它会一直阻塞直到有至少一个事件到达。
4. 获取到达的事件
Set<SelectionKey> keys = selector.selectedKeys();Iterator<SelectionKey> keyIterator = keys.iterator();while (keyIterator.hasNext()) {SelectionKey key = keyIterator.next();if (key.isAcceptable()) {// ...} else if (key.isReadable()) {// ...}keyIterator.remove();}
5. 事件循环
因为一次 select() 调用不能处理完所有的事件,并且服务器端有可能需要一直监听事件,因此服务器端处理事件的代码一般会放在一个死循环内。
while (true) {int num = selector.select();Set<SelectionKey> keys = selector.selectedKeys();Iterator<SelectionKey> keyIterator = keys.iterator();while (keyIterator.hasNext()) {SelectionKey key = keyIterator.next();if (key.isAcceptable()) {// ...} else if (key.isReadable()) {// ...}keyIterator.remove();}}
套接字 NIO 实例
public class NIOServer {public static void main(String[] args) throws IOException {Selector selector = Selector.open();ServerSocketChannel ssChannel = ServerSocketChannel.open();ssChannel.configureBlocking(false);ssChannel.register(selector, SelectionKey.OP_ACCEPT);ServerSocket serverSocket = ssChannel.socket();InetSocketAddress address = new InetSocketAddress("127.0.0.1", 8888);serverSocket.bind(address);while (true) {selector.select();Set<SelectionKey> keys = selector.selectedKeys();Iterator<SelectionKey> keyIterator = keys.iterator();while (keyIterator.hasNext()) {SelectionKey key = keyIterator.next();if (key.isAcceptable()) {ServerSocketChannel ssChannel1 = (ServerSocketChannel) key.channel();// 服务器会为每个新连接创建一个 SocketChannelSocketChannel sChannel = ssChannel1.accept();sChannel.configureBlocking(false);// 这个新连接主要用于从客户端读取数据sChannel.register(selector, SelectionKey.OP_READ);} else if (key.isReadable()) {SocketChannel sChannel = (SocketChannel) key.channel();System.out.println(readDataFromSocketChannel(sChannel));sChannel.close();}keyIterator.remove();}}}private static String readDataFromSocketChannel(SocketChannel sChannel) throws IOException {ByteBuffer buffer = ByteBuffer.allocate(1024);StringBuilder data = new StringBuilder();while (true) {buffer.clear();int n = sChannel.read(buffer);if (n == -1) {break;}buffer.flip();int limit = buffer.limit();char[] dst = new char[limit];for (int i = 0; i < limit; i++) {dst[i] = (char) buffer.get(i);}data.append(dst);buffer.clear();}return data.toString();}}
public class NIOClient {public static void main(String[] args) throws IOException {Socket socket = new Socket("127.0.0.1", 8888);OutputStream out = socket.getOutputStream();String s = "hello world";out.write(s.getBytes());out.close();}}
内存映射文件
内存映射文件 I/O 是一种读和写文件数据的方法,它可以比常规的基于流或者基于通道的 I/O 快得多。
向内存映射文件写入可能是危险的,只是改变数组的单个元素这样的简单操作,就可能会直接修改磁盘上的文件。修改数据与将数据保存到磁盘是没有分开的。
下面代码行将文件的前 1024 个字节映射到内存中,map() 方法返回一个 MappedByteBuffer,它是 ByteBuffer 的子类。因此,可以像使用其他任何 ByteBuffer 一样使用新映射的缓冲区,操作系统会在需要时负责执行映射。
MappedByteBuffer mbb = fc.map(FileChannel.MapMode.READ_WRITE, 0, 1024);
对比
NIO 与普通 I/O 的区别主要有以下两点:
- NIO 是非阻塞的;
- NIO 面向块,I/O 面向流。
