@pastqing
2016-04-25T12:22:41.000000Z
字数 13918
阅读 5801
java设计模式——代理模式
java 设计模式
一、代理模式定义
Wiki上是这样描述代理模式的:所谓代理者是指一个类可以作为其他东西的接口。代理者可以作任何东西的接口, 例如网络连接, 存储器中的大对象,文件或者其他无法复制的资源。
著名的代理模式的例子就是引用计数(reference counting): 当需要一个复杂对象的多份副本时, 代理模式可以结合享元模式以减少存储器的用量。典型做法是创建一个复杂对象以及多个代理者, 每个代理者会引用到原本的对象。而作用在代理者的运算会转送到原本对象。一旦所有的代理者都不存在时, 复杂对象会被移除。
二、静态代理
所谓静态代理, 就是在编译阶段就生成代理类来完成对代理对象的一系列操作。下面是代理模式的结构类图:
1、代理模式的参与者
代理模式的角色分四种:
- 主题接口: 即代理类的所实现的行为接口。
- 目标对象: 也就是被代理的对象。
- 代理对象: 用来封装真是主题类的代理类
- 客户端
下面是代理模式的类图结构:
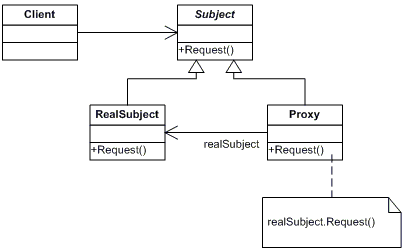
2、代理模式的实现思路
- 代理对象和目标对象均实现同一个行为接口。
- 代理类和目标类分别具体实现接口逻辑。
- 在代理类的构造函数中实例化一个目标对象。
- 在代理类中调用目标对象的行为接口。
- 客户端想要调用目标对象的行为接口,只能通过代理类来操作。
3、静态代理的实例
下面以一个延迟加载的例子来说明一下静态代理。我们在启动某个服务系统时, 加载某一个类时可能会耗费很长时间。为了获取更好的性能, 在启动系统的时候, 我们往往不去初始化这个复杂的类, 取而代之的是去初始化其代理类。这样将耗费资源多的方法使用代理进行分离, 可以加快系统的启动速度, 减少用户等待的时间。
- 定义一个主题接口
public interface Subject {public void sayHello();public void sayGoodBye();}
- 定义一个目标类, 并实现主题接口
public class RealSubject implements Subject {public void sayHello() {System.out.println("Hello World");}public void sayGoodBye() {System.out.println("GoodBye World");}}
- 定义一个代理类, 来代理目标对象。
public class StaticProxy implements Subject {Private RealSubject realSubject = null;public StaticProxy() {}public void sayHello() {//用到时候才加载, 懒加载if(realSubject == null) {realSubject = new RealSubject();}realSubject.sayHello();}//sayGoodbye方法同理...}
- 定义一个客户端
public class Client {public static void main(String [] args) {StaticProxy sp = new StaticProxy();sp.sayHello();sp.sayGoodBye();}}
以上就是静态代理的一个简单测试例子。感觉可能没有实际用途。然而并非如此。使用代理我们还可以将目标对象的方法进行改造, 比如数据库连接池中创建了一系列连接, 为了保证不频繁的打开连接,这些连接是几乎不会关闭的。然而我们编程总有习惯去将打开的Connection去close。 这样我们就可以利用代理模式来重新代理Connection接口中的close方法, 改变为回收到数据库连接池中而不是真正的执行Connection#close方法。其他的例子还有很多, 具体需要自己体会。
三、动态代理
动态代理是指在运行时动态生成代理类。即,代理类的字节码将在运行时生成并载入当前代理的 ClassLoader。与静态处理类相比,动态类有诸多好处。
- 不需要为真实主题写一个形式上完全一样的封装类,假如主题接口中的方法很多,为每一个接口写一个代理方法也很麻烦。如果接口有变动,则真实主题和代理类都要修改,不利于系统维护;
- 使用一些动态代理的生成方法甚至可以在运行时制定代理类的执行逻辑,从而大大提升系统的灵活性。
生成动态代理的方法有很多: JDK中自带动态代理, CGlib, javassist等。这些方法各有优缺点。本文主要探究JDK中的动态代理的使用和源码分析。
下面用一个实例讲解一下JDK中动态代理的用法:
public class dynamicProxy implements InvocationHandler {private RealSubject = null;public Object invoke(Object proxy, Method method, Object[] args){if(RealSubject == null) {RealSubject = new RealSubject();}method.invoke(RealSubject, args);return RealSubject;}}
客户端代码实例
public class Client {public static void main(Strings[] args) {Subject subject = (Subject)Proxy.newInstance(ClassLoader.getSystemLoader(), RealSubject.class.getInterfaces(), new DynamicProxy());Subject.sayHello();Subject.sayGoodBye();}}
从上面的代码可以看出, 要利用JDK中的动态代理。利用静态方法Proxy.newInstance(ClassLoader, Interfaces[], InvokeHandler)可以创建一个动态代理类。 newInstance方法有三个参数, 分别表示类加载器, 一个希望该代理类实现的接口列表, 以及实现InvokeHandler接口的实例。 动态代理将每个方法的执行过程则交给了Invoke方法处理。
JDK动态代理要求, 被代理的必须是个接口, 单纯的类则不行。JDK动态代理所生成的代理类都会继承Proxy类,同时代理类会实现所有你传入的接口列表。因此可以强制类型转换成接口类型。 下面是Proxy的结构图。
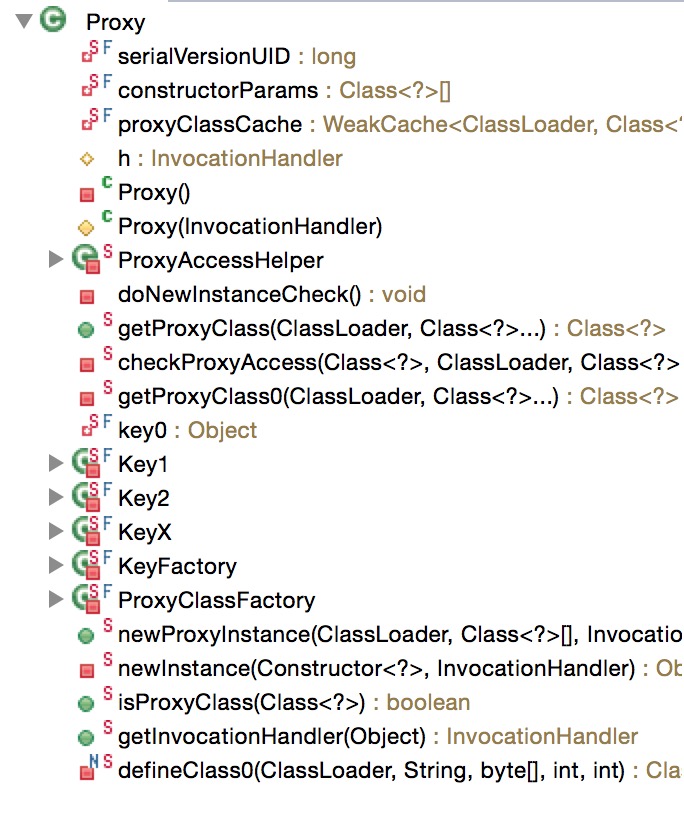
可以看出Proxy全是静态方法, 因此如果代理类没有实现任何接口, 那么他就是Proxy类型, 没有实例方法。
当然加入你要是非要代理一个没有实现某个接口的类, 同时该类的方法与其他接口定义的方法相同, 利用反射也是可以轻松实现的。
public class DynamicProxy implements InvokeHandler {//你想代理的类private TargetClass targetClass = null;//初始化该类public DynamicProxy(TargetClass targetClass) {this.targetClass = targetClass;}public Object invoke(Object proxy, Method method, Object[] args) {//利用反射获取你想代理的类的方法Method myMethod = targetClass.getClass().getDeclaredMethod(method.getName(), method.getParameterTypes());myMethod.setAccessible(true);return myMethod.invoke(targetClass, args);}}
四、JDK动态代理源码分析(JDK7)
看了上面的例子, 我们只是简单会用动态代理。但是对于代理类是如何创建出来的, 是谁调用Invoke方法等还云里雾里。下面通过分析
1、代理对象是如何创建出来的?
首先看Proxy.newInstance方法的源码:
public static Object newProxyInstance(ClassLoader loader, Class<?>[] interfaces, InvocationHandler h) throws IllegalArgumentException {}//获取接口信息final Class<?>[] intfs = interfaces.clone();final SecurityManager sm = System.getSecurityManager();if (sm != null) {checkProxyAccess(Reflection.getCallerClass(), loader, intfs);}//生成代理类Class<?> cl = getProxyClass0(loader, intfs);// ...OK我们先看前半截}
从源码看出代理类的生成是依靠getProxyClass0这个方法, 接下来看getProxyClass0源码:
private static Class<?> getProxyClass0(ClassLoader loader, Class<?>... interfaces) {//接口列表数目不能超过0xFFFFif (interfaces.length > 65535) {throw new IllegalArgumentException("interface limit exceeded");}//注意这里, 下面详细解释return proxyClassCache.get(loader, interfaces);}
对proxyClassCache.get的解释是: 如果实现接口列表的代理类已经存在,那么直接从cache中拿。如果不存在, 则通过ProxyClassFactory生成一个。
在看proxyClassCache.get源码之前,先简单了解一下proxyClassCache:
private static final WeakCache<ClassLoader, Class<?>[], Class<?>>proxyClassCache = new WeakCache<>(new KeyFactory(), new ProxyClassFactory());
proxyClassCache是一个WeakCache类型的缓存, 它的构造函数有两个参数, 其中一个就是用于生成代理类的ProxyClassFactory, 下面是proxyClassCache.get的源码:
final class WeakCache<K, P, V> {...public V get(K key, P parameter) {}}
这里K表示key, P表示parameters, V表示value
public V get(K key, P parameter) {//java7 NullObject判断方法, 如果parameter为空则抛出带有指定消息的异常。 如果不为空则返回。Objects.requireNonNull(parameter);//清理持有弱引用的WeakHashMap这种数据结构,一般用于缓存expungeStaleEntries();//从队列中获取cacheKeyObject cacheKey = CacheKey.valueOf(key, refQueue);//利用懒加载的方式填充Supplier, Concurrent是一种线程安全的mapConcurrentMap<Object, Supplier<V>> valuesMap = map.get(cacheKey);if (valuesMap == null) {ConcurrentMap<Object, Supplier<V>> oldValuesMap = map.putIfAbsent(cacheKey, valuesMap = new ConcurrentHashMap<>());if (oldValuesMap != null) {valuesMap = oldValuesMap;}}// create subKey and retrieve the possible Supplier<V> stored by that// subKey from valuesMapObject subKey = Objects.requireNonNull(subKeyFactory.apply(key, parameter));Supplier<V> supplier = valuesMap.get(subKey);Factory factory = null;while (true) {if (supplier != null) {// 从supplier中获取Value,这个Value可能是一个工厂或者Cache的实//下面这三句代码是核心代码, 返回实现InvokeHandler的类并包含了所需要的信息。V value = supplier.get();if (value != null) {return value;}}// else no supplier in cache// or a supplier that returned null (could be a cleared CacheValue// or a Factory that wasn't successful in installing the CacheValue)//下面这个过程就是填充supplier的过程if(factory == null) {//创建一个factory}if(supplier == null) {//填充supplier}else {//填充supplier}}
while循环的作用就是不停的获取实现InvokeHandler的类, 这个类可以是从缓存中拿到,也可是是从proxyFactoryClass生成的。
Factory是一个实现了Supplier<V>接口的内部类。这个类覆盖了get方法, 在get方法中调用了类型为proxyFactoryClass的实例方法apply。这个方法才是真正创建代理类的方法。下面看ProxyFactoryClass#apply方法的源码:
public Class<?> apply(ClassLoader loader, Class<?>[] interfaces) {Map<Class<?>, Boolean> interfaceSet = new IdentityHashMap<>(interfaces.length);for (Class<?> intf : interfaces) {/* Verify that the class loader resolves the name of this interface to the same Class object.*/Class<?> interfaceClass = null;try {//加载每一个接口运行时的信息interfaceClass = Class.forName(intf.getName(), false, loader);} catch (ClassNotFoundException e) {}//如果使用你自己的classload加载的class与你传入的class不相等,抛出异常if (interfaceClass != intf) {throw new IllegalArgumentException(intf + " is not visible from class loader");}//如果传入不是一个接口类型if (!interfaceClass.isInterface()) {throw new IllegalArgumentException(interfaceClass.getName() + " is not an interface");}//验证接口是否重复if (interfaceSet.put(interfaceClass, Boolean.TRUE) != null) {throw new IllegalArgumentException("repeated interface: " + interfaceClass.getName());}}String proxyPkg = null; // package to define proxy class in/* Record the package of a non-public proxy interface so that the proxy class will be defined in the same package.* Verify that all non-public proxy interfaces are in the same package.*///这一段是看你传入的接口中有没有不是public的接口,如果有,这些接口必须全部在一个包里定义的,否则抛异常for (Class<?> intf : interfaces) {int flags = intf.getModifiers();if (!Modifier.isPublic(flags)) {String name = intf.getName();int n = name.lastIndexOf('.');String pkg = ((n == -1) ? "" : name.substring(0, n + 1));if (proxyPkg == null) {proxyPkg = pkg;} else if (!pkg.equals(proxyPkg)) {throw new IllegalArgumentException("non-public interfaces from different packages");}}}if (proxyPkg == null) {// if no non-public proxy interfaces, use com.sun.proxy packageproxyPkg = ReflectUtil.PROXY_PACKAGE + ".";}/** Choose a name for the proxy class to generate.*/long num = nextUniqueNumber.getAndIncrement();//生成随机代理类的类名, $Proxy + numString proxyName = proxyPkg + proxyClassNamePrefix + num;/** 生成代理类的class文件, 返回字节流*/byte[] proxyClassFile = ProxyGenerator.generateProxyClass(proxyName, interfaces);try {return defineClass0(loader, proxyName, proxyClassFile, 0, proxyClassFile.length);} catch (ClassFormatError e) {//结束throw new IllegalArgumentException(e.toString());}}}
前文提到ProxyFactoryClass#apply是真正生成代理类的方法, 这其实是不准确的。源代码读到这里,我们会发现ProxyGenerator#generateProxyClass才是真正生成代理类的方法。根据Java class字节码组成(可以参见我的另一篇文章Java字节码学习笔记)来生成相应的Clss文件。具体ProxyGenerator#generateProxyClass源码如下:
private byte[] generateClassFile() {/** Step 1: Assemble ProxyMethod objects for all methods to* generate proxy dispatching code for.*///addProxyMethod方法,就是将方法都加入到一个列表中,并与对应的class对应起来//这里给Object对应了三个方法hashCode,toString和equalsaddProxyMethod(hashCodeMethod, Object.class);addProxyMethod(equalsMethod, Object.class);addProxyMethod(toStringMethod, Object.class);//将接口列表中的接口与接口下的方法对应起来for (int i = 0; i < interfaces.length; i++) {Method[] methods = interfaces[i].getMethods();for (int j = 0; j < methods.length; j++) {addProxyMethod(methods[j], interfaces[i]);}}/** For each set of proxy methods with the same signature,* verify that the methods' return types are compatible.*/for (List<ProxyMethod> sigmethods : proxyMethods.values()) {checkReturnTypes(sigmethods);}/** Step 2: Assemble FieldInfo and MethodInfo structs for all of* fields and methods in the class we are generating.*///方法中加入构造方法,这个构造方法只有一个,就是一个带有InvocationHandler接口的构造方法//这个才是真正给class文件,也就是代理类加入方法了,不过还没真正处理,只是先加进来等待循环,构造方法在class文件中的名称描述是<init>try {methods.add(generateConstructor());for (List<ProxyMethod> sigmethods : proxyMethods.values()) {for (ProxyMethod pm : sigmethods) {//给每一个代理方法加一个Method类型的属性,数字10是class文件的标识符,代表这些属性都是private static的fields.add(new FieldInfo(pm.methodFieldName,"Ljava/lang/reflect/Method;",ACC_PRIVATE | ACC_STATIC));//将每一个代理方法都加到代理类的方法中methods.add(pm.generateMethod());}}//加入一个静态初始化块,将每一个属性都初始化,这里静态代码块也叫类构造方法,其实就是名称为<clinit>的方法,所以加到方法列表methods.add(generateStaticInitializer());} catch (IOException e) {throw new InternalError("unexpected I/O Exception");}//方法和属性个数都不能超过65535,包括之前的接口个数也是这样,//这是因为在class文件中,这些个数都是用4位16进制表示的,所以最大值是2的16次方-1if (methods.size() > 65535) {throw new IllegalArgumentException("method limit exceeded");}if (fields.size() > 65535) {throw new IllegalArgumentException("field limit exceeded");}//接下来就是写class文件的过程, 包括魔数, 类名,常量池等一系列字节码的组成,就不一一细说了。需要的可以参考JVM虚拟机字节码的相关知识。cp.getClass(dotToSlash(className));cp.getClass(superclassName);for (int i = 0; i < interfaces.length; i++) {cp.getClass(dotToSlash(interfaces[i].getName()));}cp.setReadOnly();ByteArrayOutputStream bout = new ByteArrayOutputStream();DataOutputStream dout = new DataOutputStream(bout);try {// u4 magic;dout.writeInt(0xCAFEBABE);// u2 minor_version;dout.writeShort(CLASSFILE_MINOR_VERSION);// u2 major_version;dout.writeShort(CLASSFILE_MAJOR_VERSION);cp.write(dout); // (write constant pool)// u2 access_flags;dout.writeShort(ACC_PUBLIC | ACC_FINAL | ACC_SUPER);// u2 this_class;dout.writeShort(cp.getClass(dotToSlash(className)));// u2 super_class;dout.writeShort(cp.getClass(superclassName));// u2 interfaces_count;dout.writeShort(interfaces.length);// u2 interfaces[interfaces_count];for (int i = 0; i < interfaces.length; i++) {dout.writeShort(cp.getClass(dotToSlash(interfaces[i].getName())));}// u2 fields_count;dout.writeShort(fields.size());// field_info fields[fields_count];for (FieldInfo f : fields) {f.write(dout);}// u2 methods_count;dout.writeShort(methods.size());// method_info methods[methods_count];for (MethodInfo m : methods) {m.write(dout);}// u2 attributes_count;dout.writeShort(0); // (no ClassFile attributes for proxy classes)} catch (IOException e) {throw new InternalError("unexpected I/O Exception");}return bout.toByteArray();}
经过层层调用, 一个代理类终于生成了。
2、是谁调用了Invoke?
我们模拟JDK自己生成一个代理类, 类名为TestProxyGen:
public class TestGeneratorProxy {public static void main(String[] args) throws IOException {byte[] classFile = ProxyGenerator.generateProxyClass("TestProxyGen", Subject.class.getInterfaces());File file = new File("/Users/yadoao/Desktop/TestProxyGen.class");FileOutputStream fos = new FileOutputStream(file);fos.write(classFile);fos.flush();fos.close();}}
用JD-GUI反编译该class文件, 结果如下:
import com.su.dynamicProxy.ISubject;import java.lang.reflect.InvocationHandler;import java.lang.reflect.Method;import java.lang.reflect.Proxy;import java.lang.reflect.UndeclaredThrowableException;public final class TestProxyGen extends Proxyimplements ISubject{private static Method m3;private static Method m1;private static Method m0;private static Method m4;private static Method m2;public TestProxyGen(InvocationHandler paramInvocationHandler)throws{super(paramInvocationHandler);}public final void sayHello()throws{try{this.h.invoke(this, m3, null);return;}catch (Error|RuntimeException localError){throw localError;}catch (Throwable localThrowable){throw new UndeclaredThrowableException(localThrowable);}}public final boolean equals(Object paramObject)throws{try{return ((Boolean)this.h.invoke(this, m1, new Object[] { paramObject })).booleanValue();}catch (Error|RuntimeException localError){throw localError;}catch (Throwable localThrowable){throw new UndeclaredThrowableException(localThrowable);}}public final int hashCode()throws{try{return ((Integer)this.h.invoke(this, m0, null)).intValue();}catch (Error|RuntimeException localError){throw localError;}catch (Throwable localThrowable){throw new UndeclaredThrowableException(localThrowable);}}public final void sayGoodBye()throws{try{this.h.invoke(this, m4, null);return;}catch (Error|RuntimeException localError){throw localError;}catch (Throwable localThrowable){throw new UndeclaredThrowableException(localThrowable);}}public final String toString()throws{try{return (String)this.h.invoke(this, m2, null);}catch (Error|RuntimeException localError){throw localError;}catch (Throwable localThrowable){throw new UndeclaredThrowableException(localThrowable);}}static{try{m3 = Class.forName("com.su.dynamicProxy.ISubject").getMethod("sayHello", new Class[0]);m1 = Class.forName("java.lang.Object").getMethod("equals", new Class[] { Class.forName("java.lang.Object") });m0 = Class.forName("java.lang.Object").getMethod("hashCode", new Class[0]);m4 = Class.forName("com.su.dynamicProxy.ISubject").getMethod("sayGoodBye", new Class[0]);m2 = Class.forName("java.lang.Object").getMethod("toString", new Class[0]);return;}catch (NoSuchMethodException localNoSuchMethodException){throw new NoSuchMethodError(localNoSuchMethodException.getMessage());}catch (ClassNotFoundException localClassNotFoundException){throw new NoClassDefFoundError(localClassNotFoundException.getMessage());}}}
- 首先注意到生成代理类的构造函数, 它传入一个实现
InvokeHandler接口的类作为参数, 并调用父类Proxy的构造器, 即将Proxy中的成员变量protected InvokeHander h进行了初始化。 - 再次注意到几个静态的初始化块, 这里的静态初始化块就是对代理的接口列表以及
hashcode,toString,equals方法进行初始化。 - 最后就是这几个方法的调用过程, 全都是回调
Invoke方法。
就此代理模式分析到此结束。
