@universal
2018-05-30T10:48:56.000000Z
字数 9529
阅读 325
RecycleBin/Recycler的回收机制(上)
view
众所周知,RecycleBin是Listview,Recycler是RecyclerView的回收机制,而这个机制也正是列表view加载大量数据不会发生OOM的核心所在。
这里为什么想要对这两个机制作对比呢?因为前不久看到一个问题,我们现在可能开发大多数场景都会使用RecyclerView来实现复杂好看的UI,毕竟RecyclerView的拓展性好太多。那么既然RecyclerView都已经这样了,为什么谷歌还不舍弃ListView呢?既然表象已经被超越了,那么就看内在,总会有那么一丢丢的闪光点。
RecycleBin
我们知道,ListView继承自AbsListView。而RecycleBin是AbsListView的一个内部类,代码也很短。先来看看官方解释:
/*** The RecycleBin facilitates reuse of views across layouts. The RecycleBin has two levels of* storage: ActiveViews and ScrapViews. ActiveViews are those views which were onscreen at the* start of a layout. By construction, they are displaying current information. At the end of* layout, all views in ActiveViews are demoted to ScrapViews. ScrapViews are old views that* could potentially be used by the adapter to avoid allocating views unnecessarily.*/
大意就是: RecycleBin用于view重用,里面的views有两个级别分为ActiveViews和ScrapViews,前者就是屏幕上正在显示的view,后者存储废弃的view(比如说滑出屏幕)。
具体看看recyclerbin中的属性
class RecycleBin {private RecyclerListener mRecyclerListener;//The position of the first view stored in mActiveViews.private int mFirstActivePosition;/*** Views that were on screen at the start of layout. This array is populated at the start of* layout, and at the end of layout all view in mActiveViews are moved to mScrapViews.* Views in mActiveViews represent a contiguous range of Views, with position of the first* view store in mFirstActivePosition.*/private View[] mActiveViews = new View[0];/*** Unsorted views that can be used by the adapter as a convert view.*/private ArrayList<View>[] mScrapViews;private int mViewTypeCount;private ArrayList<View> mCurrentScrap;private ArrayList<View> mSkippedScrap;private SparseArray<View> mTransientStateViews;private LongSparseArray<View> mTransientStateViewsById;}
(1)RecyclerListener接口只有一个方法onMovedToScrapHeap(),表示某个view被回收到了scrap heap. 该view不再被显示,任何相关的昂贵资源应该被丢弃。该回调是处理回收时view中的资源释放,比如网络加载图片资源未完成,就可以再回调中停止加载。
(2)mActiveViews; 根据官方解释,该数组在布局view显示的时候会被填充,view废弃的时候会被移至mScrapViews。
(3)mScrapViews; 根据官方解释,该数组中的view可以被adapter拿来用作ConvertView,其实就是adapter中getView()方法中ConvertView参数的来源。注:这是个ArrayList型的数组,对应不同的ViewType。
(4)mSkippedScrap、mTransientStateViews和mTransientStateViewsById都是用来缓存具有TransientState的view。
这个Transient是view的一种状态,官方解释:
A view with transient state cannot be trivially rebound from an external data source, such as an adapter binding item views in a list.
This may be because the view is performing an animation, tracking user
selection of content, or similar.
也就是说,比如view如果正在执行某个动画,那么它就是不稳定状态,无法被重新绑定数据。
mTransientStateViews通过item的位置找到view,mTransientStateViewsById通过item的id找到view,如果都不符合则放入skippedScrap,有待回收。具体的逻辑如下:在addScrapView()中
final boolean scrapHasTransientState = scrap.hasTransientState();if (scrapHasTransientState) {if (mAdapter != null && mAdapterHasStableIds) {//Adapter对一个对象产生唯一的id// If the adapter has stable IDs, we can reuse the view for// the same data.if (mTransientStateViewsById == null) {mTransientStateViewsById = new LongSparseArray<View>();}mTransientStateViewsById.put(lp.itemId, scrap);} else if (!mDataChanged) {//数据没变,添加到position->view容器中// If the data hasn't changed, we can reuse the views at// their old positions.if (mTransientStateViews == null) {mTransientStateViews = new SparseArray<View>();}mTransientStateViews.put(position, scrap);} else {// 否则将其放入skippedScrap,有待回收if (mSkippedScrap == null) {mSkippedScrap = new ArrayList<View>();}mSkippedScrap.add(scrap);}} else {//真正执行回收操作if (mViewTypeCount == 1) {mCurrentScrap.add(scrap);} else {mScrapViews[viewType].add(scrap);}//调用RecyclerListener的onMoveToScrapHeap函数,执行当前view已经被回收。if (mRecyclerListener != null) {mRecyclerListener.onMovedToScrapHeap(scrap);}}
下面就看看RecycleBin是如何被使用的
从listview的layout开始
//由父类的onLayout调用@Overrideprotected void layoutChildren() {.......// Pull all children into the RecycleBin.// These views will be reused if possiblefinal int firstPosition = mFirstPosition;final RecycleBin recycleBin = mRecycler;if (dataChanged) {//如果数据发生了改变,则将view都回收mScrapViews中for (int i = 0; i < childCount; i++) {recycleBin.addScrapView(getChildAt(i), firstPosition+i);}} else {//否则就将view全部放入mActiveViews中recycleBin.fillActiveViews(childCount, firstPosition);}// 解绑所有的子view,防止创建两次detachAllViewsFromParent();recycleBin.removeSkippedScrap();.......//将所有保留在mActiveViews中的视图移动到mScrapViews。recycleBin.scrapActiveViews();}
listview的layout的后续过程就不详细分析了,可以直接看下面的图,下图是以listview第一次layout为例,后面的layout就是判断条件会发生变化,但是逻辑流程还是差不多,下面会给出相关的源码解释。
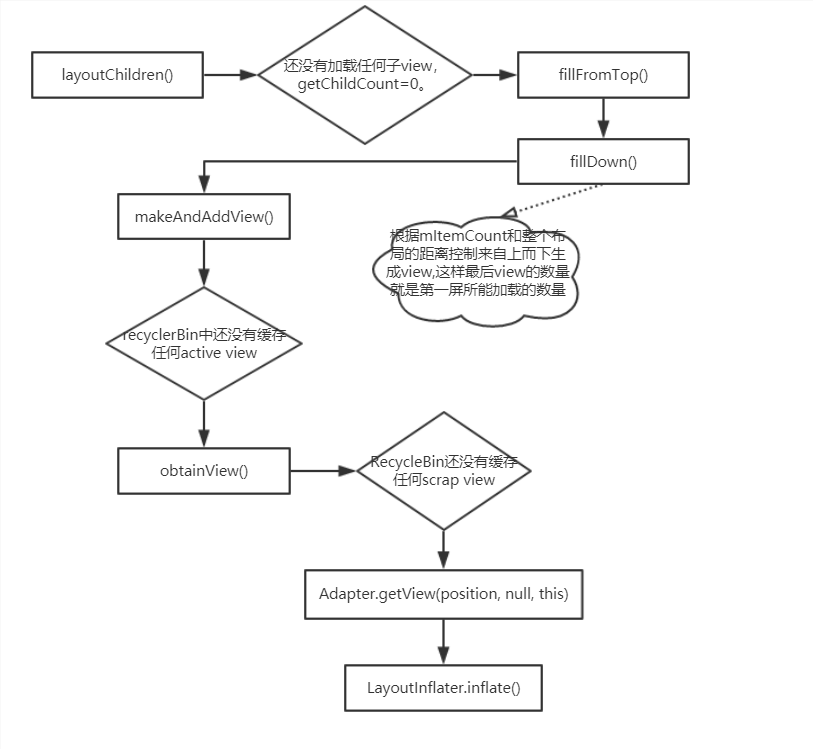
图1
来具体看看listview是如何利用有限数量的view加载更多的item
listView对滑动监听的实现是在父类AbListView中,主要是对move事件的处理
@Overridepublic boolean onTouchEvent(MotionEvent ev) {.....case MotionEvent.ACTION_MOVE: {onTouchMove(ev, vtev);break;}.....}private void onTouchMove(MotionEvent ev, MotionEvent vtev) {.....case TOUCH_MODE_SCROLL:case TOUCH_MODE_OVERSCROLL:scrollIfNeeded((int) ev.getX(pointerIndex), y, vtev);break;.....}private void scrollIfNeeded(int x, int y, MotionEvent vtev) {.....if (mTouchMode == TOUCH_MODE_SCROLL) {if (incrementalDeltaY != 0) {atEdge = trackMotionScroll(deltaY, incrementalDeltaY);}}.....}
抽丝剥茧下来,其实最重要的就是trackMotionScroll()方法,手指在屏幕上的滑动都会调用这个方法。
//Track a motion scroll//incrementalDeltaY则表示据上次触发event事件手指在Y方向上位置的改变量,incrementalDeltaY小于0,说明是向下滑动,否则就是向上滑动boolean trackMotionScroll(int deltaY, int incrementalDeltaY) {......if (down) {//向下滑int top = -incrementalDeltaY;if ((mGroupFlags & CLIP_TO_PADDING_MASK) == CLIP_TO_PADDING_MASK) {top += listPadding.top;}for (int i = 0; i < childCount; i++) {final View child = getChildAt(i);if (child.getBottom() >= top) {break;} else {count++;int position = firstPosition + i;if (position >= headerViewsCount && position < footerViewsStart) {// The view will be rebound to new data, clear any// system-managed transient state.child.clearAccessibilityFocus();mRecycler.addScrapView(child, position);}}}} else {//向上滑int bottom = getHeight() - incrementalDeltaY;if ((mGroupFlags & CLIP_TO_PADDING_MASK) == CLIP_TO_PADDING_MASK) {bottom -= listPadding.bottom;}for (int i = childCount - 1; i >= 0; i--) {final View child = getChildAt(i);if (child.getTop() <= bottom) {break;} else {start = i;count++;int position = firstPosition + i;if (position >= headerViewsCount && position < footerViewsStart) {// The view will be rebound to new data, clear any// system-managed transient state.child.clearAccessibilityFocus();mRecycler.addScrapView(child, position);}}}}if (count > 0) {detachViewsFromParent(start, count);mRecycler.removeSkippedScrap();}//使所有的子View都按照传入的参数值进行相应的偏移,实现滚动效果offsetChildrenTopAndBottom(incrementalDeltaY);final int absIncrementalDeltaY = Math.abs(incrementalDeltaY);if (spaceAbove < absIncrementalDeltaY || spaceBelow < absIncrementalDeltaY) {fillGap(down);}.....}
方法的核心其实都在这个down块中,根据滑动的方向和view的位置,将对应的滑出屏幕的view回收到srapViews中,并且detachView。然后如果ListView中最后一个View的底部已经移入了屏幕,或者ListView中第一个View的顶部移入了屏幕,就会调用fillGap()方法去加载屏幕外数据。fillGap的具体实现是在ListView中。
@Overridevoid fillGap(boolean down) {final int count = getChildCount();if (down) {.....fillDown(mFirstPosition + count, startOffset);correctTooHigh(getChildCount());} else {.....fillUp(mFirstPosition - 1, startOffset);correctTooLow(getChildCount());}}
代码逻辑很简单,根据滑动方向,调用fillDown或者fillUp方法去填充listview,fillDown和fillUp逻辑类似,只是填充时候的方向不同。
private View fillDown(int pos, int nextTop) {View selectedView = null;int end = (mBottom - mTop);if ((mGroupFlags & CLIP_TO_PADDING_MASK) == CLIP_TO_PADDING_MASK) {end -= mListPadding.bottom;}while (nextTop < end && pos < mItemCount) {// is this the selected item?boolean selected = pos == mSelectedPosition;View child = makeAndAddView(pos, nextTop, true, mListPadding.left, selected);nextTop = child.getBottom() + mDividerHeight;if (selected) {selectedView = child;}pos++;}setVisibleRangeHint(mFirstPosition, mFirstPosition + getChildCount() - 1);return selectedView;}
还是图1的逻辑,调用makeAndAddView()
private View makeAndAddView(int position, int y, boolean flow, int childrenLeft,boolean selected) {if (!mDataChanged) {// Try to use an existing view for this position.final View activeView = mRecycler.getActiveView(position);if (activeView != null) {// Found it. We're reusing an existing child, so it just needs// to be positioned like a scrap view.setupChild(activeView, position, y, flow, childrenLeft, selected, true);return activeView;}}// Make a new view for this position, or convert an unused view if// possible.final View child = obtainView(position, mIsScrap);// This needs to be positioned and measured.setupChild(child, position, y, flow, childrenLeft, selected, mIsScrap[0]);return child;}
因为在第二次layout的时候,我们已经用过存储的activeviews,而activeView是不能被重复利用的,所以这里activeView还是null。
进入到obtainView中
View obtainView(int position, boolean[] outMetadata) {// Check whether we have a transient state view. Attempt to re-bind the// data and discard the view if we fail.final View transientView = mRecycler.getTransientStateView(position);if (transientView != null) {// If the view type hasn't changed, attempt to re-bind the data.if (params.viewType == mAdapter.getItemViewType(position)) {final View updatedView = mAdapter.getView(position, transientView, this);//数据重新绑定失败,废弃更新的view放入scrap中if (updatedView != transientView) {setItemViewLayoutParams(updatedView, position);mRecycler.addScrapView(updatedView, position);}}return transientView;}final View scrapView = mRecycler.getScrapView(position);//第一次layout的时候为nullfinal View child = mAdapter.getView(position, scrapView, this);.....return child;}
这里先去判断当前position的view是否具有transient状态,若没有再去获取scrapView。
两种情况都会去调用Adapter.getView(position, scrapView, this);
看看我们平时在adapter中写的getView方法。
@Overridepublic View getView(int position, View convertView, ViewGroup parent) {Fruit fruit = getItem(position);View view;if (convertView == null) {view = LayoutInflater.from(getContext()).inflate(R.layout.item_layout, null);} else {view = convertView;}TextView fruitName = (TextView) view.findViewById(R.id.fruit_name);fruitName.setText(fruit.getName());return view;}
可以看到第二参数就是我们熟悉的convertview,所以绕了一圈又回来了。如果convertView等于null,就调用inflate()方法来加载布局,不等于null就可以直接利用convertView。加上上面一连串的逻辑可以看出来,convertView就是我们一直循环利用的view,只不过被移出屏幕后进入到了废弃缓存中,现在又重新拿出来使用而已,然后我们只需要把convertView中的数据更新成当前位置上应该显示的数据,这样就实现了有限数量的view加载更多的数据。
既然拿到了convertview,后面直接在makeAndAddView()中调用setupChild(),实现attachViewToParent(),重新与listview attach。
分析到这,recyclerBin的回收复用机制其实就分析的差不多了,总共加载的convertview数其实只有屏幕能显示的那么多,通过mScrapViews的回收和重新绑定数据,来实现四两拨千斤的效果。整篇写下来才发现,listview的回收机制有点多..0.0,所以recyclerview的就放在下一篇,先缓一缓,消化消化...。
