@coldxiangyu
2017-06-08T00:59:25.000000Z
字数 9741
阅读 2540
Spring Cloud(一、注册服务与消费)
WEB框架
前言
首先说下研究Spring Cloud的背景。目前我们银保通云核心项目采用的是dubbo+zookeeper的形式进行微服务的搭建,但是客户要求使用Spring Cloud替换dubbo,基于此,展开对Spring cloud的研究。
基本概念
首先Spring Cloud是一个笼统的概念,它是一系列开源项目的统称。
它利用Spring Boot的开发便利性巧妙地简化了分布式系统基础设施的开发,如服务发现注册、配置中心、消息总线、负载均衡、断路器、数据监控等,都可以用Spring Boot的开发风格做到一键启动和部署。Spring并没有重复制造轮子,它只是将目前各家公司开发的比较成熟、经得起实际考验的服务框架组合起来,通过Spring Boot风格进行再封装屏蔽掉了复杂的配置和实现原理,最终给开发者留出了一套简单易懂、易部署和易维护的分布式系统开发工具包。
Spring Cloud对比dubbo,两者有什么区别呢?网上有很多相关的文章,一个比较经典的比喻就是:使用Dubbo构建的微服务架构就像组装电脑,各环节我们的选择自由度很高,但是最终结果很有可能因为一条内存质量不行就点不亮了,总是让人不怎么放心,但是如果你是一名高手,那这些都不是问题;而Spring Cloud就像品牌机,在Spring Source的整合下,做了大量的兼容性测试,保证了机器拥有更高的稳定性,但是如果要在使用非原装组件外的东西,就需要对其基础有足够的了解。
常用组件
Spring Cloud下有很多工程:
Spring Cloud Config:依靠git仓库实现的中心化配置管理。配置资源可以映射到Spring的不同开发环境中,但是也可以使用在非Spring应用中。Spring Cloud Netflix:不同的Netflix OSS组件的集合:Eureka、Hystrix、Zuul、Archaius等。Spring Cloud Bus:事件总线,利用分布式消息将多个服务连接起来。非常适合在集群中传播状态的改变事件(例如:配置变更事件)Spring Cloud Consul:服务发现和配置管理,由Hashicorp团队开发。
而在Netflix又提供了以下功能:
- 服务发现:Eureka-server实例作为服务提供者,可以注册到服务注册中心,
Eureka客户端可以通过Spring管理的bean发现实例; - 断路器:利用注解,可以创建一个简单的
Hystrix客户端; - 声明式REST客户端:使用
Feign可以创建声明式、模板化的HTTP客户端; - 客户端负载均衡器:
Ribbon - 路由器和过滤器:
Zuul可以在微服务架构中提供路由功能、身份验证、服务迁移、金丝雀发布等功能。
后续再对这些进行详细研究,我们先来实现基本的功能。
前提准备:
- 了解spring boot:Spring boot相关研究
- 一个上手的编辑器,推荐IDEA,原因参考:IDEA快速创建Spring boot
- 理解多模块
1.首先创建服务注册中心
创建项目eureka-server,pom引入spring boot相关依赖:
<parent><groupId>org.springframework.boot</groupId><artifactId>spring-boot-starter-parent</artifactId><version>1.3.5.RELEASE</version><relativePath/> <!-- lookup parent from repository --></parent><dependencies><dependency><groupId>org.springframework.boot</groupId><artifactId>spring-boot-starter-test</artifactId><scope>test</scope></dependency><dependency><groupId>org.springframework.cloud</groupId><artifactId>spring-cloud-starter-eureka-server</artifactId></dependency></dependencies><dependencyManagement><dependencies><dependency><groupId>org.springframework.cloud</groupId><artifactId>spring-cloud-dependencies</artifactId><version>Brixton.RELEASE</version><type>pom</type><scope>import</scope></dependency></dependencies></dependencyManagement>
通过@EnableEurekaServer注解启动一个服务注册中心提供给其他应用进行对话。
@EnableEurekaServer@SpringBootApplicationpublic class Application {public static void main(String[] args) {new SpringApplicationBuilder(Application.class).web(true).run(args);}}
在默认设置下,该服务注册中心也会将自己作为客户端来尝试注册它自己,所以我们需要禁用它的客户端注册行为,只需要在application.properties中问增加如下配置:
#注册服务的端口号server.port=1111#是否需要注册到注册中心,因为该项目本身作为服务注册中心,所以为falseeureka.client.register-with-eureka=false#是否需要从注册中心获取服务列表,原因同上,为falseeureka.client.fetch-registry=false#注册服务器的地址:服务提供者和服务消费者都要依赖这个地址eureka.client.serviceUrl.defaultZone=http://localhost:${server.port}/eureka/
启动注册服务,访问http://localhost:1111,可以看到如下页面:
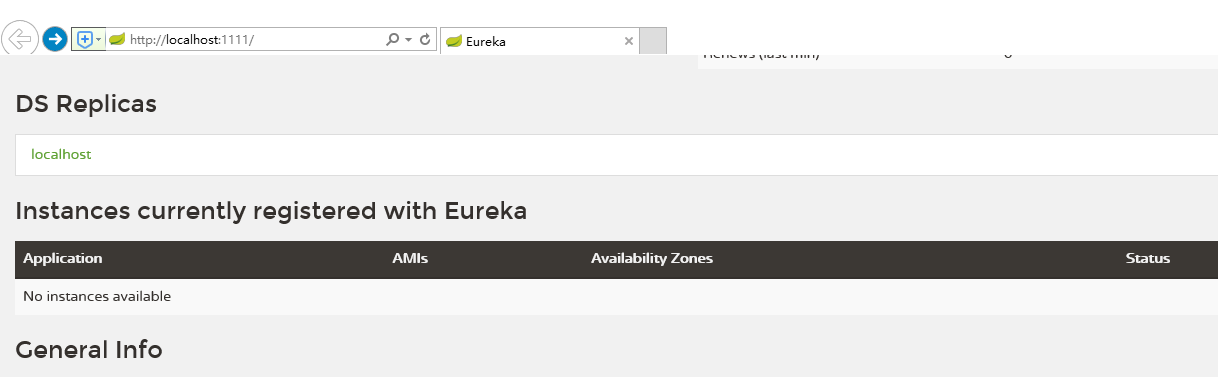
可以看到,目前还没有服务。
2.创建服务提供方
下面我们创建提供服务的客户端compute-service,并向服务注册中心注册自己。
假设我们有一个提供计算功能的微服务模块,我们实现一个RESTful API,通过传入两个参数a和b,最后返回a + b的结果。
首先,创建一个基本的Spring Boot应用,在pom.xml中,加入如下配置:
<parent><groupId>org.springframework.boot</groupId><artifactId>spring-boot-starter-parent</artifactId><version>1.3.5.RELEASE</version><relativePath/> <!-- lookup parent from repository --></parent><dependencies><dependency><groupId>org.springframework.boot</groupId><artifactId>spring-boot-starter-test</artifactId><scope>test</scope></dependency><dependency><groupId>org.springframework.cloud</groupId><artifactId>spring-cloud-starter-eureka</artifactId></dependency></dependencies><dependencyManagement><dependencies><dependency><groupId>org.springframework.cloud</groupId><artifactId>spring-cloud-dependencies</artifactId><version>Brixton.RELEASE</version><type>pom</type><scope>import</scope></dependency></dependencies></dependencyManagement>
其次,实现/add请求处理接口,通过DiscoveryClient对象,在日志中打印出服务实例的相关内容。
@RestControllerpublic class ComputeController {private final Logger logger = Logger.getLogger(getClass());@Autowiredprivate DiscoveryClient client;@RequestMapping(value = "/add" ,method = RequestMethod.GET)public Integer add(@RequestParam Integer a, @RequestParam Integer b) {ServiceInstance instance = client.getLocalServiceInstance();Integer r = a + b;logger.info("/add, host:" + instance.getHost() + ", service_id:" + instance.getServiceId() + ", result:" + r);return r;}}
最后在主类中通过加上@EnableDiscoveryClient注解,该注解能激活Eureka中的DiscoveryClient`实现,才能实现Controller中对服务信息的输出。
@EnableDiscoveryClient@SpringBootApplicationpublic class ComputeServiceApplication {public static void main(String[] args) {new SpringApplicationBuilder(ComputeServiceApplication.class).web(true).run(args);}}
配置application.properties,配置如下:
spring.application.name=compute-serviceserver.port=2223spring.cloud.client.ipAddress=192.168.43.177eureka.instance.instance-id=${spring.cloud.client.ipAddress}:${spring.application.name}:${server.port}eureka.client.serviceUrl.defaultZone=http://localhost:1111/eureka/
配置这里的时候注意eureka.instance.instance-id=${spring.cloud.client.ipAddress}:${spring.application.name}:${server.port},这条配置参考我的另一篇文章:Eureka 服务注册列表显示IP问题研究,此处不做过多讲解。
通过spring.application.name属性,我们可以指定微服务的名称后续在调用的时候只需要使用该名称就可以进行服务的访问。
eureka.client.serviceUrl.defaultZone属性对应服务注册中心的配置内容,指定服务注册中心的位置。
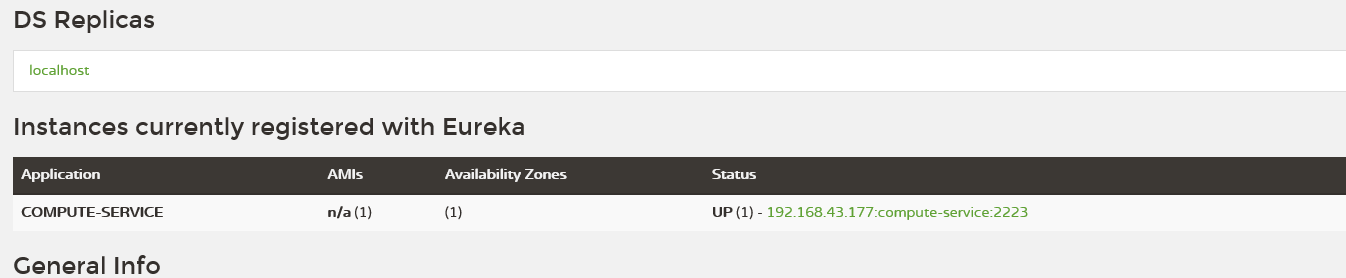
启动该工程,重新访问http://localhost:1111/
可以看到,已经注册成功了。
3.创建服务消费方
服务消费者有两种:Ribbon和Feign
先介绍一下Ribbon:
Ribbon是一个基于HTTP和TCP客户端的负载均衡器。Feign中也使用Ribbon,后续会介绍Feign的使用。
Ribbon可以在通过客户端中配置的ribbonServerList服务端列表去轮询访问以达到均衡负载的作用。
当Ribbon与Eureka联合使用时,ribbonServerList会被DiscoveryEnabledNIWSServerList重写,扩展成从Eureka注册中心中获取服务端列表。同时它也会用NIWSDiscoveryPing来取代IPing,它将职责委托给Eureka来确定服务端是否已经启动。
接下来我们来实现ribbon调用服务,以及负载均衡:
创建项目eureka-ribbon,pom配置如下:
<parent><groupId>org.springframework.boot</groupId><artifactId>spring-boot-starter-parent</artifactId><version>1.3.5.RELEASE</version><relativePath/> <!-- lookup parent from repository --></parent><dependencies><dependency><groupId>org.springframework.cloud</groupId><artifactId>spring-cloud-starter-ribbon</artifactId></dependency><dependency><groupId>org.springframework.cloud</groupId><artifactId>spring-cloud-starter-eureka</artifactId></dependency><dependency><groupId>org.springframework.boot</groupId><artifactId>spring-boot-starter-web</artifactId></dependency><dependency><groupId>org.springframework.boot</groupId><artifactId>spring-boot-starter-test</artifactId><scope>test</scope></dependency></dependencies><dependencyManagement><dependencies><dependency><groupId>org.springframework.cloud</groupId><artifactId>spring-cloud-dependencies</artifactId><version>Brixton.RELEASE</version><type>pom</type><scope>import</scope></dependency></dependencies></dependencyManagement>
在应用主类中,通过@EnableDiscoveryClient注解来添加发现服务能力。创建RestTemplate实例,并通过@LoadBalanced注解开启均衡负载能力。
@SpringBootApplication@EnableDiscoveryClientpublic class RibbonApplication {@Bean@LoadBalancedRestTemplate restTemplate() {return new RestTemplate();}public static void main(String[] args) {SpringApplication.run(RibbonApplication.class, args);}}
创建ConsumerController来消费COMPUTE-SERVICE的add服务。通过直接RestTemplate来调用服务,计算10 + 20的值。
@RestControllerpublic class ConsumerController {@AutowiredRestTemplate restTemplate;@RequestMapping(value = "/add", method = RequestMethod.GET)public String add() {return restTemplate.getForEntity("http://COMPUTE-SERVICE/add?a=10&b=20", String.class).getBody();}}
配置application.properties:
spring.application.name=ribbon-consumerserver.port=3333eureka.client.serviceUrl.defaultZone=http://localhost:1111/eureka/
这时候,ribbon的实现已经做完了,启动ribbon。
我们刚刚已经启动了服务注册方,以及服务提供方,我们更改端口2222为2223再次启动一个服务提供方,此时访问:http://localhost:1111/
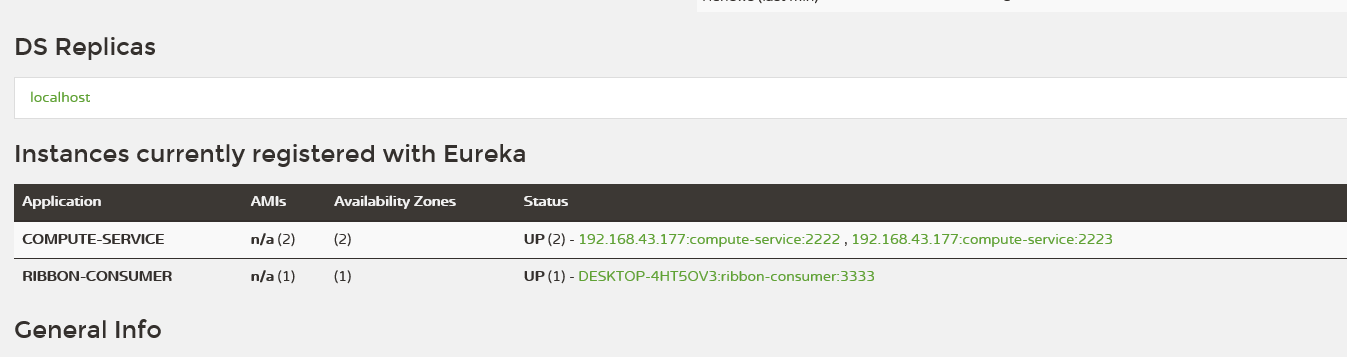
我们看到,已经有两个服务提供方还有一个消费者。
我们连续访问http://localhost:3333/add两次,查看服务提供方2222以及2223端口对应的日志。
2222端口服务日志:

2223端口服务日志:

我们可以看到,Ribbon的负载均衡功能已经实现,两次请求分别访问2222端口服务和2223端口服务。
实际上Ribbon的这种方式略显笨拙,需要请求服务提供方的URL。
接下来我们看看另外一种消费者Feign是如何工作的:
Feign是一个声明式的Web Service客户端,它使得编写Web Serivce客户端变得更加简单。我们只需要使用Feign来创建一个接口并用注解来配置它既可完成。它具备可插拔的注解支持,包括Feign注解和JAX-RS注解。Feign也支持可插拔的编码器和解码器。Spring Cloud为Feign增加了对Spring MVC注解的支持,还整合了Ribbon和Eureka来提供均衡负载的HTTP客户端实现。
我们来创建项目eureka-feign,pom配置如下:
<parent><groupId>org.springframework.boot</groupId><artifactId>spring-boot-starter-parent</artifactId><version>1.3.5.RELEASE</version><relativePath/> <!-- lookup parent from repository --></parent><dependencies><dependency><groupId>org.springframework.cloud</groupId><artifactId>spring-cloud-starter-feign</artifactId></dependency><dependency><groupId>org.springframework.cloud</groupId><artifactId>spring-cloud-starter-eureka</artifactId></dependency><dependency><groupId>org.springframework.boot</groupId><artifactId>spring-boot-starter-web</artifactId></dependency><dependency><groupId>org.springframework.boot</groupId><artifactId>spring-boot-starter-test</artifactId><scope>test</scope></dependency></dependencies><dependencyManagement><dependencies><dependency><groupId>org.springframework.cloud</groupId><artifactId>spring-cloud-dependencies</artifactId><version>Brixton.RELEASE</version><type>pom</type><scope>import</scope></dependency></dependencies></dependencyManagement>
在应用主类中通过@EnableFeignClients注解开启Feign功能,具体如下:
@SpringBootApplication@EnableDiscoveryClient@EnableFeignClientspublic class FeignApplication {public static void main(String[] args) {SpringApplication.run(FeignApplication.class, args);}}
定义compute-service服务的接口,具体如下:
@FeignClient("compute-service")public interface ComputeClient {@RequestMapping(method = RequestMethod.GET, value = "/add")Integer add(@RequestParam(value = "a") Integer a, @RequestParam(value = "b") Integer b);}
使用@FeignClient("compute-service")注解来绑定该接口对应compute-service服务
通过Spring MVC的注解来配置compute-service服务下的具体实现。
在web层中调用上面定义的ComputeClient,具体如下:
@RestControllerpublic class ConsumerController {@AutowiredComputeClient computeClient;@RequestMapping(value = "/add", method = RequestMethod.GET)public Integer add() {return computeClient.add(10, 20);}}
这时候你有没有一种熟悉的感觉,是的,dubbo既视感。不同的地方是feign无需直接引入服务提供方的jar包即可调用服务提供方的API,这无疑大大简化了开发。
Feign的application.properties配置与ribbon配置相同:
spring.application.name=feign-consumerserver.port=3333eureka.client.serviceUrl.defaultZone=http://localhost:1111/eureka/
启动Feign主程序,访问http://localhost:3333/add,观察日志,与Ribbon是一样的效果。
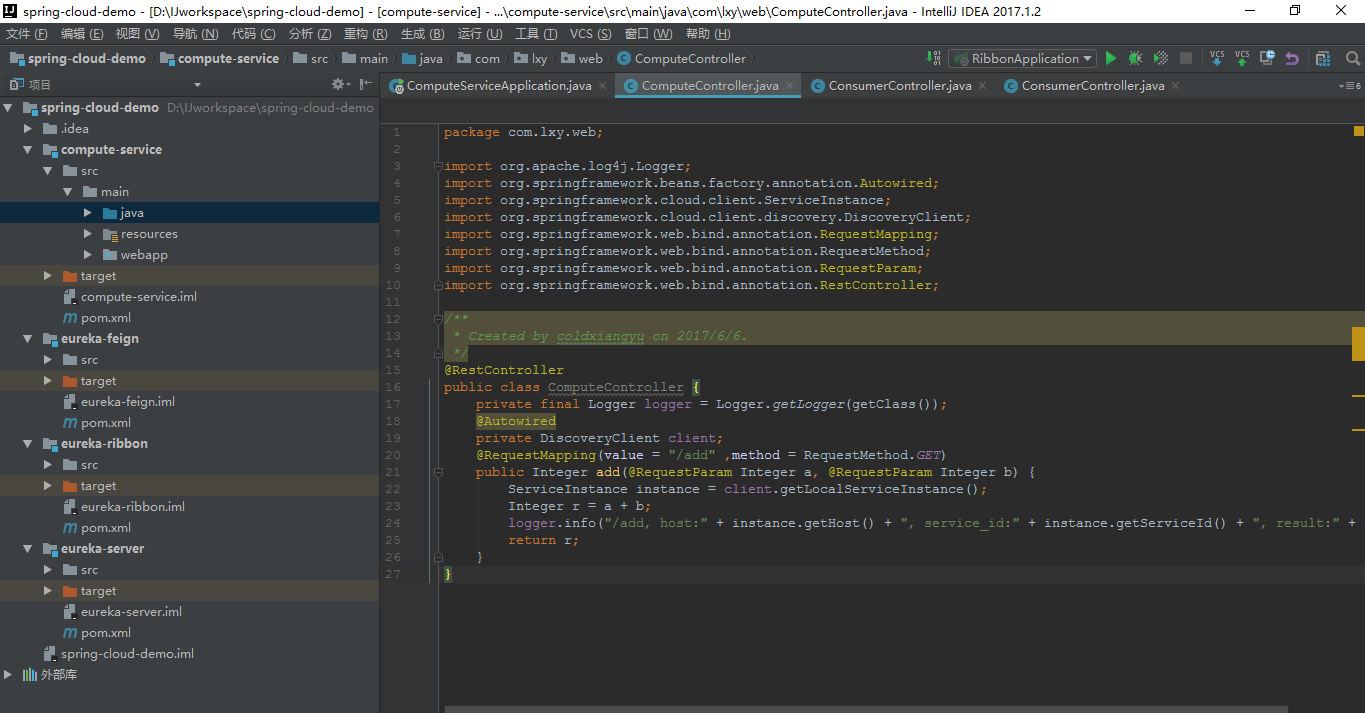
完整项目结构如下:
本文源码已上传github:https://github.com/coldxiangyu/spring-cloud-demo
