@coldxiangyu
2017-07-13T02:20:27.000000Z
字数 3761
阅读 2466
关于ByteBuffer中allocate与allocateDirect的区别
源码系列
前言
在使用NIO对现有纯Socket项目进行改造的过程中,遇到了诸多问题。也正是因为NIO在实际应用中困难重重,所以大部分架构师基本上采用netty、mina这种非常成熟的框架。但是NIO本身就显得轻量多了,很多问题我们也是通过查看NIO的源码进行问题的解决的。
这篇文章是探究ByteBuffer中allocate和allocateDirector源码级别的区别。
探究
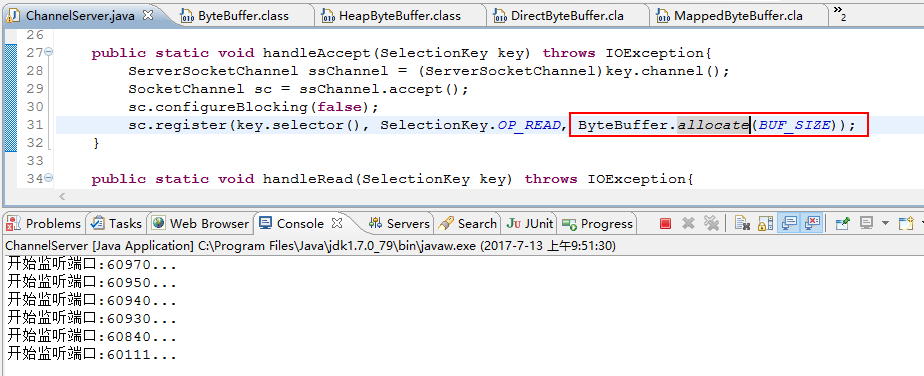
下面是我模拟单线程监听N个端口的服务端代码:
package com.sinosoft.midplat.net;import java.io.IOException;import java.net.InetSocketAddress;import java.nio.ByteBuffer;import java.nio.channels.SelectionKey;import java.nio.channels.Selector;import java.nio.channels.ServerSocketChannel;import java.nio.channels.SocketChannel;import java.nio.charset.Charset;import java.util.Iterator;/*** Created by coldxiangyu on 2017/7/7.*/public class ChannelServer {private static final int BUF_SIZE=1024;private static int[] PORTS;private static final int TIMEOUT = 3000;public static void main(String[] args) {PORTS = new int[]{60970, 60950, 60940, 60930, 60840 ,60111};selector();}public static void handleAccept(SelectionKey key) throws IOException{ServerSocketChannel ssChannel = (ServerSocketChannel)key.channel();SocketChannel sc = ssChannel.accept();sc.configureBlocking(false);sc.register(key.selector(), SelectionKey.OP_READ, ByteBuffer.allocateDirect(BUF_SIZE));}public static void handleRead(SelectionKey key) throws IOException{//Charset cn = Charset.forName("GBK");SocketChannel sc = (SocketChannel)key.channel();ByteBuffer buf = (ByteBuffer)key.attachment();buf.clear();long bytesRead = sc.read(buf);if(bytesRead == -1){sc.close();}/*while(bytesRead > 0){buf.flip();while(buf.hasRemaining()){//System.out.print(buf.get());System.out.print(cn.decode(buf));}System.out.println();buf.clear();bytesRead = sc.read(buf);}*/else{buf.flip();byte[] data = buf.array();String msg = new String(data).trim();System.out.println("客户端:" + msg);ByteBuffer outBuffer = ByteBuffer.wrap(msg.getBytes());//将消息回送给客户端sc.write(outBuffer);key.interestOps(SelectionKey.OP_READ | SelectionKey.OP_WRITE);}}public static void handleWrite(SelectionKey key) throws IOException{System.out.println("begin to write now!");ByteBuffer buf = (ByteBuffer)key.attachment();buf.flip();SocketChannel sc = (SocketChannel) key.channel();while(buf.hasRemaining()){sc.write(buf);}buf.compact();}public static void selector() {Selector selector = null;ServerSocketChannel ssc = null;try{selector = Selector.open();for (int i=0; i<PORTS.length; i++) {ssc = ServerSocketChannel.open();ssc.socket().bind(new InetSocketAddress(PORTS[i]));ssc.configureBlocking(false);ssc.register(selector, SelectionKey.OP_ACCEPT);System.out.println("开始监听端口:" + PORTS[i] + "...");}while(true){if(selector.select(TIMEOUT) == 0){//System.out.println("==");continue;}Iterator<SelectionKey> iter = selector.selectedKeys().iterator();while(iter.hasNext()){SelectionKey key = iter.next();try{if(key.isAcceptable()){handleAccept(key);}if(key.isReadable()){handleRead(key);}if(key.isWritable() && key.isValid()){handleWrite(key);}if(key.isConnectable()){System.out.println("isConnectable = true");}} catch (Exception e) {e.printStackTrace();} finally {iter.remove();key.cancel();}}}}catch(IOException e){e.printStackTrace();}}}
在客户端请求的时候,接收报文出错:

这个时候没有别的办法,只能通过看源码来解决了。
首先找到异常抛出位置,在ByteBuffer类的array方法中:
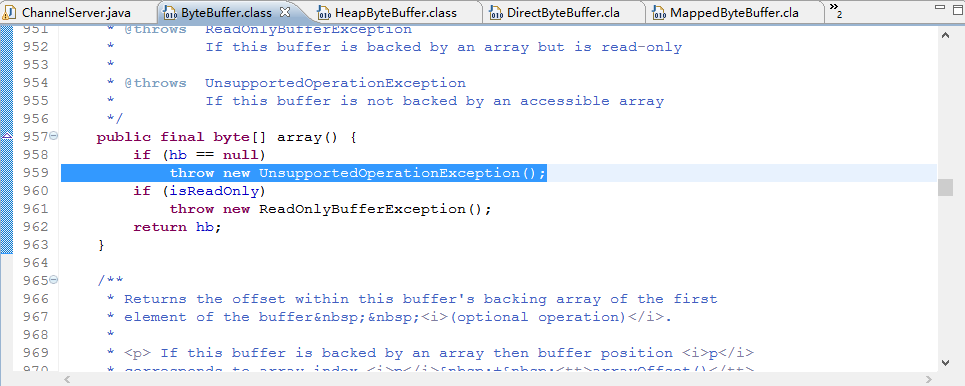
可以看到,在hb==null的时候抛出的此异常。我们再进一步探索。
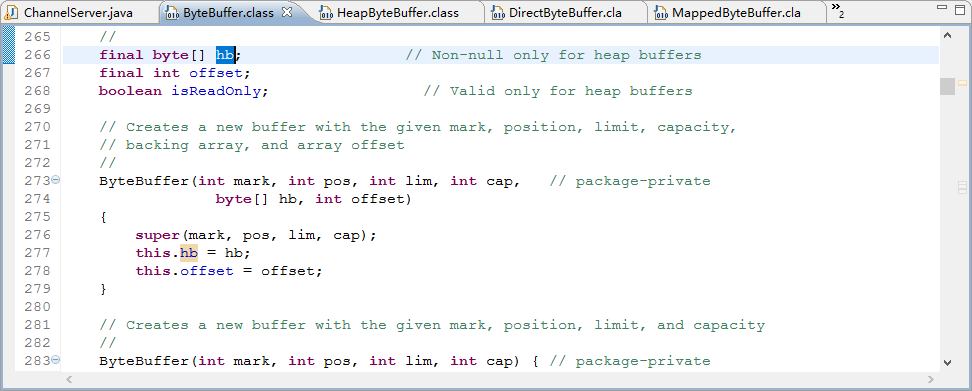
而这个hb是在ByteBuffer中定义的final byte数组,作为内存缓冲区。整个类只有在构造方法中对此赋值,如下图:
这时候就要看ByteBuffer初始化的时候为什么没有初始化hb了。我们在自己的程序中看一下ByteBuffer是在哪里进行初始化的。如下图:
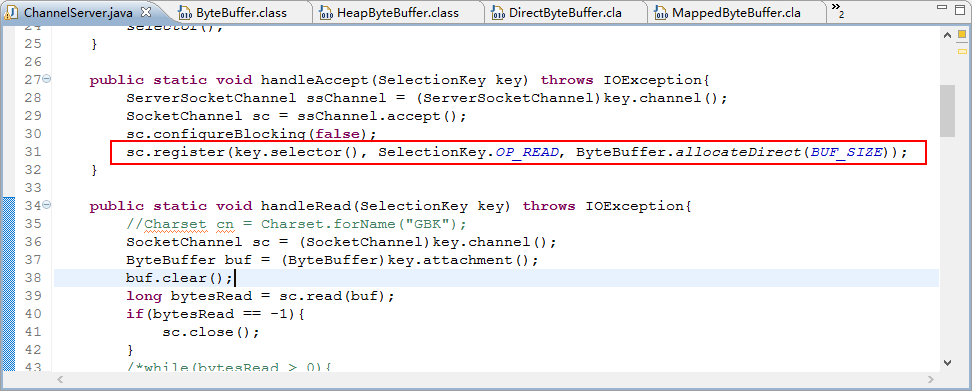
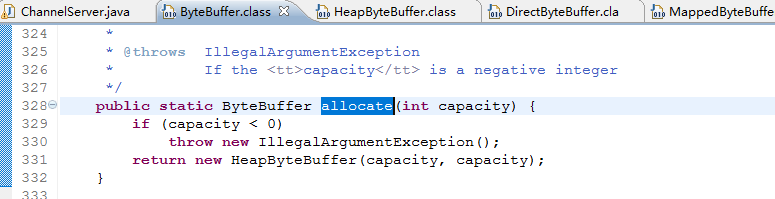
我们在注册channel的时候,以allocateDirector的形式携带了一个BUF_SIZE的ByteBuffer,我们来看看allocateDirector方法的实现:
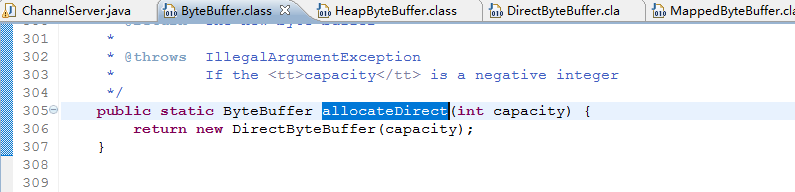
可以看到它是返回一个DirectByteBuffer对象,它的构造方法如下:

它通过super对父类初始化,调用了父类MappedByteBuffer的构造方法:

而MappedByteBuffer又是ByteBuffer的子类,它通过super初始化ByteBuffer另外一个构造方法:
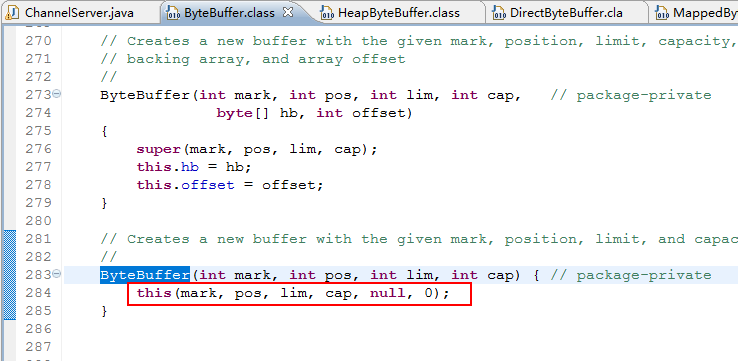
到这里就很明显了,Byte[] hb参数传递了null,于是我们找到了原因。
那我们再来看看ByteBuffer的另一个allocate方法:
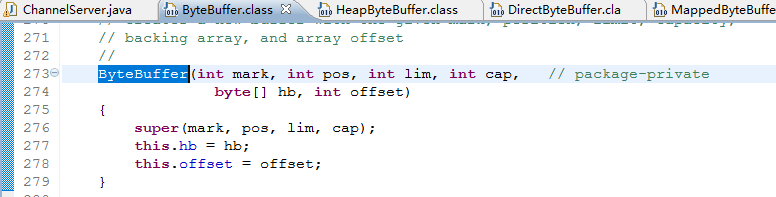
它返回了一个HeapByteBuffer对象,而HeapByteBuffer是ByteBuffer的直接子类,通过super直接对ByteBuffer进行初始化:

我们可以看到,这次初始化直接传递了new byte[cap]参数,对hb直接赋值:
我们将allocateDirector换成allocate,并启动服务端进行验证:
执行客户端程序:
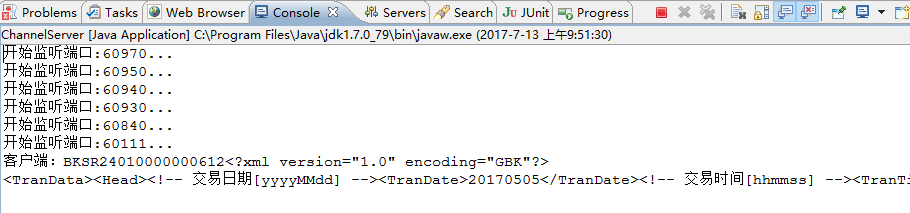
成功接收到客户端发送报文,并无报错。
至此,问题得以解决。
总结
在之前对于ByteBuffer的allocate和allocateDirector的认识,只是停留在allocateDirector可以直接操作操作系统的缓冲区,效率要比allocate添加用户缓冲区要快,在实际应用中,其实还有很多细节上的区别。
