@cxm-2016
2016-11-21T04:11:32.000000Z
字数 8776
阅读 5467
OpenGL-ES 3.0学习指南(三)——JNI操作Bitmap
OpenGL-ES
版本:1
作者:陈小默
声明:禁止商业,禁止转载
上一篇:OpenGL-ES 3.0学习指南(二)——Hello Java
五、使用JNI操作Bitmap
本章内容的安排为三个部分,第一部分主要介绍
bitmap.h头文件中声明的含义。第二部分对基本操作进行面向对象的封装。第三部分通过一个将图像变为灰度的例子来比较Java与JNI在数据处理上的差别。
5.1 bitmap.h
bitmap.h头文件中的内容并不多,主要有这些部分组成:
- 结果状态定义。
- 位图格式枚举。
- 位图信息结构体。
- 位图操作函数声明。
5.1.1 响应结果定义
#define ANDROID_BITMAP_RESULT_SUCCESS 0#define ANDROID_BITMAP_RESULT_BAD_PARAMETER -1#define ANDROID_BITMAP_RESULT_JNI_EXCEPTION -2#define ANDROID_BITMAP_RESULT_ALLOCATION_FAILED -3/* Backward compatibility: this macro used to be misspelled. */#define ANDROID_BITMAP_RESUT_SUCCESS ANDROID_BITMAP_RESULT_SUCCESS
这里定义了对Bitmap进行操作时的结果,分别对应成功,错误的参数,JNI异常,内存分配错误,至于最后一个,这是个梗。Google工程师在定义NDK的时候写错一个单词,居然没有检查就发布了,然后就233333333了。看来IDE的拼写检查对自己人也有好处。
5.1.2 位图格式枚举
enum AndroidBitmapFormat {ANDROID_BITMAP_FORMAT_NONE = 0,ANDROID_BITMAP_FORMAT_RGBA_8888 = 1,ANDROID_BITMAP_FORMAT_RGB_565 = 4,ANDROID_BITMAP_FORMAT_RGBA_4444 = 7,ANDROID_BITMAP_FORMAT_A_8 = 8,};
一般而言,常见的位图格式有RGB_565 、RGBA_8888、 ARGB_8888、 RGBA_4444、 ARGB_4444、 ALPHA_8 ,格式与每一位像素所占的长度和每一种颜色所占的位数相关,具体如下表所示
| 位图格式 | 像素长度(bit) | 颜色分量(黑色代表透明度) |
|---|---|---|
| ALPHA_8 | 8 | 0000 0000 |
| RGB_565 | 16 | 0000 0000 0000 0000 |
| RGBA_4444 | 16 | 0000 0000 0000 0000 |
| ARGB_4444 | 16 | 0000 0000 0000 0000 |
| RGBA_8888 | 32 | 0000 0000 0000 0000 0000 0000 0000 0000 |
| ARGB_8888 | 32 | 0000 0000 0000 0000 0000 0000 0000 0000 |
通过上表我们可以知道一个图片的鲜艳程度与其格式有关,选用ARGB_8888所能够表示的颜色要比RGB_565更多,但是却需要占用更多的内存空间。
5.1.3 位图信息结构体
typedef struct {uint32_t width;uint32_t height;uint32_t stride;int32_t format;uint32_t flags; // 0 for now} AndroidBitmapInfo;
width表示图片的宽度(列数),height表示图片的高度(行数),stride为行跨度,具体含义后面会进行介绍。最后一个参数已经被弃用,其值始终为0。
5.1.4 位图操作函数声明
int AndroidBitmap_getInfo(JNIEnv* env, jobject jbitmap,AndroidBitmapInfo* info);int AndroidBitmap_lockPixels(JNIEnv* env, jobject jbitmap, void** addrPtr);int AndroidBitmap_unlockPixels(JNIEnv* env, jobject jbitmap);
- AndroidBitmap_getInfo:获取当前位图信息。
- AndroidBitmap_lockPixels:锁定当前位图像素,在锁定期间该Bitmap对象不会被回收,使用完成之后必须调用AndroidBitmap_unlockPixels函数来解除对像素的锁定。
- AndroidBitmap_unlockPixels:解除像素锁定。
5.2 封装Bitmap操作
通过上面的说明,我们已经基本了解了JNI中Bitmap的操作过程,现在我们需要将上述过程封装成类。在此之前,我们需要一个工具类其中包含输出LOG等基本功能,所以我们创建一个名为JniUtil.h的头文件:
#ifndef NDK_JNIUTIL_H#define NDK_JNIUTIL_H#include <jni.h>#include <android/log.h>#include <cstdlib>using namespace std;#ifndef LOG_TAG#define LOG_TAG "NDK-LIB"#endif#define ALOGE(...) __android_log_print(ANDROID_LOG_ERROR, LOG_TAG, __VA_ARGS__)#define ALOGD(...) __android_log_print(ANDROID_LOG_DEBUG, LOG_TAG, __VA_ARGS__)#define ALOGI(...) __android_log_print(ANDROID_LOG_INFO, LOG_TAG, __VA_ARGS__)#define ALOGW(...) __android_log_print(ANDROID_LOG_WARN, LOG_TAG, __VA_ARGS__)#endif //NDK_JNIUTIL_H
现在我们来创建一个头文件Bitmap.h,并且在头文件中对这个类进行简单实现:
#ifndef NDK_BITMAP_H#define NDK_BITMAP_H#include <android/bitmap.h>#include "JniUtil.h"typedef uint32_t ABsize;//Android Bitmap sizetypedef int32_t ABformat;//Android Bitmap format#ifdef ARGB_8888typedef uint32_t APixel;ABformat checkFormat = ANDROID_BITMAP_FORMAT_RGBA_8888;#elif defined(ARGB_4444)typedef uint16_t APixel;ABformat checkFormat = ANDROID_BITMAP_FORMAT_RGBA_4444;#elif defined(RGB_565)typedef uint16_t APixel;ABformat checkFormat = ANDROID_BITMAP_FORMAT_RGB_565;#elif defined(ALPHA_8)typedef uint8_t APixel;ABformat checkFormat = ANDROID_BITMAP_FORMAT_A_8;#elsetypedef uint32_t APixel;ABformat checkFormat = ANDROID_BITMAP_FORMAT_RGBA_8888;#endifclass Bitmap {private:APixel *pixels;JNIEnv *jenv;_jobject *jbitmap;AndroidBitmapInfo info;int result;ABsize width;ABsize height;public:Bitmap(int width, int height) : jenv(NULL), jbitmap(NULL) {pixels = (APixel *) malloc(sizeof(APixel) * width * height);memset(pixels, 0, width * height);}Bitmap(JNIEnv *env, jobject bitmap) : pixels(NULL), jenv(env), jbitmap(bitmap) {if ((result = AndroidBitmap_getInfo(env, bitmap, &info)) < 0) {ALOGE("bitmap init failed ! error=%d", result);return;}if (info.format != checkFormat) {ALOGE("Bitmap format is not your selection !");return;}if ((result = AndroidBitmap_lockPixels(env, bitmap, (void **) &pixels)) < 0) {ALOGE("bitmap get pixels failed ! error=%d", result);}}~Bitmap() {if (jenv)AndroidBitmap_unlockPixels(jenv, jbitmap);elsefree(pixels);}ABsize getHeight() {return jenv ? info.height : height;}ABsize getWidth() {return jenv ? info.width : width;}ABformat getType() {return checkFormat;}int getErrorCode() {return result;}operator APixel *() {return pixels;}APixel *operator[](int y) {if (y >= getHeight()) return NULL;return pixels + y * getWidth();}};#endif //NDK_BITMAP_H
文件开始的一系列宏用来在编译时确定当前像素的类型。
#ifdef ARGB_8888...#endif
该类提供了两种构造器:
Bitmap(int width, int height);Bitmap(JNIEnv *env, jobject bitmap);
第一种直接通过宽和高创建一个表示位图的数组,可以在本地使用,不能与JNI交互。第二种构造器使用JNIEnv和一个Java Bitmap位图对象来创建。
APixel *operator[](int y) ;
这里重载了[]操作符,作用是可以将位图以二维方式操作。
5.3 将图片处理为灰度图片
将一张图片处理为灰度图片一般有三种形式,第一种是取RGB分量的最小值并分配给每一个颜色分量,但是这样会导致最终的效果图色调偏暗。第二种是第一种的反例,取RGB分量的最大值并分配给每一个颜色分量,这样又会导致最终效果图偏亮。综合以上两种方法,我们采取第三种方式,取RGB分量的平均值分配给各个分量。
5.3.1 使用Java实现灰度图
创建一个NBitmapLib的Java文件,在其中书写两个灰度变换的方法,第一个是native方法,我们使用JNI实现,第二个直接使用Java完成。
public class NBitmapLib {public static native void renderGray(Bitmap bitmap);public static void javaRenderGray(Bitmap bitmap) {int MODEL = 0xFF;int height = bitmap.getHeight();int width = bitmap.getWidth();int pixelArray[] = new int[width * height];bitmap.getPixels(pixelArray, 0, width, 0, 0, width, height);int color;int av;for (int i = 0; i < pixelArray.length; i++) {color = pixelArray[i];av = 0;av += color & MODEL;av += (color >> 8) & MODEL;av += (color >> 16) & MODEL;av /= 3;color = 0xFF00 + av;color = (color << 8) + av;color = (color << 8) + av;pixelArray[i] = color;}bitmap.setPixels(pixelArray, 0, width, 0, 0, width, height);}}
在Java中一个像素采用Integer类型表示,类型为ARGB_8888。所以灰度变换的过程为取RGB分量的和,平均后分配到每一个分量上,这里采用位运算的方式实现。
public void getPixels(int[] pixels, int offset, int stride,int x, int y, int width, int height);
- pixels:保存位图像素数据的数组。
- offset:数组偏移量,也是行偏移量。
- stride:幅度,实际每行保存数据数(不一定是显示数据)。
- x:x轴起始位置。
- y:y轴起始位置。
- width:截取原图的宽度。
- height:截取原图的高度。
举个例子:对于高为100,宽为100的一个位图bm,如果有一个数组其长度为[120列*30行]
bm.getPixels(pixelArray, 0, 120, 0, 0, 30, 30);
这个例子表示,从原图中(0,0)位置,取30行,每行30列,存放到pixelArray的起始为0的位置,在pixelArray中每行的宽度为120(多出位图可显示的部分是保留段,用于存放一些数据)。
bm.getPixels(pixelArray, 30, 120, 0, 0, 30, 30);
这个例子表示,从原图中(0,0)位置,取30行,每行数据保存到pixelArray中对应行偏移offset的位置(每行都有偏移),向后存放30个列数据。也就是pixelArray表示的二维矩阵的每一行的30-60之间。
bm.getPixels(pixelArray, 120+30, 120, 0, 0, 30, 29);
这个例子跟上面的例子相比,区别就是offset是120+30,那么它与上面例子的差别就是会跳过第一行,然后从第二行开始,每行偏移30个位置来保存数据。
public void setPixels(int[] pixels, int offset, int stride,int x, int y, int width, int height);
参数含义与getPixels相同。
5.3.2 使用JNI实现灰度图
创建一个bitmap.cpp的文件,在其中完成如下:
#define LOG_TAG "bitmap"#define ARGB_4444#include <android/bitmap.h>#include "Bitmap.h"extern "C"JNIEXPORT void JNICALLJava_com_github_cccxm_ndk_lib_NBitmapLib_renderGray(JNIEnv *env,jobject obj,jobject bitmap) {Bitmap bm(env, bitmap);ABsize height = bm.getHeight();ABsize width = bm.getWidth();const APixel MODEL = 0xF;APixel color;APixel av;APixel *pixelArray = bm;ABsize length = height * width;for (ABsize i = 0; i < length; i++) {av = 0;color = pixelArray[i];av += (color >>= 4) & MODEL;av += (color >>= 4) & MODEL;av += (color >> 4) & MODEL;av /= 3;color = av;color = (color << 4) + av;color = (color << 4) + av;pixelArray[i] = color << 4;}}#undef ARGB_4444
5.3.3 运行项目
在运行项目之前,我们要先创建一个NBitmapActivity,这个Activity的包含三个ImageView
<ImageViewandroid:layout_width="match_parent"android:layout_height="0dp"android:layout_weight="1"android:scaleType="centerCrop"android:src="@drawable/hy" /><ImageViewandroid:id="@+id/native_to_gray"android:layout_width="match_parent"android:layout_height="0dp"android:layout_weight="1"android:scaleType="centerCrop" /><ImageViewandroid:id="@+id/java_to_gray"android:layout_width="match_parent"android:layout_height="0dp"android:layout_weight="1"android:scaleType="centerCrop" />
第一个ImageView显示原图,后两个分别用来显示经JNI和Java处理过的灰度图,代码如下:
class NBitmapActivity : AppCompatActivity() {override fun onCreate(savedInstanceState: Bundle?) {super.onCreate(savedInstanceState)setContentView(R.layout.activity_nbitmap)val bitmap = BitmapFactory.decodeResource(resources, R.drawable.hy)val jni_bitmap = bitmap.copy(Bitmap.Config.ARGB_4444, true)var startTime = System.currentTimeMillis()NBitmapLib.renderGray(jni_bitmap)Log.e("---time----", "JNI Time:${System.currentTimeMillis() - startTime}")native_to_gray.setImageBitmap(jni_bitmap)val java_bitmap = bitmap.copy(Bitmap.Config.ARGB_4444, true)startTime = System.currentTimeMillis()NBitmapLib.javaRenderGray(java_bitmap)//kotlinRenderGray(java_bitmap)Log.e("---time----", "Java Time:${System.currentTimeMillis() - startTime}")java_to_gray.setImageBitmap(java_bitmap)}fun kotlinRenderGray(bitmap: Bitmap) {val MODEL = 0xFFval height = bitmap.heightval width = bitmap.widthval pixelArray = IntArray(width * height)bitmap.getPixels(pixelArray, 0, width, 0, 0, width, height)var color: Intvar av: Intfor (i in pixelArray.indices) {color = pixelArray[i]av = 0av += color and MODELav += color shr 8 and MODELav += color shr 16 and MODELav /= 3color = 0xFF00 + avcolor = (color shl 8) + avcolor = (color shl 8) + avpixelArray[i] = color}bitmap.setPixels(pixelArray, 0, width, 0, 0, width, height)}}
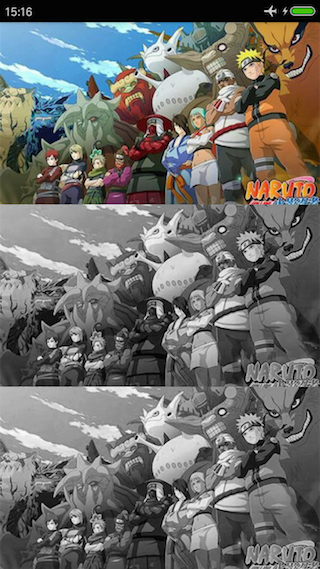
在代码中我们对两种处理过程进行了计时,在红米2A上运行五次取平均值,使用JNI渲染的平均用时是 37.6 毫秒,使用Java渲染的平均用时是 101 毫秒,差距在2~3倍之间。在Activity中,使用了Kotlin语言实现了一遍,耗时与Java一致。
下一篇:OpenGL-ES 3.0学习指南(四)——NativeActivity
