@iStarLee
2020-04-23T15:43:36.000000Z
字数 4439
阅读 1158
深度学习开发环境配置
Deep-Learning
1 查看版本号
查看 CUDA 版本:
cat /usr/local/cuda/version.txt
查看 CUDNN 版本:
cat /usr/local/cuda/include/cudnn.h | grep CUDNN_MAJOR -A 2
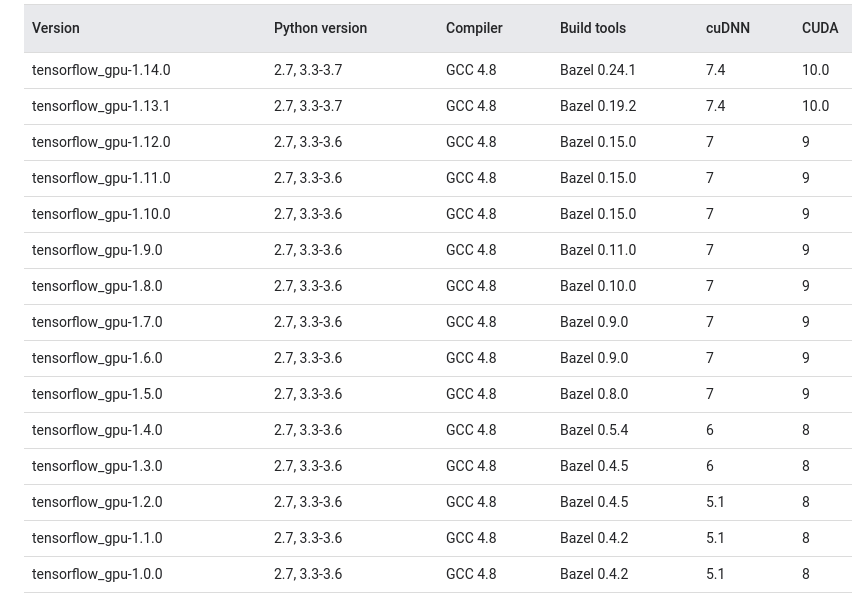
2 查找对应的匹配版本
这个在tensorflow-ros-cpp仓库的readme里面可以查看

我们需要安装的软件如下
- NVIDIA driver
- cuda
- cudnn
以上三个软件的安装遵循之前的笔记即可 - tensorfow
- tensorflow-ros-cpp
3 TensorFlow 源码编译安装
3.1 Install Bazel
https://docs.bazel.build/versions/master/install-ubuntu.html
注意Bazel的版本,一样可能出现问题,我选择了bazel0.16的release文件安装的

- 卸载 bazel
rm -rf ~/.bazel ~/.cache/bazel/ ~/bin
3.2 Install TensorFlow
3.2.1 安装python tensorflow
sudo apt install python-dev python-pip # or python3-dev python3-pippip install -U --user pip six numpy wheel setuptools mock 'future>=0.17.1'pip install -U --user keras_applications==1.0.6 --no-depspip install -U --user keras_preprocessing==1.0.5 --no-deps
- Download the TensorFlow source code
直接去release版本里面下载对应的版本,因为直接从git clone下载时间会特别长,下载完成解压 - 进行编译
cd tensorflow./configure # 除了选择python版本,cuda点y之外,其他的都默认# 下面两个选择其中之一进行编译# 1 GPU suportbazel build --config=opt --config=cuda //tensorflow/tools/pip_package:build_pip_packagebazel build --config=opt --config=cuda //tensorflow:libtensorflow_cc.so# 2 cpu onlybazel build --config=opt //tensorflow/tools/pip_package:build_pip_packagebazel build --config=opt //tensorflow:libtensorflow_cc.so
- 编译出错解决办法
bazel clean --expunge # 清除编译文件,重新来过
- 编译完成后生成安装文件
bazel-bin/tensorflow/tools/pip_package/build_pip_package ~/tensorflow_package# 安装pip3 install ~/tensorflow_package/file_name.whl
- 测试安装是否成功
#!/usr/bin/python3import tensorflow as tfhello = tf.constant('Hello, TensorFlow!')sess = tf.Session()print(sess.run(hello))
如果弹出以下文字
usr/local/lib/python3.5/dist-packages/tensorflow/python/framework/dtypes.py:519: FutureWarning: Passing (type, 1) or '1type' as a synonym of type is deprecated; in a future version of numpy, it will be understood as (type, (1,)) / '(1,)type'.
说明是numpy版本和tensorflow版本不和,需要将numpy版本降级,降到1.6应该就ok了
# 1. removesudo apt-get remove python3-numpy# 2. installsudo python3 -m pip install numpy==1.16
3.2.2 安装tensorflow cpp lib
- protobuf eigen recompile
./tensorflow/contrib/makefile/download_dependencies.shsource tensorflow/contrib/makefile/build_all_linux.sh# protobufmkdir /tmp/proto./tensorflow/contrib/makefile/download_dependencies.shcd tensorflow/contrib/makefile/downloads/protobuf/./autogen.sh./configure --prefix=/tmp/proto/makemake install# eigenmkdir /tmp/eigencd ../eigenmkdir build_dircd build_dircmake -DCMAKE_INSTALL_PREFIX=/tmp/eigen/ ../make installcd ../../../../../..
- 整理库文件和头文件
# libmkdir -p ../tf_test/libcp bazel-bin/tensorflow/libtensorflow_cc.so ../tf_test/lib/cp bazel-bin/tensorflow/libtensorflow_framework.so ../tf_test/lib/ # 之前编译r0.12和r1.3版本的库,只需要libtensorflow_cc.so,1.4版本的似乎分成了两个so文件,即还需要libtensorflow_framework.socp /tmp/proto/lib/libprotobuf.a ../tf_test/lib/# includemkdir -p ../tf_test/include/tensorflowcp -r bazel-genfiles/* ../tf_test/include/cp -r tensorflow/cc ../tf_test/include/tensorflowcp -r tensorflow/core ../tf_test/include/tensorflowcp -r third_party ../tf_test/includecp -r /tmp/proto/include/* ../tf_test/includecp -r /tmp/eigen/include/eigen3/* ../tf_test/include# nsync门槛低人-跑cp -r tensorflow/contrib/makefile/downloads/nsync/public ../tf_test/include/external/nsync/public# 删除多余cc文件cd ../tf_test/find . -name "*.cc" -type f -delete
- cmake中使用
cmake_minimum_required(VERSION 3.0)project(cpptensorflow)set(CMAKE_CXX_STANDARD 11)set(tensorflow_path /home/nrsl/Downloads/tf_test)link_directories(${tensorflow_path}/lib)include_directories(${tensorflow_path}/include)add_executable(cpptensorflow main.cpp ann_model_loader.h model_loader_base.h ann_model_loader.cpp)target_link_libraries(cpptensorflow tensorflow_cc tensorflow_framework)
4 Using tensorflow ros cpp
一个傻逼的包,劳资不用你了,我自己链接我的程序,多好用!!
pip install catkin_pkg empy pyyaml
测试tensorflow-ros-cpp安装是否成功
https://github.com/tradr-project/tensorflow_ros_test/tree/kinetic-devel
当然如果还是想要使用。。
编译方法如下,wiki链接
catkin build tensorflow_ros_cpp --cmake-args -DFORCE_TF_PIP_SEARCH="ON" \-DTF_PYTHON_VERSION="python3" \-DTF_PIP_PATH="/usr/local/lib/python3.5/dist-packages/tensorflow" \-DTF_PIP_EXECUTABLE="/home/nrsl/.local/bin/pip3" \-DTF_PYTHON_LIBRARY="/usr/lib/x86_64-linux-gnu/libpython3.5m.so"
5 其他错误记录
- 找不到libcu*.so.9.0
ImportError: libcublas.so.9.0: cannot open shared object file: No such file or directory
这是因为链接库的时候找不到cuda9的库,
sudo gedit /etc/ld.so.conf# 添加/usr/local/cuda-9.0/lib64# 生效sudo ldconfig
- pip3 install permission问题
# 找到pip3的安装位置, 比如我的是 /home/nrsl/.local/bin/pip3.5locate pip3# 建立软连接,这样就可以使用sudo pip-py3 install xx_pylibsudo ln -s /home/nrsl/.local/bin/pip3.5 /usr/local/bin/pip-py3
