@xtccc
2016-06-05T09:18:15.000000Z
字数 15166
阅读 6028
概念、部署、运行

ElasticSearch
ElasticSearch是一个分布式的全文检索分析引擎(full-text search and analytics engine),它可以帮助你存储海量的数据,并以近乎实时的方式来实现检索和分析这些海量数据。
注意这里,不仅仅是检索数据,还可以分析数据。
本文将描述怎样来部署ElasticSearch,并简单地用其来对文本进行检索。
1. 环境及软件
Elastic Search 2.3.3
Java (至少也要Java 7,推荐JDK - 1.8.0_73)
2. 基本概念
参考 : Basic Concepts
NRT
Cluster
一群节点在一起就构成一个集群,这些节点彼此合作,共同存储了你的数据,并为你提供了检索服务。每个集群都有自己唯一的名字(默认的名字是"elasticsearch"),一个节点通过cluster name来加入一个集群。
Node
A node is an instance of Elasticsearch. When you start Elasticsearch on your server, you have a node. If you start Elasticsearch on another server, it’s another node. You can even have more nodes on the same server, by starting multiple Elasticsearch processes.
一个node也有用于标识自己ID的名字,在默认情况是,当node启动时会被赋予一个random Marvel character name,并且会自动寻找并加入名为"elasticsearch"的集群。
Index
相当于RDBMS中的database。一个index就是一个文档集合,例如把customer数据作为一个index,把prodct catalog作为一个index。一个index也是由一个名字标志的,并且index的名字必须是由小写字母构成的。你可以在一个cluster中定义任意数量的index。
Type
相当于RDMBS中的table。你可以在一个index中定义多个types。我们一般可以为那些具有共同字段的文档建立一个type。例如,如果我们有一个博客平台,那么可以为user data定义一个type,为blog data定义一个type,再为comments data定义一个type。
Document
相当于RDBMS中的row,文档实际上就是一个带有id的JSON数据结构,借助于(index, type, id) 能够唯一地定位一个文档。在一个index/type内,你可以定义任意多的文档。
{ "name": "Elasticsearch Denver",
"organizer": "Lee",
"location": {
"name": "Denver, Colorado, USA",
}
}Shards
可以将一个index进行分片,每片称为一个shard;一个shard可以存储在任意一个节点上。在创建index时,可以为它指定shards的数量。为了实现容错,我们可以为一个shard创建若干个副本(称为replica shard或者replica)。primary shard和replica shards绝不会在同一个节点上。
在创建index时,可以分别指定shards和replica的数量。并且,在一个index被创建后,你可以随时改变它的replica数量,但是不能改变它的shards数量。在默认情况下,Elasticsearch会将每一个index的primary shards数量设置为5,将replica数量设置为1。
每一个shard是一个Lucene index,而单个Lucene index中的documents数量是有上限的。对Lucene-5843而言,这个上限值是2,147,483,519 (= Integer.MAX_VALUE - 128)。我们可以通过API
_cat/shards来监控shard的大小。A shard is a directory of files containing an inverted index, where Lucene stores the data for your index. A shard is also the smallest unit that Elasticsearch moves from node to node.
Elasticsearch keeps a mapping of all your fields and their types, and other settings. This mapping is specific to every type of every index. That’s why types are also called mapping types in Elasticsearch terminology.
A shard can be either a primary or a replica shard, with replicas being exactly that–copies of the primary shard. A replica is used for searching, or it becomes a new primary shard if the original primary shard is lost.

存储数据的过程,称为indexing。To index a document, we must tell ElasticSearch which type in the index it should go to.
在ES中,一个field属于一个document,一个document属于一个type,一个type属于一个index。换言之,一个index中包含了若干个type,一个type中包含了若干个document,一个document中包含了多个field。
下面是ES与Relational DB的概念类比:
| ElasticSearch | 关系型数据库 |
|---|---|
| index | database |
| type | table |
| document | row |
| field | column |
3. 快速安装(单节点集群)
进入bin目录,启动一个single node cluster
cd bin./elasticsearch
控制台输出如下
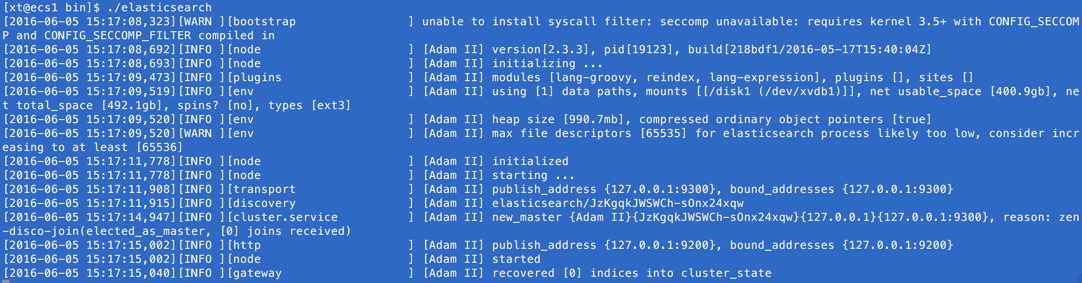
可以看到,此时,本节点的名称为 Adam II(这只是一个random Marvel character),并且已经将自己设为所在集群(默认名称为“elasticsearch”)的master。
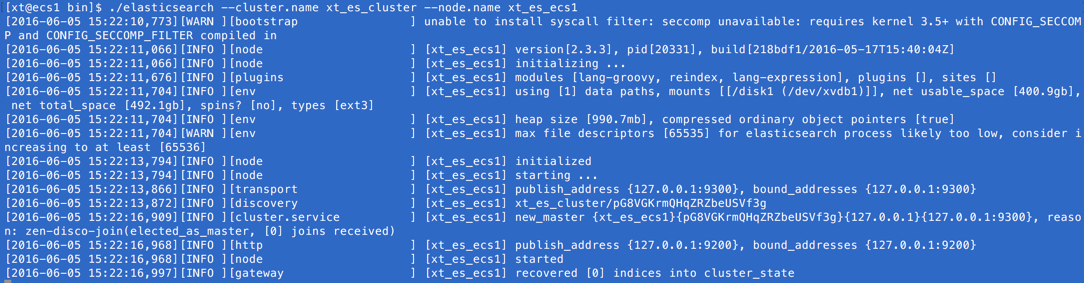
也可以在启动时指定集群和节点的名字:
./elasticsearch --cluster.name xt_es_cluster --node.name xt_es_ecs1
如果想在后台启动ES,使用
bin/elasticsearch -d
在后台启动ES后,如果想关闭ES,则可以使用如下的API:
[root@ecs1 elasticsearch-1.7.2]# curl -XPOST localhost:9200/_shutdown?pretty{"cluster_name" : "xt_es_cluster","nodes" : {"sIEyLCUgRnenH2BBMcXO4Q" : {"name" : "ecs1"}}}
从标有 http 的那一行可以看出,我们的节点可以通过IP 127.0.0.1与端口9200来访问。默认情况下,ES通过端口9200来提供对REST API的访问。
4. 查看cluster相关数据
我们使用 _cat API来监控集群的状态数据。
- 健康状态
curl 'ecs1:9200/_cat/health?v'
- 查询节点
curl 'ecs1:9200/_cat/nodes?v'
5. 配置
ES的配置文件位于三处:
- config/elasticsearch.yml
- config/logging.yml
- bin/elasticsearch.in/sh
5.1 配置Cluster Name
在文件 config/elasticsearch.yml 中配置 cluster.name。
一个刚启动的ES节点,会通过组播(multicast)的方式来寻找当前已有cluster。如果该节点的cluster.name与某一个cluster的名字相同,则会加入该cluster。
5.2 配置JVM Settings
在文件 bin/elasticsearch.in.sh 中可以在文件的开头加上ES_HEAP_SIZE=500m。
5.3 组建集群
6. 基本的REST API
API的形式
Request body是一个JSON结构,用单引号包围起来。如果request body中包含单引号,可以如下解决: 先结束单引号,然后在需要引入的单引号两边加上双引号,如下:
[root@ecs2 ~]# curl -XPUT 'ecs1:9200/get-together/group/1?pretty' -d '{"name" : "Elasticsearch '"'"S"'"'Denver","organizer" : "Lee"}'{"_index" : "get-together","_type" : "group","_id" : "1","_version" : 4,"created" : false}[root@ecs2 ~]# curl 'ecs1:9200/get-together/group/1?pretty'{"_index" : "get-together","_type" : "group","_id" : "1","_version" : 4,"found" : true,"_source":{"name" : "Elasticsearch 'S'Denver","organizer" : "Lee"}}
集群状态
通过 _cat API 来获取集群的健康状态
[root@ecs1 ~]# curl 'localhost:9200/_cat/health?v'epoch timestamp cluster status node.total node.data shards pri relo init unassign pending_tasks1444357721 10:28:41 xt_cluster_name yellow 1 1 5 5 0 0 5 0
其中,集群有green、yellow和red三种健康状态,它们的意义为:
green : everything is good;
yellow : all data is available but some replicas are not yet allocated;
red : some data is not available.
或者:
[root@ecs1 elasticsearch-1.7.2]# curl localhost:9200/?pretty{"status" : 200,"name" : "ecs1","cluster_name" : "xt_es_cluster","version" : {"number" : "1.7.2","build_hash" : "e43676b1385b8125d647f593f7202acbd816e8ec","build_timestamp" : "2015-09-14T09:49:53Z","build_snapshot" : false,"lucene_version" : "4.10.4"},"tagline" : "You Know, for Search"}
还可以通过 _cat API 来获取集群的节点的数量
[root@ecs1 ~]# curl 'localhost:9200/_cat/nodes?v'host ip heap.percent ram.percent load node.role master nameecs1.njzd.com 10.163.104.81 7 41 0.00 d * xt_node_name
打印Index列表
[root@ecs1 elasticsearch-1.7.2]# curl localhost:9200/_cat/indices?vhealth status index pri rep docs.count docs.deleted store.size pri.store.sizegreen open tweet 5 1 0 0 1.3kb 720bgreen open kimchy 5 1 0 0 1.1kb 648bgreen open twitter 5 1 0 0 1.2kb 720b
创建Index
下面创建一个名为customer的Index,然后列出所有的Index
[root@ecs1 ~]# curl -XPUT 'localhost:9200/customer?pretty'{"acknowledged" : true}[root@ecs1 ~]# curl 'localhost:9200/_cat/indices?v'health status index pri rep docs.count docs.deleted store.size pri.store.sizeyellow open customer 5 1 0 0 575b 575b
这里的pretty表示要求pretty-print the JSON response (if any).
注意这个index的状态为yellow(因为存在replica没有分配)。
当我们插入一个文档时,如果对应的Index还不存在,那么该index会自动地被创建。既然这样,为什么要主动地事先创建Index呢?
Creating the index itself takes more time than creating a document, so you might want to have the index ready beforehand. Another reason to create indices in advance is if you want to specify different settings than the ones Elasticsearch defaults to, for example, you may want a specific number of shards.
Delete an Index
[root@ecs1 ~]# curl -XDELETE 'localhost:9200/customer?pretty'{"acknowledged" : true}
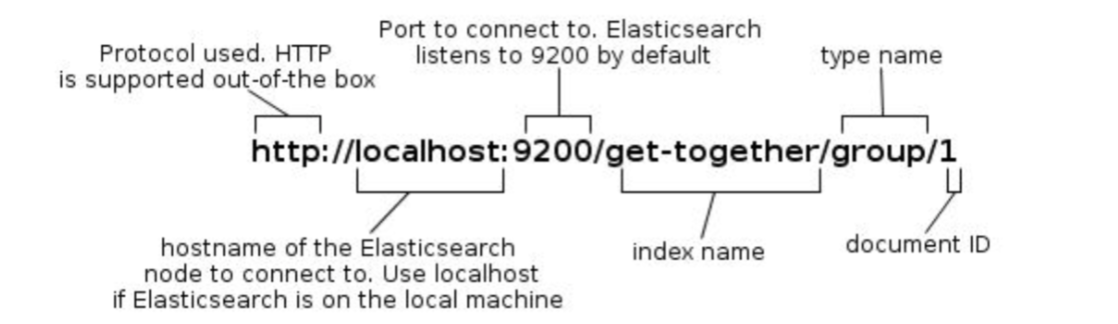
访问数据的普遍形式
curl -X<REST Verb> <Node>:<Port>/<Index>/<Type>/<ID>
Modify Data
Indexing/Replacing Documents
用 curl -XPUT <Node>:<Port>/<Index>/<Type>/<ID>?pretty' -d <new-doc>
就可以:如果该文档已存在(由Index、Type和ID三者共同决定是否已存在),则会被新文档覆盖掉;否则,会创建新的文档。
Updating Documents
Elasticsearch does not actually do in-place updates under the hood. Whenever we do an update, Elasticsearch deletes the old document and then indexes a new document with the update applied to it in one shot.
[root@ecs1 ~]# curl -XGET 'localhost:9200/customer/external/1?pretty'{"_index" : "customer","_type" : "external","_id" : "1","_version" : 1,"found" : true,"_source":{"name":"xt"}}[root@ecs1 ~]# curl -XPOST 'localhost:9200/customer/external/1/_update?pretty' -d '{ "doc" : {"name":"xiao tao"}}'{"_index" : "customer","_type" : "external","_id" : "1","_version" : 2}
[root@ecs1 ~]# curl -XGET 'localhost:9200/customer/external/1?pretty'{"_index" : "customer","_type" : "external","_id" : "1","_version" : 2,"found" : true,"_source":{"name":"xiao tao"}}[root@ecs1 ~]# curl -XPOST 'localhost:9200/customer/external/1/_update?pretty' -d '{ "doc" : {"name":"xiao tao", "age":30}}'{"_index" : "customer","_type" : "external","_id" : "1","_version" : 3}
这里,age可以是整型。
还可以通过scripts来更新文档(但是这个特性默认为disabled),如下:
[root@ecs1 ~]# curl -XPOST 'localhost:9200/customer/external/1/_update?pretty' -d '{"script" : "ctx._source.age += 5" }'
ctx._source refers to the current source document that is about to be updated.
Deleting Documents
删除一个文档:
[root@ecs1 ~]# curl -XDELETE 'localhost:9200/customer/external/1?pretty'
也可以用QUERY一次性删除多个文档。下面删除『customer, external』中name域包含“xiaotao”的全部文档:
[root@ecs1 ~]# curl -XDELETE 'localhost:9200/customer/external/_query?pretty' -d '{"query": {"match":{"name":"xiaotao"}}}'
Batch Processing
通过 _bulk API,可以实现批量操作。
Index multiple documents
[root@ecs1 ~]# curl -XPOST 'localhost:9200/customer/external/_bulk?pretty' -d '{"index":{"_id":"1"}}{"name":"XT"}{"index":{"_id":"2"}}{"name":"CCC"}'[root@ecs1 ~]# curl 'localhost:9200/customer/external/1?pretty'{"_index" : "customer","_type" : "external","_id" : "1","_version" : 5,"found" : true,"_source":{"name":"XT"}}[root@ecs1 ~]# curl 'localhost:9200/customer/external/2?pretty'{"_index" : "customer","_type" : "external","_id" : "2","_version" : 3,"found" : true,"_source":{"name":"CCC"}}
Multiple Types of Operations
[root@ecs1 ~]# curl -XPOST 'localhost:9200/customer/external/_bulk?pretty' -d '{"update": {"_id":"1"}}{"doc":{"name":"Lalala"}}{"delete":{"_id":"2"}}'[root@ecs1 ~]# curl 'localhost:9200/customer/external/1?pretty'{"_index" : "customer","_type" : "external","_id" : "1","_version" : 6,"found" : true,"_source":{"name":"Lalala"}}[root@ecs1 ~]# curl 'localhost:9200/customer/external/2?pretty'{"_index" : "customer","_type" : "external","_id" : "2","found" : false}
当批量操作Bulk API返回时,将会为每个action都返回状态码(且是按照其执行的顺序返回的)。
Exploring Data
Loading Data From JSON File
首先从这里下载一个JSON格式的样本数据文件(里面含有1000个documents),并从中解压出一个名为accounts.json的文件。
然后,将其加载到ES中:
[root@ecs1 data]# curl -XPOST 'localhost:9200/bank/account/_bulk?pretty' --data-binary "@accounts.json"[root@ecs1 data]# curl 'localhost:9200/_cat/indices?v'health status index pri rep docs.count docs.deleted store.size pri.store.sizeyellow open bank 5 1 1000 0 417.1kb 417.1kbyellow open customer 5 1 3 0 7.8kb 7.8kb
The Search API
进行search有两种方式:
1. sending search parameters through the REST request URI
2. sending search parameters through the REST request body
第二种方法显然更好。
可以通过_search来访问关于搜索的REST API。
例1 : 搜索
bank这个index中的所有文档[root@ecs1 data]# curl 'localhost:9200/bank/_search?q=*&pretty'
这里,
q=*代表要匹配(bank中)所有的文档。返回结果:
{"took" : 43,"timed_out" : false,"_shards" : {"total" : 5,"successful" : 5,"failed" : 0},"hits" : {"total" : 1000,"max_score" : 1.0,"hits" : [ {"_index" : "bank","_type" : "account","_id" : "4","_score" : 1.0,"_source":{"account_number":4,"balance":27658,"firstname":"Rodriquez","lastname":"Flores","age":31,"gender":"F","address":"986 Wyckoff Avenue","employer":"Tourmania","email":"rodriquezflores@tourmania.com","city":"Eastvale","state":"HI"}} ,...]}}
返回的response的含义took – time in milliseconds for Elasticsearch to execute the search
timed_out – tells us if the search timed out or not
_shards – tells us how many shards were searched, as well as a count of the successful/failed searched shards
hits – search results
hits.total – total number of documents matching our search criteria
hits.hits – actual array of search results (defaults to first 10 documents)例2 : 将search写入Request Body内
对例1进行改写:[root@ecs1 data]# curl -XPOST 'localhost:9200/bank/_search?pretty' -d '{"query" : { "match_all" : {} }}'
注意:ES会一次性返回全部的结果,而不会像SQL那样通过Cursor可以返回部分的结果。
The Query Language
下面举几个Query Parameter的例子
返回全部的文档
{"query" : { "match_all": {} }}
指定返回文档的数量(默认值为10)
{"query" : { "match_all": {} },"size" : 5}
分页查询 (
from是zero-based,其默认值为0){"query" : { "match_all": {} },"from" : 3,"size" : 5}
结果排序(不指定
size则默认返回10条结果){"query" : { "match_all" : {} },"sort" : { "balance" : {"order":"desc"} }}
Executing Searches
查询结果只返回指定fields
当搜索返回结果时,默认情况是返回full JSON document(即返回结果中的
_source域)。但是我们也可以要求只返回指定的一些fields。[root@ecs1 data]# curl -XPOST 'localhost:9200/bank/_search?pretty' -d '{"query" : { "match_all" : {} },"sort" : { "balance" : {"order":"desc"} },"_source":["balance", "account_number"]}'
条件查询
通过match实现。例如下面我们的Query要求account_number为20[root@ecs1 data]# curl -XPOST 'localhost:9200/bank/_search?pretty' -d '{"query" : { "match" : {"account_number": 20} }}'
下面的Query要求address域包含mill[root@ecs1 data]# curl -XPOST 'localhost:9200/bank/_search?pretty' -d '{"query" : { "match" : {"address": "milL"} },"_source":["address"]}'
注意:这里的mill不区分大小写,且满足要求的
address域的值必须包含完整的mill,如果改为mil则不会返回任何结果。
下面的Query要求address域包含mill或者lane:[root@ecs1 data]# curl -XPOST 'localhost:9200/bank/_search?pretty' -d '{"query" : { "match" : {"address": "mill lane"} },"_source":["address"]}'
下面的Query要求address域包含mill lane这个词组:[root@ecs1 data]# curl -XPOST 'localhost:9200/bank/_search?pretty' -d '{"query" : { "match_phrase" : {"address": "mill lane"} },"_source":["address"]}'
布尔条件查询
AND
curl -XPOST 'localhost:9200/bank/_search?pretty' -d '{"query" : {"bool" : {"must" : [{ "match" : { "address" : "mill" } },{ "match" : { "address" : "lane" } }]}}}'
bool must子句要求所有的query条件都必须满足。
OR
curl -XPOST 'localhost:9200/bank/_search?pretty' -d '{"query" : {"bool" : {"should" : [{ "match" : { "address" : "mill" } },{ "match" : { "address" : "lane" } }]}}}'
bool should要求至少有一个query条件满足。
ALL NOT
curl -XPOST 'localhost:9200/bank/_search?pretty' -d '{"query" : {"bool" : {"must_not" : [{ "match" : { "address" : "mill" } },{ "match" : { "address" : "lane" } }]}}}'
bool must_not要求所有的query条件都不能满足,即所有的子句都返回false。
条件组合
curl -XPOST 'localhost:9200/bank/_search?pretty' -d '{"query" : {"bool" : {"should" : [{ "match" : { "address" : "mill" } },{ "match" : { "address" : "lane" } }],"must" : [{ "match" : { "balance" : 45975} }]}}}'
Executing Filters
在查询的结果中,会有一个名为_score的域,它衡量了document与query在多大程度上匹配。 ES中的任何Query都会触发对相关度的计算,如果不需要相关度的话,则可以通过filter来进行查询。
Filter与Query很相似,但是速度更快:
- Filters do not score so they are faster to execute than queries
- Filters can be cached in memory allowing repeated search executions to be significantly faster than queries
下面来看一个filtered query例子
curl -XPOST 'localhost:9200/bank/_search?pretty' -d '{"query": {"filtered": {"query": { "match_all": {} },"filter": {"range":{"balance": {"gte": 20000,"lte": 30000}}}}}}'
Executing Aggregations
参考 aggregations reference guide
例1
下面我们根据state进行group,然后返回按照降序(默认降序)排名前10(也是默认的)的结果:
curl -XPOST 'localhost:9200/bank/_search?pretty' -d '{"size": 0,"aggs": {"group_by_state": {"terms": {"field": "state"}}}}'
将size设置为0的原因是为了不显示search hits,只显示aggregation results。
以上的查询语句类似于
SELECT state, COUNT(*) FROM bank GROUP BY state ORDER BY COUNT(*) DESC
输出结果为
{"took" : 72,"timed_out" : false,"_shards" : {"total" : 5,"successful" : 5,"failed" : 0},"hits" : {"total" : 1000,"max_score" : 0.0,"hits" : [ ]},"aggregations" : {"group_by_state" : {"doc_count_error_upper_bound" : 5,"sum_other_doc_count" : 744,"buckets" : [ {"key" : "tx","doc_count" : 30}, {"key" : "md","doc_count" : 28}, {"key" : "id","doc_count" : 27}, {"key" : "al","doc_count" : 25}, {"key" : "me","doc_count" : 25}, {"key" : "wy","doc_count" : 25}, {"key" : "dc","doc_count" : 24}, {"key" : "ma","doc_count" : 24}, {"key" : "nd","doc_count" : 24}, {"key" : "tn","doc_count" : 24} ]}}}
例2
在例1的基础上,我们按照州来计算balance的平均值(依然是按照降序排名前10):
curl -XPOST 'localhost:9200/bank/_search?pretty' -d '{"size": 0,"aggs": {"group_by_state": {"terms": {"field": "state"},"aggs": {"average_balance": {"avg": {"field": "balance"}}}}}}'
例3
例2中是按照返回结果中的doc_count的降序排列的,我们现在希望按照balance的平均值以降序排列:
curl -XPOST 'localhost:9200/bank/_search?pretty' -d '{"size": 0,"aggs": {"group_by_state": {"terms": {"field": "state","order": {"average_balance": "desc"}},"aggs": {"average_balance": {"avg": {"field": "balance"}}}}}}'
例4
按照多个field来进行aggregate。
ES的安装、部署、配置
Environment Variables
在启动ES时,会将一个内置的JAVA_OPTS参数传递至JVM。
System Configuration
File Desciptor
Open file descriptor的数量推荐设置到32K或者64K。
可以通过 Nodes Info API 来查询当前max_file_descriptors的值。
[root@ecs1 ~]# curl localhost:9200/_nodes/process?pretty
Virtual Memory
ES默认使用 hybrid mmapfs / niofs directory 来存储indices。而OS对mmap count的默认limit很低,易造成 out of memory 异常,因此需要如下操作:
[root@ecs1 ~]# sysctl -w vm.max_map_count=262144
如果想让该设置永久生效,在文件/etc/sysctl.conf中修改vm.max_map_count的值。
Memory Settings
Swapping对性能的影响非常大(可能会把ES的进程交换出去),因此应该尽量避免Swapping的发生。
ElasticSearch Settings
在config/elasticsearch.yml 中可以配置以下值:
cluster.name: xt_es_cluster
node.name: ${HOSTNAME}
path.data: /path/to/data1,/path/to/data2,/path/to/data3
Index Setting
在创建Index时,ES在默认情况下是将Index存储在文件系统中,我们可以要求它将Index存储在内存中。
[root@ecs1 elasticsearch-1.7.2]# curl -XPUT localhost:9200/kimchy/ -d \'index :store :type : memory'
或者在启动ES时指定这个配置:
elasticsearch -Des.index.store.type=memory
