@xushengkai
2023-01-01T05:38:15.000000Z
字数 15330
阅读 347
Nginx-入门篇2
nginx
[TOC]
一.Nginx WEB模块
1.连接状态(stub_status_module)
用来观察用户和nginx的连接数量信息
1.查询模块是否安装
[root@xsk ~]# nginx -V 2>&1 | grep stub_status参数解释:2>&1:把正确的和错误的输出重定向
2.启动状态模块
为了保证实验的唯一性,我把上面我创建的网站删掉[root@xsk ~]# rm -rf /etc/nginx/conf.d//xsk.conf[root@xsk ~]# rm -rf /xsk/[root@xsk ~]# systemctl restart nginxnginx页面[root@xsk ~]# vim /etc/nginx/conf.d/default.conf在server{ 下面写入一下内容,2-5行1 server {2 location /nginx_status { #当有人访问这个页面时给他看这个模块3 stub_status; #模块名4 allow all; #用户访问页面的权限,所有用户都可以访问5 }
3.重启服务,再次访问
[root@xsk ~]# systemctl restart nginx打开浏览输入http://192.168.200.149/nginx_status显示内容:Active connections: 1 #几个人在连接server accepts handled requests #连接了多少次1 1 1 #总连接数;成功连接数;总共处理的请求数Reading: 0 Writing: 1 Waiting: 0#Reading :读取客户端Header的信息数 请求头#Writing:返回给客户端的header的信息数 响应头#Waiting:等待的请求数,开启了keepalive
2.关于连接的问题
什么是连接?
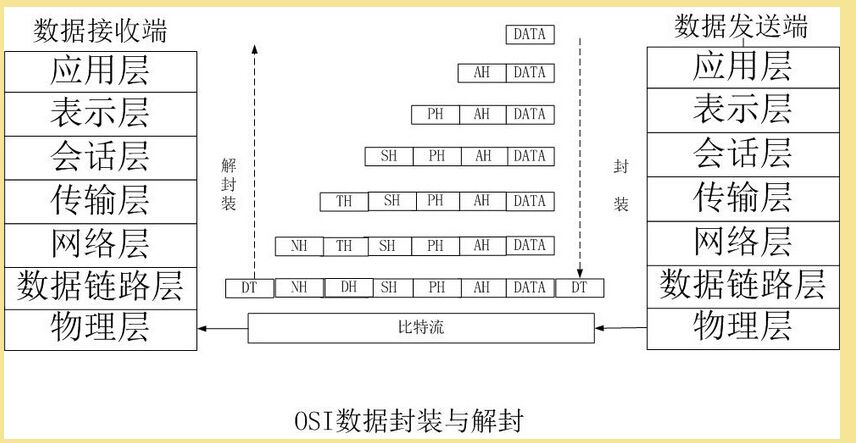
OSI封装回顾
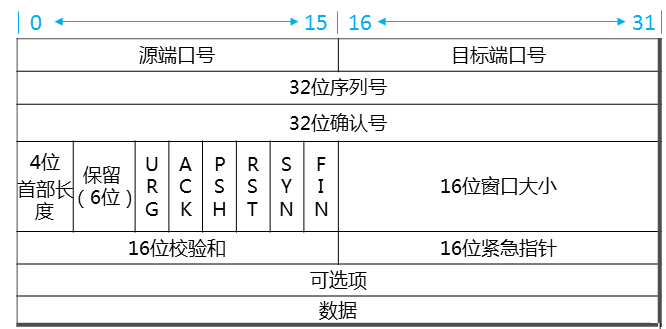
TCP封装结构
TCP三次握手
step1:第一次握手
建立连接时,客户端发送SYN包到服务器,其中包含客户端的初始序号seq=x,并进入SYN_SENT状态,等待服务器确认。(其中,SYN=1,ACK=0,表示这是一个TCP连接请求数据报文;序号seq=x,表明传输数据时的第一个数据字节的序号是x)。step2:第二次握手
服务器收到请求后,必须确认客户的数据包。同时自己也发送一个SYN包,即SYN+ACK包,此时服务器进入SYN_RECV状态。(其中确认报文段中,标识位SYN=1,ACK=1,表示这是一个TCP连接响应数据报文,并含服务端的初始序号seq(服务器)=y,以及服务器对客户端初始序号的确认号ack(服务器)=seq(客户端)+1=x+1)。step3:第三次握手
客户端收到服务器的SYN+ACK包,向服务器发送一个序列号(seq=x+1),确认号为ack(客户端)=y+1,此包发送完毕,客户端和服务器进入ESTAB_LISHED(TCP连接成功)状态,完成三次握手。未连接队列
在三次握手协议中,服务器维护一个未连接队列,该队列为每个客户端的SYN包(syn=j)开设一个条目,该条目表明服务器已收到SYN包,并向客户发出确认,正在等待客户的确认包时,删除该条目,服务器进入ESTAB_LISHED状态。
TCP四次挥手
step1:第一次挥手
首先,客户端发送一个FIN,用来关闭客户端到服务器的数据传送,然后等待服务器的确认。其中终止标志位FIN=1,序列号seq=u。step2:第二次挥手
服务器收到这个FIN,它发送一个ACK,确认ack为收到的序号加一step3:第三次挥手
关闭服务器到客户端的连接,发送一个FIN给客户端。step4:第四次挥手
客户端收到FIN后,并发回一个ACK报文确认,并将确认序号seq设置为收到序号加一。首先进行关闭的一方将执行主动关闭,而另一方执行被动关闭。客户端发送FIN后,进入终止等待状态,服务器收到客户端连接释放报文段后,就立即给客户端发送确认,服务器就进入CLOSE_WAIT状态,此时TCP服务器进程就通知高层应用进程,因而从客户端到服务器的连接就释放了。此时是“半关闭状态”,即客户端不可以发送给服务器,服务器可以发送给客户端。
此时,如果服务器没有数据报发送给客户端,其应用程序就通知TCP释放连接,然后发送给客户端连接释放数据报,并等待确认。客户端发送确认后,进入TIME_WAIT状态,但是此时TCP连接还没有释放,然后经过等待计时器设置的2MSL后,才进入到CLOSED状态。
TCP机制(四大计时器)
重传计时器(Retransmession)
持久计时器(Persistance)
保活计时器(keep-alive)
时间等待(time-wait)
TCP流控/拥塞管理
原理:
接收端处理数据的速度是有限的,如果发送方的速度太快,就会把缓冲区打满。这个时候如果继续发送数据,就会导致丢包等一系列连锁反应。
所以TCP支持根据接收端能力来决定发送端的发送速度。这个机制叫做流控制。窗口大小:
(接收端向发送端主机通知自己可以接受数据的大小,这个大小限制就叫做窗口大小)
什么是请求
一次HTTP查询
keepalived
从HTTP/1.1起,默认使用长连接,用以保持连接特性。使用长连接的HTTP协议
在使用长连接的情况下,当一个网页打开完成后,客户端和服务器之间用于传输HTTP数据的TCP连接不会关闭,客户端再次访问这个服务器时,会继续使用这一条已经建立的连接。Keep-Alive不会永久保持连接,它有一个保持时间,可以在不同的服务器软件(如Apache)中设定这个时间。实现长连接需要客户端和服务端都支持长连接。
HTTP协议的长连接和短连接,实质上是TCP协议的长连接和短连接
长连接设置
HTTP守护进程,一般都提供了keepalive_timeout时间设置参数,比如nginx的keepalive_timeout,
[root@xsk ~]# vim /etc/nginx/nginx.conf27 keepalive_timeout 65;
和Apache的keepalivetimeout,这个时间值意味着:一个HTTP产生的TCP连接在传送完最后一个响应后,还需要hold住keepalive_timeout秒后,才开始关闭这个连接,当HTTP守护发送完一个响应后,理应马上主动关闭相应的TCP连接,设置keepalive_timeout后,HTTP守护进程会想说:“再等等吧,看看浏览器还有没有请求过来”这一等便是keepalive_timeout时间,如果守护进程在这个等待时间里,一直没有收到浏览发过来的http请求,则关闭这个http连接
3.随机主页(random_index_module)
目的:微更新,将主页设置成随机页面,是一种微调更新机制
示例:
创建主页目录
[root@xsk ~]# mkdir /app
创建多个主页
[root@xsk ~]# touch /app/{blue.html,green.html,red.html,.yellow.html}[root@xsk ~]# ll -a /app/总用量 0drwxr-xr-x 2 root root 77 12月 3 15:40 .dr-xr-xr-x. 18 root root 235 12月 3 15:38 ..-rw-r--r-- 1 root root 0 12月 3 15:40 blue.html-rw-r--r-- 1 root root 0 12月 3 15:40 green.html-rw-r--r-- 1 root root 0 12月 3 15:40 red.html-rw-r--r-- 1 root root 0 12月 3 15:40 .yellow.html
在不同的页面插入不同的内容,内容不重要,复制粘贴就可以了。
[root@xsk ~]# vim /app/red.html<html><head><title>green color</title></head><body style="background-color:red"><h1>red color!</h1></body></html>[root@xsk ~]# vim /app/.yellow.html<html><head><title>green color</title></head><body style="background-color:yellow"><h1>yellow color!</h1></body></html>[root@xsk ~]# vim /app/green.html<html><head><title>green color</title></head><body style="background-color:green"><h1>green color!</h1></body></html><html><head><title>green color</title></head><body style="background-color:blue"><h1>blue color!</h1></body></html>
启动随机主页
[root@xsk ~]# vim /etc/nginx/conf.d/default.conf1 server {2 location /nginx_status {3 stub_status;4 allow all;5 }6 listen 80;7 server_name localhost;89 #access_log /var/log/nginx/host.access.log main;1011 location / {12 #root /usr/share/nginx/html; #把12,13行注释掉13 #index index.html index.htm;14 root /app; #添加14,15行的内容15 random_index on;16 }重启nginx[root@xsk ~]# systemctl restart nginx
打开浏览器,输入服务器IP,多次刷新页面,会展示出不同颜色的页面,实验成功,但是只能看到红色,绿色,蓝色的页面,不能看到黄色的页面,是因为黄色页面的文件是隐藏文件
4.替换模块(sub_module)
目的:网页内容替换,如果我们用模板生成网站的时候,因为疏漏或者别的原因造成代码不如意,但是此时因为文件数量巨大,不方便全部生成,那么这个时候我们就可以用此模块来暂时实现纠错,另一方面,我们也可以利用这个实现服务器端文字过滤的效果
示例:
启动nginx默认页面,先将上个实验的注释内容的取消,添加的内容注释掉。改完以后就是下面的内容[root@xsk ~]# vim /etc/nginx/conf.d/default.conf11 location / {12 root /usr/share/nginx/html;13 index index.html index.htm;14 #root /app;15 #random_index on;然后在第一行的下面添加下以内容,2-3行1 server {2 sub_filter nginx "shengkai"; #过滤nginx换成shengkai3 sub_filter_once off; #过滤一次关闭
重启nginx
[root@xsk ~]# systemctl restart nginx
打开浏览器输入服务器IP,查看结果:Welcome to shengkai!
5.文件读取模块(ngx_http_core_module)
语法:sendfile on|off;
原理介绍
sendfile
未使用sendfile()的传统网络传输过程:
硬盘-->内核空间-->用户空间-->内核的接口缓存-->协议栈
使用sendfile()来进行网络传输的过程:
硬盘-->内核空间(快速拷贝到内核的接口缓存)-->协议栈
默认sendfile on;
[root@xsk ~]# vim /etc/nginx/nginx.conf24 sendfile on;安装好nginx后,默认打开
tcp_nopush
未使用tcp_nopush()网络资源浪费
应用程序每产生一次操作就会发送一个包,而典型情况下一个包会拥有一个字节的数据以及40个字节长的包头,于是产生4000%的过载,很轻易的就能令网络发生拥塞,同时也浪费资源
使用tcp_nopush()网络传输效率提升
当包累计到一定大小后再发送
[root@xsk ~]# vim /etc/nginx/nginx.conf25 #tcp_nopush on;默认是关闭的,打开以后可以起到优化nginx的作用
tcp_nodelay
开启或关闭nginx使用tcp_nodelay选项的功能,这个选项仅在将链接转变为长连接的时候才被禁用
tcp_nodelay是禁用Nagle算法,即数据包立即发送出去
由于Nagle和DelayedACK的原因,数据包的确认信息需要积攒到两个时才发送,长连接情况下,奇数包会造成延时40ms,所以tcp_nodelay会将ack立刻发出去,如果不在长连接时,可以关闭此模块,因为ack会被立刻发出去
示例:
启用模块这三个模块,重启nginx,不需要验证,因为肉眼看不到的效果[root@xsk ~]# vim /etc/nginx/nginx.conf24 sendfile on;25 tcp_nopush on;26 tcp_nodelay on;[root@xsk ~]# systemctl restart nginx
6.文件压缩(ngx_http_gzip_module)
原理
启动该模块,使文件传输前进行压缩,提升传输效率语法
gizp on | off;
默认:gzip off;
[root@xsk ~]# vim /etc/nginx/nginx.conf29 #gzip on;
压缩级别
语法:gzip_comp_level level(1-9);
默认:gzip_comp_level 1;压缩版本
语法:gzip_http_version 1.0 | 1.1;
默认:gzip_http_version 1.0;
示例:
1.观察未压缩传输
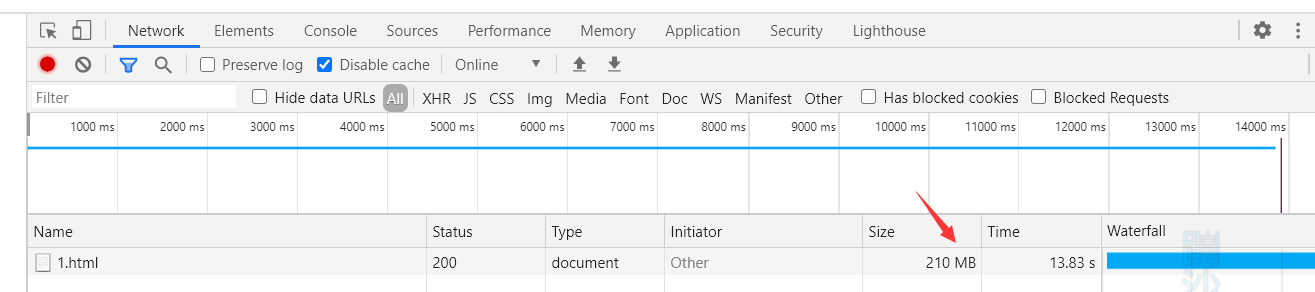
拷贝文本到文件主目录[root@xsk ~]# cd /usr/share/nginx/html/[root@xsk html]# vim 1.html在里面写上大量内容[root@xsk html]# ll -h总用量 5.0M-rw-r--r-- 1 root root 210.0M 12月 4 08:59 1.html-rw-r--r-- 1 root root 497 10月 19 18:48 50x.html-rw-r--r-- 1 root root 615 10月 19 18:48 index.html
1.2通过浏览器下载文件并观察下载后的大小,http:192.168.200.149/1.html,点击F12,进入控制台
2.启动压缩功能
[root@xsk ~]# vim /etc/nginx/nginx.conf在第14行下面添加以下内容14 http {15 gzip on; #打开压缩功能16 gzip_http_version 1.1; #用1.1版本17 gzip_comp_level 9; #压缩级别最高918 gzip_types text/plain application/javascript application/x-javascript text/css application/xml text/javascript application/x-httpd-php image/jpeg image/gif image/png; #可以压缩的内容:文本;脚本;网页文件;java脚本,网页文件,http/php模块,图像19 gzip_static on; #开启静态压缩重启nginx[root@xsk ~]# systemctl restart firewalld
3.观察压缩传输,通过浏览器下载文件并观察下载后的大小,http:192.168.200.149/1.html,点击F12,进入控制台,压缩以后从210MB变成了916KB

7.页面缓存(ngx_http_headers_module)
expires起到控制页面缓存的作用,合理的配置expires可以减少很多服务器的请求,要配置expires,可以在http段中(所有的服务器)或者server段中(本服务器)或者loaction段中(本页面)加入。
Nginx(expires缓存减轻服务端压力)语法
expires time;
expires epoch | max | off;
默认:expires off;
epoch:指定expires的值为1max:指定expires的值为10年-1:指定expires的值为当前服务器时间-1s,即永远过期off:不修改expires和Cache-Control的值
原理
无缓存,每次访问服务器均是全文传输,开启缓存可以加速浏览网站
示例:
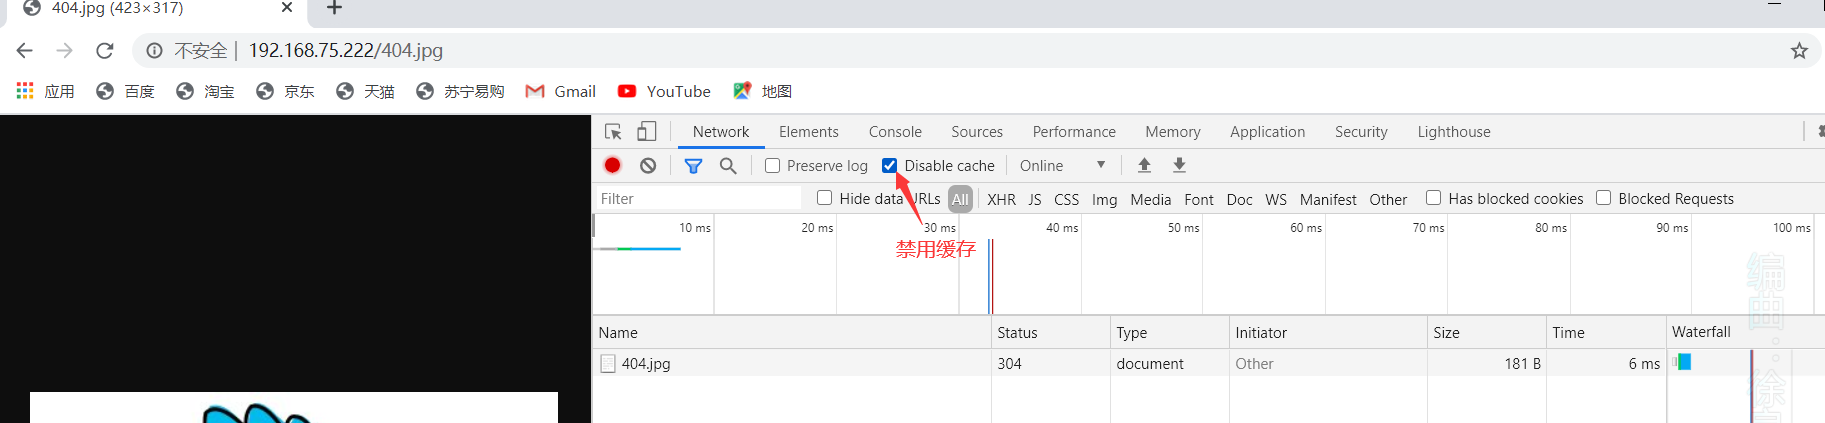
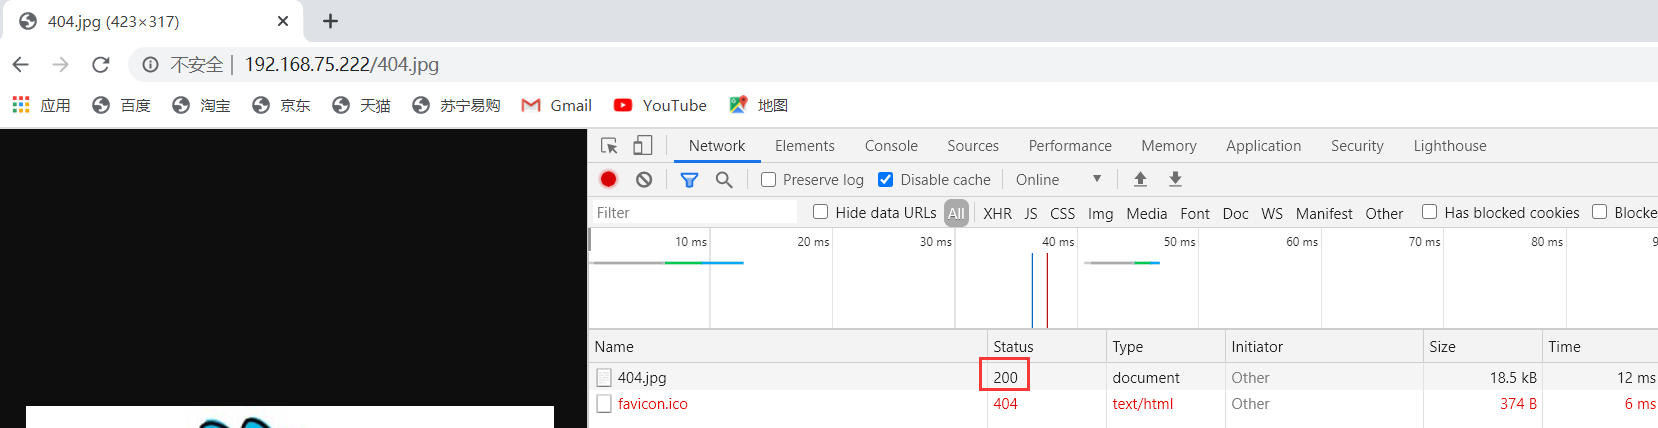
1.打开浏览器缓存,浏览默认页面,放个图片才会看到缓存的状态,主页不缓存


2.禁用缓存浏览页面,返回码200全文传输,理解浏览器缓存作用
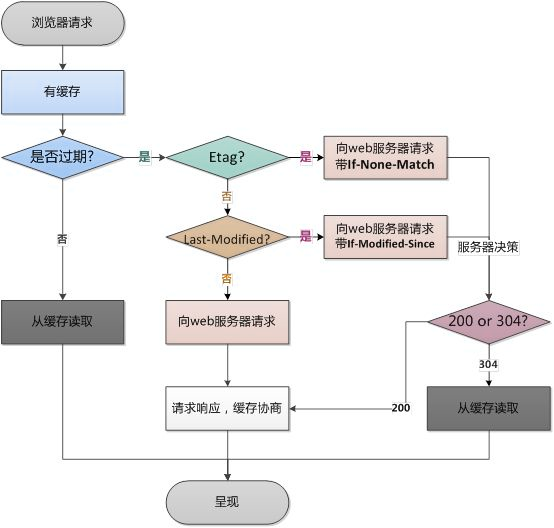
3.解析缓存原理
4.开启服务器缓存模块
[root@xsk ~]# vim /etc/nginx/conf.d/default.conf在14行的下面添加以下内容14 location / {15 expires 24h;重启nginx[root@xsk ~]# systemctl restart nginx
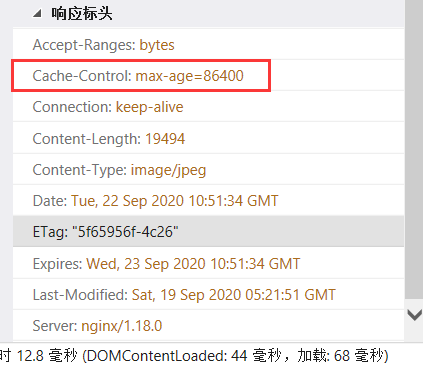
5.再次打开浏览器查看,观察响应头出现服务器回复的缓存时间86400秒就是我们设置的24h
理解nginx服务器启动缓存时间,加速浏览,缺点是时效性降低
8.防盗链(ngx_http_referer_module)
语法:valid_refereers none | blocked |server_names |string..;
日志原理介绍
log_format main '$remote_addr - $remote_user [$time_local] "$request" ''$status $body_bytes_sent "$http_referer" ''"$http_user_agent" "$http_x_forwarded_for"';
日志格式中的http_referer是记录访问点引用是URL,也就是超链接的上一级地址,通过这段地址可以发现一种网络行为--盗链,非法盗链会影响站点的正常访问,通过http_referer模块可以控制这一点,防止非法盗链现象
示例
展现防盗链现象,启动防盗链
1.搭建一个a.com网站,在主页中插入图片
#创建主页的配置文件[root@xsk ~]# vim /etc/nginx/conf.d/a.com.confserver {listen 80;server_name a.com;location / {root /a.com;index index.html;}}#给主页创建内容,添加图片[root@xsk ~]# vim /a.com/index.html<img src='1.jpg' />#准备1.png图片,注意权限可读[root@xsk ~]# cd /a.com/[root@xsk a.com]# rz[root@xsk a.com]# ll -d 1.jpg-rw-r--r-- 1 root root 19784 11月 29 10:16 1.jpg#重启nginx[root@xsk a.com]# systemctl restart nginx
1.2打开一台桌面模式的linux客户机来验证
#关闭安全机制[root@192 ~]# systemctl stop firewalld[root@192 ~]# setenforce 0#在客户机上做域名解析[root@192 ~]# vim /etc/hosts192.168.200.149 a.com b.com#在客户机上打开火狐浏览器查看a.com页面,显示出我刚才添加的照片
2.搭建一个b.com网站,在主页中盗链网站上搜索的图片
#创建主页的配置文件[root@xsk ~]# vim /etc/nginx/conf.d/b.com.confserver {listen 80;server_name b.com;location / {root /b.com;index index.html;}}#给主页创建内容,这次盗链网站上搜索的图片[root@xsk ~]# cd /b.com[root@xsk b.com]# vim index.html<img src="https://img.zcool.cn/community/019f4b6022a5ec11013f792878170a.jpg@1280w_1l_2o_100sh.jpg" />#重启nginx[root@xsk b.com]# systemctl restart nginx#在linunx客户机上打开火狐浏览器访问b.com,显示的内容就是我从网站搜索的图片
3.在b.com上盗链a.com网站的图片
[root@xsk b.com]# vim index.html<img src="http://a.com/1.jpg" />#在linux客户机上打开火狐浏览器访问b.com显示的页面和a.com的页面一样
访问两个网站页面,均能正常显示图片
4.将a.com和b.com两个网站的日志分离
#设置a网站的日志[root@xsk ~]# vim /etc/nginx/conf.d/a.com.conf#在server{ 的下面添加以下内容1 server {2 access_log /var/log/nginx/a.com.access.log main;#设置b网站的日志[root@xsk ~]# vim /etc/nginx/conf.d/b.com.conf#在server{ 的下面添加以下内容1 server {2 access_log /var/log/nginx/b.com.access.log main;#重启nginx[root@xsk ~]# systemctl restart nginx#这时候nginx的日志目录下多了两个日志,一个a网站的,一个b网站的[root@xsk ~]# ls /var/log/nginx/access.log access.log-20221204 error.log-20221201.gzaccess.log-20221201.gz a.com.access.log error.log-20221202.gzaccess.log-20221202.gz b.com.access.log error.log-20221203.gzaccess.log-20221203.gz error.log error.log-20221204
5.注意啊a.com和b.com网站的日志
#多次刷新b网站,观察b网站的日志正常[root@xsk ~]# tail -f /var/log/nginx/b.com.access.log192.168.200.138 - - [04/Dec/2022:15:03:44 +0800] "GET / HTTP/1.1" 304 0 "-" "Mozilla/5.0 (X11; Linux x86_64; rv:52.0) Gecko/20100101 Firefox/52.0" "-"#观察a网站的日志,日志不正常[root@xsk ~]# tail -f /var/log/nginx/a.com.access.log192.168.200.138 - - [04/Dec/2022:15:05:09 +0800] "GET /1.jpg HTTP/1.1" 304 0 "http://b.com/" "Mozilla/5.0 (X11; Linux x86_64; rv:52.0) Gecko/20100101 Firefox/52.0" "-"
总结:在多次访问b网站时,a网站的日志莫名其妙的产生了,观察referer字段,发现被盗链了,这个时候就需要防盗链的技术,阻止这个行为的发生
6.启用a网站的防盗链功能
#在a网站的配置文件中location / {的下面添加以下内容[root@xsk ~]# vim /etc/nginx/conf.d/a.com.conf5 location / {6 valid_referers none blocked *.a.com; #没有人可以引用,锁住所有的a.com7 if ($invalid_referer){ #如果有人访问我,就返回403包括,此时a网站也是不能访问的8 return 403;9 }#重启nginx[root@xsk ~]# systemctl restart nginx#在linux客户机上打开火狐浏览器再次访问b.com,此时页面丢失,设置防盗链成功
7.如果希望某些网站能够使用盗链资源,怎么操作?请看下面操作(白名单功能)
[root@xsk ~]# vim /etc/nginx/conf.d/a.com.conf1 server {2 access_log /var/log/nginx/a.com.access.log main;3 listen 80;4 server_name a.com;5 location / {6 valid_referers none blocked *.a.com server_name~\.google\. ~\.baidu\. b.com 192.168.200.* a.com;#像是以.google结束的网站,像是以.baidu结束的网站,b.com,192.168.200.*整个200网段,b.com;7 if ($invalid_referer){8 return 403;9 }10 root /a.com;11 index index.html;12 }13 }
再次盗链,用linux客户机打开火狐浏览器访问两个网站,显示页面的都是a网站的图片,设置白名单成功
9.Nginx 访问限制
ngx_http_limit_req_module
目的:限制http请求
1.测试未限制情况下的访问
#安装压力测试工具[root@xsk ~]# yum -y install httpd-tools#设置域名解析[root@xsk ~]# vim /etc/hosts192.168.200.149 xsk.com a.com#开始测试[root@xsk ~]# ab -n 100 -c 10 http://a.com/ #发起一百次请求,分十次发送,向a.com网站的根目录发送Benchmarking a.com (be patient).....doneServer Software: nginx/1.22.1 #服务器版本Server Hostname: a.com #服务器主机名Server Port: 80 #服务器端口Document Path: / #申请内容根目录Document Length: 20 bytes #文档长度Concurrency Level: 10 #发送了10次Time taken for tests: 0.003 seconds #测试总耗时Complete requests: 100 #完成100次的请求Failed requests: 0 #失败0次Write errors: 0 #写入错误0次Total transferred: 25100 bytes #已经传输了25100字节HTML transferred: 2000 bytes #HTML传输了2000字节Requests per second: 36153.29 [#/sec] (mean) #吞吐率Time per request: 0.277 [ms] (mean) #平均等待时间Time per request: 0.028 [ms] (mean, across all concurrent requests)Transfer rate: 8861.79 [Kbytes/sec] receivedConnection Times (ms)min mean[+/-sd] median maxConnect: 0 0 0.0 0 0Processing: 0 0 0.0 0 0Waiting: 0 0 0.0 0 0Total: 0 0 0.1 0 0Percentage of the requests served within a certain time (ms)50% 066% 075% 080% 090% 095% 098% 099% 0100% 0 (longest request)
启动限制,共两步,定义和引用
定义:limit_req_zone binary_remote_addr:二进制地址
zone=req_zone:限制策略的名称
10m:占用10M空间
rate=1r/s:允许每秒一次请求引用:limit_rep zone=req_zone (引用限制策略的名称)
2.定义
[root@xsk ~]# vim /etc/nginx/nginx.conf#在http模块内,在http {的下面添加以下的内容14 http {15 limit_req_zone $binary_remote_addr zone=req_zone:10m rate=1r/s; #定义#在a.com的配置文件中引用,在location / {下面添加以下内容[root@xsk ~]# vim /etc/nginx/conf.d/a.com.conf1 server {2 access_log /var/log/nginx/a.com.access.log main;3 listen 80;4 server_name a.com;5 location / {6 limit_req zone=req_zone; #引用#重启nginx[root@xsk ~]# systemctl restart nginx
3.再次进行压力测试
[root@xsk ~]# ab -n 100 -c 10 http://a.com/Concurrency Level: 10Time taken for tests: 0.003 secondsComplete requests: 100Failed requests: 99(Connect: 0, Receive: 0, Length: 99, Exceptions: 0)Write errors: 0Non-2xx responses: 99Total transferred: 36782 bytesHTML transferred: 19523 bytesRequests per second: 35186.49 [#/sec] (mean)Time per request: 0.284 [ms] (mean)Time per request: 0.028 [ms] (mean, across all concurrent requests)Transfer rate: 12638.96 [Kbytes/sec] receivedConnection Times (ms)min mean[+/-sd] median maxConnect: 0 0 0.0 0 0Processing: 0 0 0.0 0 0Waiting: 0 0 0.0 0 0Total: 0 0 0.1 0 1Percentage of the requests served within a certain time (ms)50% 066% 075% 080% 090% 095% 098% 099% 1100% 1 (longest request)#查看测试结果发现发起了100次请求,但是99次请求都被拒绝了,因为设置限制以后,服务器认为恶意攻击
4.观察错误日志,99个访问拒绝的日志
[root@xsk ~]# cat /var/log/nginx/error.log2022/12/04 17:07:19 [error] 2065#2065: *71 limiting requests, excess: 0.999 by zone "req_zone", client: 192.168.200.149, server: a.com, request: "GET / HTTP/1.0", host: "a.com"
bngx_http_limit_conn_module
目的:通过IP地址,限制连接(TCP)。实验环境无法测试
1.启动连接频率限制,和限制http请求基本一样
[root@xsk ~]# vim /etc/nginx/nginx.confhttp {limit_conn_zone $binary_remote_addr zone=conn_zone:10m;}[root@xsk ~]# vim /etc/nginx/conf.d/a.com.confserver {location / {...limit_conn conn_zone 1;}}
2.测试
ab -n 100 -c 10 http://服务器IP地址/
了解不同的网站压力测试工具
- LoadRunner(商用版)官网:https://saas.hpe.com/zh-cn/software/loadrunner
- kylinTOP测试与监控平台(商用版)官网地址:http://www.70testing.com
- Apache JMeter(开源免费)官网链接:http://jmeter.apache.org/
- Webbench是知名的网站压力测试工具,它是由Lionbridge公司(http://www.lionbridge.com)开发。
二.Nginx 访问控制
1.基于主机(IP)
模块:
ngx_http_access_module
两个关键指令
allow允许某些主机
deny拒绝某些主机语法:
allow address |网段 | unix:|all;
适用范围:http,server,location,limit_except
示例
1.限制主机访问
#在server {的下面添加2-3行的内容[root@xsk ~]# vim /etc/nginx/conf.d/a.com.conf1 server {2 allow 192.168.200.1; #允许这个主机访问3 deny all; #所有的主机都拒绝4 access_log /var/log/nginx/a.com.access.log main;5 listen 80;6 server_name a.com;7 location / {8 #limit_req zone=req_zone; #注释掉此行,前面实验的设置会影响本次实验#重启nginx[root@xsk ~]# systemctl restart nginx
2.测试
打开linux客户机的火狐浏览器访问a.com页面,显示“403 Forbidden”,因为我客户机的IP是192.168.200.138,属于被拒绝的主机,设置成功
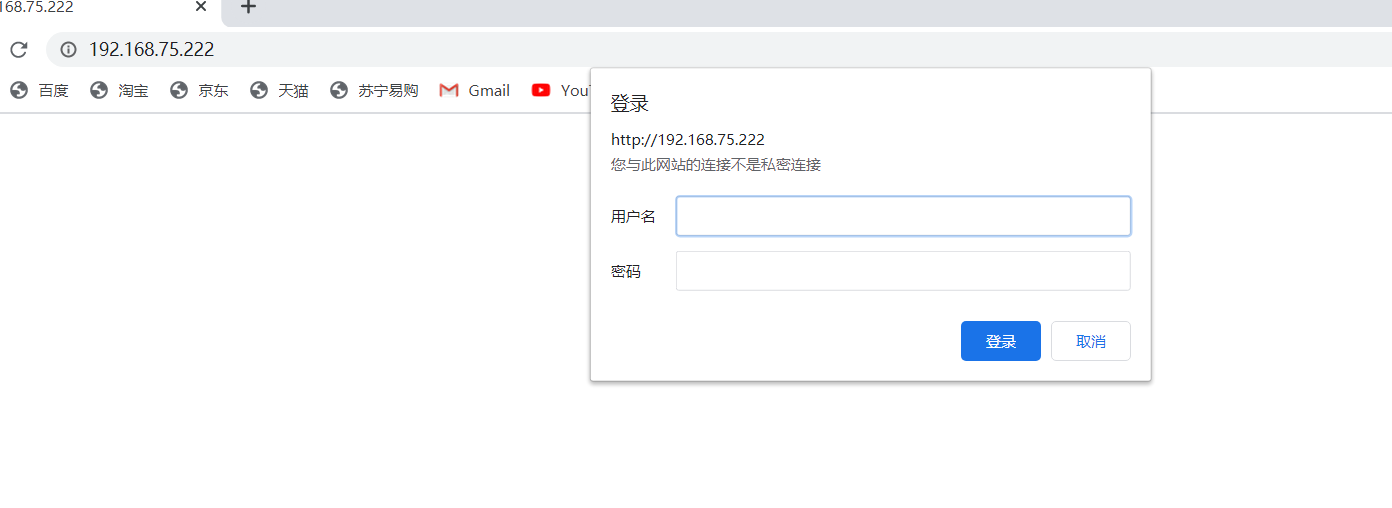
2.基于用户(username&password)
模块:ngx_http_auth_basic_module
语法
第一种:auth_basic string| off;
适用范围:http,server,location,limit_except第二种(常用):auth_basic_user_file file;
通过加密文件,加密文件是独立存储的,需要调用
适用范围:http,server,location,limit_except
示例
1.建立认证文件
#安装需要加密的工具[root@xsk ~]# yum -y install http-tools#为用户创建密码[root@xsk ~]# htpasswd -cm /etc/nginx/conf.d/passwd user10New password: #输入需要设置的密码Re-type new password: #再次输入Adding password for user user10 #为用户10创建密码[root@xsk ~]# htpasswd -m /etc/nginx/conf.d/passwd user20New password:Re-type new password:Adding password for user user20#参数解释:-c:创建新的文件,如果文件已存在,去掉-c参数-m:加密#查看创建的口令文件[root@xsk ~]# cat /etc/nginx/conf.d/passwduser10:$apr1$Hd/4RhCb$CTHA9q6.9w3vNr3h6w9Ek.user20:$apr1$LTRvquy1$YI2b1aTWYmITIlVrk543G/
2.启动认证
#在a.com的配置文件中,server {的下面写入以下内容2-3行[root@xsk ~]# vim /etc/nginx/conf.d/a.com.conf1 server {2 auth_basic "lai le lao di!!"; #认证基础信息“欢迎词”3 auth_basic_user_file /etc/nginx/conf.d/passwd; #基础认证文件的位置4 #allow 192.168.200.1; #把上个实验的两行注释掉,不然无法访问5 #deny all;#重启nginx[root@xsk ~]# systemctl restart nginx
3.测试
打开linux客户机的火狐浏览器,访问a.com的页面,需要用户名和密码才能看到页面内容,输入刚才设置的两个用户名和对应的密码进行访问