@Tyhj
2019-12-11T12:47:16.000000Z
字数 10470
阅读 1636
实现Android换肤
Android
之前看过一点关于Android换肤的文章,插件化、Hook、无缝换肤什么的,听起来好像很难的样子,也没有好好看;现在关于换肤的开源项目现在也比较多,但其实原理都差不多;最近看了一下,自己实现了一波,感觉还是很简单的样子;这里也只是讲讲换肤的原理,知道了原理每个点就可以快速学习,然后完成整个流程;具体实现可以看代码;

换肤原理
换肤其实很简单,说白了就是修改View的属性,一般就是修改字体颜色、背景、图片等;如果是一个超级简单的界面,最简单的实现方式就是点击换肤的时候把每一个View都重新设置一下属性就完事了;
View设置属性简单吧,问题就在于在实际项目中不可能手动去获取到每一个控件进行换肤,因为控件太多了;那么问题就变为如何获取到所有的控件进行属性设置;然后换肤,其实就是换一套皮肤,换一套资源文件对吧,如何去更换资源文件也是一个问题
使用theme实现
Activity的theme属性肯定都有用过,theme里面可以设置各种属性,更改了theme里面的属性比如颜色,我们的导航栏什么的使用了theme里面的颜色属性的控件颜色都会改变;可以从这个点入手,设置不同的theme,然后更换theme就可以实现;但是有一个问题,设置theme只有在activity的setContentView之前才有效,所以要实现换肤必须得重启Activity才能实现,而且每次新增皮肤必须重新修改源码,重新打包,这种方法感觉不太行;
获取到所有View
所以还是那个问题,如何获取到所有的View进行换肤处理;有一个点就是每个Activity都有setContentView方法,其实猜也能猜到,就是把xml布局解析成一个View对象;有点像AOP(面向切面编程)的思想,如果我们能从这个点切入,拿到每一个生成的View对象,我们就可以统一处理了;
那就是去看源码了,其实很简单,我的MainActivity继承至AppCompatActivity,跟着方法深入下去
@Overrideprotected void onCreate(Bundle savedInstanceState) {super.onCreate(savedInstanceState);setContentView(R.layout.activity_main);...
AppCompatActivity里面的方法,我们跟着layoutResID走,直到layoutResID变为View
@Overridepublic void setContentView(@LayoutRes int layoutResID) {getDelegate().setContentView(layoutResID);}
AppCompatDelegate里面的抽象方法
public abstract void setContentView(@LayoutRes int resId);
AppCompatDelegateImpl里面的实现,其实看到LayoutInflater.from(mContext).inflate(resId, contentParent);这句代码就很熟悉了,我们也会经常使用它去加载布局;
@Overridepublic void setContentView(int resId) {ensureSubDecor();ViewGroup contentParent = (ViewGroup) mSubDecor.findViewById(android.R.id.content);contentParent.removeAllViews();LayoutInflater.from(mContext).inflate(resId, contentParent);mOriginalWindowCallback.onContentChanged();}
还是一样跟着resId走到LayoutInflater里面
public View inflate(@LayoutRes int resource, @Nullable ViewGroup root, boolean attachToRoot) {final Resources res = getContext().getResources();if (DEBUG) {Log.d(TAG, "INFLATING from resource: \"" + res.getResourceName(resource) + "\" ("+ Integer.toHexString(resource) + ")");}final XmlResourceParser parser = res.getLayout(resource);try {return inflate(parser, root, attachToRoot);} finally {parser.close();}}
走到这个方法是返回生成的View,那生成View肯定是在inflate(parser, root, attachToRoot);方法里面
public View inflate(@LayoutRes int resource, @Nullable ViewGroup root, boolean attachToRoot) {final Resources res = getContext().getResources();if (DEBUG) {Log.d(TAG, "INFLATING from resource: \"" + res.getResourceName(resource) + "\" ("+ Integer.toHexString(resource) + ")");}final XmlResourceParser parser = res.getLayout(resource);try {return inflate(parser, root, attachToRoot);} finally {parser.close();}}
找到了生成View的地方
// Temp is the root view that was found in the xmlfinal View temp = createViewFromTag(root, name, inflaterContext, attrs);
继续看createViewFromTag方法,里面使用各种Factory去创建View
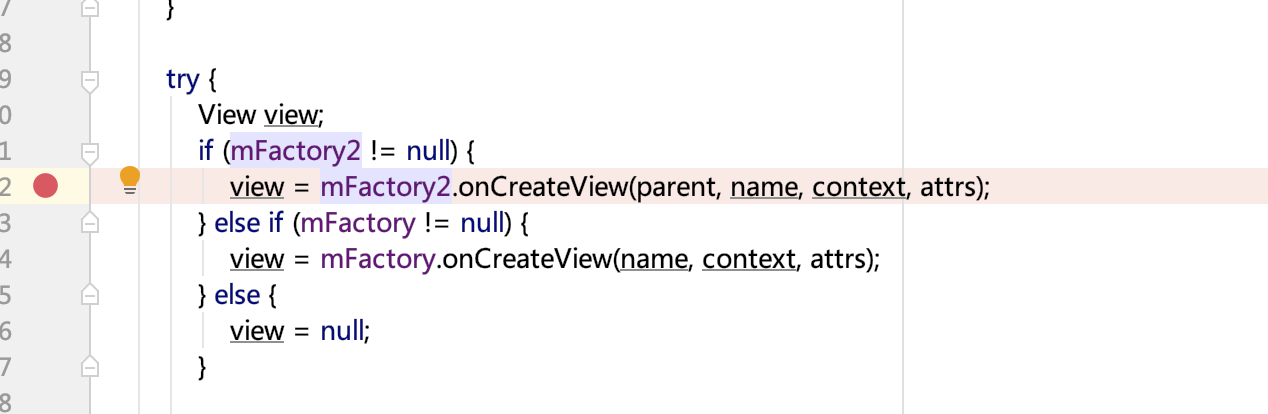
try {View view;if (mFactory2 != null) {view = mFactory2.onCreateView(parent, name, context, attrs);} else if (mFactory != null) {view = mFactory.onCreateView(name, context, attrs);} else {view = null;}if (view == null && mPrivateFactory != null) {view = mPrivateFactory.onCreateView(parent, name, context, attrs);}if (view == null) {final Object lastContext = mConstructorArgs[0];mConstructorArgs[0] = context;try {if (-1 == name.indexOf('.')) {view = onCreateView(parent, name, attrs);} else {view = createView(name, null, attrs);}} finally {mConstructorArgs[0] = lastContext;}}return view;
好的,就是这里了,因为所有加载xml布局创建View的流程都会走到这里来,然后Factory只是一个接口,到这里后从逻辑也可以看出来可能会有不同的Factory去创建View,也就是说不能再深入下去了;我们只需要实现我们的Factory然后设置给mFactory2就可以获取到所有的View了,这里是一个Hook点;
那么问题来了,我们怎么去实现用Factory创建View,这里xml里面的东西已经解析完了,看这个方法的参数,有了attrs和控件类名name,我们自己用反射不就轻松的可以生成View吗;
View createViewFromTag(View parent, String name, Context context, AttributeSet attrs,boolean ignoreThemeAttr) {...
还有有最简单的方法,其实系统原来已经实现了对吧,我们照着他写不就完事儿了吗;我们在这里打个断点,进入这个方法,他怎么实现我们就跟着写就完事儿了;
发现是在AppCompatDelegateImpl这个类实现的方法,好的直接看retur的地方,进去进入方法
@Overridepublic View createView(View parent, final String name, @NonNull Context context,@NonNull AttributeSet attrs) {if (mAppCompatViewInflater == null) {TypedArray a = mContext.obtainStyledAttributes(R.styleable.AppCompatTheme);String viewInflaterClassName =a.getString(R.styleable.AppCompatTheme_viewInflaterClass);if ((viewInflaterClassName == null)|| AppCompatViewInflater.class.getName().equals(viewInflaterClassName)) {// Either default class name or set explicitly to null. In both cases// create the base inflater (no reflection)mAppCompatViewInflater = new AppCompatViewInflater();} else {try {Class viewInflaterClass = Class.forName(viewInflaterClassName);mAppCompatViewInflater =(AppCompatViewInflater) viewInflaterClass.getDeclaredConstructor().newInstance();} catch (Throwable t) {Log.i(TAG, "Failed to instantiate custom view inflater "+ viewInflaterClassName + ". Falling back to default.", t);mAppCompatViewInflater = new AppCompatViewInflater();}}}boolean inheritContext = false;if (IS_PRE_LOLLIPOP) {inheritContext = (attrs instanceof XmlPullParser)// If we have a XmlPullParser, we can detect where we are in the layout? ((XmlPullParser) attrs).getDepth() > 1// Otherwise we have to use the old heuristic: shouldInheritContext((ViewParent) parent);}return mAppCompatViewInflater.createView(parent, name, context, attrs, inheritContext,IS_PRE_LOLLIPOP, /* Only read android:theme pre-L (L+ handles this anyway) */true, /* Read read app:theme as a fallback at all times for legacy reasons */VectorEnabledTintResources.shouldBeUsed() /* Only tint wrap the context if enabled */);}
好的,终于看见最终的方法了
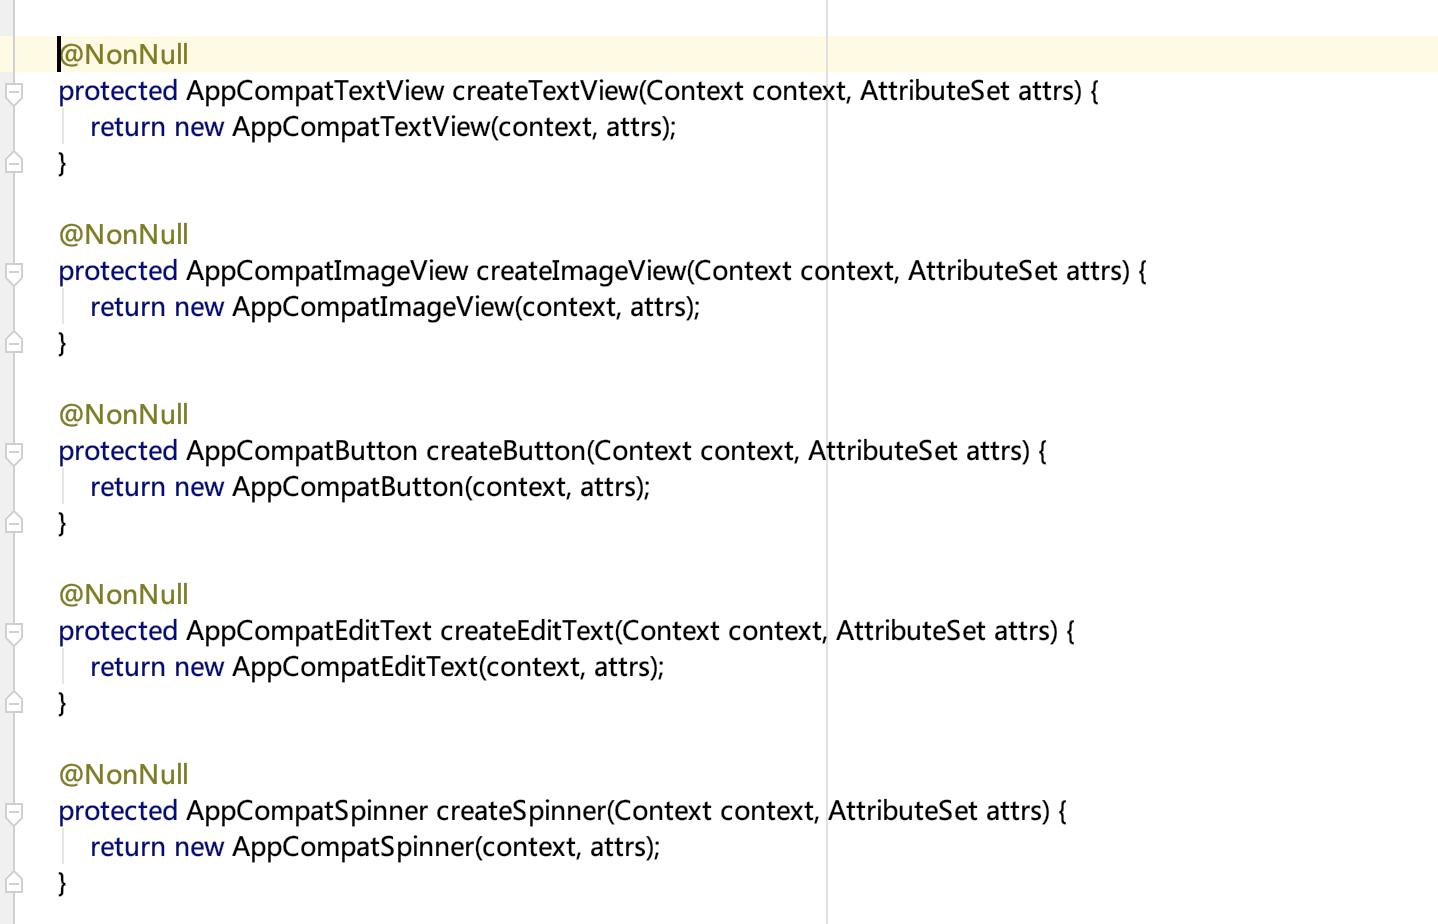
final View createView(View parent, final String name, @NonNull Context context,@NonNull AttributeSet attrs, boolean inheritContext,boolean readAndroidTheme, boolean readAppTheme, boolean wrapContext) {final Context originalContext = context;// We can emulate Lollipop's android:theme attribute propagating down the view hierarchy// by using the parent's contextif (inheritContext && parent != null) {context = parent.getContext();}if (readAndroidTheme || readAppTheme) {// We then apply the theme on the context, if specifiedcontext = themifyContext(context, attrs, readAndroidTheme, readAppTheme);}if (wrapContext) {context = TintContextWrapper.wrap(context);}View view = null;// We need to 'inject' our tint aware Views in place of the standard framework versionsswitch (name) {case "TextView":view = createTextView(context, attrs);verifyNotNull(view, name);break;case "ImageView":view = createImageView(context, attrs);verifyNotNull(view, name);break;case "Button":view = createButton(context, attrs);verifyNotNull(view, name);break;case "EditText":view = createEditText(context, attrs);verifyNotNull(view, name);break;case "Spinner":view = createSpinner(context, attrs);verifyNotNull(view, name);break;case "ImageButton":view = createImageButton(context, attrs);verifyNotNull(view, name);break;case "CheckBox":view = createCheckBox(context, attrs);verifyNotNull(view, name);break;case "RadioButton":view = createRadioButton(context, attrs);verifyNotNull(view, name);break;case "CheckedTextView":view = createCheckedTextView(context, attrs);verifyNotNull(view, name);break;case "AutoCompleteTextView":view = createAutoCompleteTextView(context, attrs);verifyNotNull(view, name);break;case "MultiAutoCompleteTextView":view = createMultiAutoCompleteTextView(context, attrs);verifyNotNull(view, name);break;case "RatingBar":view = createRatingBar(context, attrs);verifyNotNull(view, name);break;case "SeekBar":view = createSeekBar(context, attrs);verifyNotNull(view, name);break;default:// The fallback that allows extending class to take over view inflation// for other tags. Note that we don't check that the result is not-null.// That allows the custom inflater path to fall back on the default one// later in this method.view = createView(context, name, attrs);}if (view == null && originalContext != context) {// If the original context does not equal our themed context, then we need to manually// inflate it using the name so that android:theme takes effect.view = createViewFromTag(context, name, attrs);}if (view != null) {// If we have created a view, check its android:onClickcheckOnClickListener(view, attrs);}return view;}
仔细看的话,它创建出来的控件都是androidx.appcompat.widget里面的一些比较新的控件,就是升了一下级;其实感觉mFactory2就是Google自己修改皮肤用的;
如果我们的MainActivity继承至Activity的话,同样打断点会进入到另一个创建View的方法;虽然看起来代码很复杂,我们只要记住我们只是来创建View的,其他我们不管,我们自己实现的时候也是这个道理,我们就是实现创建View的方法;所以直接看创建View很简单了,就是直接用反射,传入View的参数AttributeSet,new一个View出来
...Object[] args = mConstructorArgs;args[1] = attrs;final View view = constructor.newInstance(args);...
这里还有个问题,既然这里可能有不同的Factory来创建View,我们随便实现一个,去设置给mFactory2,那肯定只会用我们的mFactory2来创建了;那是不是有问题,那我们的MainActivity其实继承Activity还是AppCompatActivity都会走我们自己的方法了;那我们的这个Factory到底是应该照着AppCompatActivity走的方法来写还是Activity走的这个方法来写,或者还有其他的方法来写
其实问题不大,正常开发中我们一般只会选一个Activity来做我们的BaseActivity是吧,我们就按照BaseActivity继承的这种类型来写;而且不同的Activity也可以,因为每个Activity的LayoutInflater是不一样的,我们可以实现不同的Factory分别设置给不同的Activity的LayoutInflater就行了;
好的在这里我们实现自己的Factory去创建View对象,就可以趁机保存所有的对象,然后当我们想换肤的时候就可以把每一个对象的属性修改就可以了;至于这里View怎么保存,怎么销毁,怎么防止内存泄漏这些小问题简单提一下,全局监听一下Activity的生命周期就完事了
application.registerActivityLifecycleCallbacks(new SkinActivityLifecycleCallbacks());
更换资源文件
如何更换资源文件?插件化换肤感觉是最好的方法,通过一个皮肤包,可以理解为我们更换了一套皮肤后重新打的一个apk包;这样点击换肤的时候,我们拿到每一个View控件,获取到当前View对应属性的资源的ID,然后通过这个ID去皮肤包里面获取出对应的资源对象,然后设置给当前View就完成了换肤;
这里面有一个点,就是我们没法更换我们运行的APP里面的资源文件,我们只是从皮肤包里面读取出相应的资源,比如图片,就是读取出Drawable对象,通过setImageDrawable设置给当前的View;
具体如何去读取其实很简单,就是AssetManager通过反射设置apk文件的路径,就可以拿到Resources对象,Resources就可以通过resId拿到各种资源对象;
AssetManager assetManager = AssetManager.class.newInstance();Method method = assetManager.getClass().getMethod("addAssetPath", String.class);method.setAccessible(true);method.invoke(assetManager, path);Resources resources = mApplication.getResources();Resources skinRes = new Resources(assetManager, resources.getDisplayMetrics(), resources.getConfiguration());//根据ID获取到资源文件Drawable drawable = skinRes.getDrawable(resId);
其实通过皮肤包来实现非常方便,不管是想内置几种皮肤还是上线后更新皮肤包都可以实现,而且不需要改动之前的代码;
整体流程
总结一下,其实就是APP启动的时候,通过application.registerActivityLifecycleCallbacks();,监听Activity的生命周期;每个Activity启动的时候,获取Activity的布局加载器LayoutInflater,给它设置一个Factory,首先会用它去创建View,在创建的时候就会给View设置指定皮肤包里面的资源了;然后保存这个Activity里面的每一个View,当再次换肤的时候获取到每一个View,重新设置指定皮肤的资源;当然Activity销毁的时候肯定是要释放掉View的;大致的流程就是这样
缺点
这个东西肯定是有缺点的,我们只是针对布局加载器LayoutInflater进行换肤,也就是说,只要是通过LayoutInflater创建的View我们都可以进行换肤;但是如果有些View是我们new出来的,是换不了的,解决方法也很简单,就是手动添加到换肤的View集合里面去;
第二是只换资源文件里面的属性,这没什么好说的,本来就是根据资源文件换肤;
第三就是和theme相关的控件颜色没法换,这个很简单,因为我们从皮肤包里面是获取不到theme对象的;其实获取到也没有办法,因为重新给Activity设置theme是必须重启Activity的;我自己各种看源码,各种反射搞了半天,发现这个东西的确是搞不定的,这个东西比较复杂,因为它不是一个具体的资源文件;
解决方法是在加载View的时候判断一下View,比如RadioButton或者TabLayout这种可以设置属性进去的就单独改改很简单,但是你要是涉及到那些只能跟随theme属性的控件比如Switch这种,那的确是换不了的,theme换不掉,没办法修改颜色;
if (view instanceof RadioButton) {if (isDrawable()) {RadioButton radioButton = (RadioButton) view;Drawable drawable = SkinResourcesUtils.getDrawable(attrValueRefId);radioButton.setButtonDrawable(drawable);}}if (view instanceof TabLayout) {TabLayout tl = (TabLayout) view;if (isColor()) {int color = SkinResourcesUtils.getColor(attrValueRefId);tl.setSelectedTabIndicatorColor(color);}}
上面存在的这些小问题,只能说有相应的替代方案,做不到完美;包括自定义Factory也是一样的,包括自定义View也需要自己适配,换肤这种东西感觉没有一个万能的,完美的方案,只能是针对不同的项目有不同的解决方法;
其实还是不错了,有些问题虽然存在,但是实际项目中换肤应该都比较简单,随便写写,适配一下肯定没问题的;
