@carlchen
2017-04-27T05:54:06.000000Z
字数 24933
阅读 939
第四章:进化!模块化你的应用
前端Angular2教程
一个复杂组件的分拆
上一节的末尾我们堆砌了大量代码,可能你看起来都有点晕了,这就是典型的一个功能经过一段时间的需求累积后,代码也不可避免的臃肿起来。现在我们看看怎么分拆一下吧。
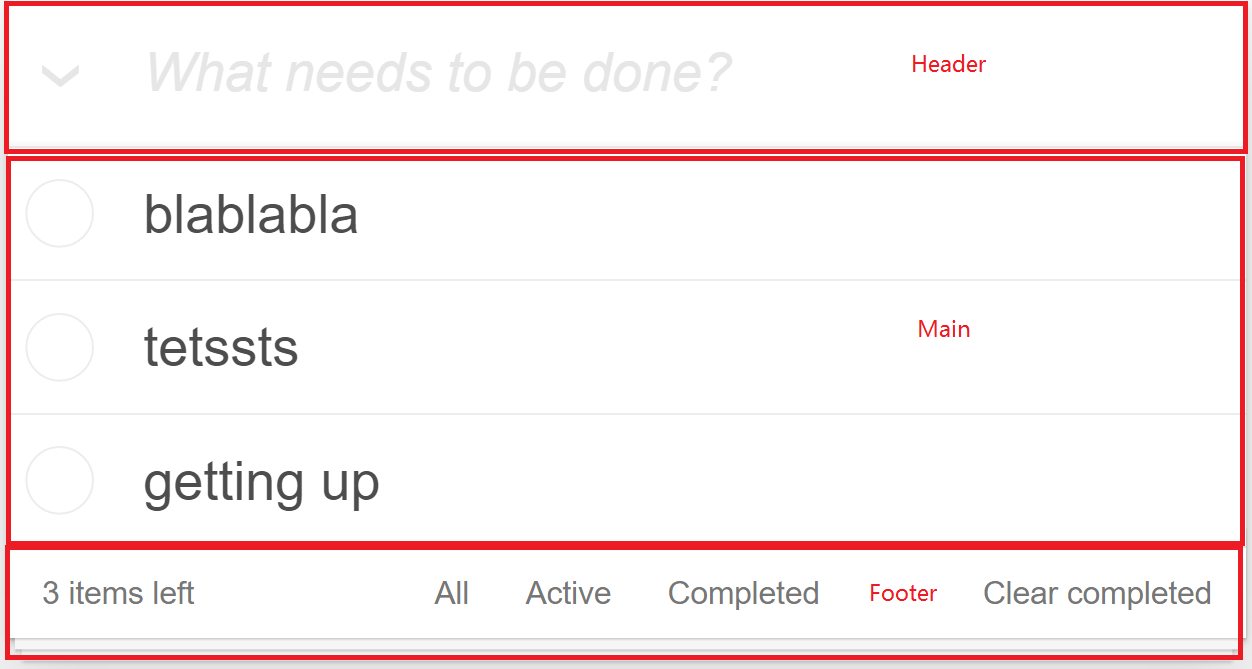
我们的应用似乎可以分为Header,Main和Footer几部分。首先我们来建立一个新的Component,键入ng g c todo/todo-footer。然后将src\app\todo\todo.component.html中的<footer>...</footer>段落剪切到src\app\todo\todo-footer\todo-footer.component.html中。
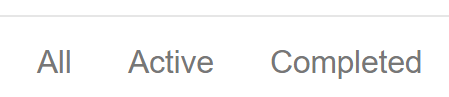
<footer class="footer" *ngIf="todos?.length > 0"><span class="todo-count"><strong>{{todos?.length}}</strong> {{todos?.length == 1 ? 'item' : 'items'}} left</span><ul class="filters"><li><a href="">All</a></li><li><a href="">Active</a></li><li><a href="">Completed</a></li></ul><button class="clear-completed">Clear completed</button></footer>
观察上面的代码,我们看到似乎所有的变量都是todos?.length,这提醒我们其实对于Footer来说,我们并不需要传入todos,而只需要给出一个item计数即可。那么我们来把所有的todos?.length改成itemCount。
<footer class="footer" *ngIf="itemCount > 0"><span class="todo-count"><strong>{{itemCount}}</strong> {{itemCount == 1 ? 'item' : 'items'}} left</span><ul class="filters"><li><a href="">All</a></li><li><a href="">Active</a></li><li><a href="">Completed</a></li></ul><button class="clear-completed">Clear completed</button></footer>
这样的话也就是说如果在src\app\todo\todo.component.html中我们可以用<app-todo-footer [itemCount]="todos?.length"></app-todo-footer>去传递todo项目计数给Footer即可。所以在src\app\todo\todo.component.html中刚才我们剪切掉代码的位置加上这句吧。当然,如果要让父组件可以传递值给子组件,我们还需要在子组件中声明一下。@Input()是输入型绑定的修饰符,用于把数据从父组件传到子组件。
import { Component, OnInit, Input } from '@angular/core';@Component({selector: 'app-todo-footer',templateUrl: './todo-footer.component.html',styleUrls: ['./todo-footer.component.css']})export class TodoFooterComponent implements OnInit {//声明itemCount是可以一个可输入值(从引用者处)@Input() itemCount: number;constructor() { }ngOnInit() {}}
运行一下看看效果,应该一切正常!
输入和输出属性
类似的我们建立一个Header组件,键入ng g c todo/todo-header,同样的把下面的代码从src\app\todo\todo.component.html中剪切到src\app\todo\todo-header\todo-header.component.html中
<header class="header"><h1>Todos</h1><input class="new-todo" placeholder="What needs to be done?" autofocus="" [(ngModel)]="desc" (keyup.enter)="addTodo()"></header>
这段代码看起来有点麻烦,主要原因是我们好像不但需要给子组件输入什么,而且希望子组件给父组件要输出一些东西,比如输入框的值和按下回车键的消息等。当然你可能猜到了,Angular2里面有@Input()就相应的有@Output()修饰符。
我们希望输入框的占位文字(没有输入的情况下显示的默认文字)是一个输入型的参数,在回车键抬起时可以发射一个事件给父组件,同时我们也希望在输入框输入文字时父组件能够得到这个字符串。也就是说父组件调用子组件时看起来是下面的样子,相当于我们自定义的组件中提供一些事件,父组件调用时可以写自己的事件处理方法,而$event就是子组件发射的事件对象:
<app-todo-headerplaceholder="What do you want"(onTextChanges)="onTextChanges($event)"(onEnterUp)="addTodo()" ></app-todo-header>
但是第三个需求也就是“在输入框输入文字时父组件能够得到这个字符串”,这个有点问题,如果每输入一个字符都要回传给父组件的话,系统会过于频繁进行这种通信,有可能会有性能的问题。那么我们希望可以有一个类似滤波器的东东,它可以过滤掉一定时间内的事件。因此我们定义一个输入型参数delay。
<app-todo-headerplaceholder="What do you want"delay="400"(textChanges)="onTextChanges($event)"(onEnterUp)="addTodo()" ></app-todo-header>
现在的标签引用应该是上面这个样子,但我们只是策划了它看起来是什么样子,还没有做呢。我们一起动手看看怎么做吧。
todo-header.component.html的模板中我们调整了一些变量名和参数以便让大家不混淆子组件自己的模板和父组件中引用子组件的模板片段。
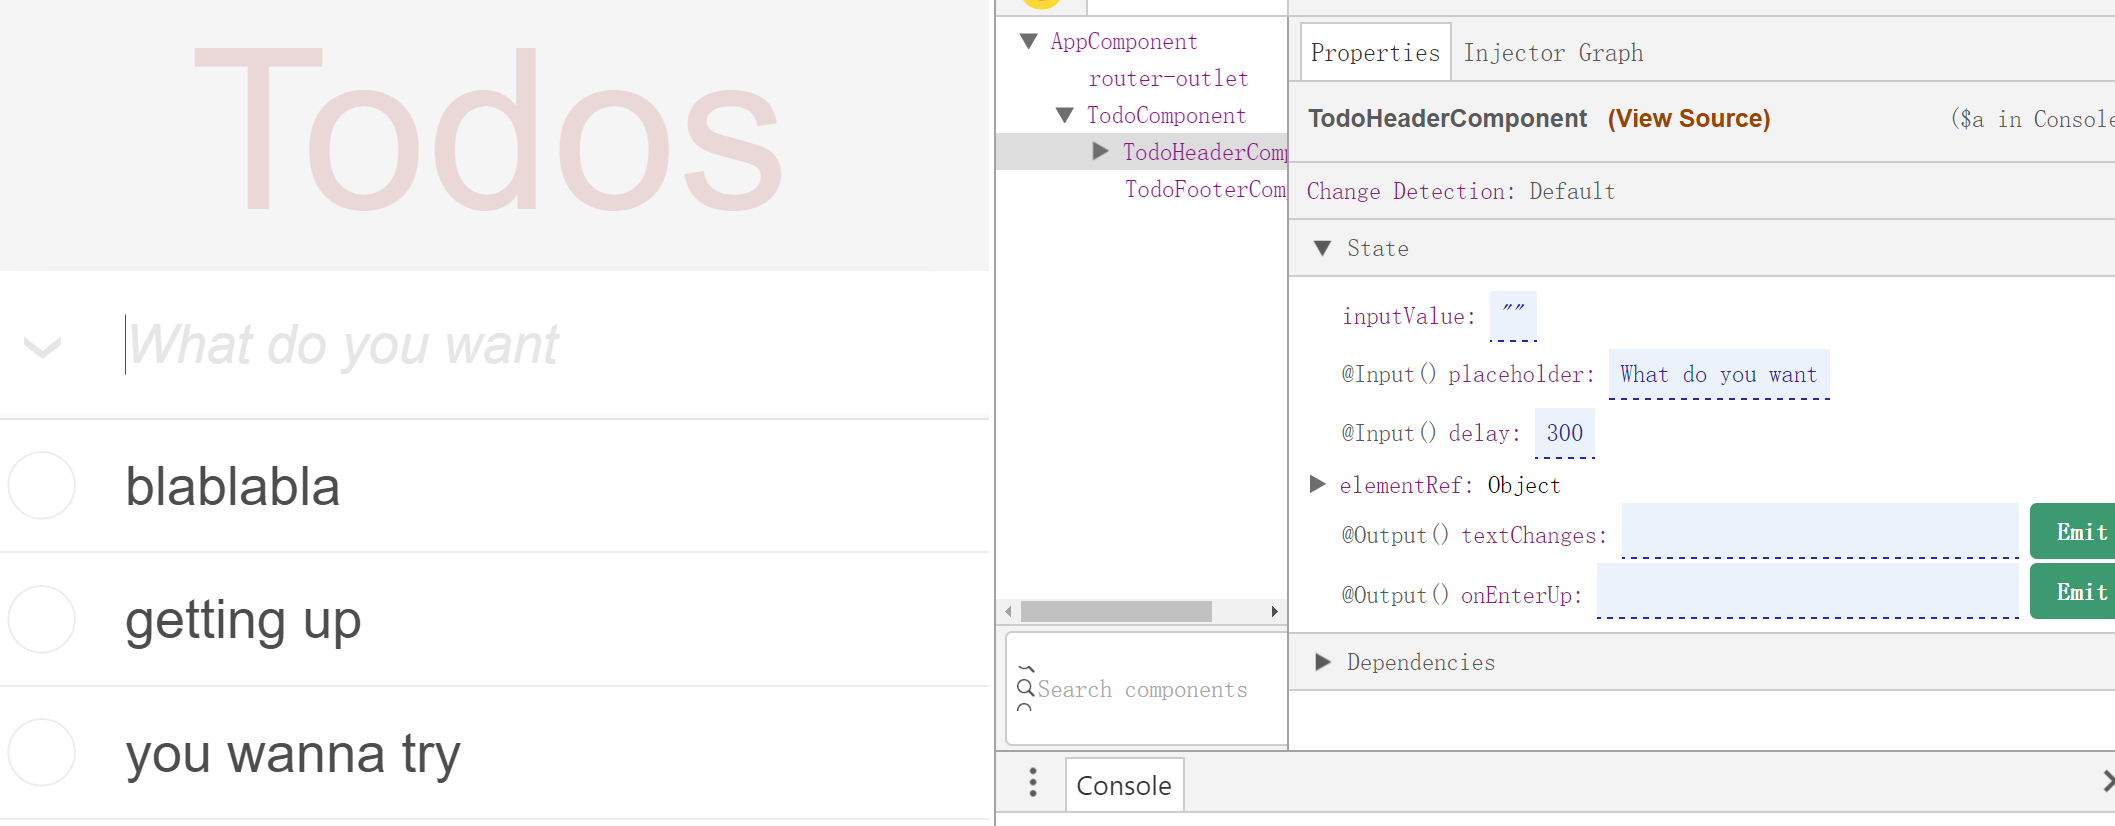
//todo-header.component.html<header class="header"><h1>Todos</h1><inputclass="new-todo"[placeholder]="placeholder"autofocus=""[(ngModel)]="inputValue"(keyup.enter)="enterUp()"></header>
牢记子组件的模板是描述子组件自己长成什么样子,应该有哪些行为,这些东西和父组件没有任何关系。比如todo-header.component.html中的placeholder就是HTML标签Input中的一个属性,和父组件没有关联,如果我们不在todo-header.component.ts中声明@Input() placeholder,那么子组件就没有这个属性,在父组件中也无法设置这个属性。
父组件中的声明为@Input()的属性才会成为子组件对外可见的属性,我们完全可以把@Input() placeholder声明为@Input() hintText,这样的话在引用header组件时,我们就需要这样写<app-todo-header hintText="What do you want" ...
现在看一下todo-header.component.ts
import { Component, OnInit, Input, Output, EventEmitter, ElementRef } from '@angular/core';import {Observable} from 'rxjs/Rx';import 'rxjs/Observable';import 'rxjs/add/operator/debounceTime';import 'rxjs/add/operator/distinctUntilChanged';@Component({selector: 'app-todo-header',templateUrl: './todo-header.component.html',styleUrls: ['./todo-header.component.css']})export class TodoHeaderComponent implements OnInit {inputValue: string = '';@Input() placeholder: string = 'What needs to be done?';@Input() delay: number = 300;//detect the input value and output this to parent@Output() textChanges = new EventEmitter<string>();//detect the enter keyup event and output this to parent@Output() onEnterUp = new EventEmitter<boolean>();constructor(private elementRef: ElementRef) {const event$ = Observable.fromEvent(elementRef.nativeElement, 'keyup').map(() => this.inputValue).debounceTime(this.delay).distinctUntilChanged();event$.subscribe(input => this.textChanges.emit(input));}ngOnInit() {}enterUp(){this.onEnterUp.emit(true);this.inputValue = '';}}
分析一下代码:
placeholder和delay作为2个输入型变量,这样<app-todo-header>标签中就可以设置这两个属性了。
接下来我们看到了由@Output修饰的onTextChanges和onEnterUp,这两个顾名思义是分别处理文本变化和回车键抬起事件的,这两个变量呢都定义成了EventEmitter(事件发射器)。我们会在子组件的逻辑代码中以适当的条件去发射对应事件,而父组件会接收到这些事件。我们这里采用了2中方法来触发发射器
- enterUp:这个是比较常规的方法,在
todo-header.component.html中我们定义了(keyup.enter)="enterUp()",所以在组件的enterUp方法中,我们直接让onEnterUp发射了对应事件。 - 构造器中使用Rx:这里涉及了很多新知识,首先我们注入了ElementRef,这个是一个Angular中需要谨慎使用的对象,因为它可以让你直接操作DOM,也就是HTML的元素和事件。同时我们使用了Rx(响应式对象),Rx是一个很复杂的话题,这里我们不展开了,但我们主要是利用Observable去观察HTML中的keyup事件,然后在这个事件流中做一个转换把输入框的值发射出来(map),应用一个时间的滤波器(debounceTime),然后应用一个筛选器(distinctUntilChanged)。这里由于这个事件的发射条件是依赖于输入时的当时条件,我们没有办法按前面的以模板事件触发做处理。
最后需要在todo.component.ts中加入对header输出参数发射事件的处理
onTextChanges(value) {this.desc = value;}
最后由于组件分拆后,我们希望也分拆一下css, todo-header.component.css , todo-footer.component.css 和 todo.component.css 都需要更新。
todo-header.component.css的样式如下:
h1 {position: absolute;top: -155px;width: 100%;font-size: 100px;font-weight: 100;text-align: center;color: rgba(175, 47, 47, 0.15);-webkit-text-rendering: optimizeLegibility;-moz-text-rendering: optimizeLegibility;text-rendering: optimizeLegibility;}input::-webkit-input-placeholder {font-style: italic;font-weight: 300;color: #e6e6e6;}input::-moz-placeholder {font-style: italic;font-weight: 300;color: #e6e6e6;}input::input-placeholder {font-style: italic;font-weight: 300;color: #e6e6e6;}.new-todo {position: relative;margin: 0;width: 100%;font-size: 24px;font-family: inherit;font-weight: inherit;line-height: 1.4em;border: 0;color: inherit;padding: 6px;border: 1px solid #999;box-shadow: inset 0 -1px 5px 0 rgba(0, 0, 0, 0.2);box-sizing: border-box;-webkit-font-smoothing: antialiased;-moz-osx-font-smoothing: grayscale;}.new-todo {padding: 16px 16px 16px 60px;border: none;background: rgba(0, 0, 0, 0.003);box-shadow: inset 0 -2px 1px rgba(0,0,0,0.03);}
todo-footer.component.css的样式如下
.footer {color: #777;padding: 10px 15px;height: 20px;text-align: center;border-top: 1px solid #e6e6e6;}.footer:before {content: '';position: absolute;right: 0;bottom: 0;left: 0;height: 50px;overflow: hidden;box-shadow: 0 1px 1px rgba(0, 0, 0, 0.2),0 8px 0 -3px #f6f6f6,0 9px 1px -3px rgba(0, 0, 0, 0.2),0 16px 0 -6px #f6f6f6,0 17px 2px -6px rgba(0, 0, 0, 0.2);}.todo-count {float: left;text-align: left;}.todo-count strong {font-weight: 300;}.filters {margin: 0;padding: 0;list-style: none;position: absolute;right: 0;left: 0;}.filters li {display: inline;}.filters li a {color: inherit;margin: 3px;padding: 3px 7px;text-decoration: none;border: 1px solid transparent;border-radius: 3px;}.filters li a:hover {border-color: rgba(175, 47, 47, 0.1);}.filters li a.selected {border-color: rgba(175, 47, 47, 0.2);}.clear-completed:active {float: right;position: relative;line-height: 20px;text-decoration: none;cursor: pointer;}.clear-completed:hover {text-decoration: underline;}
当然上述代码要从todo.component.css中删除,现在的todo.component.css看起来是这个样子
.todoapp {background: #fff;margin: 130px 0 40px 0;position: relative;box-shadow: 0 2px 4px 0 rgba(0, 0, 0, 0.2),0 25px 50px 0 rgba(0, 0, 0, 0.1);}.main {position: relative;z-index: 2;border-top: 1px solid #e6e6e6;}.todo-list {margin: 0;padding: 0;list-style: none;}.todo-list li {position: relative;font-size: 24px;border-bottom: 1px solid #ededed;}.todo-list li:last-child {border-bottom: none;}.todo-list li.editing {border-bottom: none;padding: 0;}.todo-list li.editing .edit {display: block;width: 506px;padding: 12px 16px;margin: 0 0 0 43px;}.todo-list li.editing .view {display: none;}.todo-list li .toggle {text-align: center;width: 40px;/* auto, since non-WebKit browsers doesn't support input styling */height: auto;position: absolute;top: 0;bottom: 0;margin: auto 0;border: none; /* Mobile Safari */-webkit-appearance: none;appearance: none;}.todo-list li .toggle:after {content: url('data:image/svg+xml;utf8,<svg xmlns="http://www.w3.org/2000/svg" width="40" height="40" viewBox="-10 -18 100 135"><circle cx="50" cy="50" r="50" fill="none" stroke="#ededed" stroke-width="3"/></svg>');}.todo-list li .toggle:checked:after {content: url('data:image/svg+xml;utf8,<svg xmlns="http://www.w3.org/2000/svg" width="40" height="40" viewBox="-10 -18 100 135"><circle cx="50" cy="50" r="50" fill="none" stroke="#bddad5" stroke-width="3"/><path fill="#5dc2af" d="M72 25L42 71 27 56l-4 4 20 20 34-52z"/></svg>');}.todo-list li label {word-break: break-all;padding: 15px 60px 15px 15px;margin-left: 45px;display: block;line-height: 1.2;transition: color 0.4s;}.todo-list li.completed label {color: #d9d9d9;text-decoration: line-through;}.todo-list li .destroy {display: none;position: absolute;top: 0;right: 10px;bottom: 0;width: 40px;height: 40px;margin: auto 0;font-size: 30px;color: #cc9a9a;margin-bottom: 11px;transition: color 0.2s ease-out;}.todo-list li .destroy:hover {color: #af5b5e;}.todo-list li .destroy:after {content: '×';}.todo-list li:hover .destroy {display: block;}.todo-list li .edit {display: none;}.todo-list li.editing:last-child {margin-bottom: -1px;}label[for='toggle-all'] {display: none;}.toggle-all {position: absolute;top: -55px;left: -12px;width: 60px;height: 34px;text-align: center;border: none; /* Mobile Safari */}.toggle-all:before {content: '❯';font-size: 22px;color: #e6e6e6;padding: 10px 27px 10px 27px;}.toggle-all:checked:before {color: #737373;}
CSS样式的一点小说明
上一张我们讲了组件CSS样式,这一章我们进一步讲一下。我们有几种方式来把样式加入组件:
- 内联在模板的 HTML 中
- 设置styles或styleUrls元数据
- 通过 CSS 文件导入
第一种方式我们也可以把它们放到 <style> 标签中来直接在 HTML 模板中嵌入样式。
@Component({selector: 'hello-app',template: `<style>button {background-color: white;border: 1px solid #777;}</style><h3>Controls</h3><button (click)="activate()">Activate</button>`})export class HelloAppComponent {/* . . . */}
第二种方式中我们可以给@Component装饰器添加一个styles数组型属性。这个数组中的每一个字符串(通常也只有一个)定义一份 CSS。
@Component({selector: 'hello-app',template: `<h1>Hello World</h1><app-hello-main></app-hello-main>`,styles: ['h1 { font-weight: normal; }']})export class HelloAppComponent {/* . . . */}
或者使用URL指定样式文件
@Component({selector: 'hello-app',template: `<h1>Hello World</h1><app-hello-main></app-hello-main>`,styleUrls: ['app/hello-app.component.css']})export class HelloAppComponent {/* . . . */}
第三种方式是通过在组件的 HTML 模板中嵌入<link>标签或通过标准的 CSS @import 规则来把其它 CSS 文件导入到我们的 CSS 文件中。
@Component({selector: 'hello-app',template: `<link rel="stylesheet" href="app/hello-app.component.css"><h3>Todos</h3>`})
像styleUrls标签一样,这个link标签的href指向的URL也是 相对于应用的根目录的 ,而不是组件文件。
通过CSS的import引入的URL 是 相对于我们执行导入操作的 CSS 文件的 ,这点需要注意。
@import 'hello-app-blablabla.css';
控制视图的封装模式
我们前面提过了,组件的CSS样式被封装进了自己的视图中,而不会影响到应用程序的其它部分。而控制视图的封装模式分为:原生 (Native)、仿真 (Emulated) 和无 (None)
- Native模式:完全隔离,外面的样式无法影响组件,组件里面的样式也无法影响外面。
- Emulated模式(默认值):全局样式可以影响组件,但组件样式无法影响外层。
- None意味着完全消除隔离特性,全局样式可以影响组件,组件样式也可以影响外层。这种情况下 Angular 不使用视图封装。Angular 会把CSS添加到全局样式中。而不会应用上前面讨论过的那些作用域规则、隔离和保护等。从本质上来说,这跟把组件的样式直接放进 HTML 是一样的。
封装成独立模块
现在我们的todo目录下好多文件了,而且我们观察到这个功能相对很独立。这种情况下我们似乎没有必要将所有的组件都声明在根模块AppModule当中,因为类似像子组件没有被其他地方用到。Angular中提供了一种组织方式,那就是模块。模块和根模块很类似,我们先在todo目录下建一个文件src\app\todo\todo.module.ts
import { CommonModule } from '@angular/common';import { NgModule } from '@angular/core';import { HttpModule } from '@angular/http';import { FormsModule } from '@angular/forms';import { routing} from './todo.routes'import { TodoComponent } from './todo.component';import { TodoFooterComponent } from './todo-footer/todo-footer.component';import { TodoHeaderComponent } from './todo-header/todo-header.component';import { TodoService } from './todo.service';@NgModule({imports: [CommonModule,FormsModule,HttpModule,routing],declarations: [TodoComponent,TodoFooterComponent,TodoHeaderComponent],providers: [{provide: 'todoService', useClass: TodoService}]})export class TodoModule {}
注意一点,我们没有引入BrowserModule,而是引入了CommonModule。导入 BrowserModule 会让该模块公开的所有组件、指令和管道在 AppModule 下的任何组件模板中直接可用,而不需要额外的繁琐步骤。CommonModule 提供了很多应用程序中常用的指令,包括 NgIf 和 NgFor 等。BrowserModule 导入了 CommonModule 并且 重新导出 了它。 最终的效果是:只要导入 BrowserModule 就自动获得了 CommonModule 中的指令。
几乎所有要在浏览器中使用的应用的 根模块 ( AppModule )都应该从 @angular/platform-browser 中导入 BrowserModule 。在其它任何模块中都 不要导入 BrowserModule,应该改成导入 CommonModule 。 它们需要通用的指令。它们不需要重新初始化全应用级的提供商。
由于和根模块很类似,我们就不展开讲了。需要做的事情是把TodoComponent中的TodoService改成用@Inject('todoService')来注入。但是注意一点,我们需要模块自己的路由定义。我们在todo目录下建立一个todo.routes.ts的文件,和根目录下的类似。
import { Routes, RouterModule } from '@angular/router';import { TodoComponent } from './todo.component';export const routes: Routes = [{path: 'todo',component: TodoComponent}];export const routing = RouterModule.forChild(routes);
这里我们只定义了一个路由就是“todo”,另外一点和根路由不一样的是export const routing = RouterModule.forChild(routes);,我们用的是forChild而不是forRoot,因为forRoot只能用于根目录,所有非根模块的其他模块路由都只能用forChild。下面就得更改根路由了,src\app\app.routes.ts看起来是这个样子:
import { Routes, RouterModule } from '@angular/router';import { LoginComponent } from './login/login.component';export const routes: Routes = [{path: '',redirectTo: 'login',pathMatch: 'full'},{path: 'login',component: LoginComponent},{path: 'todo',redirectTo: 'todo'}];export const routing = RouterModule.forRoot(routes);
注意到我们去掉了TodoComponent的依赖,而且更改todo路径定义为redirecTo到todo路径,但没有给出组件,这叫做“无组件路由”,也就是说后面的事情是TodoModule负责的。此时我们就可以去掉AppModule中引用的Todo相关的组件了。
import { BrowserModule } from '@angular/platform-browser';import { NgModule } from '@angular/core';import { FormsModule } from '@angular/forms';import { HttpModule } from '@angular/http';import { TodoModule } from './todo/todo.module';import { InMemoryWebApiModule } from 'angular-in-memory-web-api';import { InMemoryTodoDbService } from './todo/todo-data';import { AppComponent } from './app.component';import { LoginComponent } from './login/login.component';import { AuthService } from './core/auth.service';import { routing } from './app.routes';@NgModule({declarations: [AppComponent,LoginComponent],imports: [BrowserModule,FormsModule,HttpModule,InMemoryWebApiModule.forRoot(InMemoryTodoDbService),routing,TodoModule],providers: [{provide: 'auth', useClass: AuthService}],bootstrap: [AppComponent]})export class AppModule { }
而且此时我们注意到其实没有任何一个地方目前还需引用<app-todo></app-todo>了,这就是说我们可以安全地把selector: 'app-todo',从Todo组件中的@Component修饰符中删除了。
更真实的web服务
这里我们不想再使用内存Web服务了,所以我们使用一个更“真”的web服务:json-server。使用npm install -g json-server安装json-server。然后在todo目录下建立todo-data.json。这个json-server的牛逼之处在于可以根据一个或多个json数据建立一个完整的web服务,提供Restful的API形式。比内存Web服务好的地方在于,我们可以通过浏览器或一些工具(比如Postman)检验API的有效性和数据传递。
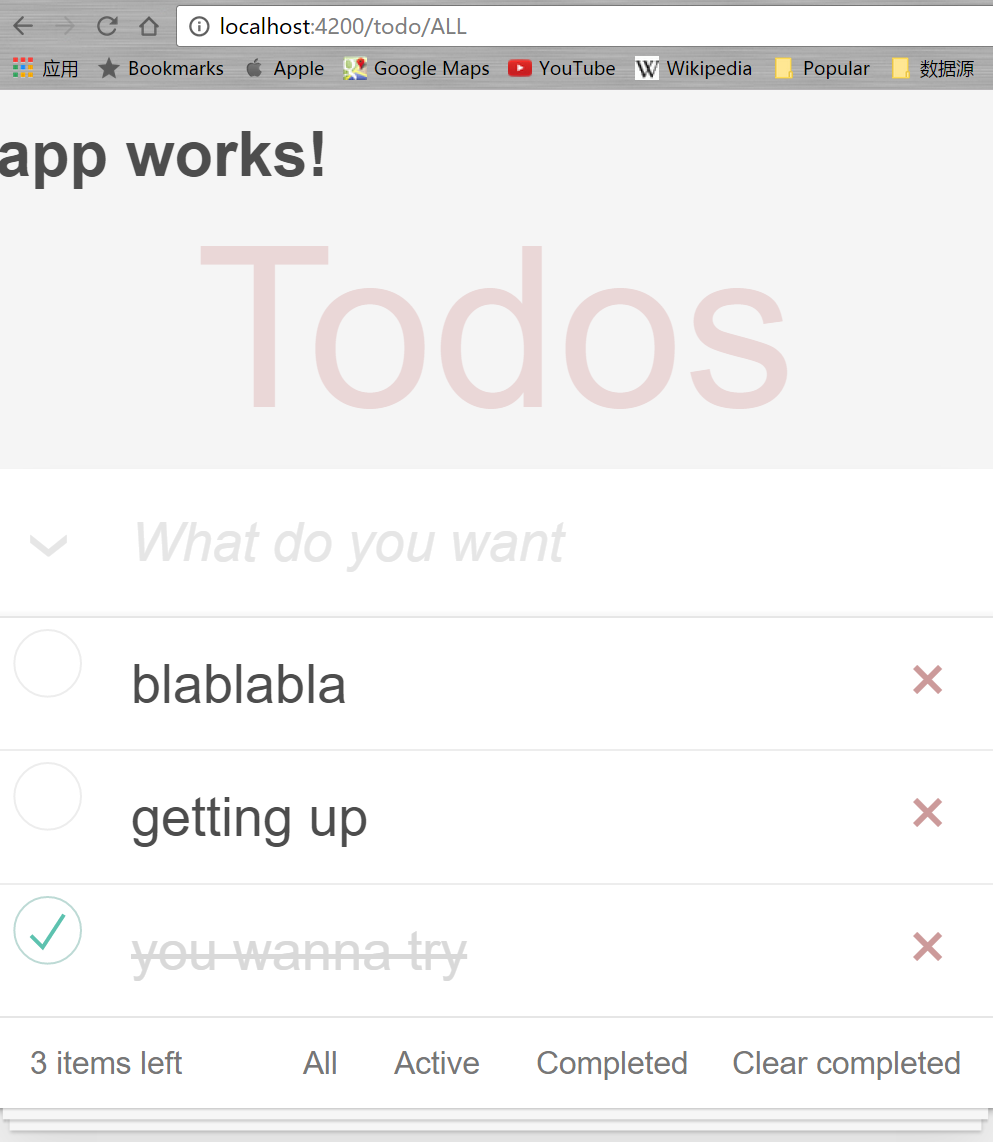
{"todos": [{"id": "f823b191-7799-438d-8d78-fcb1e468fc78","desc": "blablabla","completed": false},{"id": "dd65a7c0-e24f-6c66-862e-0999ea504ca0","desc": "getting up","completed": false},{"id": "c1092224-4064-b921-77a9-3fc091fbbd87","desc": "you wanna try","completed": false},{"id": "e89d582b-1a90-a0f1-be07-623ddb29d55e","desc": "have to say good","completed": false}]}
在src\app\todo\todo.service.ts中更改
// private api_url = 'api/todos';private api_url = 'http://localhost:3000/todos';
现在我们的json结构并不在data节点下了,所以请将addTodo和getTodos中then语句中的 res.json().data替换成res.json()。在AppModule中删掉内存web服务相关的语句。
import { BrowserModule } from '@angular/platform-browser';import { NgModule } from '@angular/core';import { FormsModule } from '@angular/forms';import { HttpModule } from '@angular/http';import { TodoModule } from './todo/todo.module';import { AppComponent } from './app.component';import { LoginComponent } from './login/login.component';import { AuthService } from './core/auth.service';import { routing } from './app.routes';@NgModule({declarations: [AppComponent,LoginComponent],imports: [BrowserModule,FormsModule,HttpModule,routing,TodoModule],providers: [{provide: 'auth', useClass: AuthService}],bootstrap: [AppComponent]})export class AppModule { }
另外打开一个命令窗口,进入工程目录,输入json-server ./src/app/todo/todo-data.json
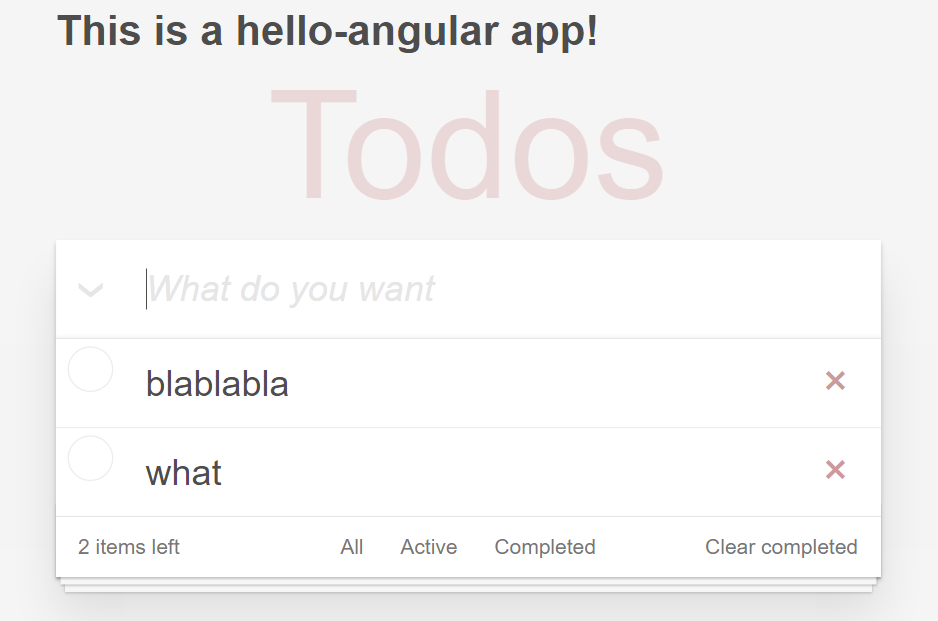
欣赏一下成果吧
完善Todo应用
在结束本节前,我们得给Todo应用收个尾,还差一些功能没完成:
- 从架构上来讲,我们似乎还可以进一步构建出TodoList和TodoItem两个组件
- 全选并反转状态
- 底部筛选器:All,Active,Completed
- 清理已完成项目
TodoItem和TodoList组件
在命令行窗口键入ng g c todo/todo-item,angular-cli会十分聪明的帮你在todo目录下建好TodoItem组件,并且在TodoModule中声明。一般来说,如果要生成某个模块下的组件,输入ng g c 模块名称/组件名称。 好的,类似的我们再建立一个TodoList控件,ng g c todo/todo-list。我们希望未来的todo.component.html是下面这个样子的
<section class="todoapp"><app-todo-headerplaceholder="What do you want"(textChanges)="onTextChanges($event)"(onEnterUp)="addTodo()" ></app-todo-header><app-todo-list[todos]="todos"(onRemoveTodo)="removeTodo($event)"(onToggleTodo)="toggleTodo($event)"></app-todo-list><app-todo-footer [itemCount]="todos?.length"></app-todo-footer></section>
那么TodoItem哪儿去了呢?TodoItem是TodoList的子组件,TodoItem的模板应该是todos循环内的一个todo的模板。TodoList的HTML模板看起来应该是下面的样子:
<section class="main" *ngIf="todos?.length > 0"><input class="toggle-all" type="checkbox"><ul class="todo-list"><li *ngFor="let todo of todos" [class.completed]="todo.completed"><app-todo-item[isChecked]="todo.completed"(onToggleTriggered)="onToggleTriggered(todo)"(onRemoveTriggered)="onRemoveTriggered(todo)"[todoDesc]="todo.desc"></app-todo-item></li></ul></section>
那么我们先从最底层的TodoItem看,这个组件怎么剥离出来?首先来看todo-item.component.html
<div class="view"><input class="toggle" type="checkbox" (click)="toggle()" [checked]="isChecked"><label [class.labelcompleted]="isChecked" (click)="toggle()">{{todoDesc}}</label><button class="destroy" (click)="remove(); $event.stopPropagation()"></button></div>
我们需要确定有哪些输入型和输出型参数
- isChecked:输入型参数,用来确定是否被选中,由父组件(TodoList)设置
- todoDesc:输入型参数,显示Todo的文本描述,由父组件设置
- onToggleTriggered:输出型参数,在用户点击checkbox或label时以事件形式通知父组件。在TodoItem中我们是在处理用户点击事件时在toggle方法中发射这个事件。
- onRemoveTriggered:输出型参数,在用户点击删除按钮时以事件形式通知父组件。在TodoItem中我们是在处理用户点击按钮事件时在remove方法中发射这个事件。
//todo-item.component.tsimport { Component, Input, Output, EventEmitter } from '@angular/core';@Component({selector: 'app-todo-item',templateUrl: './todo-item.component.html',styleUrls: ['./todo-item.component.css']})export class TodoItemComponent{@Input() isChecked: boolean = false;@Input() todoDesc: string = '';@Output() onToggleTriggered = new EventEmitter<boolean>();@Output() onRemoveTriggered = new EventEmitter<boolean>();toggle() {this.onToggleTriggered.emit(true);}remove() {this.onRemoveTriggered.emit(true);}}
建立好TodoItem后,我们再来看TodoList,还是从模板看一下
<section class="main" *ngIf="todos?.length > 0"><input class="toggle-all" type="checkbox"><ul class="todo-list"><li *ngFor="let todo of todos" [class.completed]="todo.completed"><app-todo-item[isChecked]="todo.completed"(onToggleTriggered)="onToggleTriggered(todo)"(onRemoveTriggered)="onRemoveTriggered(todo)"[todoDesc]="todo.desc"></app-todo-item></li></ul></section>
TodoList需要一个输入型参数todos,由父组件(TodoComponent)指定,TodoList本身不需要知道这个数组是怎么来的,它和TodoItem只是负责显示而已。当然我们由于在TodoList里面还有TodoITem子组件,而且TodoList本身不会处理这个输出型参数,所以我们需要把子组件的输出型参数再传递给TodoComponent进行处理。
import { Component, Input, Output, EventEmitter } from '@angular/core';import { Todo } from '../todo.model';@Component({selector: 'app-todo-list',templateUrl: './todo-list.component.html',styleUrls: ['./todo-list.component.css']})export class TodoListComponent {_todos: Todo[] = [];@Input()set todos(todos:Todo[]){this._todos = [...todos];}get todos() {return this._todos;}@Output() onRemoveTodo = new EventEmitter<Todo>();@Output() onToggleTodo = new EventEmitter<Todo>();onRemoveTriggered(todo: Todo) {this.onRemoveTodo.emit(todo);}onToggleTriggered(todo: Todo) {this.onToggleTodo.emit(todo);}}
上面代码中有一个新东东,就是在todos()方法前我们看到有set和get两个访问修饰符。这个是由于我们如果把todos当成一个成员变量给出的话,在设置后如果父组件的todos数组改变了,子组件并不知道这个变化,从而不能更新子组件本身的内容。所以我们把todos做成了方法,而且通过get和set修饰成属性方法,也就是说从模板中引用的话可以写成{{todos}}。
通过标记set todos()为@Input我们可以监视父组件的数据变化。也就是说如果只定义一个输入型属性的话,那么这个属性是“只写”的,如果要检测父组件给设置的值的变化,我们需要读,所以要提供读和写两个方法。
现在回过头来看一下todo.component.html,我们看到(onRemoveTodo)="removeTodo($event)",这句是为了处理子组件(TodoList)的输出型参数(onRemoveTodo),而$event其实就是这个事件反射器携带的参数(这里是todo:Todo)。我们通过这种机制完成组件间的数据交换。
<section class="todoapp"><app-todo-headerplaceholder="What do you want"(textChanges)="onTextChanges($event)"(onEnterUp)="addTodo()" ></app-todo-header><app-todo-list[todos]="todos"(onRemoveTodo)="removeTodo($event)"(onToggleTodo)="toggleTodo($event)"></app-todo-list><app-todo-footer [itemCount]="todos?.length"></app-todo-footer></section>
讲到这里大家可能要问是不是过度设计了,这么少的功能用得着这么设计吗?是的,本案例属于过度设计,但我们的目的是展示出更多的Angular实战方法和特性。
填坑,完成漏掉的功能
现在我们还差几个功能:全部反转状态(ToggleAll),清除全部已完成任务(Clear Completed)和状态筛选器。我们的设计方针是逻辑功能放在TodoComponent中,而其他子组件只负责表现。这样的话,我们先来看看逻辑上应该怎么完成。
用路由参数传递数据
首先看一下过滤器,在Footer中我们有三个过滤器:All,Active和Completed,点击任何一个过滤器,我们只想显示过滤后的数据。
这个功能其实有几种可以实现的方式,第一种我们可以按照之前讲过的组件间传递数据的方式设置一个@Output的事件发射器来实现。但本节中我们采用另一种方式,通过路由传递参数来实现。Angular2可以给路由添加参数,最简单的一种方式是比如/todo是我们的TodoComponent处理的路径,如果希望携带一个filter参数的话,可以在路由定义中写成
{path: 'todo/:filter',component: TodoComponent}
这个:filter是一个参数表达式,也就是说例如todo/ACTIVE就意味着参数filter='ACTIVE'。看上去有点像子路由,但这里我们使用一个组件去处理不同路径的,所以todo/后面的数据就被当作路由参数来对待了。这样的话就比较简单了,我们在todo-footer.component.html中把几个过滤器指向的路径写一下,注意这里和需要使用Angular2特有的路由链接指令(routerLink)
<ul class="filters"><li><a routerLink="/todo/ALL">All</a></li><li><a routerLink="/todo/ACTIVE">Active</a></li><li><a routerLink="/todo/COMPLETED">Completed</a></li></ul>
当然我们还需要在todo.routes.ts中增加路由参数到路由数组中
{path: 'todo/:filter',component: TodoComponent}
根路由定义也需要改写一下,因为原来todo不带参数时,我们直接重定向到todo模块即可,但现在有参数的话应该重定向到默认参数是“ALL”的路径;
{path: 'todo',redirectTo: 'todo/ALL'}
现在打开todo.component.ts看看怎么接收这个参数:
1. 引入路由对象 import { Router, ActivatedRoute, Params } from '@angular/router';
2. 在构造中注入ActivatedRoute和Router
constructor(@Inject('todoService') private service,private route: ActivatedRoute,private router: Router) {}
然后在ngOnInit()中添加下面的代码,一般的逻辑代码如果需要在ngOnInit()中调用。
ngOnInit() {this.route.params.forEach((params: Params) => {let filter = params['filter'];this.filterTodos(filter);});}
从this.route.params返回的是一个Observable,里面包含着所以传递的参数,当然我们这个例子很简单只有一个,就是刚才定义的filter。当然我们需要在组件内添加对各种filter处理的方法:调用service中的处理方法后对todos数组进行操作。组件中原有的getTodos方法已经没有用了,删掉吧。
filterTodos(filter: string): void{this.service.filterTodos(filter).then(todos => this.todos = [...todos]);}
最后我们看看在todo.service.ts中我们如何实现这个方法
// GET /todos?completed=true/falsefilterTodos(filter: string): Promise<Todo[]> {switch(filter){case 'ACTIVE': return this.http.get(`${this.api_url}?completed=false`).toPromise().then(res => res.json() as Todo[]).catch(this.handleError);case 'COMPLETED': return this.http.get(`${this.api_url}?completed=true`).toPromise().then(res => res.json() as Todo[]).catch(this.handleError);default:return this.getTodos();}}
至此大功告成,我们来看看效果吧。现在输入http://localhost:4200/todo进入后观察浏览器地址栏,看到了吧,路径自动被修改成了http://localhost:4200/todo/ALL,我们的在跟路由中定义的重定向起作用了!
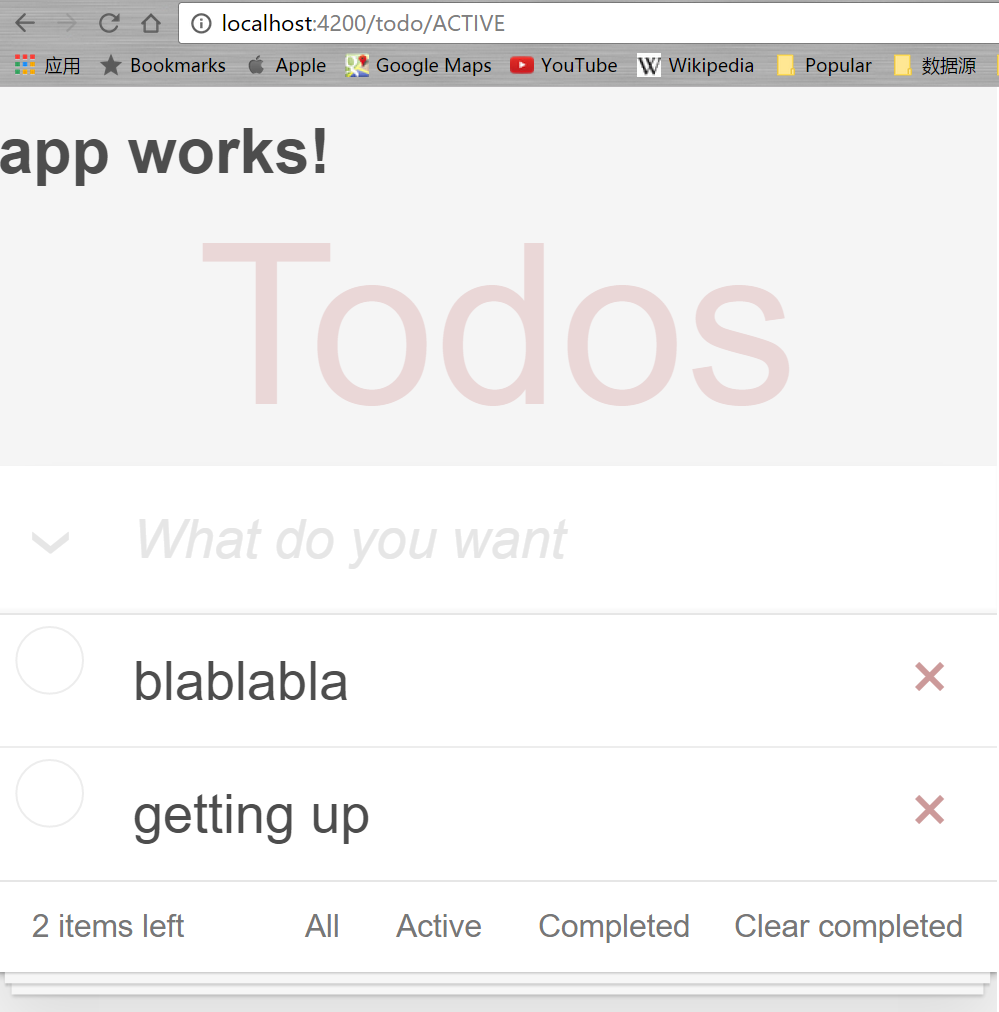
现在,试着点击其中某个todo更改其完成状态,然后点击Active,我们看到不光路径变了,数据也按照我们期待的方式更新了。
批量修改和批量删除
ToggleAll和ClearCompleted的功能其实是一个批量修改和批量删除的过程。
在todo-footer.component.html中增加Clear Completed按钮的事件处理
<button class="clear-completed" (click)="onClick()">Clear completed</button>
Clear Completed在Footer中,所以我们需要给Footer组件增加一个输出型参数onClear和onClick()事件处理方法
//todo-footer.component.ts...@Output() onClear = new EventEmitter<boolean>();onClick(){this.onClear.emit(true);}...
类似的,ToggleAll位于TodoList中,所以在todo-list.component.html中为其增加点击事件
<input class="toggle-all" type="checkbox" (click)="onToggleAllTriggered()">
在todo-list.component.ts中增加一个输出型参数onToggleAll和onToggleAllTriggered的方法
@Output() onToggleAll = new EventEmitter<boolean>();onToggleAllTriggered() {this.onToggleAll.emit(true);}
在父组件模板中添加子组件中刚刚声明的新属性,在todo.component.html中为app-todo-list和app-todo-footer添加属性:
...<app-todo-list...(onToggleAll)="toggleAll()"></app-todo-list><app-todo-footer...(onClear)="clearCompleted()"></app-todo-footer>...
最后在父组件(todo.component.ts)中添加对应的处理方法。最直觉的做法是循环数组,执行已有的toggleTodo(todo: Todo)和removeTodo(todo: Todo)。我们更改一下todo.component.ts,增加下面两个方法:
toggleAll(){this.todos.forEach(todo => this.toggleTodo(todo));}clearCompleted(){const todos = this.todos.filter(todo=> todo.completed===true);todos.forEach(todo => this.removeTodo(todo));}
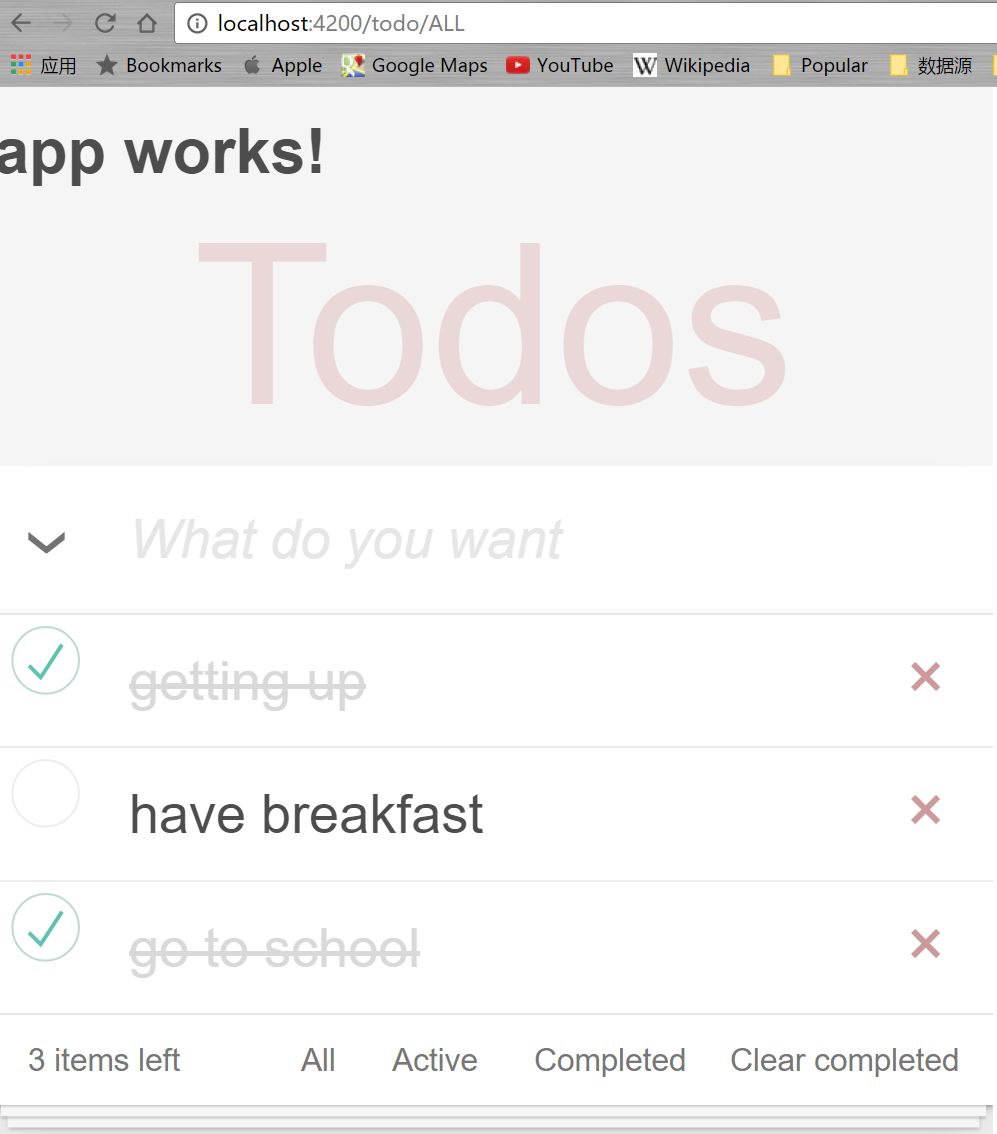
先保存一下,点击一下输入框左边的下箭头图标或者右下角的“Clear Completed”,看看效果
大功告成!慢着,等一下,哪里好像不太对。让我们回过头再看看toggleAll方法和clearCompleted方法。目前的实现方式有个明显问题,那就是现在的处理方式又变成同步的了(this.todos.forEach()是个同步方法),如果我们的处理逻辑比较复杂的话,现在的实现方式会导致UI没有响应。
但是如果不这么做的话,对于一系列的异步操作我们怎么处理呢?Promise.all(iterable)就是应对这种情况的,它适合把一系列的Promise一起处理,直到所有的Promise都处理完(或者是异常时reject),之后也返回一个Promise,里面是所有的返回值。
let p1 = Promise.resolve(3);let p2 = 1337;let p3 = new Promise((resolve, reject) => {setTimeout(resolve, 100, "foo");});Promise.all([p1, p2, p3]).then(values => {console.log(values); // [3, 1337, "foo"]});
但是还有个问题,我们目前的toggleTodo(todo: Todo)和removeTodo(todo: Todo)并不返回Promise,所以也需要小改造一下:
//todo.component.ts片段toggleTodo(todo: Todo): Promise<void> {const i = this.todos.indexOf(todo);return this.service.toggleTodo(todo).then(t => {this.todos = [...this.todos.slice(0,i),t,...this.todos.slice(i+1)];return null;});}removeTodo(todo: Todo): Promise<void> {const i = this.todos.indexOf(todo);return this.service.deleteTodoById(todo.id).then(()=> {this.todos = [...this.todos.slice(0,i),...this.todos.slice(i+1)];return null;});}toggleAll(){Promise.all(this.todos.map(todo => this.toggleTodo(todo)));}clearCompleted(){const completed_todos = this.todos.filter(todo => todo.completed === true);const active_todos = this.todos.filter(todo => todo.completed === false);Promise.all(completed_todos.map(todo => this.service.deleteTodoById(todo.id))).then(() => this.todos = [...active_todos]);}
现在再去试试效果,应该一切功能正常。当然这个版本其实还是有问题的,本质上还是在循环调用toggleTodo和removeTodo,这样做会导致多次进行HTTP连接,所以最佳策略应该是请服务器后端同学增加一个批处理的API给我们。但是服务器端的编程不是本教程的范畴,这里就不展开了,大家只需记住如果在生产环境中切记要减少HTTP请求的次数和缩减发送数据包的大小。
说到减小HTTP交互数据的大小的话,我们的todo.service.ts中可以对toggleTodo方法做点改造。原来的put方法是将整个todo数据上传,但其实我们只改动了todo.completed属性。如果你的web api是符合REST标准的话,我们可以用Http的PATCH方法而不是PUT方法,PATCH方法会只上传变化的数据。
// It was PUT /todos/:id before// But we will use PATCH /todos/:id instead// Because we don't want to waste the bytes those don't changetoggleTodo(todo: Todo): Promise<Todo> {const url = `${this.api_url}/${todo.id}`;let updatedTodo = Object.assign({}, todo, {completed: !todo.completed});return this.http.patch(url, JSON.stringify({completed: !todo.completed}), {headers: this.headers}).toPromise().then(() => updatedTodo).catch(this.handleError);}
最后其实Todo的所有子组件其实都没有用到ngInit,所以不必实现NgInit接口,可以去掉ngInit方法和相关的接口引用。
本节代码: https://github.com/wpcfan/awesome-tutorials/tree/chap04/angular2/ng2-tut
