@carlchen
2017-04-27T05:57:39.000000Z
字数 7704
阅读 728
第八章:查缺补漏大合集(上)
前端Angular2教程
这一章其实是我在前七章读者评论和私信交流时发现很多点我是要么漏掉了,要么自己理解有误。那这第八和第九章就来做一个小总结吧。本章我们讨论如何在Angular2中引入第三方JS库、惰性加载路由和子路由。
第三方JS类库的引入
这个是许多人的困惑,我们在Angular2中使用了TypeScript,但大量的类库是没有TypeScript怎么办?其实不用担心,非常简单。但在讲方法前,我们最好还是理解一下背景。
为什么JS不能直接使用
由于TypeScript是一个强类型语言,所以对于第三方类库,我们需要知道它们的JavaScript里面的暴露给外部使用的这些对象和方法的类型定义是什么。
这个类型定义文件长什么样呢?我们来看一看,你可以进入工程下的node_modules中的 @angular/common/src/directives/ng_class.d.ts:
import { DoCheck, ElementRef, IterableDiffers, KeyValueDiffers, Renderer } from '@angular/core';/*** @ngModule CommonModule** @whatItDoes Adds and removes CSS classes on an HTML element.** @description** The CSS classes are updated as follows, depending on the type of the expression evaluation:* - `string` - the CSS classes listed in the string (space delimited) are added,* - `Array` - the CSS classes declared as Array elements are added,* - `Object` - keys are CSS classes that get added when the expression given in the value* evaluates to a truthy value, otherwise they are removed.** @stable*/export declare class NgClass implements DoCheck {private _iterableDiffers;private _keyValueDiffers;private _ngEl;private _renderer;private _iterableDiffer;private _keyValueDiffer;private _initialClasses;private _rawClass;constructor(_iterableDiffers: IterableDiffers, _keyValueDiffers: KeyValueDiffers, _ngEl: ElementRef, _renderer: Renderer);klass: string;ngClass: string | string[] | Set<string> | {[klass: string]: any;};ngDoCheck(): void;private _cleanupClasses(rawClassVal);private _applyKeyValueChanges(changes);private _applyIterableChanges(changes);private _applyInitialClasses(isCleanup);private _applyClasses(rawClassVal, isCleanup);private _toggleClass(klass, enabled);}
可以看到这个文件其实就是用来做类型定义声明的,我们一般把这种以 .d.ts 后缀结尾的文件叫做类型定义文件(Type Definition)。有了这个声明定义,我们就可以在TypeScript中使用了。这个文件看起来也挺麻烦的,事实上真正需要你自己动手写的类库很少。我们来看一下一般的集成第三方类库的过程是什么样子的。
标准的JS库引入方法
我们拿百度的echarts (https://github.com/ecomfe/echarts)图表类库的集成来说明一下。我们先安装其npm包,在命令行窗口输入 npm install --save echarts ,然后我们安装其类型定义文件,在命令行窗口输入 npm install --save-dev @types/echarts 。然后。。就没有然后了。这么简单吗?是滴。
注意两件事,首先我们安装时使用了 --save-dev 开关,因为这个类型定义文件只对开发时有用,它并不是我们工程的依赖,只是为了编写时的方便。
第二件事我们使用了 @types/echarts 这样一个有点怪的名称,其实是这样的,微软维护了一个海量的类型定义数据中心,这个就是 @types。那么我们为了寻找echarts就会在 @types 这个目录下搜索它的二级目录。
这样安装之后,你可以在本地工程目录下的 node_modules/@types/echarts/index.d.ts 找到echarts的定义:
// Type definitions for echarts// Project: http://echarts.baidu.com/// Definitions by: Xie Jingyang <https://github.com/xieisabug>// Definitions: https://github.com/DefinitelyTyped/DefinitelyTypeddeclare namespace ECharts {function init(dom:HTMLDivElement|HTMLCanvasElement, theme?:Object|string, opts?:{devicePixelRatio?: numberrenderer?: string}):ECharts;…//此处省略大部分声明,可以查阅本地文件}declare module "echarts" {export = ECharts;}
一般情况下,到这步就结束了,此时我们可以试验一下是否可以使用了,在一个组件文件中尝试引入echarts,如果你看到了智能提示中有你希望引入的类库中的方法或对象,那就一切顺利,接下来就可以正常使用这个类库了。

引入库的特殊情况
但有的时候,我们执行第二步 npm install --save-dev @types/echarts 时,会发现没有找到对应的类型定义文件。这个时候怎么办呢?
这时候要分两种情况看,首先应该去检查一下node_modules目录中的你要使用的类库子目录(本例中是echarts)中是否有类型定义文件,因为有的类库会把类型定义文件直接打包在npm的包中。比如我们前几章接触的angular-uuid,这个类库其实就是直接把类型定义文件打包在npm package中的。看下图,如果是这种情况,那么我们什么都不需要做,直接使用就好了。

当然还有一种情形就是,这样也找不到,或者这个类库是我们的团队已有的、自己写的等等情况。这时候就得自己写一下,也很简单,在 src/typings.d.ts 中加上一行:
declare module 'echarts';
然后在要使用此类库的组件中引入:
import * as echarts from 'echarts';
后面就可以正常使用了,当然这种添加方式是没有智能提示和自动完成的,你需要自己保证调用的正确性。如果觉得不爽,还是希望有提示、类型检查等等,那就得自己写一个类型定义文件了,可以参考 https://basarat.gitbooks.io/typescript/content/docs/types/ambient/d.ts.html 去编写自己的类型定义文件。
惰性路由和子路由
惰性路由
在需求和功能不断添加和修改之后,应用的尺寸将会变得更大。在某一个时间点,我们将达到一个顶点,应用 将会需要过多的时间来加载。这会带来一定的性能问题。
如何才能解决这个问题呢?Angular2引进了异步路由,我们可以惰性加载指定的模块或组件。这样给我们带来了下列好处:
- 可以继续开发我们的新功能,但不再增加初始加载文件的大小。
- 只有在用户请求时才加载特定模块。
- 为那些只访问应用程序某些区域的用户加快加载速度
还是我们一起打造一个例子说明一下,之后大家就可以清楚的理解这个概念了。我们新建一个叫Playground的module。打开一个命令行窗口,输入 ng g m playgorund ,这样Angular CLI非常聪明的帮我们建立了PlaygroundModule,不光如此,它还帮我们建立了一个PlaygroundComponent。因为一般来说,我们新建一个模块肯定会至少有一个组件的。
由于要做惰性加载,我们并不需要在根模块AppModule中引入这个模块,所以我们检查一下根模块 src/app/app.module.ts 中是否引入了PlaygroundModule,如果有,请去掉。
首先为PlaygroundModule建立自己模块的路由,我们如果遵守Google的代码风格建议的话,那么就应该为每个模块建立独立的路由文件。
const routes: Routes = [{ path: '', component: PlaygroundComponent },];@NgModule({imports: [ RouterModule.forChild(routes) ],exports: [ RouterModule ],})export class PlaygroundRoutingModule { }
在src/app/app-routing.module.ts中我们要添加一个惰性路由指向PlaygroundModule
import { NgModule } from '@angular/core';import { Routes, RouterModule } from '@angular/router';import { LoginComponent } from './login/login.component';import { AuthGuardService } from './core/auth-guard.service';const routes: Routes = [{path: '',redirectTo: 'login',pathMatch: 'full'},…{path: 'playground',loadChildren: 'app/playground/playground.module#PlaygroundModule',}];@NgModule({imports: [RouterModule.forRoot(routes)],exports: [RouterModule]})export class AppRoutingModule {}
在这段代码中我们看到一个新面孔,loadChildren 。路由器用 loadChildren 属性来映射我们希望惰性加载的模块文件,这里是 PlaygroundModule 。路由器将接收我们的 loadChildren 字符串,并把它动态加载进 PlaygroundModule ,它的路由被动态合并到我们的配置中,然后加载所请求的路由。但只有在首次加载该路由时才会这样做,后续的请求都会立即完成。
app/playground/playground.module#PlaygroundModule 这个表达式是这样的规则:模块的路径#模块名称
现在我们回顾一下,在应用启动时,我们并没有加载PlaygroundModule,因为在AppModule中没有它的引用。但是当你在浏览器中手动输入 http://localhost:4200/playground 时,系统在此时加载 PlaygroundModule。
子路由
程序复杂了之后,一层的路由可能就不会够用了,在一个模块内部由于功能较复杂,需要再划分出二级甚至更多级别的路径。这种情况下我们就需要Angular2提供的一个内建功能叫做:子路由。
我们向来认为例子是最好的说明,所以还是来做一个小功能:现在我们需要对一个叫playground的路径下添加子路由,子路由有2个:one和two。其中one下面还有一层路径叫three。形象的表示一下,就像下面的结构一样。
/playground---||/one|--------|three|/two
那么我们还是先在项目工程目录输入 ng g c playground/one,然后再执行 ng g c playground/two ,还有一个three,所以再来:ng g c playground/three 。
现在我们有了三个组件,看看怎么处理路由吧,原有的模块路由文件如下:
import { NgModule } from '@angular/core';import { Routes, RouterModule } from '@angular/router';import { PlaygroundComponent } from './playground.component';const routes: Routes = [{path: '',component: PlaygroundComponent},];@NgModule({imports: [ RouterModule.forChild(routes) ],exports: [ RouterModule ],})export class PlaygroundRoutingModule { }
我们首先需要在模块的根路由下添加one和two,Angular2在路由定义数组中对于每个路由定义对象都有一个属性叫做children,这里就是指定子路由的地方了。所以在下面代码中我们把one和two都放入了children数组中。
import { NgModule } from '@angular/core';import { Routes, RouterModule } from '@angular/router';import { PlaygroundComponent } from './playground.component';import { OneComponent } from './one/one.component';import { TwoComponent } from './two/two.component';const routes: Routes = [{path: '',component: PlaygroundComponent,children: [{path: 'one',component: OneComponent,},{path: 'two',component: TwoComponent}]},];@NgModule({imports: [ RouterModule.forChild(routes) ],exports: [ RouterModule ],})export class PlaygroundRoutingModule { }
这只是定义了路由数据,我们还需要在某个地方显示路由指向的组件,那么这里面我们还是在PlaygroundComponent的模版中把路由插座放入吧。
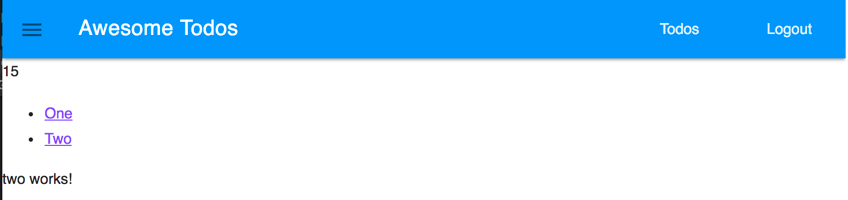
<ul><li><a routerLink="one">One</a></li><li><a routerLink="two">Two</a></li></ul><router-outlet></router-outlet>
现在我们试验一下,打开浏览器输入 http://localhost:4200/playground 我们看到两个链接,你可以分别点一下,观察地址栏。应该可以看到,点击one时,地址变成 http://localhost:4200/playground/one 在我们放置路由插座的位置也会出现one works。当然点击two时也会有对应的改变。这说明我们的子路由配置好用了!
当然有的时候还需要更深的层级的子路由,其实也很简单。就是重复我们刚才做的就好,只不过要在对应的子路由节点上。下面我们还是演练一下,在点击one之后我们希望到达一个有子路由的页面(也就是子路由的子路由)。于是我们在OneComponent节点下又加了children,然后把ThreeComponent和对应的路径写入
import { NgModule } from '@angular/core';import { Routes, RouterModule } from '@angular/router';import { PlaygroundComponent } from './playground.component';import { OneComponent } from './one/one.component';import { TwoComponent } from './two/two.component';import { ThreeComponent } from './three/three.component';const routes: Routes = [{path: '',component: PlaygroundComponent,children: [{path: 'one',component: OneComponent,children: [{path: 'three',component: ThreeComponent}]},{path: 'two',component: TwoComponent}]},];@NgModule({imports: [ RouterModule.forChild(routes) ],exports: [ RouterModule ],})export class PlaygroundRoutingModule { }
当然,还是一样,我们需要改造一下OneComponent的模版以便于它可以显示子路由的内容。改动 src/app/playground/one/one.component.html 为如下内容
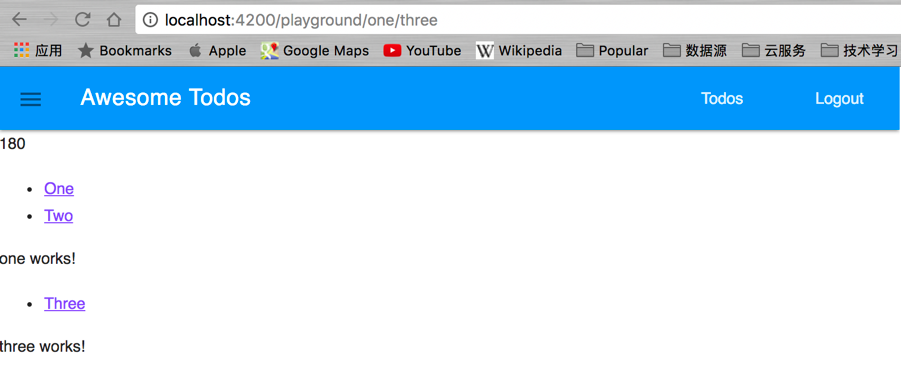
<p>one works!</p><ul><li><a routerLink="three">Three</a></li></ul><router-outlet></router-outlet>
这回我们看到如果在浏览器中输入 http://localhost:4200/playground/one/three 会看到如图所示的结果:
经过这个小练习,相信再复杂的路由你也可以搞定了。但是我要说一句,个人不是很推荐过于复杂的路由(复杂这里指层级嵌套太多)。层级多了之后意味着这个模块太大了,负责了过多它不应该负责的事情。也就是说当要使用子路由时,一定多问自己几遍,这样做是必须的吗?可以用别的方式解决吗?是不是我的模块改拆分了?
