@carlchen
2017-04-27T05:54:38.000000Z
字数 13502
阅读 662
第五章:多用户版本的待办事项应用
前端Angular2教程
第四章我们完成的Todo的基本功能看起来还不错,但是有个大问题,就是每个用户看到的都是一样的待办事项,我们希望的是每个用户拥有自己的待办事项列表。
我们来分析一下怎么做,如果每个todo对象带一个UserId属性是不是可以解决呢?好像可以,逻辑大概是这样:用户登录后转到/todo,TodoComponent得到当前用户的UserId,然后调用TodoService中的方法,传入当前用户的UserId,TodoService中按UserId去筛选当前用户的Todos。
但可惜我们目前的LoginComponent还是个实验品,很多功能的缺失,我们是先去做Login呢,还是利用现有的Todo对象先试验一下呢?我个人的习惯是先进行试验。
数据驱动开发
按之前我们分析的,给todo加一个userId属性,我们手动给我们目前的数据加上userId属性吧。更改todo\todo-data.json为下面的样子:
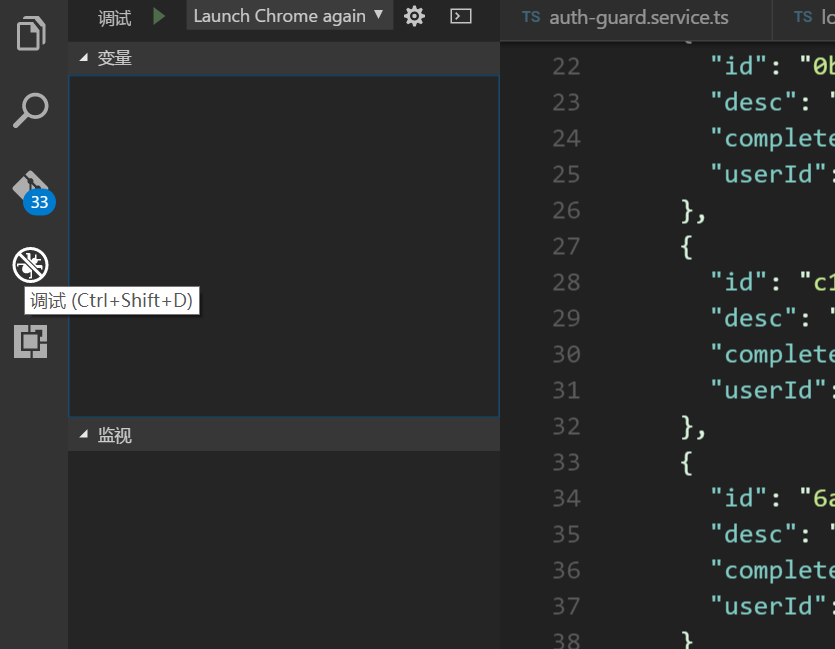
{"todos": [{"id": "bf75769b-4810-64e9-d154-418ff2dbf55e","desc": "getting up","completed": false,"userId": 1},{"id": "5894a12f-dae1-5ab0-5761-1371ba4f703e","desc": "have breakfast","completed": true,"userId": 2},{"id": "0d2596c4-216b-df3d-1608-633899c5a549","desc": "go to school","completed": true,"userId": 1},{"id": "0b1f6614-1def-3346-f070-d6d39c02d6b7","desc": "test","completed": false,"userId": 2},{"id": "c1e02a43-6364-5515-1652-a772f0fab7b3","desc": "This is a te","completed": false,"userId": 1}]}
如果你还没有启动json-server的话让我们启动它: json-server ./src/app/todo/todo-data.json,然后打开浏览器在地址栏输入http://localhost:3000/todos/?userId=2你会看到只有userId=2的json被输出了
[{"id": "5894a12f-dae1-5ab0-5761-1371ba4f703e","desc": "have breakfast","completed": true,"userId": 2},{"id": "0b1f6614-1def-3346-f070-d6d39c02d6b7","desc": "test","completed": false,"userId": 2}]
有兴趣的话可以再试试http://localhost:3000/todos/?userId=2&completed=false或其他组合查询。现在todo有了userId字段,但我们还没有User对象,User的json表现形式看起来应该是这样:
{"id": 1,"username": "wang","password": "1234"}
当然这个表现形式有很多问题,比如密码是明文的,这些问题我们先不管,但大概样子是类似的。那么现在如果要建立User数据库的话,我们应该新建一个user-data.json
{"users": [{"id": 1,"username": "wang","password": "1234"},{"id": 2,"username": "peng","password": "5678"}]}
但这样做的话感觉单独为其建一个文件有点不值得,我们干脆把user和todo数据都放在一个文件吧,现在删除./src/app/todo/todo-data.json删除,在src\app下面新建一个data.json
{"todos": [{"id": "bf75769b-4810-64e9-d154-418ff2dbf55e","desc": "getting up","completed": false,"userId": 1},{"id": "5894a12f-dae1-5ab0-5761-1371ba4f703e","desc": "have breakfast","completed": true,"userId": 2},{"id": "0d2596c4-216b-df3d-1608-633899c5a549","desc": "go to school","completed": true,"userId": 1},{"id": "0b1f6614-1def-3346-f070-d6d39c02d6b7","desc": "test","completed": false,"userId": 2},{"id": "c1e02a43-6364-5515-1652-a772f0fab7b3","desc": "This is a te","completed": false,"userId": 1}],"users": [{"id": 1,"username": "wang","password": "1234"},{"id": 2,"username": "peng","password": "5678"}]}
当然有了数据,我们就得有对应的对象,基于同样的理由,我们把所有的entity对象都放在一个文件:删除src\app\todo\todo.model.ts,在src\app下新建一个目录domain,然后在domain下新建一个entities.ts,请别忘了更新所有的引用。
export class Todo {id: string;desc: string;completed: boolean;userId: number;}export class User {id: number;username: string;password: string;}
对于TodoService来说,我们可以做的就是按照刚才的逻辑进行改写:删除和切换状态的逻辑不用改,因为是用Todo的ID标识的。其他的要在访问的URL中加入userId的参数。添加用户的时候要把userId传入:
...addTodo(desc:string): Promise<Todo> {let todo = {id: UUID.UUID(),desc: desc,completed: false,userId: this.userId};return this.http.post(this.api_url, JSON.stringify(todo), {headers: this.headers}).toPromise().then(res => res.json() as Todo).catch(this.handleError);}getTodos(): Promise<Todo[]>{return this.http.get(`${this.api_url}?userId=${this.userId}`).toPromise().then(res => res.json() as Todo[]).catch(this.handleError);}filterTodos(filter: string): Promise<Todo[]> {switch(filter){case 'ACTIVE': return this.http.get(`${this.api_url}?completed=false&userId=${this.userId}`).toPromise().then(res => res.json() as Todo[]).catch(this.handleError);case 'COMPLETED': return this.http.get(`${this.api_url}?completed=true&userId=${this.userId}`).toPromise().then(res => res.json() as Todo[]).catch(this.handleError);default:return this.getTodos();}}...
验证用户账户的流程
我们来梳理一下用户验证的流程
- 存储要访问的URL
- 根据本地的已登录标识判断是否此用户已经登录,如果已登录就直接放行
- 如果未登录导航到登录页面 用户填写用户名和密码进行登录
- 系统根据用户名查找用户表中是否存在此用户,如果不存在此用户,返回错误
- 如果存在对比填写的密码和存储的密码是否一致,如果不一致,返回错误
- 如果一致,存储此用户的已登录标识到本地
- 导航到原本要访问的URL即第一步中存储的URL,删掉本地存储的URL
看上去我们需要实现
- UserService:用于通过用户名查找用户并返回用户
- AuthService:用于认证用户,其中需要利用UserService的方法
- AuthGuard:路由拦截器,用于拦截到路由后通过AuthService来知道此用户是否有权限访问该路由,根据结果导航到不同路径。
看到这里,你可能有些疑问,为什么我们不把UserService和AuthService合并呢?这是因为UserService是用于对用户的操作的,不光认证流程需要用到它,我们未来要实现的一系列功能都要用到它,比如注册用户,后台用户管理,以及主页要显示用户名称等。
核心模块
根据这个逻辑流程,我们来组织一下代码。开始之前我们想把认证相关的代码组织在一个新的模块下,我们暂时叫它core吧。在src\app下新建一个core目录,然后在core下面新建一个core.module.ts
import { ModuleWithProviders, NgModule, Optional, SkipSelf } from '@angular/core';import { CommonModule } from '@angular/common';@NgModule({imports: [CommonModule]})export class CoreModule {constructor (@Optional() @SkipSelf() parentModule: CoreModule) {if (parentModule) {throw new Error('CoreModule is already loaded. Import it in the AppModule only');}}
注意到这个模块和其他模块不太一样,原因是我们希望只在应用启动时导入它一次,而不会在其它地方导入它。在模块的构造函数中我们会要求Angular把CoreModule注入自身,这看起来像一个危险的循环注入。不过,@SkipSelf装饰器意味着在当前注入器的所有祖先注入器中寻找CoreModule。如果该构造函数在我们所期望的AppModule中运行,就没有任何祖先注入器能够提供CoreModule的实例,于是注入器会放弃查找。默认情况下,当注入器找不到想找的提供商时,会抛出一个错误。但@Optional装饰器表示找不到该服务也无所谓。 于是注入器会返回null,parentModule参数也就被赋成了空值,而构造函数没有任何异常。
那么我们在什么时候会需要这样一个模块?比如在这个模块中我们可能会要提供用户服务(UserService),这样的服务系统各个地方都需要,但我们不希望它被创建多次,希望它是一个单例。再比如某些只应用于AppComponent模板的一次性组件,没有必要共享它们,然而如果把它们留在根目录,还是显得太乱了。我们可以通过这种形式隐藏它们的实现细节。然后通过根模块AppModule导入CoreModule来获取其能力。
路由守卫
首先我们来看看Angular内建的路由守卫机制,在实际工作中我们常常会碰到下列需求:
- 该用户可能无权导航到目标组件。 导航前需要用户先登录(认证)。
- 在显示目标组件前,我们可能得先获取某些数据。
- 在离开组件前,我们可能要先保存修改。
- 我们可能要询问用户:你是否要放弃本次更改,而不用保存它们?
我们可以往路由配置中添加守卫,来处理这些场景。守卫返回true,导航过程会继续;返回false,导航过程会终止,且用户会留在原地(守卫还可以告诉路由器导航到别处,这样也取消当前的导航)。
路由器支持多种守卫:
- 用CanActivate来处理导航到某路由的情况。
- 用CanActivateChild处理导航到子路由的情况。
- 用CanDeactivate来处理从当前路由离开的情况。
- 用Resolve在路由激活之前获取路由数据。
- 用CanLoad来处理异步导航到某特性模块的情况。
在分层路由的每个级别上,我们都可以设置多个守卫。路由器会先按照从最深的子路由由下往上检查的顺序来检查CanDeactivate守护条件。然后它会按照从上到下的顺序检查CanActivate守卫。如果任何守卫返回false,其它尚未完成的守卫会被取消,这样整个导航就被取消了。
本例中我们希望用户未登录前不能访问todo,那么需要使用CanActivate
import { AuthGuardService } from '../core/auth-guard.service';const routes: Routes = [{path: 'todo/:filter',canActivate: [AuthGuardService],component: TodoComponent}];
当然光这么写是没有用的,下面我们来建立一个AuthGuardService,命令行中键入ng g s core/auth-guard(angular-cli对于Camel写法的文件名是采用-来分隔每个大写的词)。
import { Injectable, Inject } from '@angular/core';import {CanActivate,Router,ActivatedRouteSnapshot,RouterStateSnapshot } from '@angular/router';@Injectable()export class AuthGuardService implements CanActivate {constructor(private router: Router) { }canActivate(route: ActivatedRouteSnapshot, state: RouterStateSnapshot): boolean {//取得用户访问的URLlet url: string = state.url;return this.checkLogin(url);}checkLogin(url: string): boolean {//如果用户已经登录就放行if (localStorage.getItem('userId') !== null) { return true; }//否则,存储要访问的URl到本地localStorage.setItem('redirectUrl', url);//然后导航到登陆页面this.router.navigate(['/login']);//返回false,取消导航return false;}}
观察上面代码,我们发现本地存储的userId的存在与否决定了用户是否已登录的状态,这当然是一个漏洞百出的实现,但我们暂且不去管它。现在我们要在登录时把这个状态值写进去。我们新建一个登录鉴权的AuthService:ng g s core/auth:
import { Injectable, Inject } from '@angular/core';import { Http, Headers, Response } from '@angular/http';import 'rxjs/add/operator/toPromise';import { Auth } from '../domain/entities';@Injectable()export class AuthService {constructor(private http: Http, @Inject('user') private userService) { }loginWithCredentials(username: string, password: string): Promise<Auth> {return this.userService.findUser(username).then(user => {let auth = new Auth();localStorage.removeItem('userId');let redirectUrl = (localStorage.getItem('redirectUrl') === null)?'/': localStorage.getItem('redirectUrl');auth.redirectUrl = redirectUrl;if (null === user){auth.hasError = true;auth.errMsg = 'user not found';} else if (password === user.password) {auth.user = Object.assign({}, user);auth.hasError = false;localStorage.setItem('userId',user.id);} else {auth.hasError = true;auth.errMsg = 'password not match';}return auth;}).catch(this.handleError);}private handleError(error: any): Promise<any> {console.error('An error occurred', error); // for demo purposes onlyreturn Promise.reject(error.message || error);}}
注意到我们返回了一个Auth对象,这是因为我们要知道几件事:
- 用户最初要导航的页面URL
- 用户对象
- 如果发生错误的话,是什么错误,我们需要反馈给用户
这个Auth对象同样在src\app\domain\entities.ts中声明
export class Auth {user: User;hasError: boolean;errMsg: string;redirectUrl: string;}
当然我们还得实现UserService:ng g s user:
import { Injectable } from '@angular/core';import { Http, Headers, Response } from '@angular/http';import 'rxjs/add/operator/toPromise';import { User } from '../domain/entities';@Injectable()export class UserService {private api_url = 'http://localhost:3000/users';constructor(private http: Http) { }findUser(username: string): Promise<User> {const url = `${this.api_url}/?username=${username}`;return this.http.get(url).toPromise().then(res => {let users = res.json() as User[];return (users.length>0)?users[0]:null;}).catch(this.handleError);}private handleError(error: any): Promise<any> {console.error('An error occurred', error); // for demo purposes onlyreturn Promise.reject(error.message || error);}}
这段代码比较简单,就不细讲了。下面我们改造一下src\app\login\login.component.html,在原来用户名的验证信息下加入,用于显示用户不存在或者密码不对的情况
<div *ngIf="usernameRef.errors?.required">this is required</div><div *ngIf="usernameRef.errors?.minlength">should be at least 3 charactors</div><!--add the code below--><div *ngIf="auth?.hasError">{{auth.errMsg}}</div>
接下来我们还得改造src\app\login\login.component.ts:
import { Component, OnInit, Inject } from '@angular/core';import { Router, ActivatedRoute, Params } from '@angular/router';import { Auth } from '../domain/entities';@Component({selector: 'app-login',templateUrl: './login.component.html',styleUrls: ['./login.component.css']})export class LoginComponent implements OnInit {username = '';password = '';auth: Auth;constructor(@Inject('auth') private service, private router: Router) { }ngOnInit() {}onSubmit(formValue){this.service.loginWithCredentials(formValue.login.username, formValue.login.password).then(auth => {let redirectUrl = (auth.redirectUrl === null)? '/': auth.redirectUrl;if(!auth.hasError){this.router.navigate([redirectUrl]);localStorage.removeItem('redirectUrl');} else {this.auth = Object.assign({}, auth);}});}}
然后我们别忘了在core模块中声明我们的服务src\app\core\core.module.ts:
import { ModuleWithProviders, NgModule, Optional, SkipSelf } from '@angular/core';import { CommonModule } from '@angular/common';import { AuthService } from './auth.service';import { UserService } from './user.service';import { AuthGuardService } from './auth-guard.service';@NgModule({imports: [CommonModule],providers: [{ provide: 'auth', useClass: AuthService },{ provide: 'user', useClass: UserService },AuthGuardService]})export class CoreModule {constructor (@Optional() @SkipSelf() parentModule: CoreModule) {if (parentModule) {throw new Error('CoreModule is already loaded. Import it in the AppModule only');}}}
最后我们得改写一下TodoService,因为我们访问的URL变了,要传递的数据也有些变化
//todo.service.ts代码片段// POST /todosaddTodo(desc:string): Promise<Todo> {//“+”是一个简易方法可以把string转成numberconst userId:number = +localStorage.getItem('userId');let todo = {id: UUID.UUID(),desc: desc,completed: false,userId};return this.http.post(this.api_url, JSON.stringify(todo), {headers: this.headers}).toPromise().then(res => res.json() as Todo).catch(this.handleError);}// GET /todosgetTodos(): Promise<Todo[]>{const userId = +localStorage.getItem('userId');const url = `${this.api_url}/?userId=${userId}`;return this.http.get(url).toPromise().then(res => res.json() as Todo[]).catch(this.handleError);}// GET /todos?completed=true/falsefilterTodos(filter: string): Promise<Todo[]> {const userId:number = +localStorage.getItem('userId');const url = `${this.api_url}/?userId=${userId}`;switch(filter){case 'ACTIVE': return this.http.get(`${url}&completed=false`).toPromise().then(res => res.json() as Todo[]).catch(this.handleError);case 'COMPLETED': return this.http.get(`${url}&completed=true`).toPromise().then(res => res.json() as Todo[]).catch(this.handleError);default:return this.getTodos();}}
现在应该已经ok了,我们来看看效果:
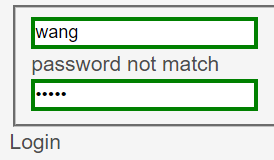
用户密码不匹配时,显示password not match
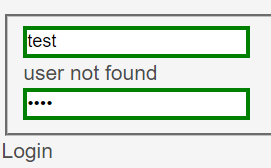
用户不存在时,显示user not found
直接在浏览器地址栏输入http://localhost:4200/todo,你会发现被重新导航到了login。输入正确的用户名密码后,我们被导航到了todo,现在每个用户都可以创建属于自己的待办事项了。
路由模块化
Angular团队推荐把路由模块化,这样便于使业务逻辑和路由松耦合。虽然目前在我们的应用中感觉用处不大,但按官方推荐的方式还是和大家一起改造一下吧。删掉原有的app.routes.ts和todo.routes.ts。添加app-routing.module.ts:
import { NgModule } from '@angular/core';import { Routes, RouterModule } from '@angular/router';import { LoginComponent } from './login/login.component';const routes: Routes = [{path: '',redirectTo: 'login',pathMatch: 'full'},{path: 'login',component: LoginComponent},{path: 'todo',redirectTo: 'todo/ALL'}];@NgModule({imports: [RouterModule.forRoot(routes)],exports: [RouterModule]})export class AppRoutingModule {}
以及src\app\todo\todo-routing.module.ts:
import { NgModule } from '@angular/core';import { Routes, RouterModule } from '@angular/router';import { TodoComponent } from './todo.component';import { AuthGuardService } from '../core/auth-guard.service';const routes: Routes = [{path: 'todo/:filter',canActivate: [AuthGuardService],component: TodoComponent}];@NgModule({imports: [ RouterModule.forChild(routes) ],exports: [ RouterModule ]})export class TodoRoutingModule { }
并分别在AppModule和TodoModule中引入路由模块。
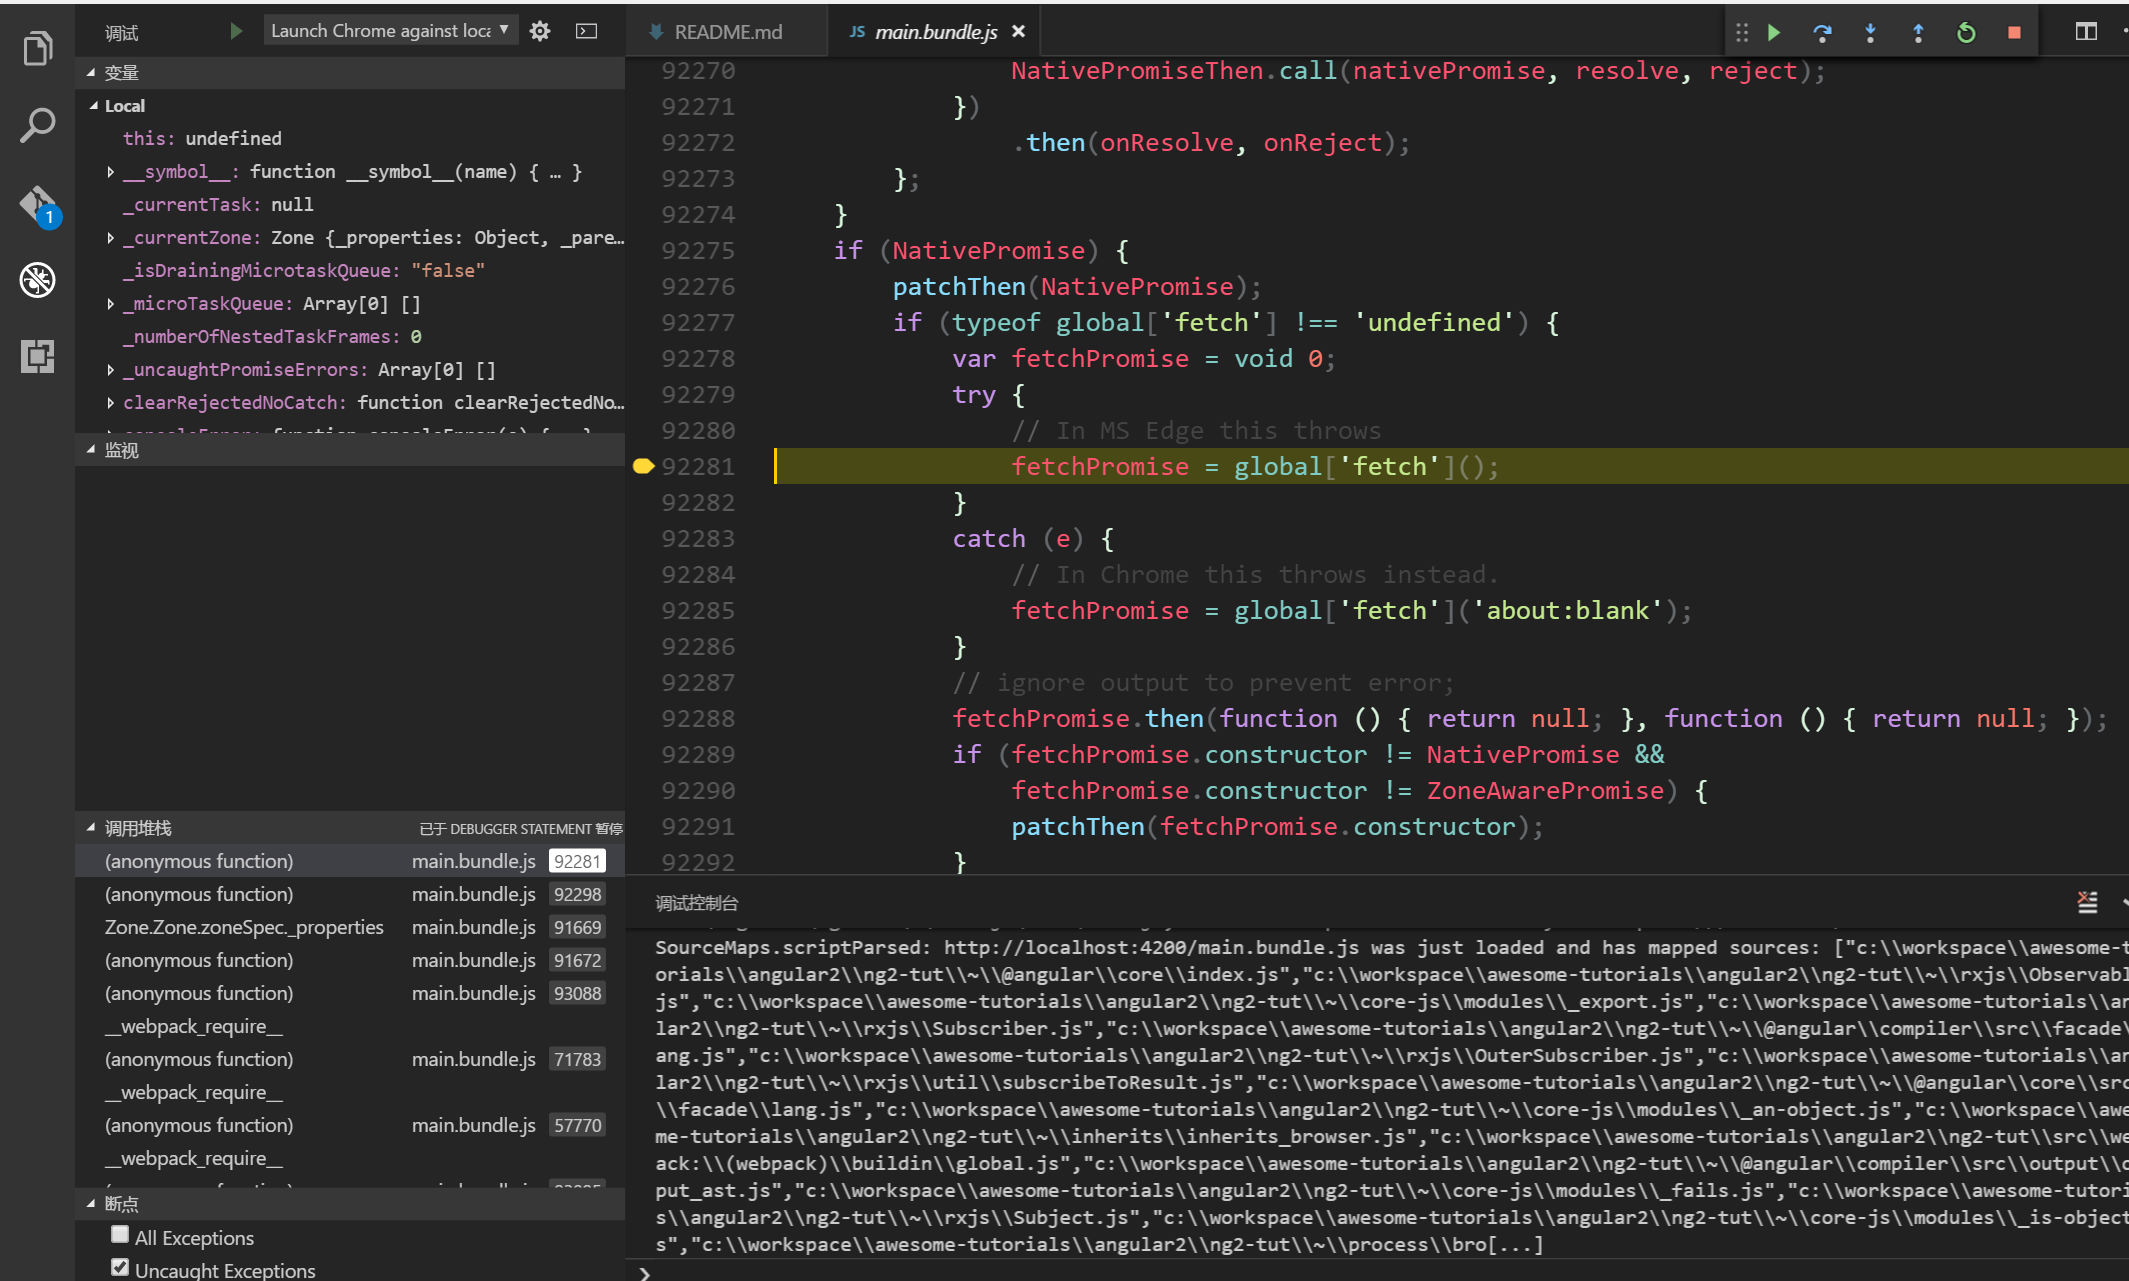
用VSCode进行调试
我们一直都没讲如何用vscode进行debug,这章我们来介绍一下。首先需要安装一个vscode插件,点击左侧最下面的图标或者“在查看菜单中选择命令面板,输入install,选择扩展:安装扩展”,然后输入“debugger for chrome”回车,点击安装即可。
然后点击最左边的倒数第二个按钮
如果是第一次使用的话,齿轮图标上会有个红点,点击选择debugger for chrome,vscode会帮你创建一个配置文件,这个文件位于\.vscode\launch.json是debugger的配置文件,请改写成下面的样子。注意如果是MacOSX或者Linux,请把userDataDir替换成对应的临时目录,另外把"webpack:///C:*":"C:/*"替换成"webpack:///*": "/*",这句是因为angular-cli是采用webpack打包的,如果没有使用angular-cli不需要添加这句。
{"version": "0.2.0","configurations": [{"name": "Launch Chrome against localhost, with sourcemaps","type": "chrome","request": "launch","url": "http://localhost:4200","sourceMaps": true,"runtimeArgs": ["--disable-session-crashed-bubble","--disable-infobars"],"diagnosticLogging": true,"webRoot": "${workspaceRoot}/src",//windows setup"userDataDir": "C:\\temp\\chromeDummyDir","sourceMapPathOverrides": {"webpack:///C:*":"C:/*"//use "webpack:///*": "/*" on Linux/OSX}},{"name": "Attach to Chrome, with sourcemaps","type": "chrome","request": "attach","port": 9222,"sourceMaps": true,"diagnosticLogging": true,"webRoot": "${workspaceRoot}/src","sourceMapPathOverrides": {"webpack:///C:*":"C:/*"}}]}
现在你可以试着在源码中设置一个断点,点击debug视图中的debug按钮,可以尝试右键点击变量把它放到监视中看看变量值或者逐步调试应用。

在笔者写书的时间点,由于一些问题(可能是zone.js引起的异常),启动VSCode debug时可能会自动进入一个断点,只要点击继续就可以了,并不影响调试。
本章完整代码见: https://github.com/wpcfan/awesome-tutorials/tree/chap05/angular2/ng2-tut
