@qidiandasheng
2020-07-13T06:43:09.000000Z
字数 6802
阅读 3434
GPUImage解析(四):自定义美颜滤镜
音视频
相关类介绍
GPUImageFilterGroup
属性:
// 最终输出的filter@property(readwrite, nonatomic, strong) GPUImageOutput<GPUImageInput> *terminalFilter;// 要处理的filter数组@property(readwrite, nonatomic, strong) NSArray *initialFilters;
GPUImageFilterGroup是多个filter的集合。GPUImageFilterGroup本身不绘制图像,对GPUImageFilterGroup添加删除Target操作的操作都会转为terminalFilter的操作。
本身也是继承自GPUImageOutput,并且准守GPUImageInput协议,所以也是整个响应链上的一员,但真正的渲染还是交给initialFilters数组里的filter来做的,主要是实现以下两个方法:
// 给所有的filter对象设置输入帧缓冲- (void)setInputFramebuffer:(GPUImageFramebuffer *)newInputFramebuffer atIndex:(NSInteger)textureIndex;{for (GPUImageOutput<GPUImageInput> *currentFilter in _initialFilters){[currentFilter setInputFramebuffer:newInputFramebuffer atIndex:textureIndex];}}// 通知所有的filter准备开始绘制渲染- (void)newFrameReadyAtTime:(CMTime)frameTime atIndex:(NSInteger)textureIndex;{for (GPUImageOutput<GPUImageInput> *currentFilter in _initialFilters){if (currentFilter != self.inputFilterToIgnoreForUpdates){[currentFilter newFrameReadyAtTime:frameTime atIndex:textureIndex];}}}
GPUImageTwoInputFilter
GPUImageTwoInputFilter是GPUImageFilter的子类,对两个输入纹理进行通用的处理,需要继承它并准备自己的片元着色器。
两个输入纹理默认为inputImageTexture和inputImageTexture2。
- 绘制渲染
GPUImageFilter最后调用的是以下函数通过单个输入帧缓冲进行绘制:
- (void)renderToTextureWithVertices:(const GLfloat *)vertices textureCoordinates:(const GLfloat *)textureCoordinates;
GPUImageTwoInputFilter重写了上面的函数,主要改动就是变为通过两个输入帧缓冲来进行绘制:
- (void)renderToTextureWithVertices:(const GLfloat *)vertices textureCoordinates:(const GLfloat *)textureCoordinates;{if (self.preventRendering){[firstInputFramebuffer unlock];[secondInputFramebuffer unlock];return;}[GPUImageContext setActiveShaderProgram:filterProgram];outputFramebuffer = [[GPUImageContext sharedFramebufferCache] fetchFramebufferForSize:[self sizeOfFBO] textureOptions:self.outputTextureOptions onlyTexture:NO];[outputFramebuffer activateFramebuffer];if (usingNextFrameForImageCapture){[outputFramebuffer lock];}[self setUniformsForProgramAtIndex:0];glClearColor(backgroundColorRed, backgroundColorGreen, backgroundColorBlue, backgroundColorAlpha);glClear(GL_COLOR_BUFFER_BIT);glActiveTexture(GL_TEXTURE2);glBindTexture(GL_TEXTURE_2D, [firstInputFramebuffer texture]);glUniform1i(filterInputTextureUniform, 2);glActiveTexture(GL_TEXTURE3);glBindTexture(GL_TEXTURE_2D, [secondInputFramebuffer texture]);glUniform1i(filterInputTextureUniform2, 3);glVertexAttribPointer(filterPositionAttribute, 2, GL_FLOAT, 0, 0, vertices);glVertexAttribPointer(filterTextureCoordinateAttribute, 2, GL_FLOAT, 0, 0, textureCoordinates);glVertexAttribPointer(filterSecondTextureCoordinateAttribute, 2, GL_FLOAT, 0, 0, [[self class] textureCoordinatesForRotation:inputRotation2]);glDrawArrays(GL_TRIANGLE_STRIP, 0, 4);[firstInputFramebuffer unlock];[secondInputFramebuffer unlock];if (usingNextFrameForImageCapture){dispatch_semaphore_signal(imageCaptureSemaphore);}}
nextAvailableTextureIndex用于获取下一个纹理索引:
- (NSInteger)nextAvailableTextureIndex;{if (hasSetFirstTexture){return 1;}else{return 0;}}
setInputFramebuffer: atIndex:设置输入帧缓冲
此函数会根据获取的textureIndex设置firstInputFramebuffer和secondInputFramebuffer。如果是textureIndex = 0,设置hasSetFirstTexture表示已经设置第一个纹理。
- (void)setInputFramebuffer:(GPUImageFramebuffer *)newInputFramebuffer atIndex:(NSInteger)textureIndex;{if (textureIndex == 0){firstInputFramebuffer = newInputFramebuffer;hasSetFirstTexture = YES;[firstInputFramebuffer lock];}else{secondInputFramebuffer = newInputFramebuffer;[secondInputFramebuffer lock];}}
GPUImageThreeInputFilter
GPUImageThreeInputFilter的逻辑与GPUImageTwoInputFilter类似,增加了thirdInputFramebuffer作为第三个纹理inputImageTexture3的输入。
GPUImageBeautifyFilter
GPUImageBeautifyFilter继承自GPUImageFilterGroup,主要就是通过GPUImageBilateralFilter、GPUImageCannyEdgeDetectionFilter、GPUImageCombinationFilter、GPUImageHSBFilter这几个滤镜实现美颜滤镜。
绘制流程图:
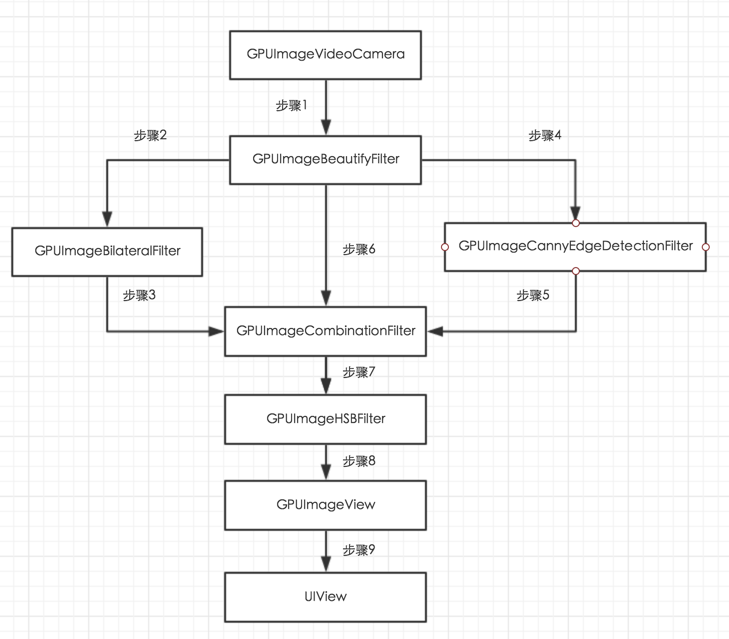
1、GPUImageVideoCamera捕获摄像头图像
调用newFrameReadyAtTime: atIndex:通知GPUImageBeautifyFilter;
2、GPUImageBeautifyFilter调用newFrameReadyAtTime: atIndex:
通知GPUImageBilateralFliter输入纹理已经准备好;
3、GPUImageBilateralFliter 绘制图像后在informTargetsAboutNewFrameAtTime(),
调用setInputFramebufferForTarget: atIndex:
把绘制的图像设置为GPUImageCombinationFilter输入纹理,
并通知GPUImageCombinationFilter纹理已经绘制完毕;
4、GPUImageBeautifyFilter调用newFrameReadyAtTime: atIndex:
通知 GPUImageCannyEdgeDetectionFilter输入纹理已经准备好;
5、同3,GPUImageCannyEdgeDetectionFilter 绘制图像后,
把图像设置为GPUImageCombinationFilter输入纹理;
6、GPUImageBeautifyFilter调用newFrameReadyAtTime: atIndex:
通知 GPUImageCombinationFilter输入纹理已经准备好;
7、GPUImageCombinationFilter判断是否有三个纹理,三个纹理都已经准备好后
调用GPUImageThreeInputFilter的绘制函数renderToTextureWithVertices: textureCoordinates:,
图像绘制完后,把图像设置为GPUImageHSBFilter的输入纹理,
通知GPUImageHSBFilter纹理已经绘制完毕;
8、GPUImageHSBFilter调用renderToTextureWithVertices: textureCoordinates:绘制图像,
完成后把图像设置为GPUImageView的输入纹理,并通知GPUImageView输入纹理已经绘制完毕;
9、GPUImageView把输入纹理绘制到自己的帧缓存,然后通过
[self.context presentRenderbuffer:GL_RENDERBUFFER]显示到UIView上。
- 步骤一美颜滤镜获取输入源
- 步骤二、三、四、五原始纹理通过两种滤镜处理输出两个纹理交给
GPUImageCombinationFilter - 步骤六直接使用原始纹理交给
GPUImageCombinationFilter - 步骤七
GPUImageCombinationFilter拿到三个输入纹理并开始绘制并输出 - 步骤八
GPUImageHSBFilter获取到GPUImageCombinationFilter的输出纹理进行滤镜处理后输出 - 步骤九
GPUImageView拿到GPUImageHSBFilter的输出帧缓冲开始绘制并显示
GPUImageCombinationFilter处理逻辑
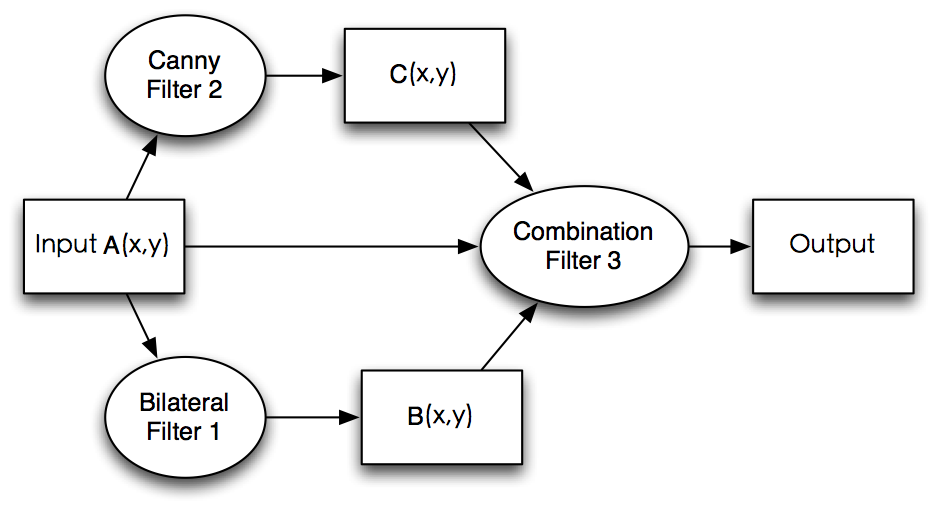
Combination Filter是我们自己定义的三输入的滤波器。三个输入分别是原图像A(x, y),双边滤波后的图像B(x, y),边缘图像C(x, y)。其中A,B,C可以看成是图像矩阵,(x,y)可以看成其中某一像素的坐标。Combination Filter的处理逻辑如下图:
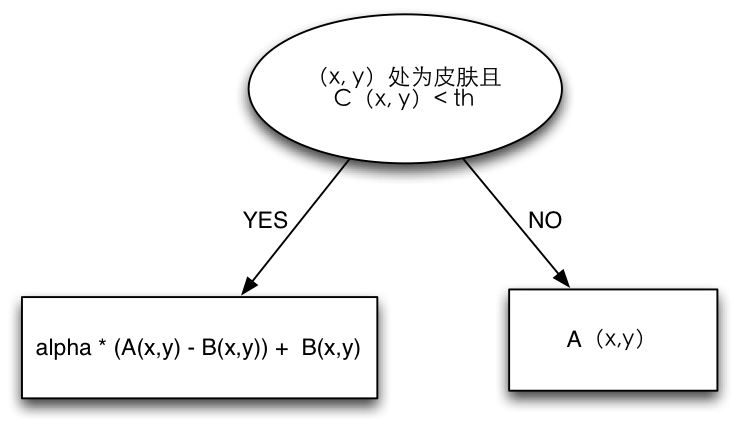
以下是Combination Filter着色器的代码:
NSString *const kGPUImageBeautifyFragmentShaderString = SHADER_STRING(varying highp vec2 textureCoordinate;varying highp vec2 textureCoordinate2;varying highp vec2 textureCoordinate3;uniform sampler2D inputImageTexture;uniform sampler2D inputImageTexture2;uniform sampler2D inputImageTexture3;uniform mediump float smoothDegree;void main(){highp vec4 bilateral = texture2D(inputImageTexture, textureCoordinate);highp vec4 canny = texture2D(inputImageTexture2, textureCoordinate2);highp vec4 origin = texture2D(inputImageTexture3,textureCoordinate3);highp vec4 smooth;lowp float r = origin.r;lowp float g = origin.g;lowp float b = origin.b;if (canny.r < 0.2 && r > 0.3725 && g > 0.1568 && b > 0.0784 && r > b && (max(max(r, g), b) - min(min(r, g), b)) > 0.0588 && abs(r-g) > 0.0588) {smooth = (1.0 - smoothDegree) * (origin - bilateral) + bilateral;}else {smooth = origin;}smooth.r = log(1.0 + 0.2 * smooth.r)/log(1.2);smooth.g = log(1.0 + 0.2 * smooth.g)/log(1.2);smooth.b = log(1.0 + 0.2 * smooth.b)/log(1.2);gl_FragColor = smooth;});
美颜(磨皮)原理
大家对于美颜比较常见的需求就是磨皮、美白。当然提高饱和度、提亮之类的就根据需求而定。这里主要介绍磨皮的实现,参考自基于GPUImage的实时美颜滤镜。
高斯模糊
磨皮的本质实际上是模糊。而在图像处理领域,模糊就是将像素点的取值与周边的像素点取值相关联。而我们常见的高斯模糊 ,它的像素点取值则是由周边像素点求加权平均所得,而权重系数则是像素间的距离的高斯函数,大致关系是距离越小、权重系数越大。下图3.1是高斯模糊效果的示例:

双边滤波
如果单单使用高斯模糊来磨皮,得到的效果是不尽人意的。原因在于,高斯模糊只考虑了像素间的距离关系,没有考虑到像素值本身之间的差异。举个例子来讲,头发与人脸分界处(颜色差异很大,黑色与人皮肤的颜色),如果采用高斯模糊则这个边缘也会模糊掉,这显然不是我们希望看到的。而双边滤波(Bilateral Filter) 则考虑到了颜色的差异,它的像素点取值也是周边像素点的加权平均,而且权重也是高斯函数。不同的是,这个权重不仅与像素间距离有关,还与像素值本身的差异有关,具体讲是,像素值差异越小,权重越大,也是这个特性让它具有了保持边缘的特性,因此它是一个很好的磨皮工具。下图3.2是双边滤波的效果示例:
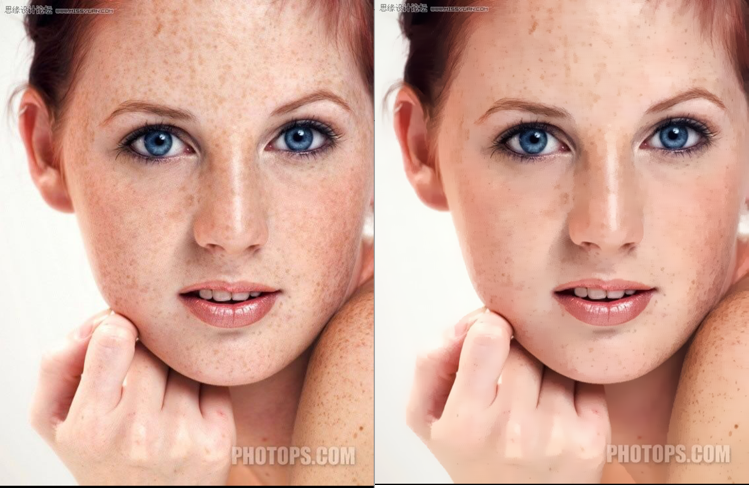
对比3.1和3.2,双边滤波效果确实在人脸细节部分保留得更好,因此采用了双边滤波作为磨皮的基础算法。双边滤波在GPUImage中也有实现,是GPUImageBilateralFilter。
边缘检测
根据图3.2,可以看到图中仍有部分人脸的细节保护得不够,还有我们并不希望将人的头发也模糊掉(我们只需要对皮肤进行处理)。由此我们需要做一个边缘检测,边缘检测在GPUImage中的实现为GPUImageCannyEdgeDetectionFilter。
