@qidiandasheng
2021-04-22T22:49:55.000000Z
字数 16364
阅读 2263
Python 实现 Python 解释器(😁)
Python&Ruby
入门解释器
最简单的入门解释器仅实现加法这一个功能。它也只认得三条指令,所以它可以运行的程序也只有这三个指令的排列组合而已。
入门解释器最基本的三个指令:
- LOAD_VALUE
- ADD_TWO_VALUES
- PRINT_ANSWER
这里我们先关心编译后字节码,以7+5的源码为例:
what_to_execute = {"instructions": [("LOAD_VALUE", 0), # 第一个数("LOAD_VALUE", 1), # 第二个数("ADD_TWO_VALUES", None),("PRINT_ANSWER", None)],"numbers": [7, 5] }
其中what_to_execute就是我们的字节码对象(code object), instructions相当于字节码。
我们的解释器是一个堆栈机器,所以是使用栈来完成加法的。首先执行第一个指令LOAD_VALUE,将第一个数压入栈中,第二个指令同样将第二个数压入栈中。第三个指令ADD_TWO_VALUES弹出栈中的两个数,将它们相加并将结果压入栈中,最后一个指令弹出栈中的答案并打印。

LOAD_VALUE 指令需要找到参数指定的数据进行压栈,那么数据哪里来的呢?可以发现我们的指令集包含两部分:指令自身与一个常量列表。数据来自常量列表。
我们可以看到("LOAD_VALUE", 0)和("LOAD_VALUE", 1)传的参数0和1表示分别从常量列表读取第一个和第二个值压如栈中,("ADD_TWO_VALUES", None)并没有传参,它只需要从栈中弹出两个数相加再把结果压如栈中即可。
真实的Python字节码
我们先定义一个函数,然后输出一些信息:
import disdef cond():x = 3if x < 5:return 'yes'else:return 'no'//输出字节码print(cond.__code__.co_code)//输出字节码对应的数字数组print(list(bytearray(cond.__code__.co_code)))//输出反编译代码dis.dis(cond)//输出100对应的指令print(dis.opname[100])//输出常数列表print(cond.__code__.co_consts)
拿定义的 cond 方法举例,cond.__code__是其code object ,cond.__code__.co_code 是其字节码。以下内容为对应的输出:
b'd\x01}\x00|\x00d\x02k\x00r\x10d\x03S\x00d\x04S\x00d\x00S\x00'[100, 1, 125, 0, 124, 0, 100, 2, 107, 0, 114, 16, 100, 3, 83, 0, 100, 4, 83, 0, 100, 0, 83, 0]4 0 LOAD_CONST 1 (3)2 STORE_FAST 0 (x)5 4 LOAD_FAST 0 (x)6 LOAD_CONST 2 (5)8 COMPARE_OP 0 (<)10 POP_JUMP_IF_FALSE 166 12 LOAD_CONST 3 ('yes')14 RETURN_VALUE8 >> 16 LOAD_CONST 4 ('no')18 RETURN_VALUE20 LOAD_CONST 0 (None)22 RETURN_VALUELOAD_CONST(None, 3, 5, 'yes', 'no')
字节码对象的属性
print(dir(code_obj))
['__class__', '__delattr__', '__dir__', '__doc__', '__eq__', '__format__', '__ge__', '__getattribute__', '__gt__', '__hash__', '__init__', '__init_subclass__', '__le__', '__lt__', '__ne__', '__new__', '__reduce__', '__reduce_ex__', '__repr__', '__setattr__', '__sizeof__', '__str__', '__subclasshook__', 'co_argcount', 'co_cellvars', 'co_code', 'co_consts', 'co_filename', 'co_firstlineno', 'co_flags', 'co_freevars', 'co_kwonlyargcount', 'co_lnotab', 'co_name', 'co_names', 'co_nlocals', 'co_posonlyargcount', 'co_stacksize', 'co_varnames', 'replace']
- co_code:输出字节码
- co_consts:输出常量列表
字节码表示
b'd\x01}\x00|\x00d\x02k\x00r\x10d\x03S\x00d\x04S\x00d\x00S\x00'为字节码的输出,一个字节表示一个数字。
[100, 1, 125, 0, 124, 0, 100, 2, 107, 0, 114, 16, 100, 3, 83, 0, 100, 4, 83, 0, 100, 0, 83, 0]就是每个字节转换为数字之后排列的数组。
每个字节可能是使用的ASCII表示(1个ASCII占用一个字节),也可能使用的是2个16进制数表示(1个16进制数4位,两个8位一个字节)
以下为前面几个字节对应的翻译:
d:100 (ASCII)01:1 (16进制)}:125 (ASCII)00:0 (16进制)|:124 (ASCII)00:0 (16进制)d:100 (ASCII)02:2 (16进制)k:107 (ASCII)
反编译
当然我们直接看字节码并不直观,这里我们使用dis.dis(cond)反编译,翻译成人能读懂的指令:
4 0 LOAD_CONST 1 (3)2 STORE_FAST 0 (x)5 4 LOAD_FAST 0 (x)6 LOAD_CONST 2 (5)8 COMPARE_OP 0 (<)10 POP_JUMP_IF_FALSE 166 12 LOAD_CONST 3 ('yes')14 RETURN_VALUE8 >> 16 LOAD_CONST 4 ('no')18 RETURN_VALUE20 LOAD_CONST 0 (None)22 RETURN_VALUELOAD_CONST
这里一共分4列
- 第一列表示指令对应的行,这里表示第4行为
x = 3指令。 - 第二列表示字节码偏移,也就是第几个字节,从数组中直观看就是数组value对应的index,我们获取对应的值,其中序号0的值为100,100对应的指令为
LOAD_CONST,我们可以使用print(dis.opname[100])来输出值对应的指令。 - 第三列也就是对应的指令
- 第四列表示需要的参数在常数列表中的位置,括号里的是对应的值,我们这里输出的常数列表为
(None, 3, 5, 'yes', 'no'),我们看到第一个指令为LOAD_CONST,读取列表index为1的值3作为参数。
第4行指令翻译:
LOAD_CONST读取3作为参数,压如栈中,STORE_FAST读取x变量,从栈中弹出3赋值给x。
读取源代码编译成字节码对象
code = """def loop():x = 1while x < 5:if x==3:breakx = x + 1print(x)return xdef add():x = 1 + 1"""# compile 能够将源代码编译成字节码对象code_obj = compile(code, "tmp", "exec")
- 我们这里源代码包含两个函数,我们输出字节码看看,然后反编译:
print(code_obj.co_code)dis.dis(code_obj)
b'd\x00d\x01\x84\x00Z\x00d\x02d\x03\x84\x00Z\x01d\x04S\x00'2 0 LOAD_CONST 0 (<code object loop at 0x109bcdb30, file "tmp", line 2>)2 LOAD_CONST 1 ('loop')4 MAKE_FUNCTION 06 STORE_NAME 0 (loop)10 8 LOAD_CONST 2 (<code object add at 0x109bcdbe0, file "tmp", line 10>)10 LOAD_CONST 3 ('add')12 MAKE_FUNCTION 014 STORE_NAME 1 (add)16 LOAD_CONST 4 (None)18 RETURN_VALUEDisassembly of <code object loop at 0x109bcdb30, file "tmp", line 2>:3 0 LOAD_CONST 1 (1)2 STORE_FAST 0 (x)4 >> 4 LOAD_FAST 0 (x)6 LOAD_CONST 2 (5)8 COMPARE_OP 0 (<)10 POP_JUMP_IF_FALSE 405 12 LOAD_FAST 0 (x)14 LOAD_CONST 3 (3)16 COMPARE_OP 2 (==)18 POP_JUMP_IF_FALSE 226 20 JUMP_ABSOLUTE 407 >> 22 LOAD_FAST 0 (x)24 LOAD_CONST 1 (1)26 BINARY_ADD28 STORE_FAST 0 (x)8 30 LOAD_GLOBAL 0 (print)32 LOAD_FAST 0 (x)34 CALL_FUNCTION 136 POP_TOP38 JUMP_ABSOLUTE 49 >> 40 LOAD_FAST 0 (x)42 RETURN_VALUEDisassembly of <code object add at 0x109bcdbe0, file "tmp", line 10>:11 0 LOAD_CONST 1 (2)2 STORE_FAST 0 (x)4 LOAD_CONST 0 (None)6 RETURN_VALUE
我们可以看到输出的这个字节码为python对象的字节码,loop函数和add函数都是它的常量,比如这里LOAD_CONST取常量列表中第0个值为loop函数的字节码对象,压如栈中。
- 我们使用
print(code_obj.co_consts)输出常量列表为:
(<code object loop at 0x10d9f7b30, file "tmp", line 2>, 'loop', <code object add at 0x10d9f7be0, file "tmp", line 10>, 'add', None)
- 取出loop函数的字节码对象并输出对应数组:
loopbytes = code_obj.co_consts[0].co_codeprint(loopbytes)print(list(bytearray(loopbytes)))
b'd\x01}\x00|\x00d\x02k\x00r(|\x00d\x03k\x02r\x16q(|\x00d\x01\x17\x00}\x00t\x00|\x00\x83\x01\x01\x00q\x04|\x00S\x00'[100, 1, 125, 0, 124, 0, 100, 2, 107, 0, 114, 40, 124, 0, 100, 3, 107, 2, 114, 22, 113, 40, 124, 0, 100, 1, 23, 0, 125, 0, 116, 0, 124, 0, 131, 1, 1, 0, 113, 4, 124, 0, 83, 0]
帧的概念
我们知道了一个函数内的代码是如何被编译运行的,那函数外呢,RETURN_VALUE之后又是什么呢?为了回答这个问题,需要再引入一个概念:帧。帧包含了一段代码运行所需要的信息与上下文环境。帧在代码执行时被动态地创建与销毁,每一个帧的创建对应一次函数调用,所以每一个帧都有一个 code object与其关联,同时一个 code object 可以拥有多个帧,因为一个函数可以递归调用自己多次。
帧存在于调用栈中,你在程序异常时所看到的Traceback就是调用栈中的信息。调用栈顾名思义就是每当你在当前函数内调用一次函数就在当前调用栈上压入所调用的函数的帧,在所调用函数返回时再将该帧弹出。这里再说下解释器用到的另外两个栈,第一个我们已经接触过了,就是数据栈,执行字节码操作时使用的栈。还有一个叫作块栈,用于特定的控制流,比如循环与异常处理。每一个帧都拥有自己的数据栈与块栈。
举个具体例子来说明一下,以下代码的调用顺序是 main(模块) --> foo() --> bar()
>>> def bar(y):... z = y + 3 # <--- (3) ... 现在解释器执行到这里... return z...>>> def foo():... a = 1... b = 2... return a + bar(b) # <--- (2) ... 调用 bar 函数...>>> foo() # <--- (1) 我们在 foo() 中
下图显示当前调用栈中的内容:
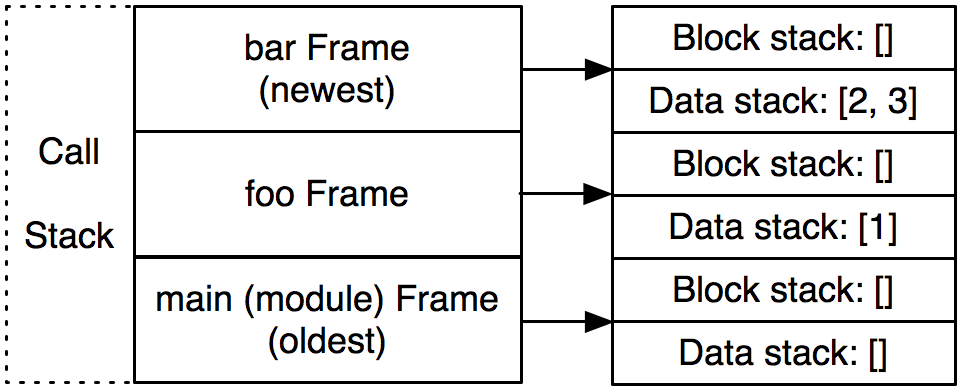
我们现在在 bar() 中,在该函数返回后,bar Frame 就会被弹出,foo Frame 也是同理。
RETURN_VALUE 令解释器在帧之间传递一个值,首先调用栈的栈顶帧的数据栈的栈顶值会被弹出,之后丢弃栈顶帧,将之前弹出的值压到下一个帧的数据栈中。这样就完成了一次 RETURN_VALUE 。
实现Python解释器
Python环境:3.8.6
创建帧类
class Frame(object):def __init__(self, code_obj, global_names, local_names, prev_frame):# 当前帧的字节码对象self.code_obj = code_obj# 全局变量self.f_globals = global_names# 局部变量self.f_locals = local_names# 上一帧self.prev_frame = prev_frame# 数据栈self.stack = []# block 栈self.block_stack = []# 如果前一帧存在,则把前一帧的内建模块赋值给当前帧# 否则取本地的内建模块给当前帧if prev_frame:self.f_builtins = prev_frame.f_builtinselse:self.f_builtins = local_names['__builtins__']if hasattr(self.f_builtins, '__dict__'):self.f_builtins = self.f_builtins.__dict__# 最后运行的指令,初始为 0self.last_instruction = 0
创建函数类
class Function(object):# __slots__ 会固定对象的属性,无法再动态增加新的属性,这可以节省内存空间__slots__ = ['func_code', 'func_name', 'func_defaults', 'func_globals','func_locals', 'func_dict', 'func_closure','__name__', '__dict__', '__doc__','_vm', '_func',]def __init__(self, name, code, globs, defaults, closure, vm):"""这部分不需要去深究,但是代码会尽量注释说明"""self._vm = vm# 这里的 code 即所调用函数的 code_objself.func_code = code# 函数名会存在 code.co_name 中self.func_name = self.__name__ = name or code.co_name# 函数参数的默认值,如 func(a=5,b=3) ,则 func_defaults 为 (5,3)self.func_defaults = tuple(defaults)self.func_globals = globsself.func_locals = self._vm.frame.f_localsself.__dict__ = {}# 函数的闭包信息self.func_closure = closureself.__doc__ = code.co_consts[0] if code.co_consts else None# 有时我们需要用到真实 Python 的函数,下面的代码是为它准备的kw = {'argdefs': self.func_defaults,}# 为闭包创建 cell 对象if closure:kw['closure'] = tuple(make_cell(0) for _ in closure)self._func = types.FunctionType(code, globs, **kw)def __call__(self, *args, **kwargs):"""每当调用一次函数,会创建一个新 frame 并运行"""# 通过 inspect 获得函数的参数callargs = inspect.getcallargs(self._func, *args, **kwargs)# 创建函数的帧frame = self._vm.make_frame(self.func_code, callargs, self.func_globals, {})return self._vm.run_frame(frame)def make_cell(value):"""创建一个真实的 cell 对象"""# Thanks to Alex Gaynor for help with this bit of twistiness.fn = (lambda x: lambda: x)(value)return fn.__closure__[0]
虚拟机类
- 初始化虚拟机,并创建帧,运行帧
class VirtualMachine(object):def __init__(self):# 调用栈self.frames = []# 当前运行的帧self.frame = None# frame 返回时的返回值self.return_value = Noneself.last_exception = Nonedef run_code(self, code, global_names=None, local_names=None):""" 运行 Python 程序的入口,程序编译后生成 code_obj这里 code_obj 在参数 code 中run_code 根据输入的 code_obj 新建一个 frame 并开始运行"""frame = self.make_frame(code, global_names=global_names,local_names=local_names)self.run_frame(frame)# 新建一个帧,code 为 code_obj ;callargs 为函数调用时的参数def make_frame(self, code, callargs={}, global_names=None, local_names=None):if global_names is not None:global_names = global_namesif local_names is None:local_names = global_nameselif self.frames:global_names = self.frame.global_nameslocal_names = {}else:# __builtins__内建函数global_names = local_names = {'__builtins__':__builtins__,'__name__': '__main__','__doc__': None,'__package__':None,}# 将函数调用时的参数更新到局部变量空间中local_names.update(callargs)frame = Frame(code, global_names, local_names, self.frame)return frame# 运行 framedef run_frame(self, frame):"""运行帧直至它返回"""self.push_frame(frame)while True:byte_name, arguments = self.parse_byte_and_args()why = self.dispatch(byte_name, arguments)while why and frame.block_stack:why = self.manage_block_stack(why)if why:breakself.pop_frame()if why == 'exception':exc, val, tb = self.last_exceptione = exc(val)e.__traceback__ = tbraise ereturn self.return_value
- 调用栈和数据栈的操作
class VirtualMachine(object):# [... 跳过 ...]# 调用栈压入 framedef push_frame(self, frame):self.frames.append(frame)self.frame = frame# 调用栈弹出 framedef pop_frame(self):self.frames.pop()if self.frames:self.frame = self.frames[-1]else:self.frame = None# 数据栈操作def top(self):return self.frame.stack[-1]def pop(self):return self.frame.stack.pop()def push(self, *vals):self.frame.stack.extend(vals)def popn(self, n):"""弹出多个值"""if n:ret = self.frame.stack[-n:]self.frame.stack[-n:] = []return retelse:return []# block栈操作def push_block(self, b_type, handler=None):stack_height = len(self.frame.stack)self.frame.block_stack.append(Block(b_type, handler, stack_height))def pop_block(self):return self.frame.block_stack.pop()def unwind_block(self, block):"""Unwind the values on the data stack corresponding to a given block."""if block.type == 'except-handler':# The exception itself is on the stack as type, value, and traceback.offset = 3else:offset = 0while len(self.frame.stack) > block.stack_height + offset:self.pop()if block.type == 'except-handler':traceback, value, exctype = self.popn(3)self.last_exception = exctype, value, tracebackdef manage_block_stack(self, why):"""管理一个 frame 的 block 栈在循环、异常处理、返回这几个方面操作 block 栈与数据栈"""frame = self.frameblock = frame.block_stack[-1]if block.type == 'loop' and why == 'continue':self.jump(self.return_value)why = Nonereturn whyself.pop_block()self.unwind_block(block)if block.type == 'loop' and why == 'break':why = Noneself.jump(block.handler)return whyif (block.type in ['setup-except', 'finally'] and why == 'exception'):self.push_block('except-handler')exctype, value, tb = self.last_exceptionself.push(tb, value, exctype)self.push(tb, value, exctype) # yes, twicewhy = Noneself.jump(block.handler)return whyelif block.type == 'finally':if why in ('return', 'continue'):self.push(self.return_value)self.push(why)why = Noneself.jump(block.handler)return whyreturn why
- 在第一步运行帧的时候,会循环调用
parse_byte_and_args,获取当前帧的指令和参数,然后通过dispatch动态获取对于的函数进行调用
class VirtualMachine(object):# [... 跳过 ...]# 解析当前帧的指令名称和参数def parse_byte_and_args(self):f = self.frameopoffset = f.last_instruction# 取得要运行的指令byteCode = f.code_obj.co_code[opoffset]f.last_instruction += 1# 指令名称byte_name = dis.opname[byteCode]# 指令码 <dis.HAVE_ARGUMENT 的都是无参数指令,其它则是有参数指令if byteCode >= dis.HAVE_ARGUMENT:# 取得后一字节的参数arg = f.code_obj.co_code[f.last_instruction:f.last_instruction+1]f.last_instruction += 1# 参数第一个字节为参数arg_val = arg[0]if byteCode in dis.hasconst: # 查找常量arg = f.code_obj.co_consts[arg_val]elif byteCode in dis.hasname: # 查找变量名arg = f.code_obj.co_names[arg_val]elif byteCode in dis.haslocal: # 查找局部变量名arg = f.code_obj.co_varnames[arg_val]elif byteCode in dis.hasjrel: # 计算跳转位置arg = f.last_instruction + arg_valelse:arg = arg_valargument = [arg]else:f.last_instruction += 1argument = []return byte_name, argument# 获取到指令对应的函数进行分发调用def dispatch(self, byte_name, argument):why = Nonetry:# 通过指令名得到对应的方法函数bytecode_fn = getattr(self, 'byte_%s' % byte_name, None)if bytecode_fn is None:# 这里对一元操作、二元操作和其它操作做了区分if byte_name.startswith('UNARY_'):self.unaryOperator(byte_name[6:])elif byte_name.startswith('BINARY_'):self.binaryOperator(byte_name[7:])else:raise VirtualMachineError("unsupported bytecode type: %s" % byte_name)else:why = bytecode_fn(*argument)except:# 存储运行指令时的异常信息self.last_exception = sys.exc_info()[:2] + (None,)why = 'exception'return why
- 指令对于的函数,主要就是各种栈的操作
class VirtualMachine(object):# [... 跳过 ...]def byte_LOAD_CONST(self, const):self.push(const)def byte_POP_TOP(self):self.pop()## Names,读取变量对应的值def byte_LOAD_NAME(self, name):frame = self.frame# 局部变量>全局变量>内建变量if name in frame.f_locals:val = frame.f_locals[name]elif name in frame.f_globals:val = frame.f_globals[name]elif name in frame.f_builtins:val = frame.f_builtins[name]else:raise NameError("name '%s' is not defined" % name)self.push(val)def byte_STORE_NAME(self, name):self.frame.f_locals[name] = self.pop()def byte_LOAD_FAST(self, name):if name in self.frame.f_locals:val = self.frame.f_locals[name]else:raise UnboundLocalError("local variable '%s' referenced before assignment" % name)self.push(val)def byte_STORE_FAST(self, name):self.frame.f_locals[name] = self.pop()def byte_LOAD_GLOBAL(self, name):f = self.frameif name in f.f_globals:val = f.f_globals[name]elif name in f.f_builtins:val = f.f_builtins[name]else:raise NameError("global name '%s' is not defined" % name)self.push(val)BINARY_OPERATORS = {'POWER': pow,'MULTIPLY': operator.mul,'FLOOR_DIVIDE': operator.floordiv,'TRUE_DIVIDE': operator.truediv,'MODULO': operator.mod,'ADD': operator.add,'SUBTRACT': operator.sub,'SUBSCR': operator.getitem,'LSHIFT': operator.lshift,'RSHIFT': operator.rshift,'AND': operator.and_,'XOR': operator.xor,'OR': operator.or_,}def binaryOperator(self, op):x, y = self.popn(2)self.push(self.BINARY_OPERATORS[op](x, y))COMPARE_OPERATORS = [operator.lt,operator.le,operator.eq,operator.ne,operator.gt,operator.ge,lambda x, y: x in y,lambda x, y: x not in y,lambda x, y: x is y,lambda x, y: x is not y,lambda x, y: issubclass(x, Exception) and issubclass(x, y),]def byte_COMPARE_OP(self, opnum):x, y = self.popn(2)self.push(self.COMPARE_OPERATORS[opnum](x, y))## Attributes and indexingdef byte_LOAD_ATTR(self, attr):obj = self.pop()val = getattr(obj, attr)self.push(val)def byte_STORE_ATTR(self, name):val, obj = self.popn(2)setattr(obj, name, val)## Buildingdef byte_BUILD_LIST(self, count):elts = self.popn(count)self.push(elts)def byte_BUILD_MAP(self, size):self.push({})def byte_STORE_MAP(self):the_map, val, key = self.popn(3)the_map[key] = valself.push(the_map)def byte_LIST_APPEND(self, count):val = self.pop()the_list = self.frame.stack[-count] # peekthe_list.append(val)## Jumpsdef byte_JUMP_FORWARD(self, jump):self.jump(jump)def byte_JUMP_ABSOLUTE(self, jump):self.jump(jump)def byte_POP_JUMP_IF_TRUE(self, jump):val = self.pop()if val:self.jump(jump)def byte_POP_JUMP_IF_FALSE(self, jump):val = self.pop()if not val:self.jump(jump)def jump(self, jump):self.frame.last_instruction = jump## Blocksdef byte_SETUP_LOOP(self, dest):self.push_block('loop', dest)def byte_GET_ITER(self):self.push(iter(self.pop()))def byte_FOR_ITER(self, jump):iterobj = self.top()try:v = next(iterobj)self.push(v)except StopIteration:self.pop()self.jump(jump)def byte_BREAK_LOOP(self):return 'break'def byte_POP_BLOCK(self):self.pop_block()## Functionsdef byte_MAKE_FUNCTION(self, argc):name = self.pop()# 从数据栈中取出数据code = self.pop()defaults = self.popn(argc)globs = self.frame.f_globalsfn = Function(name, code, globs, defaults, None, self)self.push(fn)def byte_CALL_FUNCTION(self, arg):lenKw, lenPos = divmod(arg, 256) # KWargs not supported hereposargs = self.popn(lenPos)func = self.pop()frame = self.frameretval = func(*posargs)self.push(retval)def byte_RETURN_VALUE(self):self.return_value = self.pop()return "return"## Printsdef byte_PRINT_ITEM(self):item = self.pop()sys.stdout.write(str(item))def byte_PRINT_NEWLINE(self):print("")
源码
运行时结构
我们这里用以一段C程序源程序为例:
int fun(int a,int b);int m = 10;int main(){int i = 4;int j = 5;m = fun(i,j);return 0;}int fun(int a,int b){int c = 0;c = a + b;return c;}
eip & ebp & esp
eip永远指向代码区将要执行的下一条指令,它的管控方式有两种,一种是“顺序执行”,即程序执行完一条指令后自动指向下一条执行;另一种是跳转,也就是执行完一条跳转指令后跳转到指定的位置。
ebp和esp用来管控栈空间,ebp指向栈底,esp指向栈顶,在代码区中,函数调用、返回和执行伴随着不断压栈和清栈,栈中数据存储和释放的原则是后进先出。
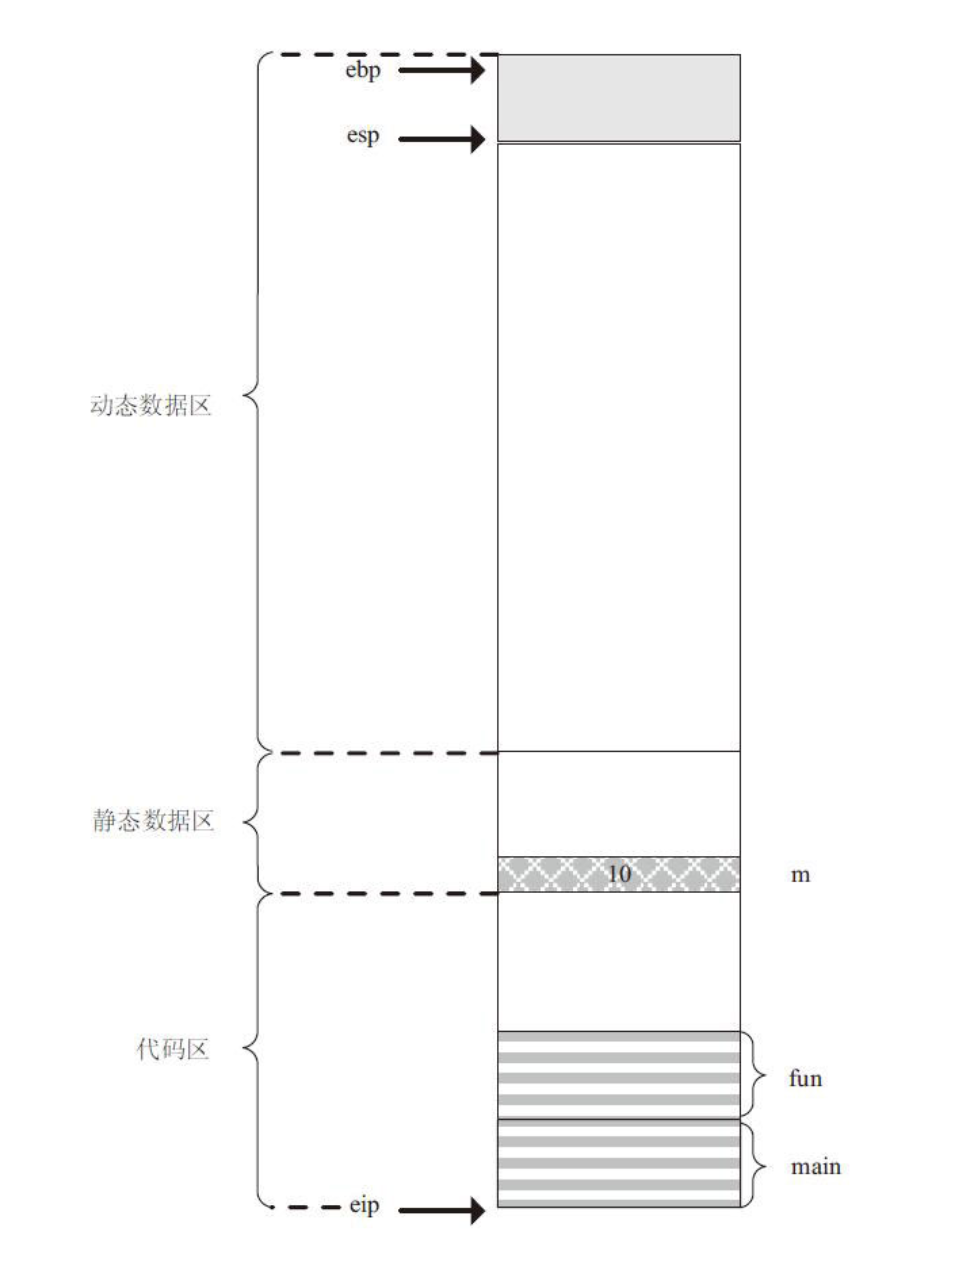
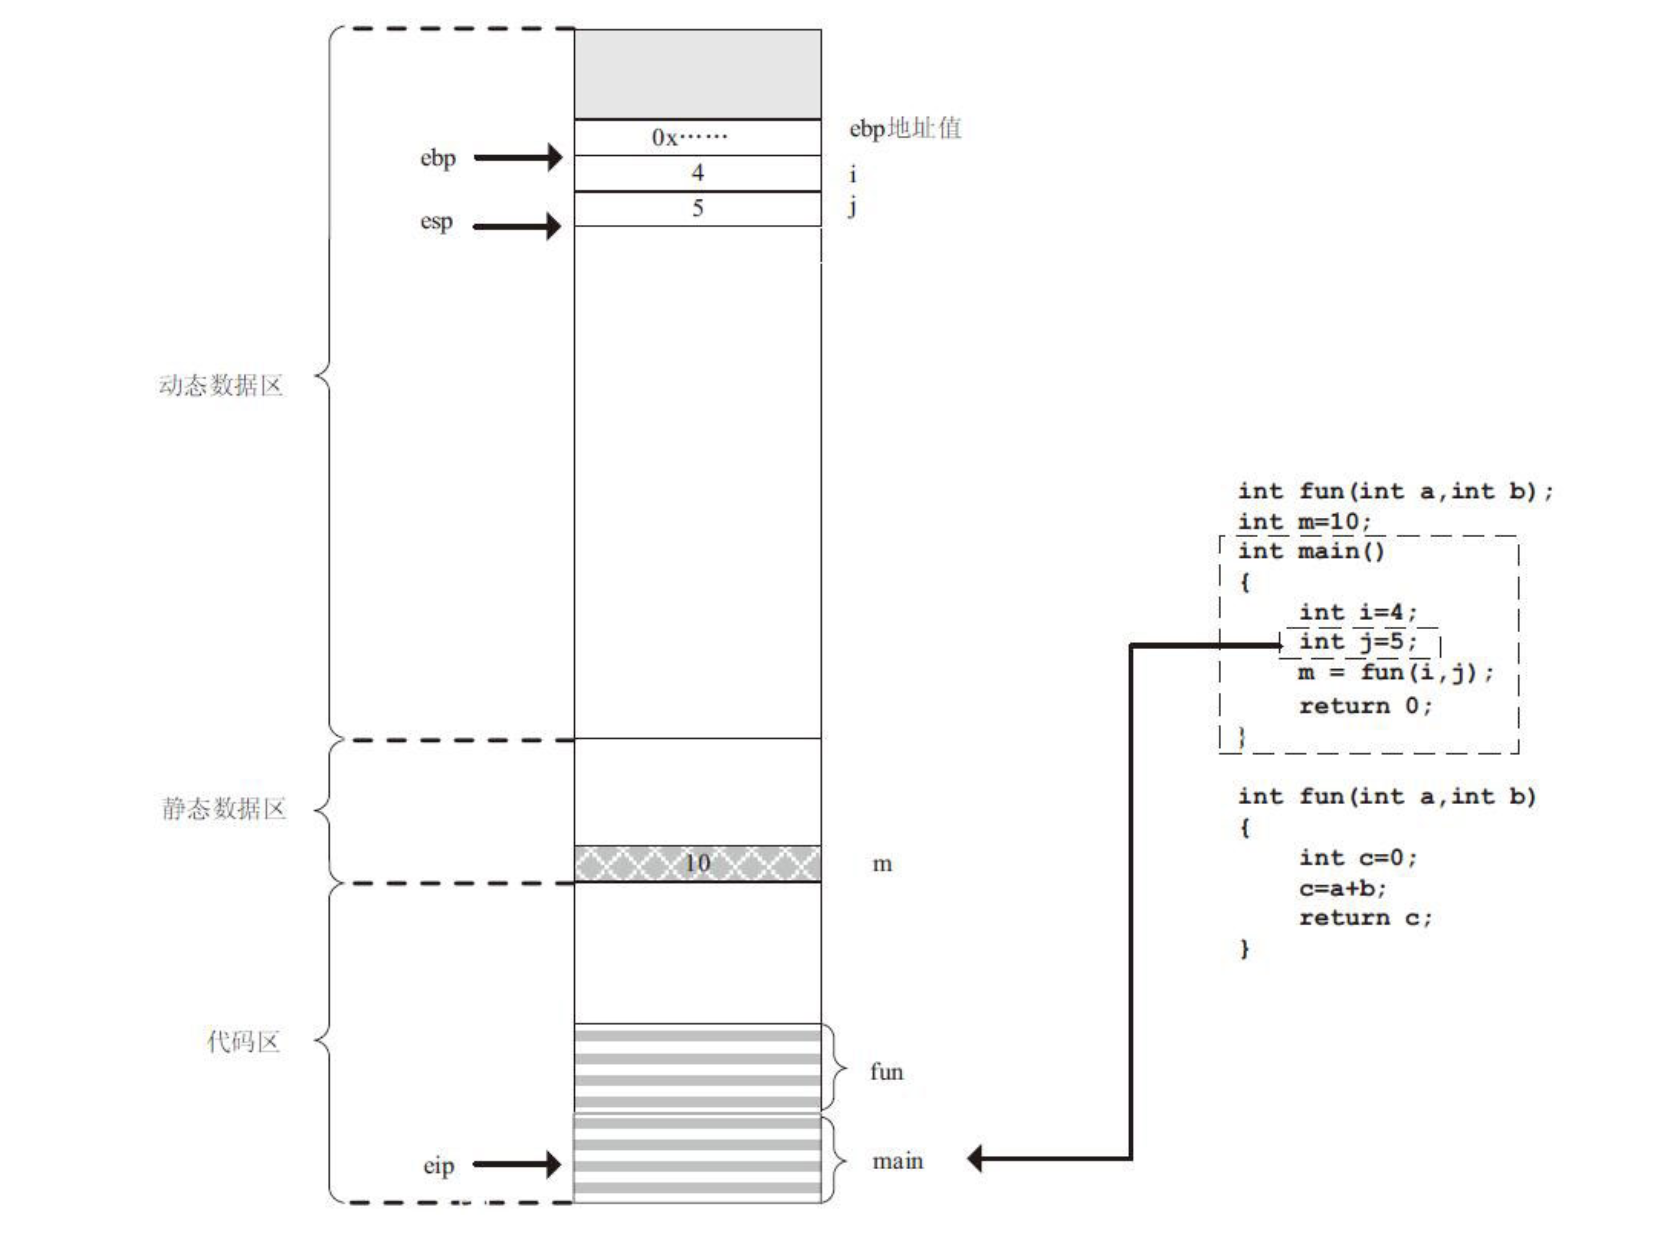
运行时初始状态
eip指向main函数的第一条指令,此时程序还没有运行,栈空间里还没有数据,ebp和esp指向的位置是程序加载时内核设置的。

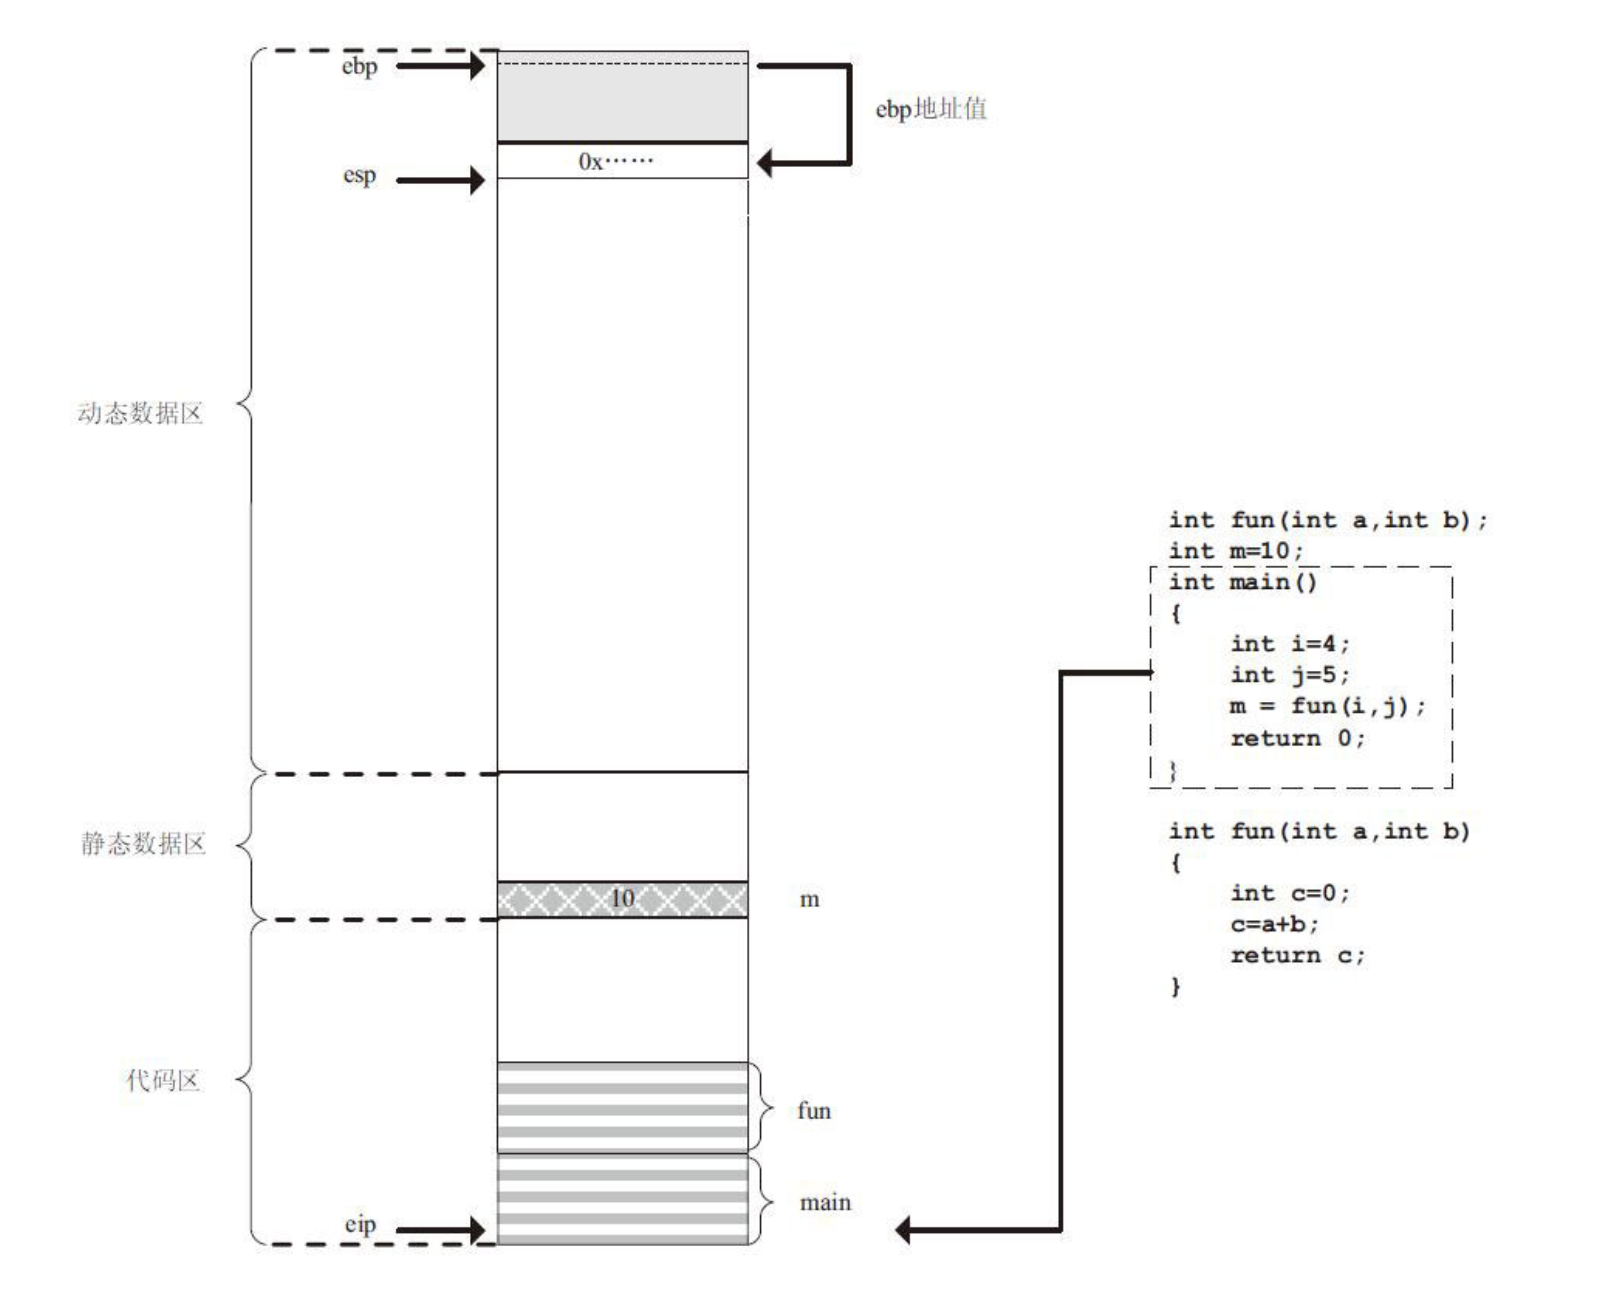
保存ebp
程序开始执行main函数第一条指令,eip自动指向下一条指令。第一条指令的执行,致使ebp的地址值被保存在栈中,保存的目的是本程序执行完毕后,ebp还能返回现在的位置,复原现在的栈。随着ebp地址值的压栈,esp自动向栈顶方向移动,它将永远指向栈顶。
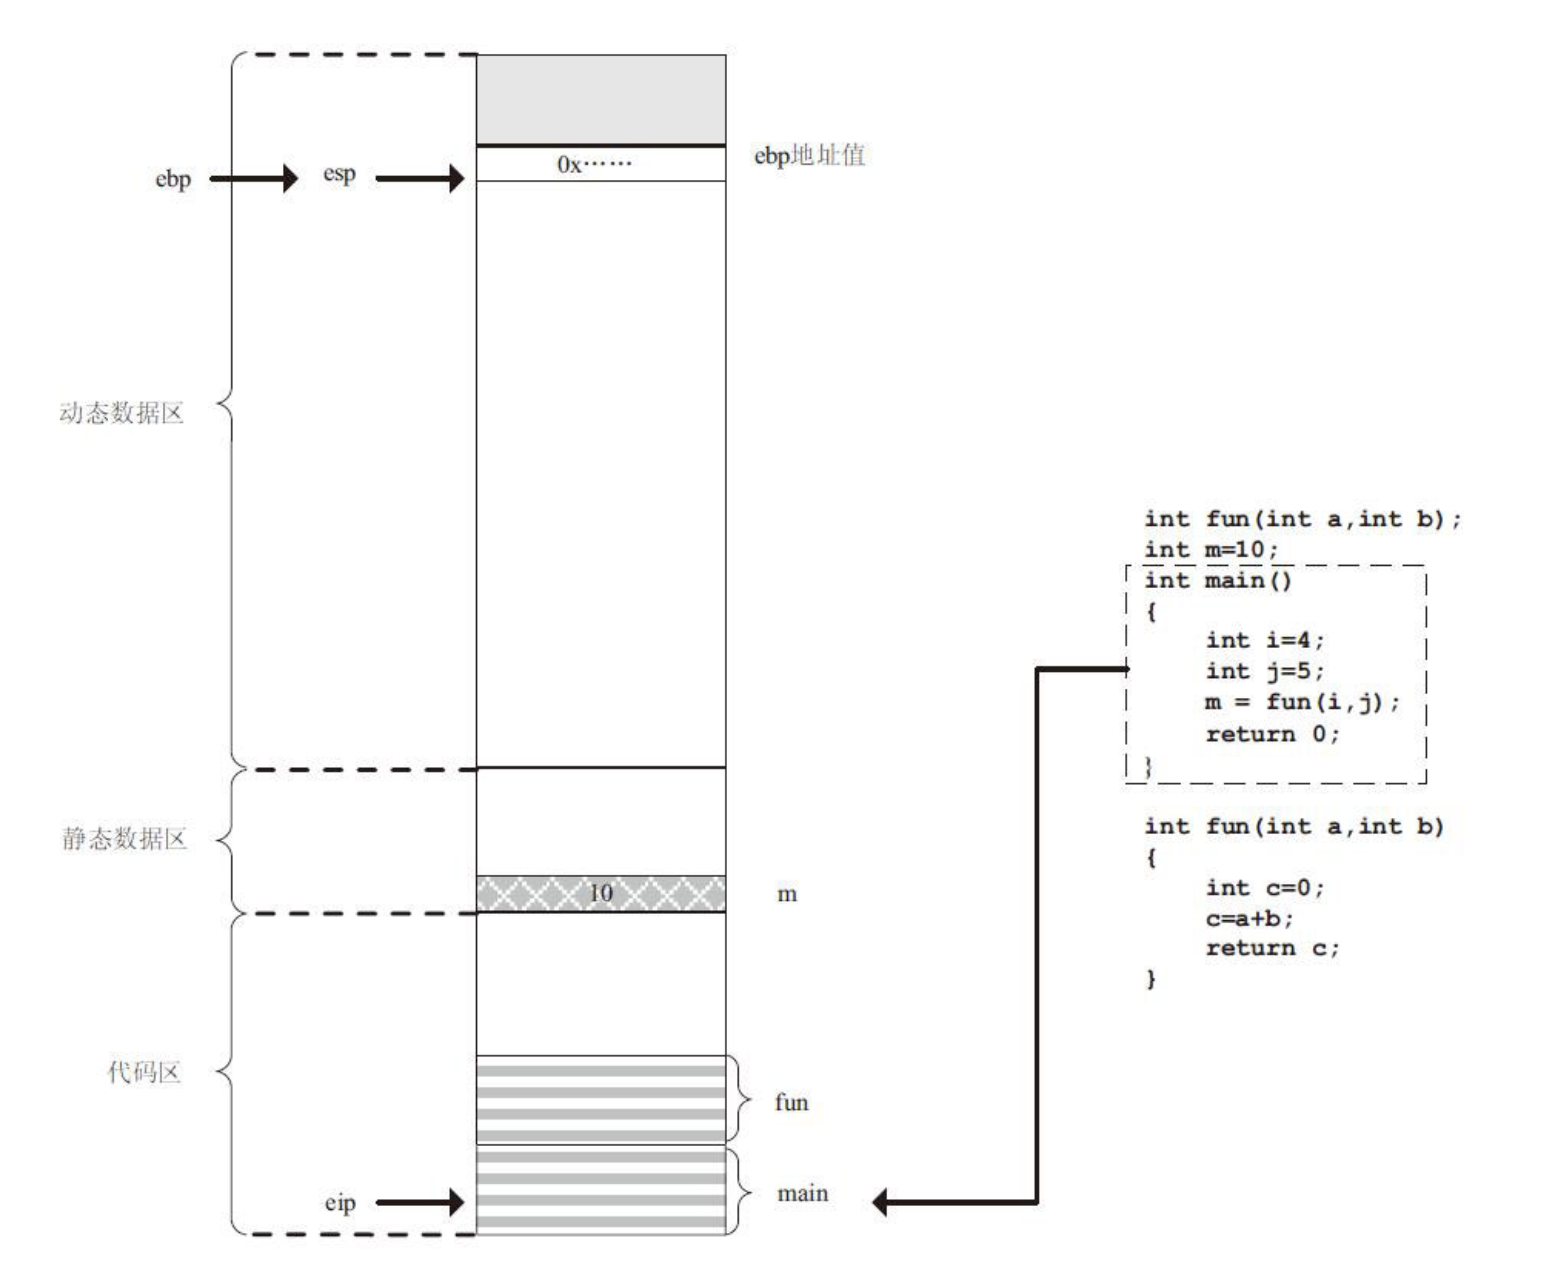
构建main函数栈
程序继续执行,开始构建main函数自己的栈,ebp原来指向的地址值已经被保存了,它被腾出来了,用来看管main函数的栈底,此时它和esp是重叠的。
变量i和j压栈并初始化
程序继续执行,eip指向下一条指令,此次执行的是局部变量i的初始化,初始值4被存储在栈中,esp自动向栈顶方向移动。j同样流程。
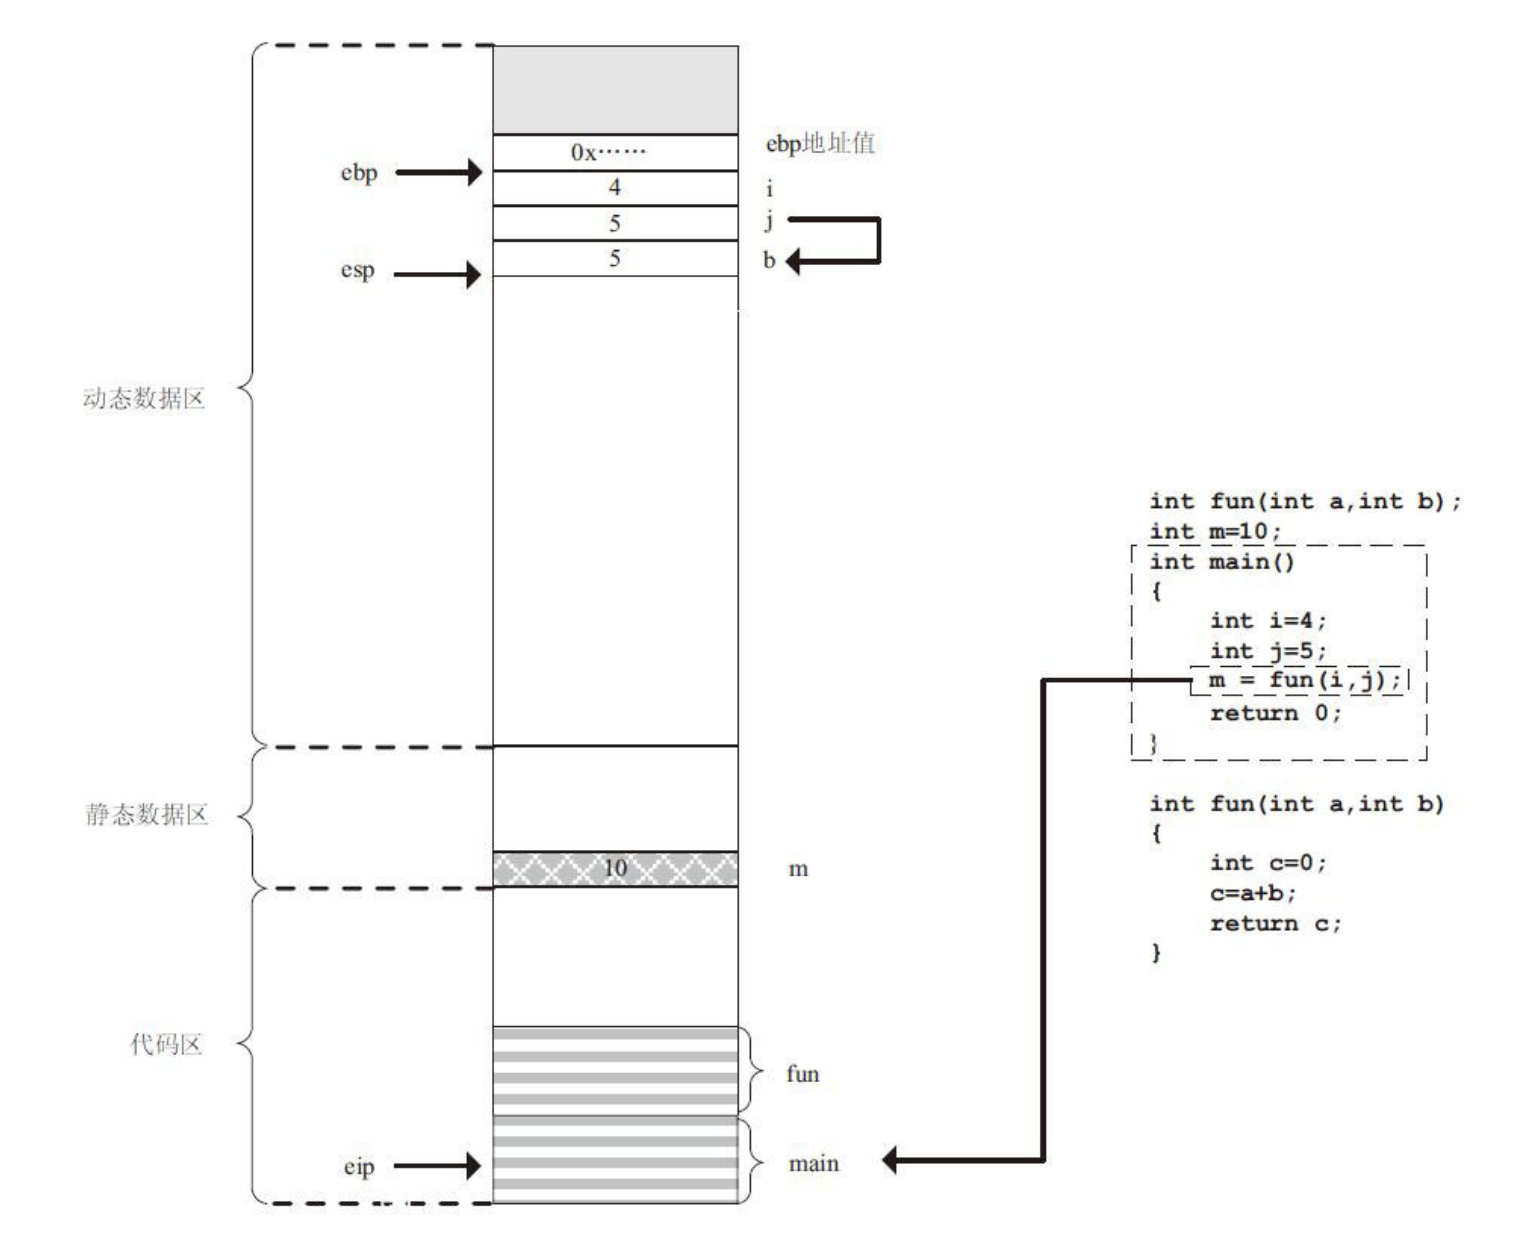
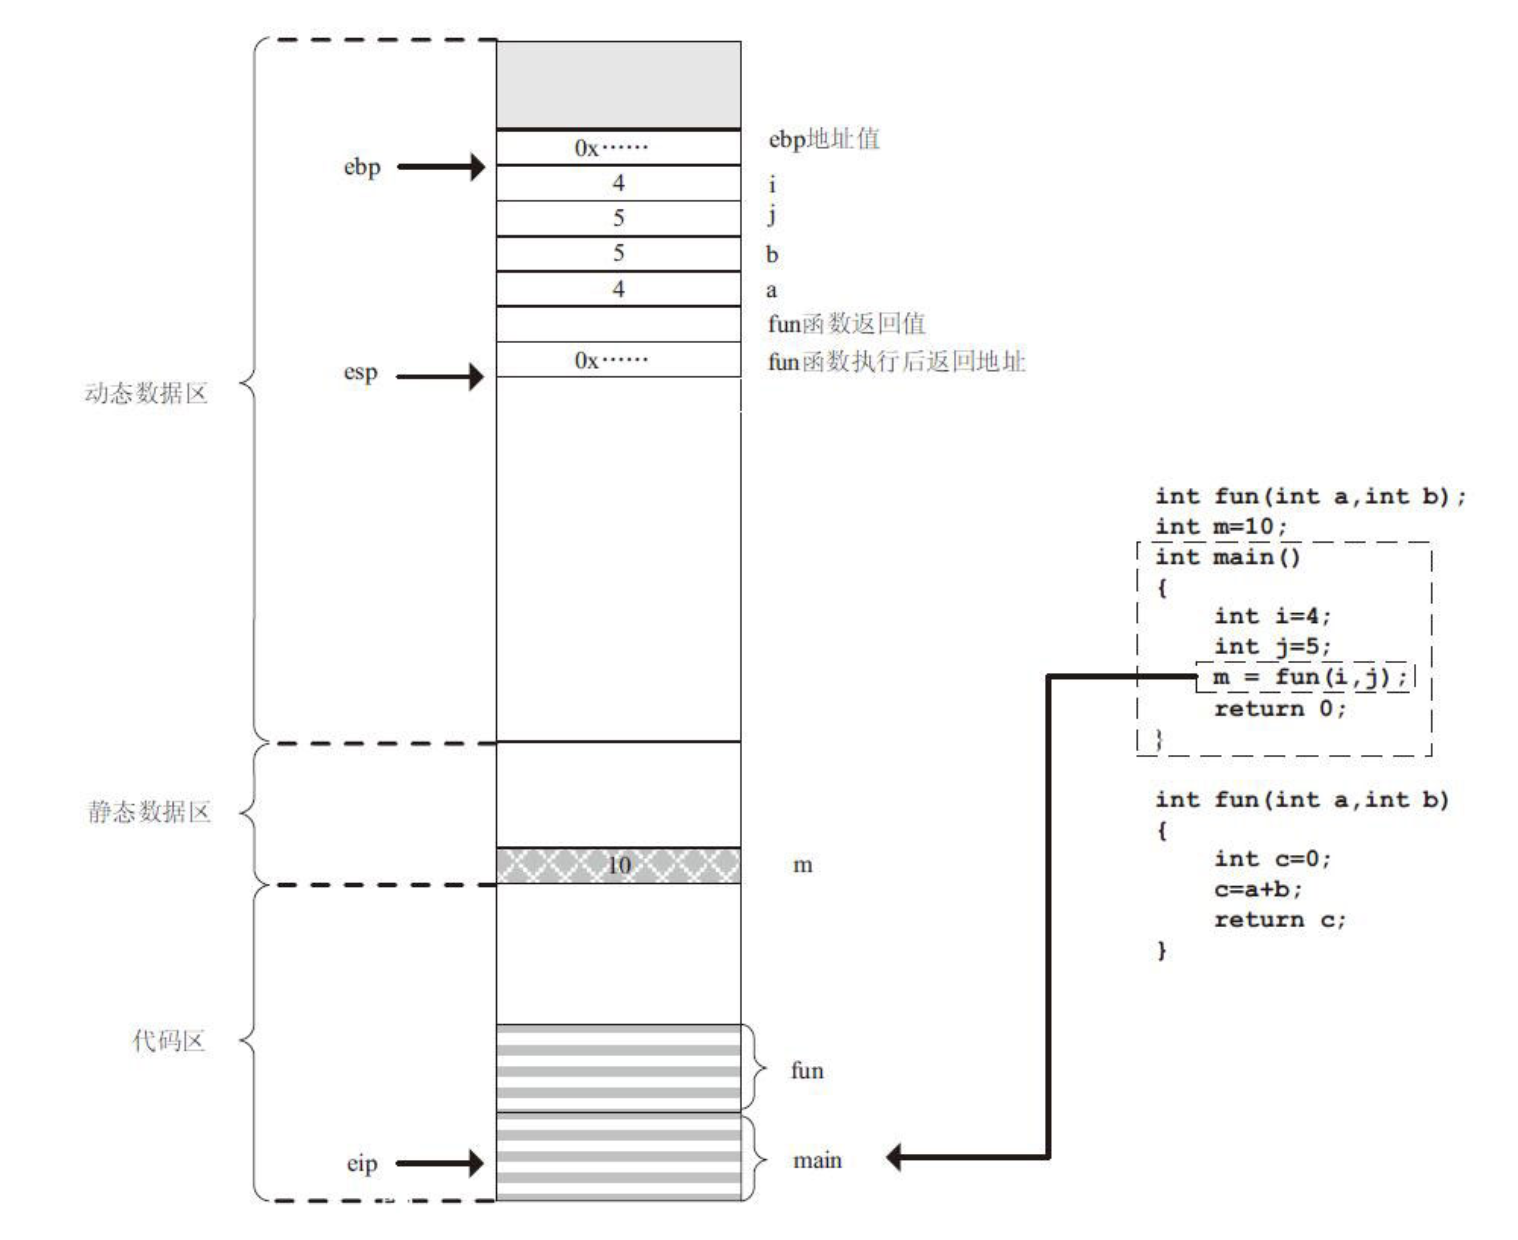
传参
上面两个局部数据都是供main函数自己用的,接下来调用fun函数时压栈的数据虽然也保存在main函数的栈中,但它们都是供fun函数用的。可以说fun函数的数据,一半在fun函数中,一半在主调函数中。
先执行传参的指令,此时参数入栈的顺序和代码中传参的书写顺序正好相反,参数b先入栈,数值是main函数中局部变量j的数值5。
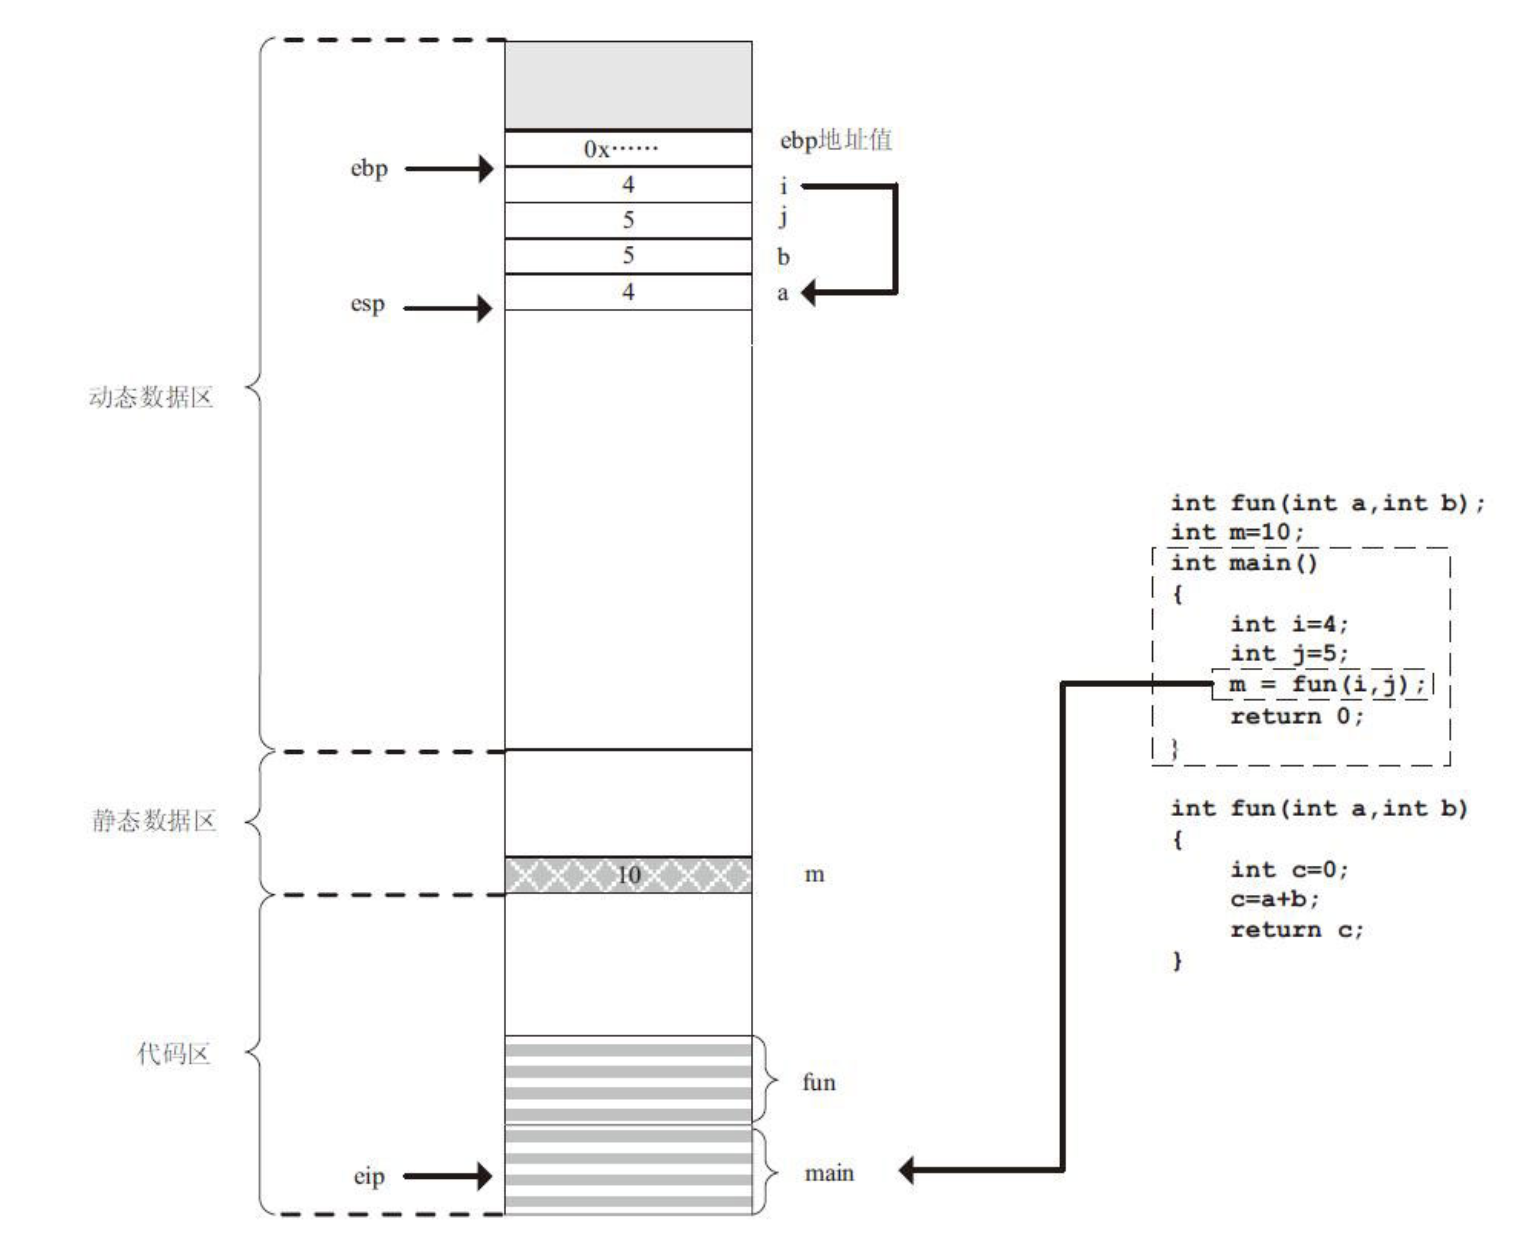
程序继续执行,参数a被压入栈中,数值是局部变量i的数值4
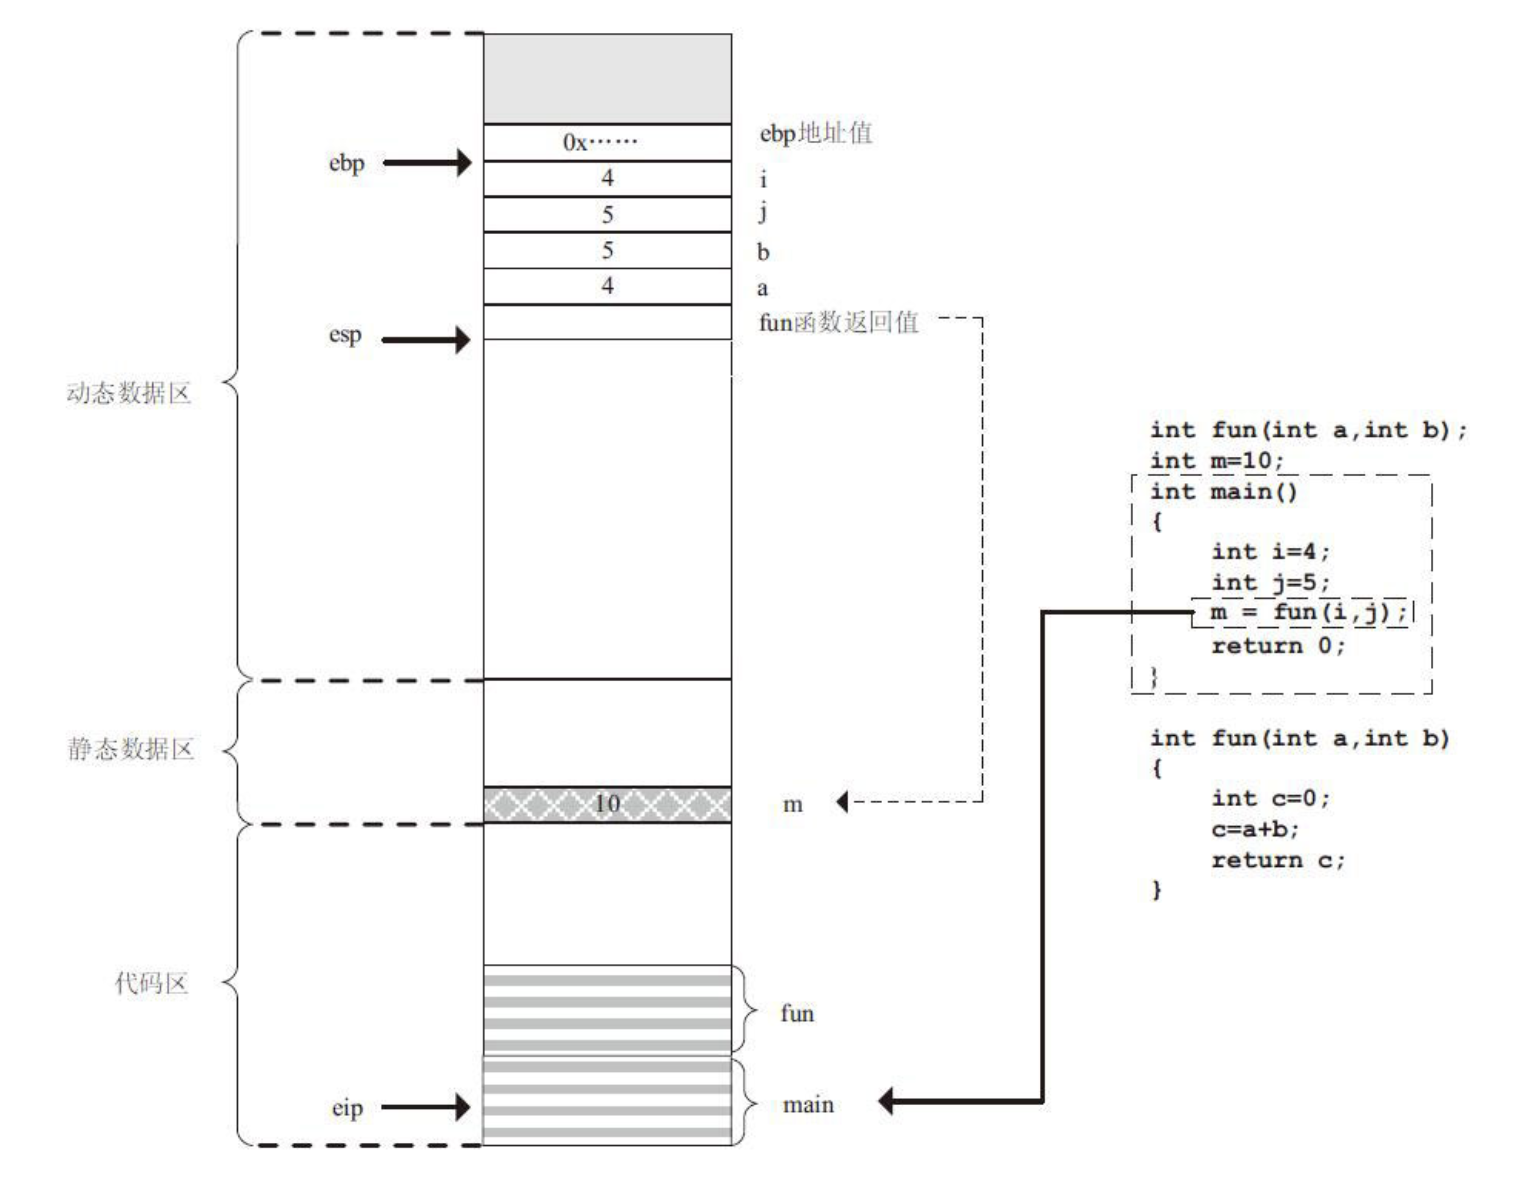
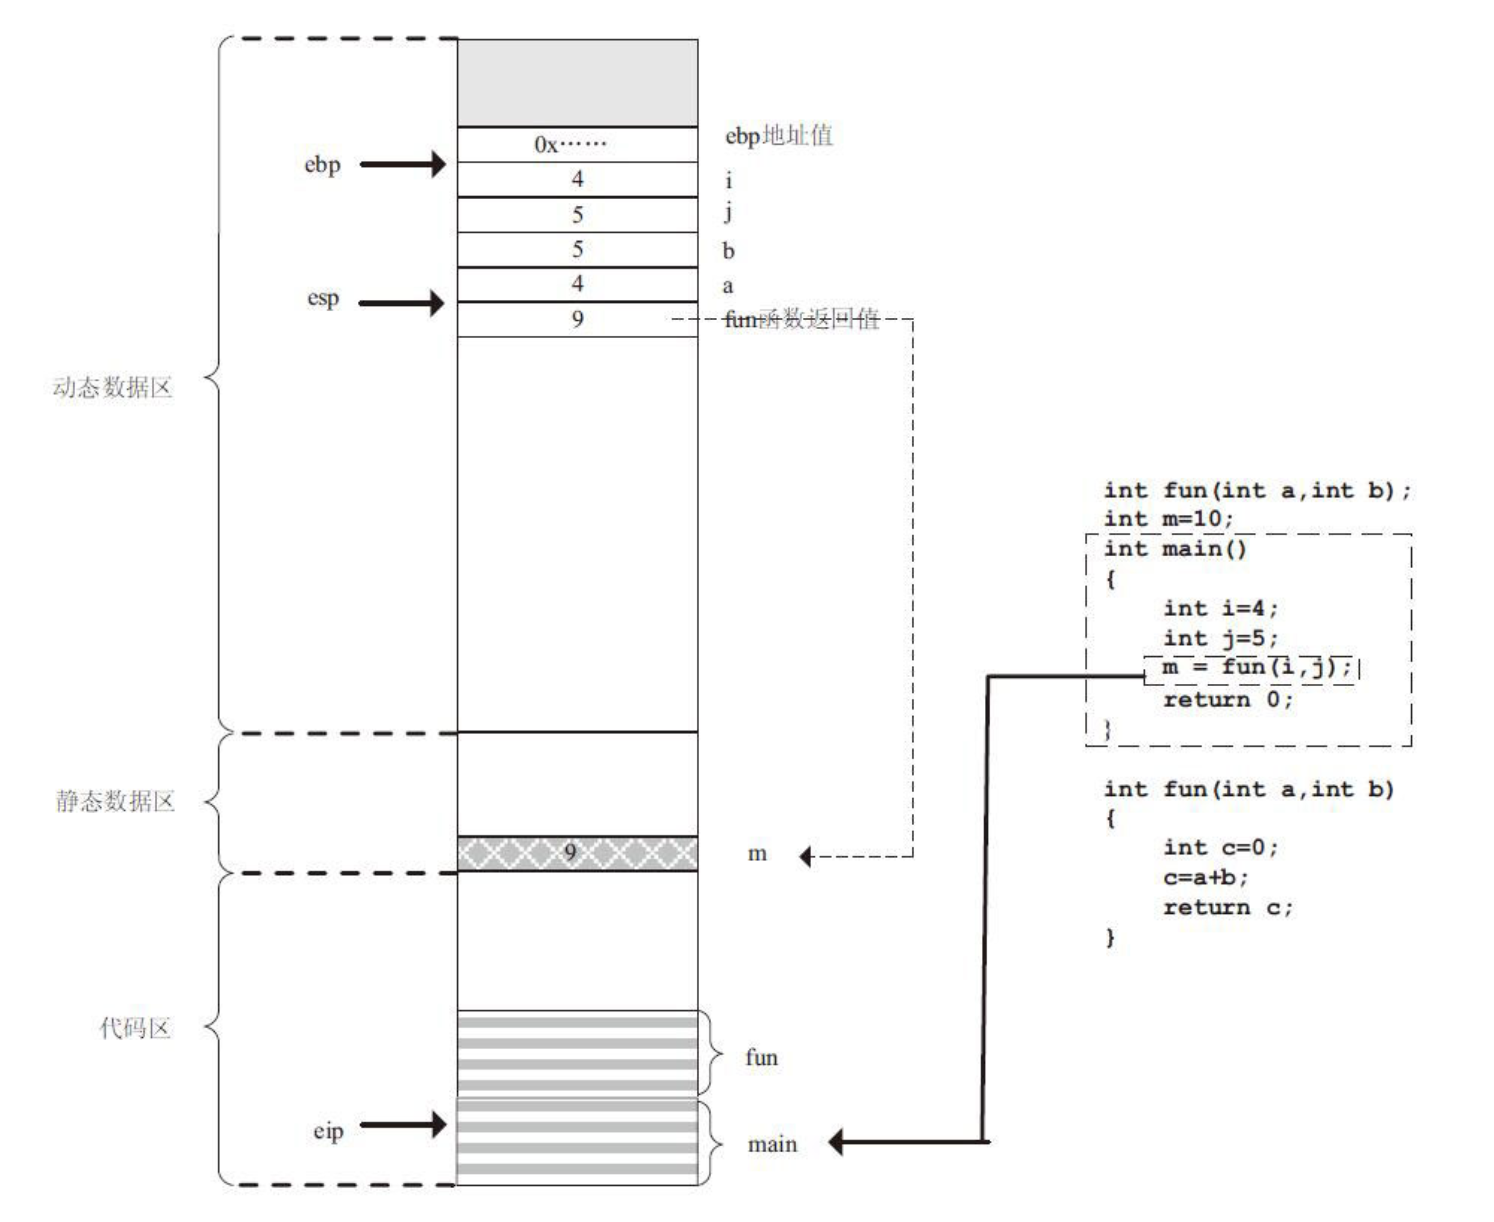
设置fun函数返回值位置
程序继续执行,此次压入的是fun函数返回值,将来fun函数返回之后,这里的值会传递给m
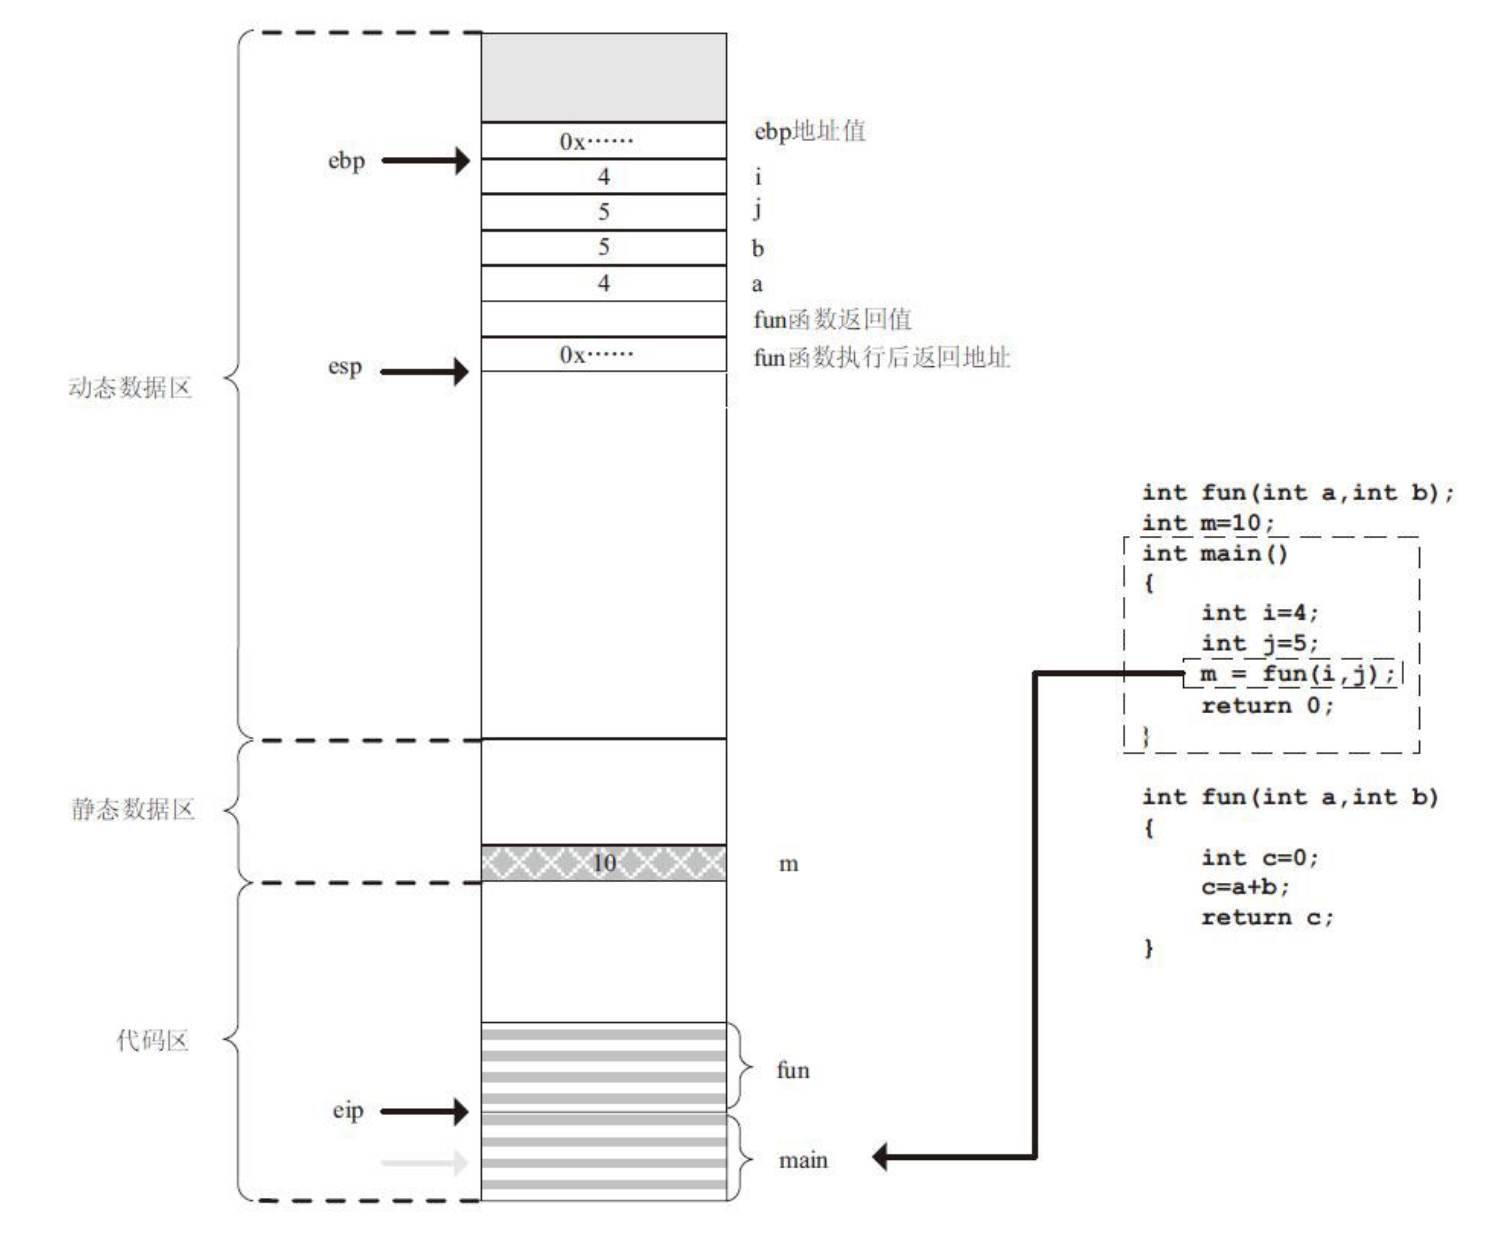
fun函数执行后的返回地址压栈
跳转到fun函数去执行,这一步分为两部分动作,一部分是把fun函数执行后的返回地址压入栈中,以便fun函数执行完毕后能返回到main函数中继续执行。
另一部分就是跳转到被调用的函数的第一条指令去执行
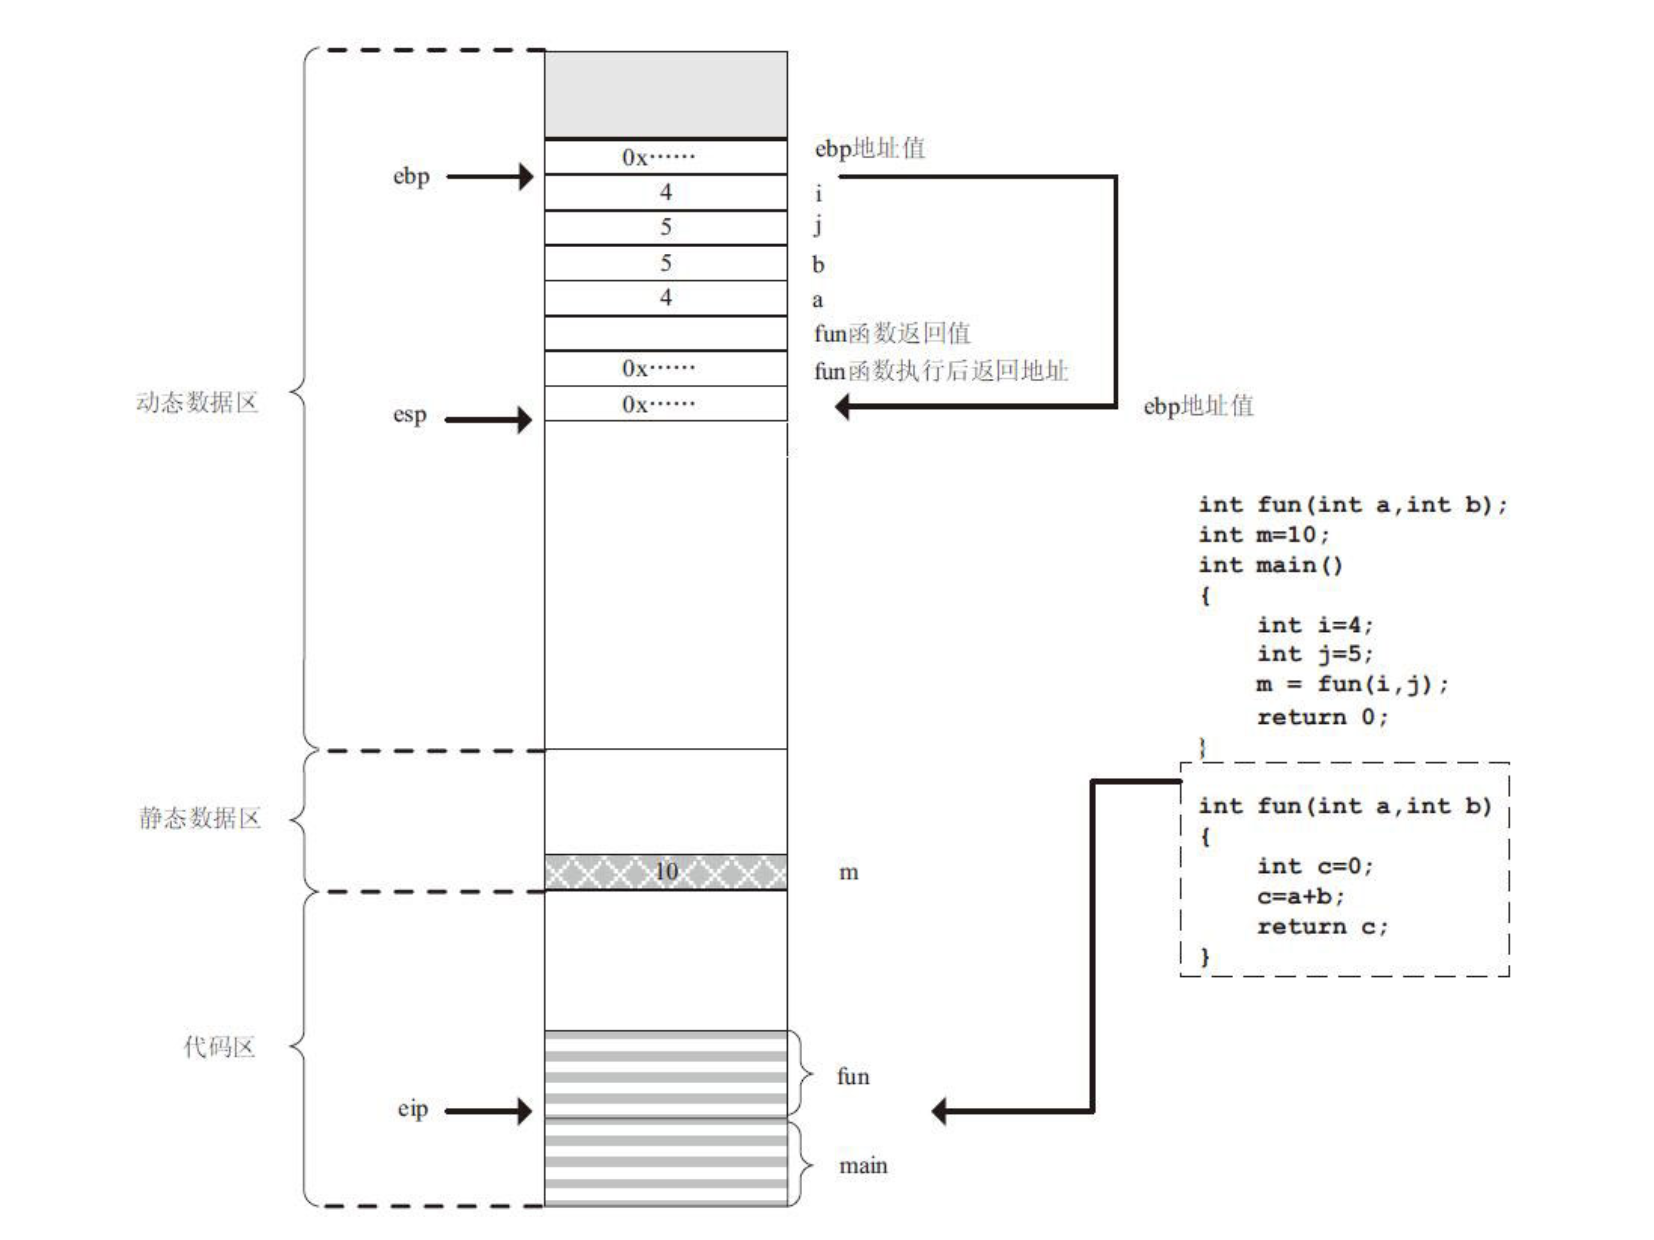
fun函数开始执行
第一件事就是保存ebp指向的地址值,此时ebp指向的是main函数的栈底,保存的目的是在返回时恢复main函数栈底的位置,这和前面main函数刚开始执行时第一步就保存ebp的地址值的目的是一样的。
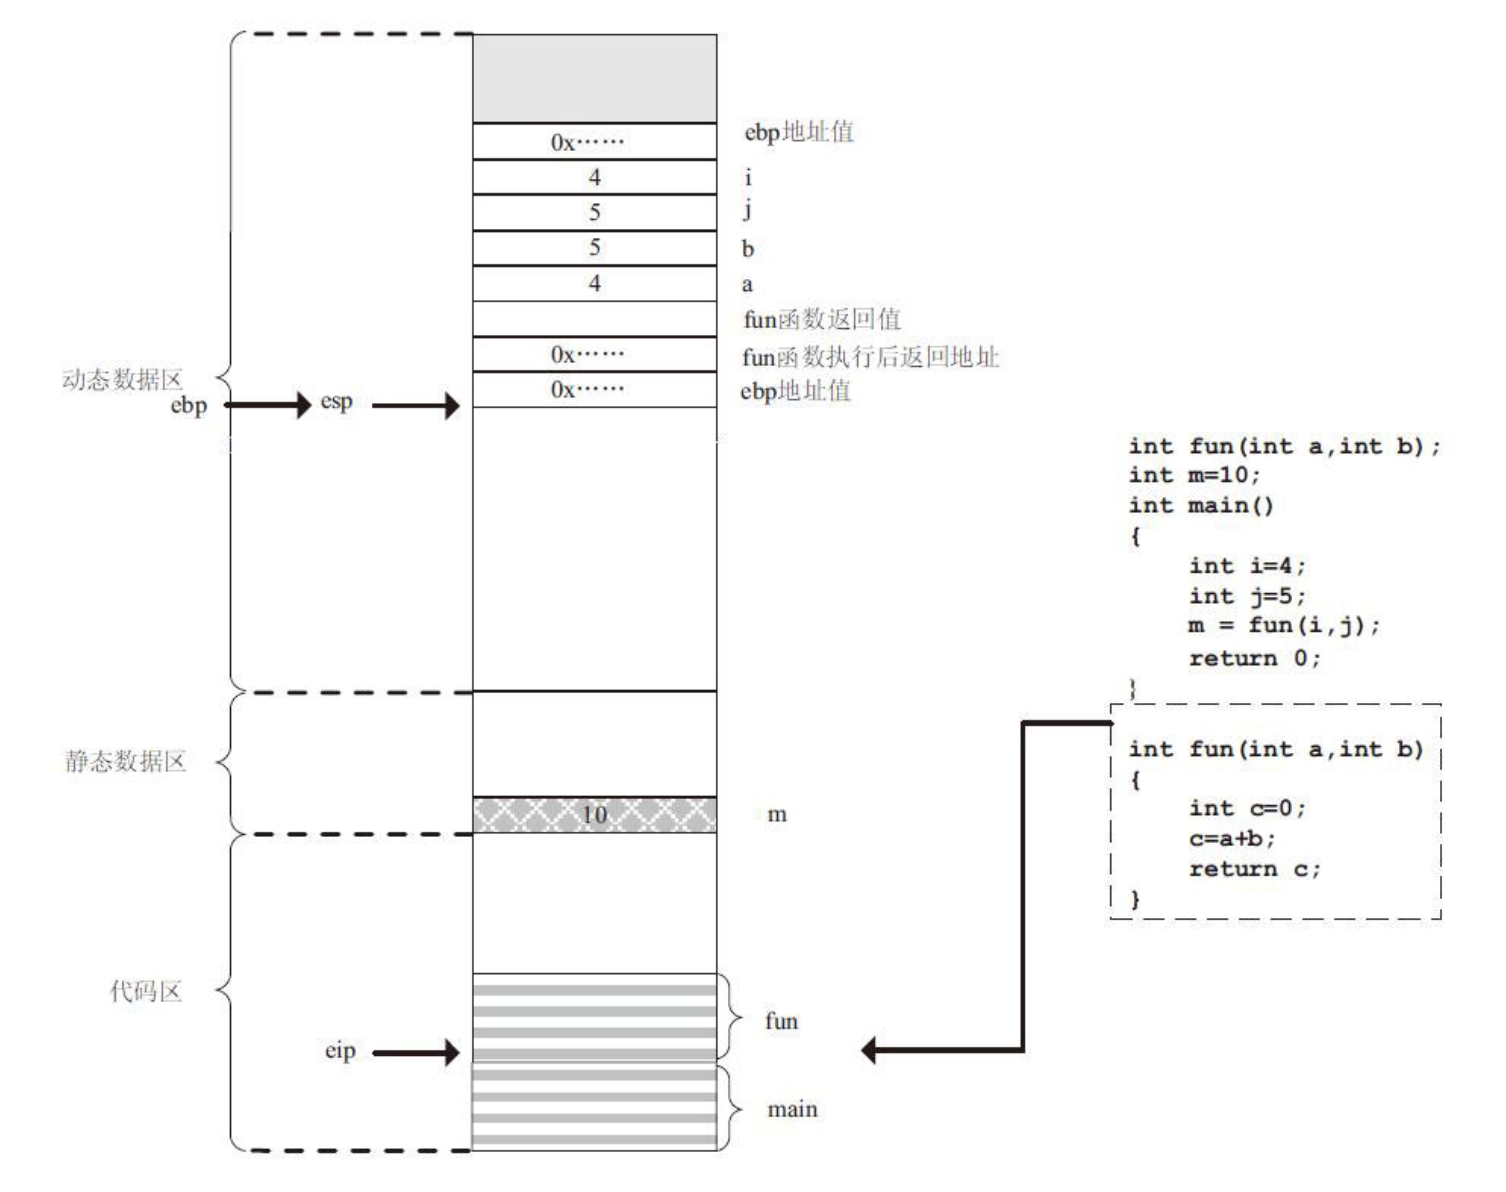
构建fun函数栈
程序继续执行,仍然使用腾出来的ebp看管栈底,ebp和esp此时指向相同的位置
局部变量c压栈
局部变量c开始初始化,入栈,数值为0,这个c就是fun函数的数据,存在于fun函数的栈中
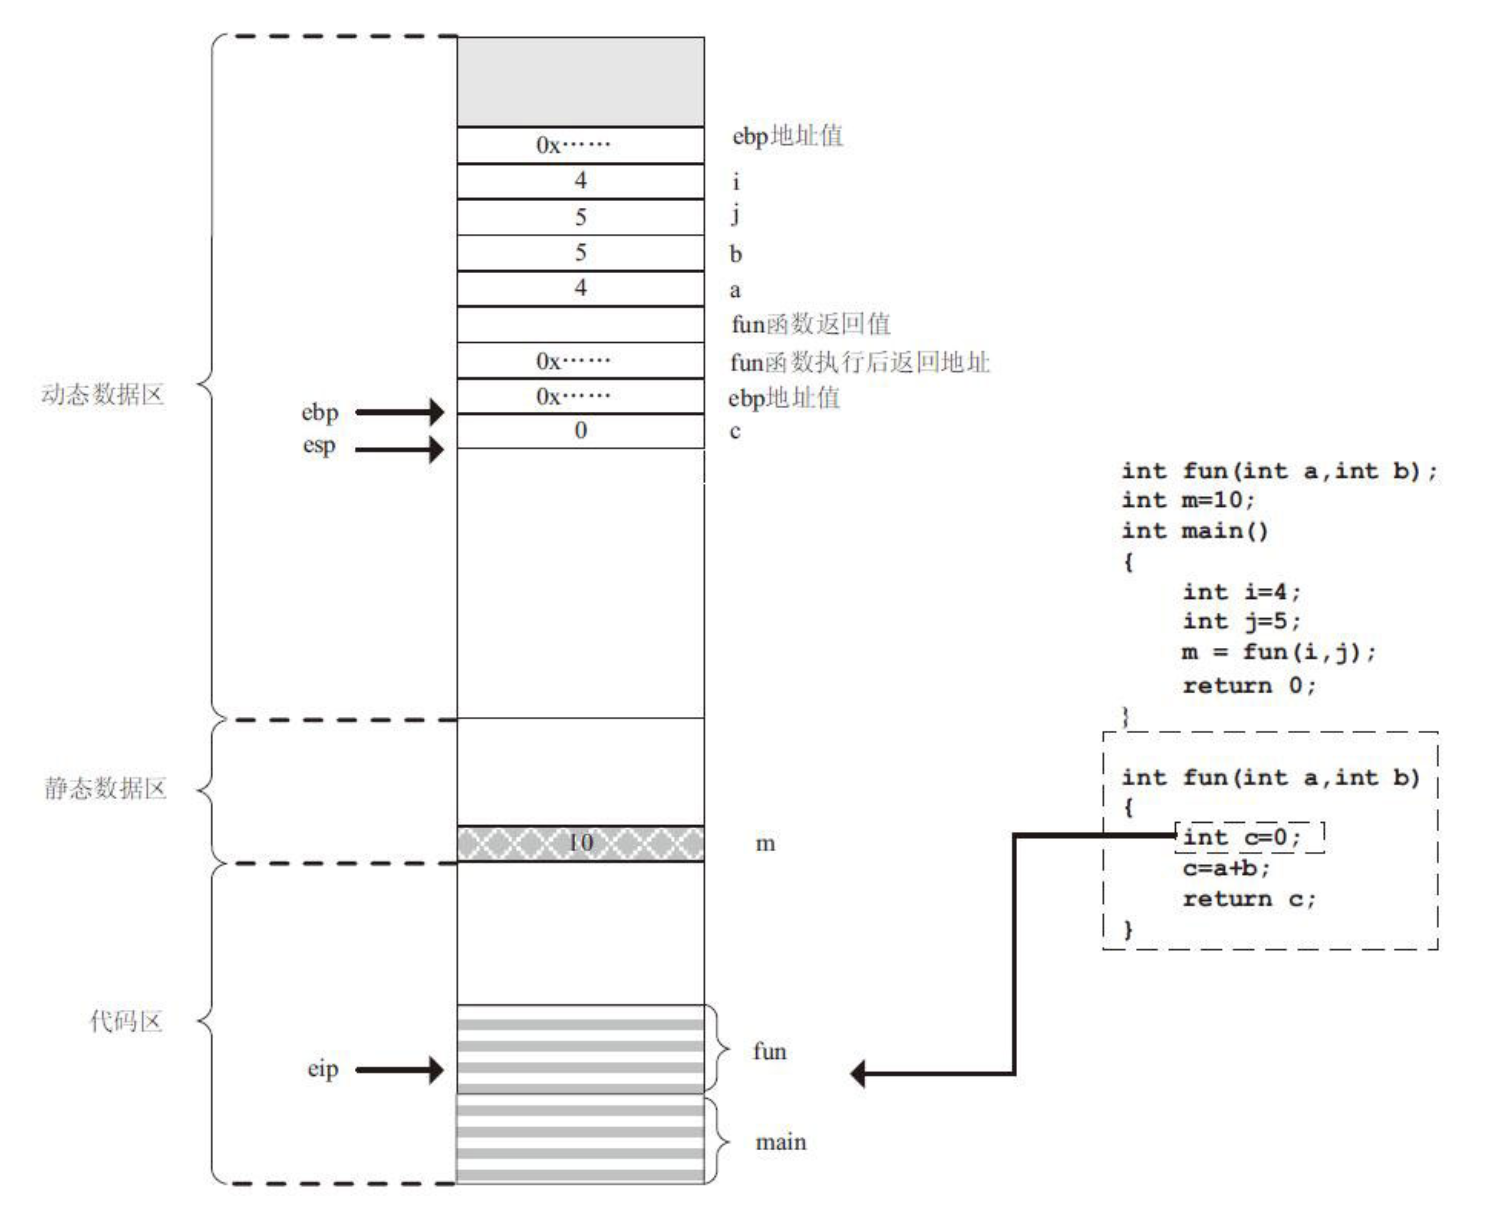
加法运算

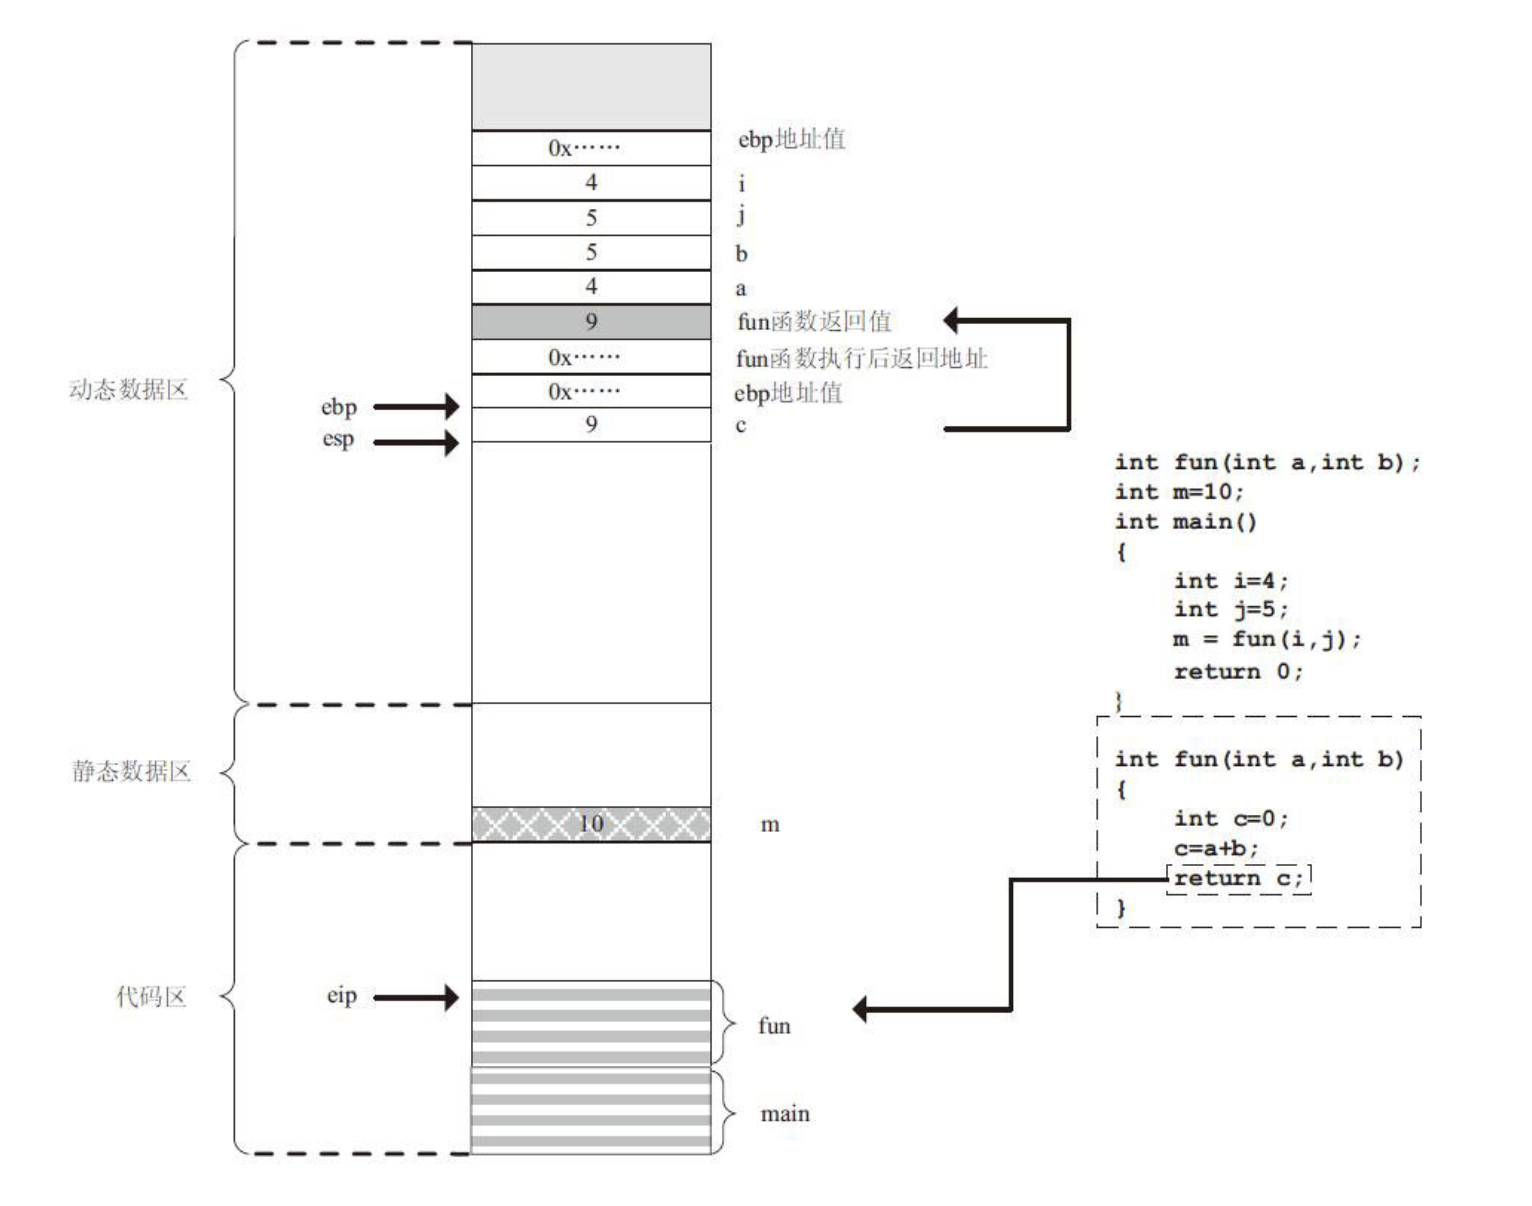
返回值返回
程序继续执行,fun函数中局部变量c的数据当成返回值返回
恢复main函数栈
现在fun函数已经执行完毕,要恢复main函数调用fun函数的现场,这一现场包括两个部分,一部分是main函数的栈要恢复,包括栈顶和栈底,另一部分是要找到fun函数执行后的返回地址,然后再跳转到那里继续执行。
我们来看ebp的恢复。前面存储了ebp的地址值,现在可以把存储的地址值赋值给ebp,使之指向main函数的栈底。
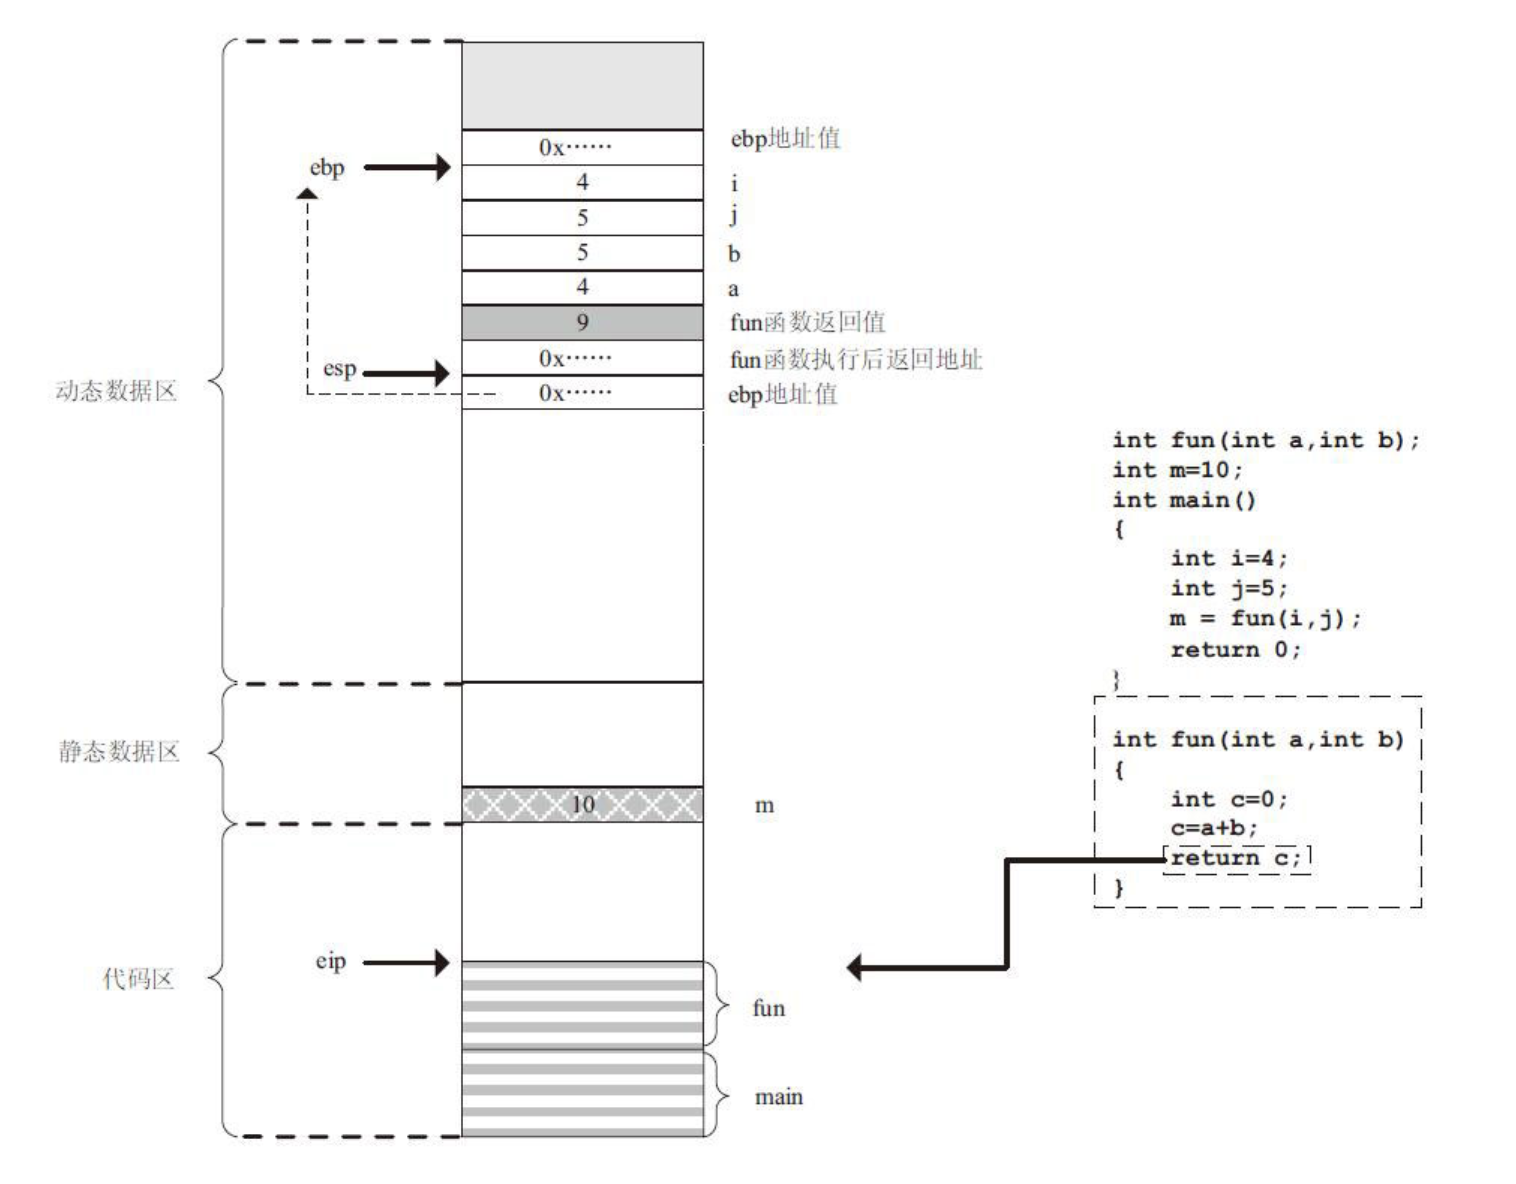
ebp地址值出栈后,esp自动退栈,指向fun函数执行后的返回地址,之后执行ret指令,即返回指令,把地址值传给eip,使之指向fun函数执行后的返回地址。
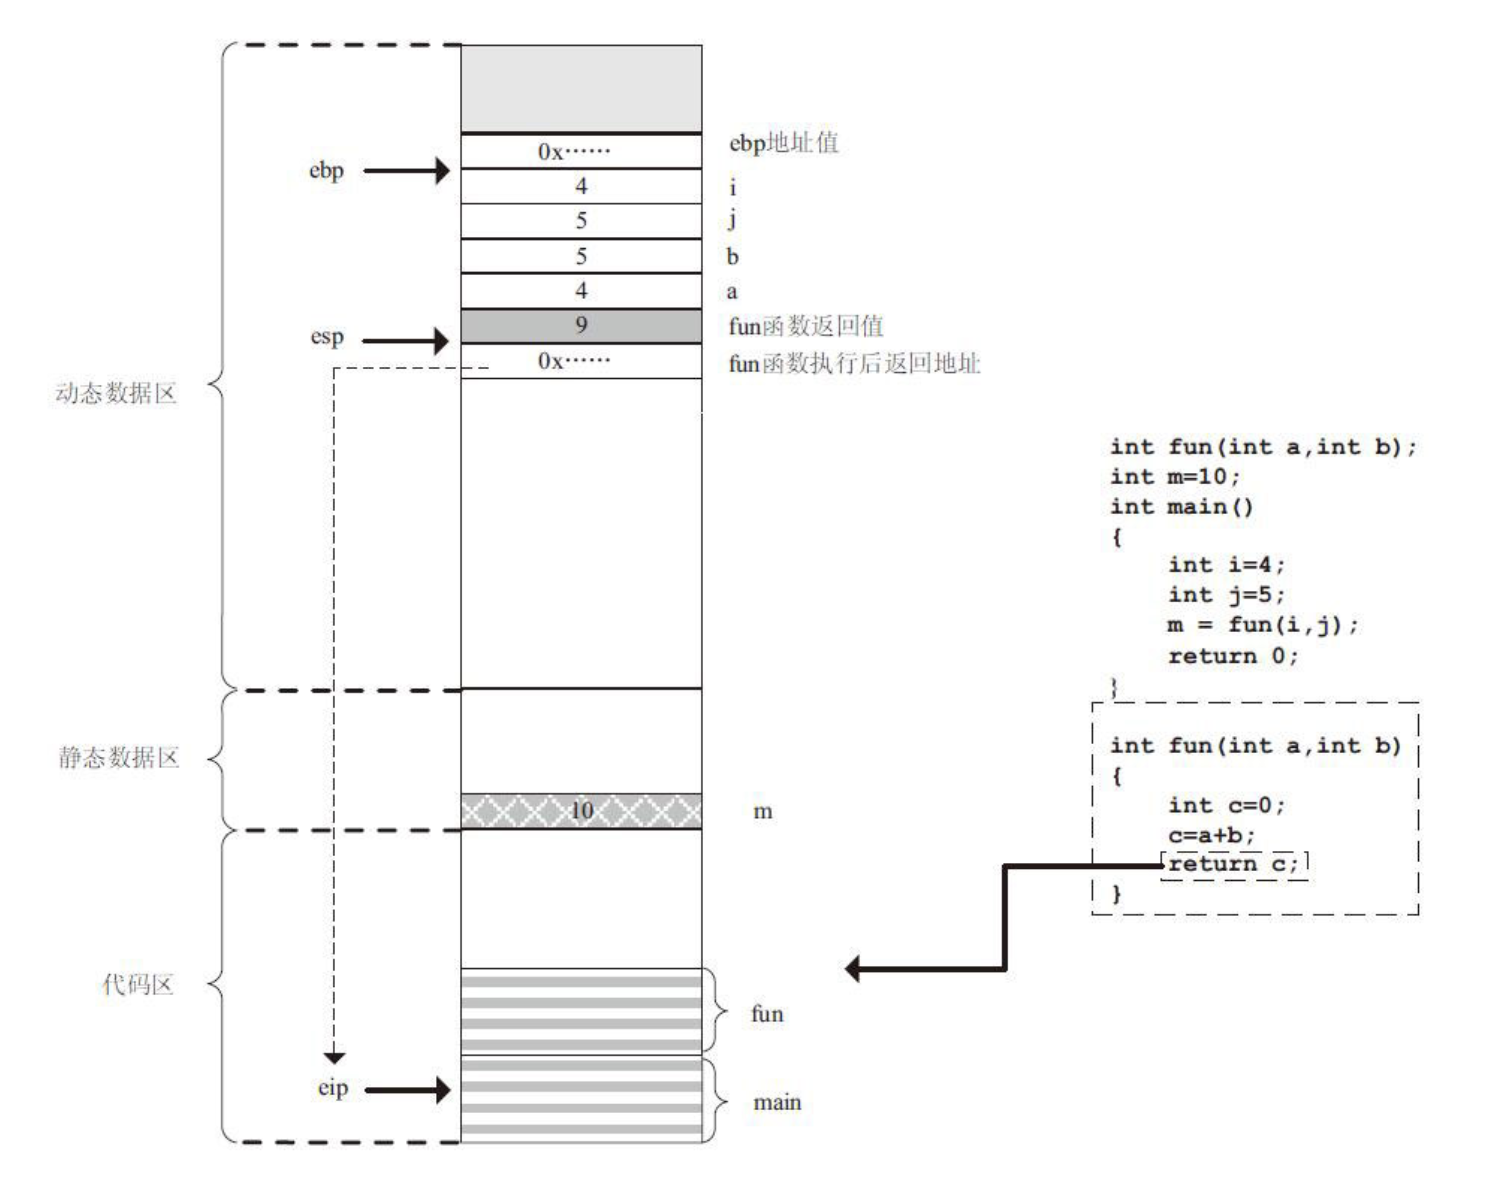
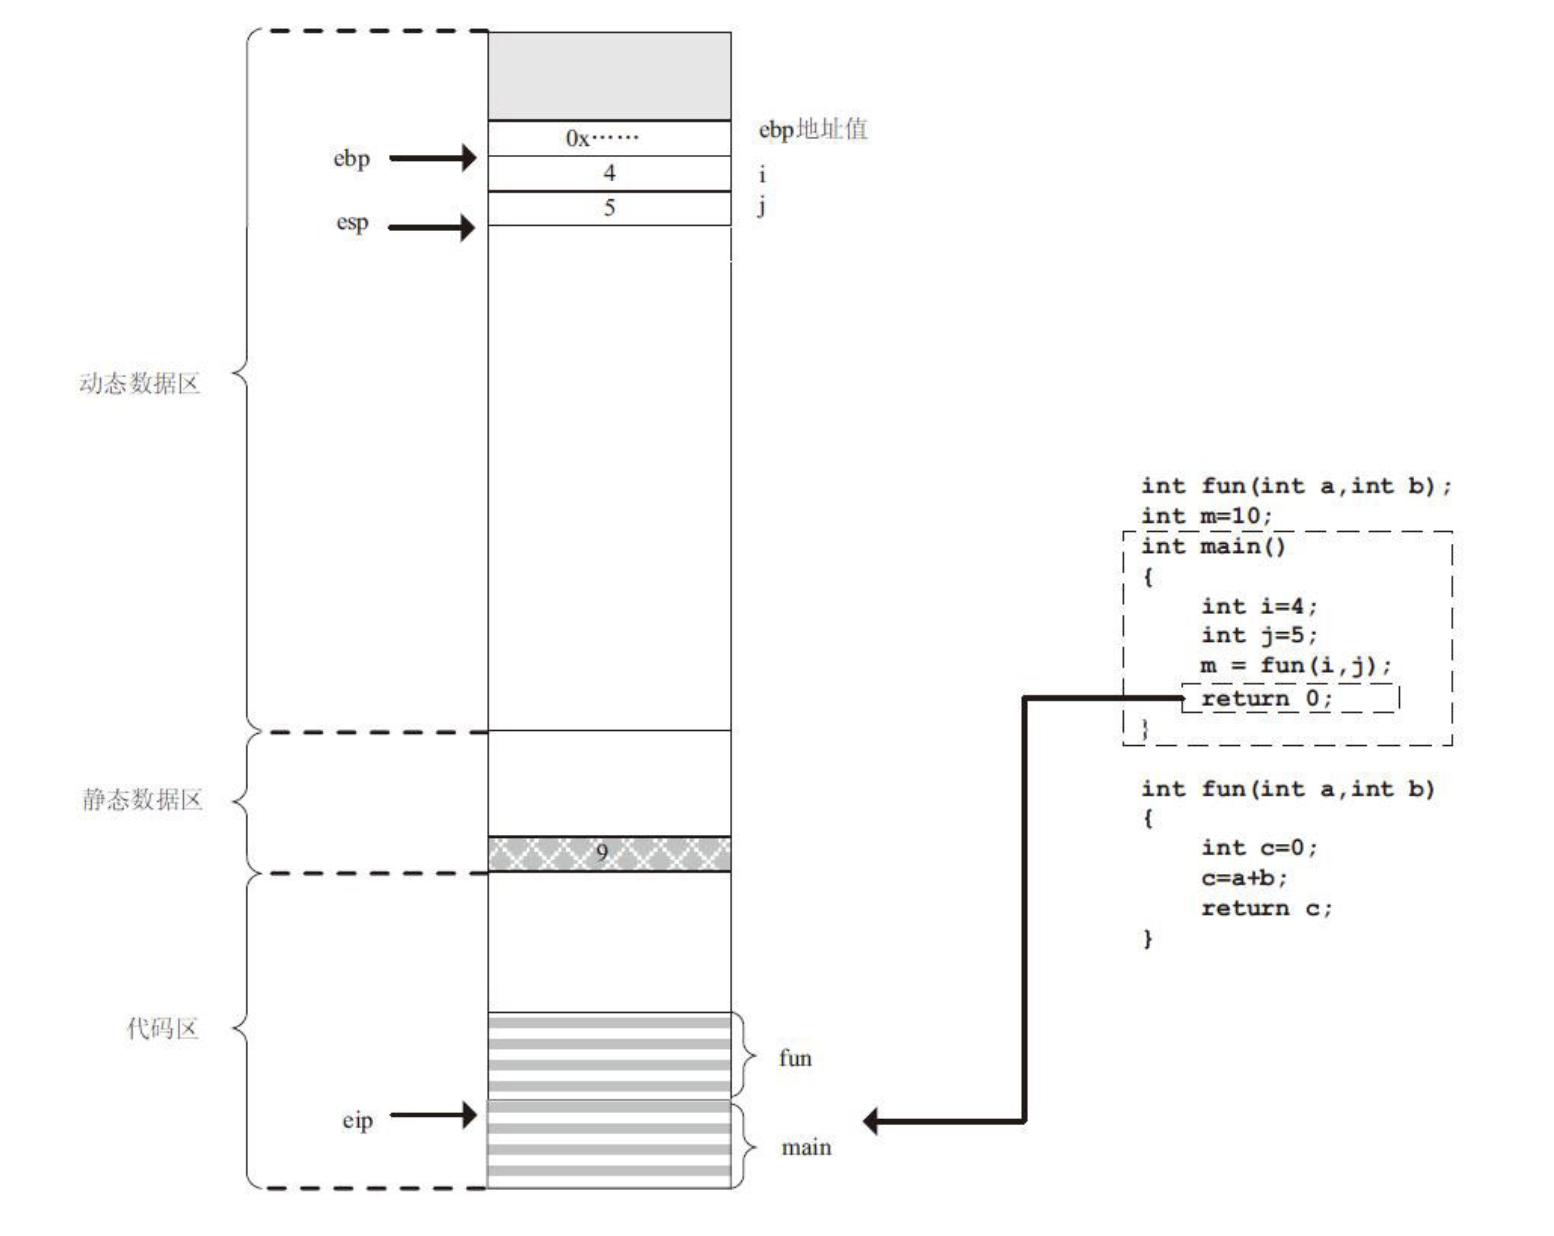
返回值赋值给m
恢复现场以后,把fun函数返回值传递给m
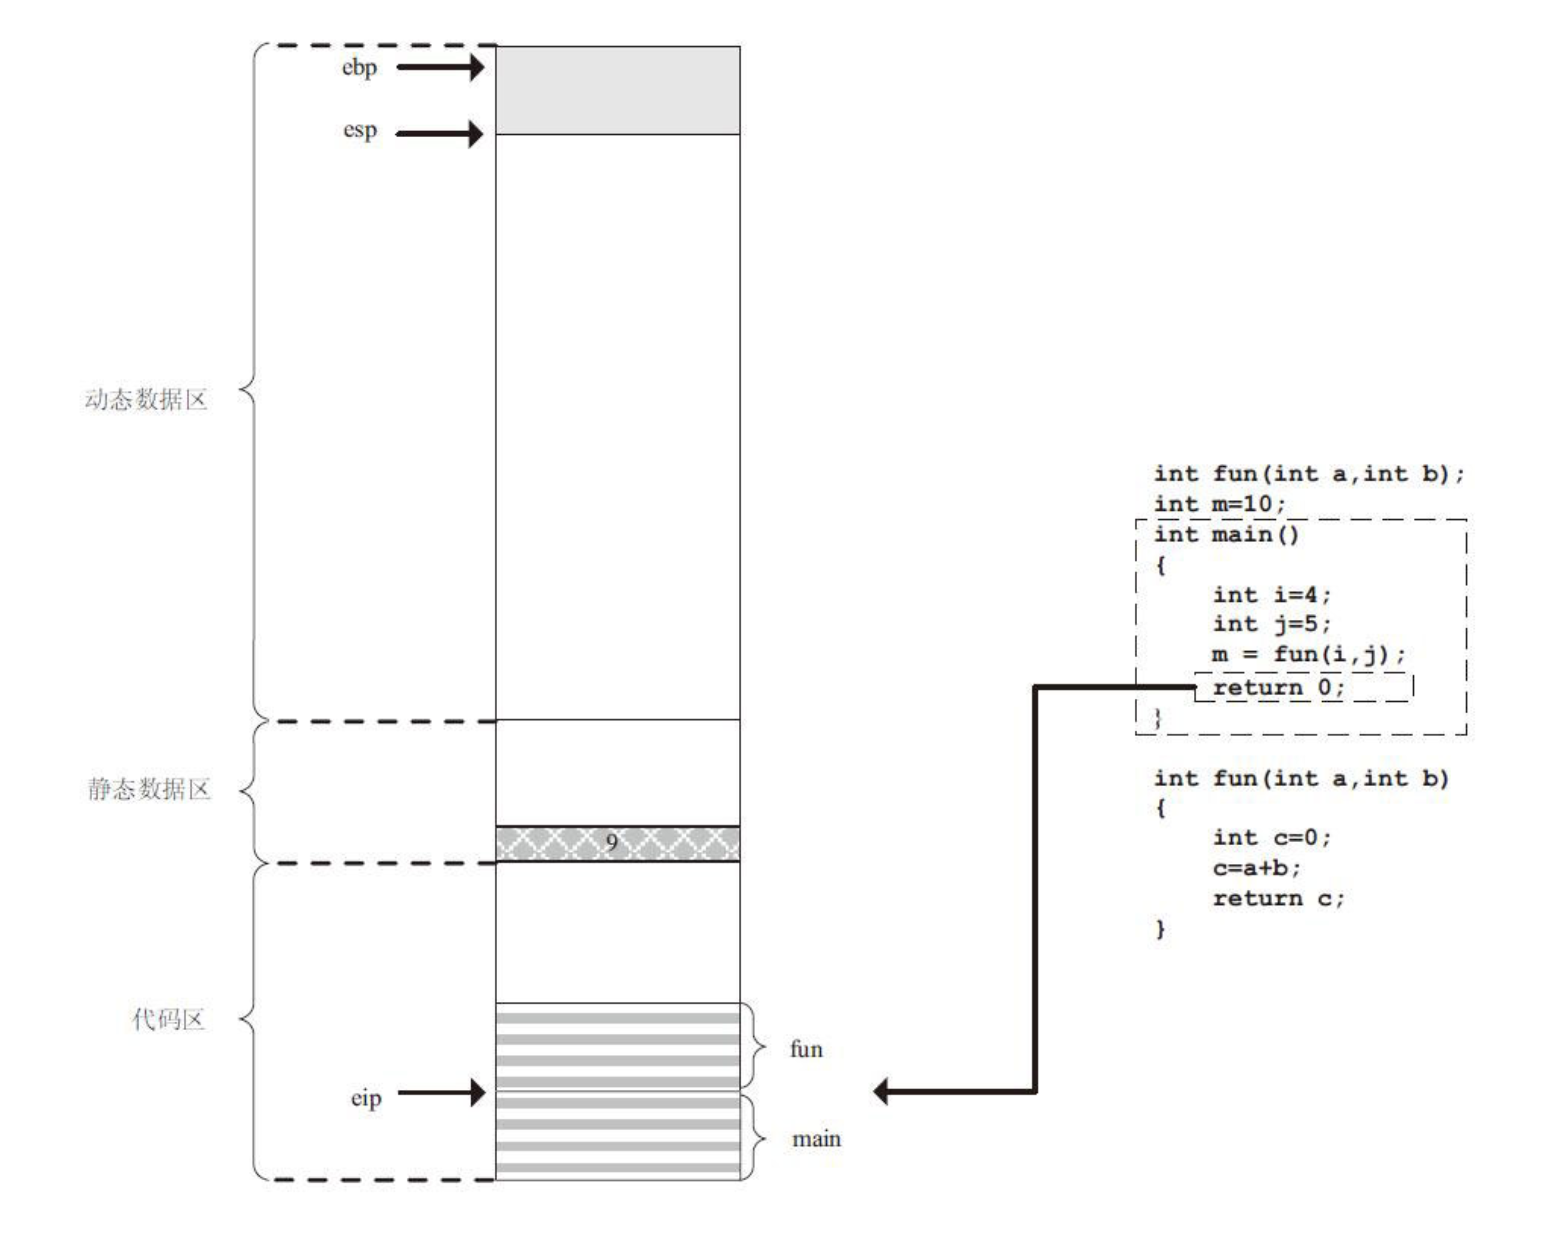
清栈
参数和返回值清栈:
main函数清栈:
参考
Python 实现 Python 解释器
编译系统透视:图解编译原理
