@qidiandasheng
2022-08-23T01:27:10.000000Z
字数 16597
阅读 4037
内存优化(😁)
性能优化
常见内存问题
FOOM
FOOM(Foreground Out Of Memory),是指App在前台因消耗内存过多引起系统强杀。对用户而言,表现跟Crash一样。
Facebook早在2015年8月提出FOOM检测办法,大致原理是排除各种情况后,剩余的情况是FOOM;Facebook如何判定上一次启动是否出现FOOM方法:
- 1.App没有升级
- 2.App没有调用exit()或abort()退出
- 3.App没有出现Crash (依赖于自身CrashReport组件的Crash回调)
- 4.用户没有强退App
- 5.系统没有升级/重启
- 6.App当时没有后台运行(依赖于ApplicationState和前后台切换通知)
- 7.App出现FOOM (依赖于ApplicationState和前后台切换通知)
排查法有误报的可能,因为有些被系统强杀case,但是我们捕获不到信息,也可能被归类到OOM;已知被系统强杀的case是:OOM和watchdog(Code 0x8badf00d)。
发现FOOM问题的关键:监控App使用内存增长,在收到内存警告通知时,dump 内存信息,获取对象名称、对象个数、各对象的内存值,并在合适的时机上报到服务器;加强对大内存的分配监控。
内存泄露
内存泄露(Memory Leak):指申请的内存空间使用完毕之后未回收,内存泄露问题多的话,对App质量影响很大;
目前引起内存泄露的主要原因是循环引用(堆内存中对象相互引用,彼此都得不到释放的机会),目前,调试阶段使用Instrument的Leaks工具发现,线上利用MLeaksFinder发现后上报;
WKWebview白屏
WKWebview白屏问题,严格来说,是一种内存方面的问题;之前的UIWebview因为内存使用过大会Crash,而WKWebview不会Crash,会白屏;
WKWebView是一个多进程组件,
Network Loading以及UI Rendering在其它进程中执行,当WKWebView总体的内存占用比较大时,WebContent Process会Crash,从而出现白屏现象。
解决办法:
KVO监听URL, 当URL为nil,重新reload
在进程被终止回调中,重新reload
// 此方法适用iOS9.0以上- (void)webViewWebContentProcessDidTerminate:(WKWebView *)webView NS_AVAILABLE(10_11, 9_0){//reload}复
野指针问题
野指针:指向一个已删除的对象 或 受限内存区域的指针;目前此类问题很少了,主要来自两个方面
- MRC时代 到 ARC时代,OC对象管理极大方便了,ARC解决大部分野指针问题
- iOS 9开始,系统库中部分遗留的被assign(unsafe_unretain)修饰的 delegate和target-action修改成了weak,内存被回收的时候,这些指针设为nil,这也大幅度减少了野指针的出现。
目前绝大部分App都是iOS 9起步,野指针少了很多,但是工程中依然会有野指针问题,本质还是内存使用不当;
Mach Exception大多数都是野指针的问题,崩溃日志里最多见objc_msgSend和unrecognized selector sent to等等。对于野指针问题,最好能复现,使用
Zombie Object帮助调试,Zombie Object实现原理就是 hook 住了对象的dealloc方法,通过调用自己的__dealloc_zombie方法来把对象进行僵尸化,当这个对象再次收到消息,objc_msgsend的时候,调用abort()崩溃并打印出调用的方法。
iOS 9以后NSNotificationCenter不需要手动移除观察者
在iOS9之前,通知中心使用 unsafe_unretained修饰引用观察者,如果观察者被回收时,若不手动移除,指针会指向被回收的内存区域,变为野指针,如果再发送消息会造成Crash;
而iOS 9之后,通知中心使用weak修饰引用观察者 ,即使不手动移除观察者,weak指针也会在观察者被回收后自动置nil。之后发送消息,是不会有问题的。
iOS 10 nano_free Crash
在iOS 10.0 - 10.1,苹果bug引入
nano_free Crash问题,这些Crash发生libsystem_malloc.dylib中的nano zone内的;libsystem_malloc.dylib中,对内存的管理有两个实现:nano zone和scalable zone。他们分别管理不同大小的内存块:- 内存分配函数malloc和calloc等默认使用的是nano_zone,nao_zone是 256B 以下小内存的分配,
- 大于 256B 的时候会使用 scalable_zone 来分配。
当时微信团队提出的几种解决思路,最后给的解决方案是不使用nano zone,具体描述:
- 创建一个自己的zone,命名为guard zone。
修改nano zone的函数指针,重定向到guard zone(通过malloc_zone_create创建的)。
- 对于没有传入指针的函数,直接重定向到guard zone
- 对于有传入指针的函数,先用size判断所属的zone,再进行分发。
针对内存类型的优化
IOKit
这一部分主要是图片、OpenGL纹理、CVPixelBuffer等,比如通常是OpenGL的纹理,glTexImage2d调用产生的。iOS系统有相关释放接口。但可能释放不及时。
CPU和GPU的都算在VM中。Allocations不包含GL纹理,创建一定数量纹理后,到达极限值,则之后创建纹理就会失败,App可能不会崩溃,但是出现异常,花屏,或者拍后页白屏。
显存可能被映射到某块虚拟内存,因此可以通过IOKit来查看纹理增长情况。手机的显存就是内存,而Mac才区分显存和内存。
纹理是在内核态分配的,不计算到Allocations里边。如包含OpenGL的纹理,是Dirty Size,需要降下来。
若GL分配纹理不释放,则IOKit的Virtual Size不断增长;如果纹理正确释放,则Virtual Size比较稳定。
所以,通常情况下,开发者已经正确调用了释放内存的操作,但是OpenGL自己做的优化,使得内存并未真正地及时释放掉,仅仅是为了重用。
glDeleteTextures函数,并非一定会立即释放掉纹理,而是表明该纹理可以再次在glGenTextures的时候被复用。
CVOpenGLESTextureCacheFlush()
GPUImage里面有一个释放帧缓冲的方法,当收到内存警告的时候就会调用这个方法,里面就有对纹理缓存进行了释放。
- (void)purgeAllUnassignedFramebuffers{runAsynchronouslyOnVideoProcessingQueue(^{[framebufferCache removeAllObjects];[framebufferTypeCounts removeAllObjects];#if TARGET_IPHONE_SIMULATOR || TARGET_OS_IPHONECVOpenGLESTextureCacheFlush([[GPUImageContext sharedImageProcessingContext] coreVideoTextureCache], 0);#else#endif});}
这里有一点需要格外注意:CVOpenGLESTextureCacheFlush调用后,内存可能依然不会立即释放。假设延迟5s执行,则可能释放(而延迟1s,则可能只释放部分内存)。
这与CVPixelBuffer以及CVOpenGLESTextureCacheFlush的自身机制有关系。
- 如默认情况下纹理会延迟1s进行page out操作;
CVOpenGLESTextureCacheFlush的方法注释中刻意添加了周期性调用(This call must be made periodically)的提示,以保证纹理释放操作的执行。
//// cacheAttributes//// By default, textures will age out after one second. Setting a maximum// texture age of zero will disable the age-out mechanism completely.// CVOpenGLESTextureCacheFlush() can be used to force eviction in either case.CV_EXPORT const CFStringRef CV_NONNULL kCVOpenGLESTextureCacheMaximumTextureAgeKey COREVIDEO_GL_DEPRECATED(ios, 5.0, 12.0) COREVIDEO_GL_DEPRECATED(tvos, 9.0, 12.0) API_UNAVAILABLE(macosx) __WATCHOS_PROHIBITED;/*!@function CVOpenGLESTextureCacheFlush@abstract Performs internal housekeeping/recycling operations@discussion This call must be made periodically to give the texture cache a chance to make OpenGLES callson the OpenGLES context used to create it in order to do housekeeping operations. The EAGLContextassociated with the cache may be used to delete or unbind textures.@param textureCache The texture cache object to flush@param options Currently unused, set to 0.*/CV_EXPORT void CVOpenGLESTextureCacheFlush( CVOpenGLESTextureCacheRef CV_NONNULL textureCache, CVOptionFlags options ) COREVIDEO_GL_DEPRECATED(ios, 5.0, 12.0) COREVIDEO_GL_DEPRECATED(tvos, 9.0, 12.0) API_UNAVAILABLE(macosx) __WATCHOS_PROHIBITED;
注意,这里的periodically肯定是有坑的。如果遇到内存未立即释放的情况,试一下延迟几秒钟执行CVOpenGLESTextureCacheFlush操作。
CGImageRef转CVPixelBufferRef
- (void)dealloc {if (_pixelBufferPool) {CVPixelBufferPoolFlush(_pixelBufferPool, kCVPixelBufferPoolFlushExcessBuffers);CVPixelBufferPoolRelease(_pixelBufferPool);_pixelBufferPool = nil;}}- (CVPixelBufferRef)createPixelBufferFromCGImage:(CGImageRef )image {size_t height = CGImageGetHeight(image);size_t width = CGImageGetWidth(image);if (!_pixelBufferPool || !CGSizeEqualToSize(_pixelPoolSize, CGSizeMake(width, height))) {if (_pixelBufferPool) {CVPixelBufferPoolFlush(_pixelBufferPool, kCVPixelBufferPoolFlushExcessBuffers);CVPixelBufferPoolRelease(_pixelBufferPool);_pixelBufferPool = nil;}NSMutableDictionary *attributes = [NSMutableDictionary dictionary];[attributes setObject:[NSNumber numberWithInt:kCVPixelFormatType_32BGRA] forKey:(NSString *)kCVPixelBufferPixelFormatTypeKey];[attributes setObject:@(width) forKey:(NSString *)kCVPixelBufferWidthKey];[attributes setObject:@(height) forKey:(NSString *)kCVPixelBufferHeightKey];[attributes setObject:@(32) forKey:(NSString *)kCVPixelBufferBytesPerRowAlignmentKey];[attributes setObject:[NSDictionary dictionary] forKey:(NSString *)kCVPixelBufferIOSurfacePropertiesKey];CVPixelBufferPoolCreate(kCFAllocatorDefault, NULL, (__bridge CFDictionaryRef _Nullable)(attributes), &_pixelBufferPool);_pixelPoolSize = CGSizeMake(width, height);}CVPixelBufferRef pxbuffer = NULL;CVPixelBufferPoolCreatePixelBuffer(kCFAllocatorDefault, _pixelBufferPool,&pxbuffer);NSParameterAssert(pxbuffer != NULL);CIImage *ciimage = [[CIImage alloc] initWithCGImage:image];[_ciContext render:ciimage toCVPixelBuffer:pxbuffer];return pxbuffer;}
如果PixelBuffer重用,则使用Pool,释放操作需要调用Pool的flush函数。而iOS系统中实际的内存释放时机会有延迟,且这里拍照的pixelBuffer并不会频繁复用,因此直接使用create方法来替代Pool更合理。用完就释放。
修改为:
- (CVPixelBufferRef)createPixelBufferFromCGImage:(CGImageRef )image {size_t height = CGImageGetHeight(image);size_t width = CGImageGetWidth(image);CVPixelBufferRef pxbuffer = NULL;CFDictionaryRef empty; // empty value for attr value.CFMutableDictionaryRef attrs;empty = CFDictionaryCreate(kCFAllocatorDefault, NULL, NULL, 0, &kCFTypeDictionaryKeyCallBacks, &kCFTypeDictionaryValueCallBacks); // our empty IOSurface properties dictionaryattrs = CFDictionaryCreateMutable(kCFAllocatorDefault, 1, &kCFTypeDictionaryKeyCallBacks, &kCFTypeDictionaryValueCallBacks);CFDictionarySetValue(attrs, kCVPixelBufferIOSurfacePropertiesKey, empty);CVPixelBufferCreate(kCFAllocatorDefault, width, height, kCVPixelFormatType_32BGRA, attrs, &pxbuffer);CFRelease(attrs);CFRelease(empty);NSParameterAssert(pxbuffer != NULL);CIImage *ciimage = [[CIImage alloc] initWithCGImage:image];[_ciContext render:ciimage toCVPixelBuffer:pxbuffer];return pxbuffer;}
VM:ImageIO_PNG_Data
UIImage的imageNamed:方法会将图片数据缓存在内存中。而imageWithContentsOfFile:方法则不会进行缓存,用完立即释放掉了。优化建议:
- 对于经常需要使用的小图,可以放到Assets.xcassets中,使用
imageNamed:方法。 - 对于不经常使用的大图,不要放到Assets.xcassets中,且使用
imageWithContentsOfFile:方法。
如果对于多图的滚动视图,渲染到imageView中后,可以使用autoreleasepool来尽早释放:
for (int i=0;i<10;i++) {UIImageView *imageView = xxx;NSString *imageFile = xxx;@autoreleasepool {imageView.image = [UIImage imageWithContentsOfFile:imageFile];}[self.scrollView addSubview:imageView];}
优化措施:适当地使用imageNamed:和imageWithContentsOfFile:方法。对于比较老的项目,可以在调试环境对imageNamed:方法进行hook,检测UIImage的size大小,以筛选出尺寸过大的图片。
VM:CG raster data
光栅数据,即为UIImage的解码数据。SDWebImage将解码数据做了缓存,避免渲染时候在主线程解码而造成阻塞。
优化措施:
[[SDImageCache sharedImageCache] config].shouldDecompressImages = NO;[[SDImageCache sharedImageCache] config].shouldCacheImagesInMemory = NO;[[SDWebImageDownloader sharedDownloader] setShouldDecompressImages:NO];
VM:CoreAnimation
一般是UIView,CALayer。如有个5.78MB的,无法看出是哪个View,只知道是一个很大的View。
CA::Render::Shmem::new_bitmap xxxxxCABackingStorePrepareUpdate_(CABackingStore*,xxxxxxx)CABackingStoreUpdate_invocation function for block in CA::Layer::display_()
优化措施:不要用太大的UIView和CALayer。
代码段__TEXT
优化措施:缩小包体积。
图片
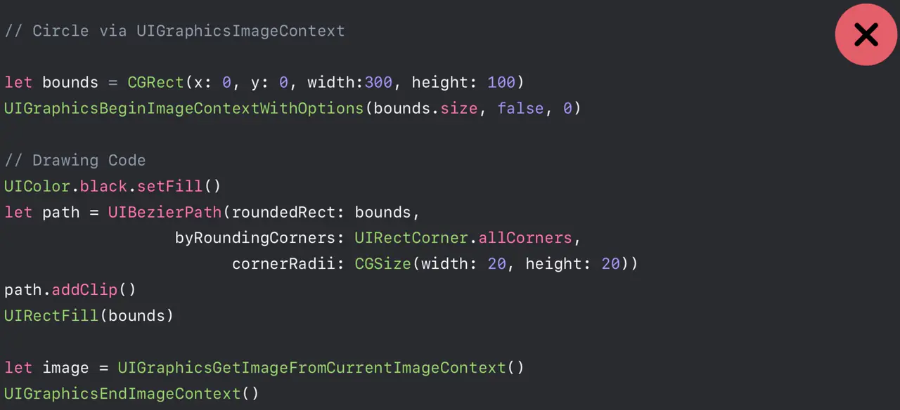
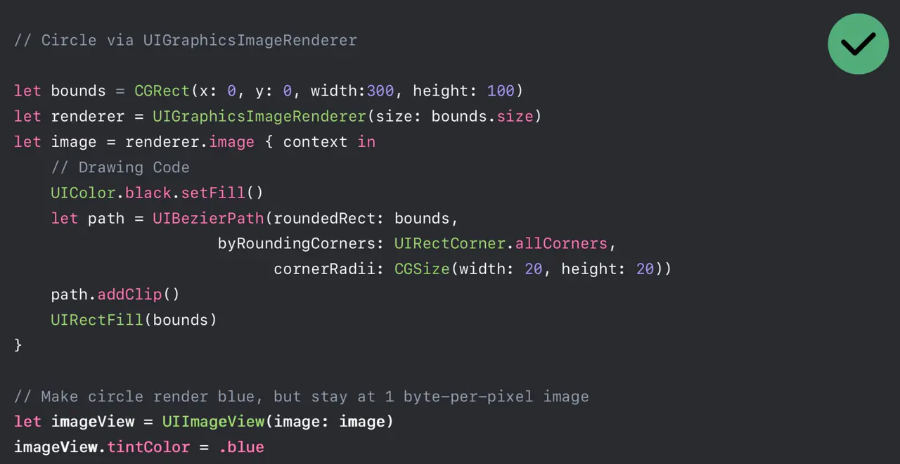
生成图片(UIGraphicsImageRenderer)
用 UIGraphicsImageRenderer 代替 UIGraphicsBeginImageContextWithOptions。
使用 UIGraphicsBeginImageContextWithOptions 生成的图片,每个像素需要 4 个字节表示。建议使用 UIGraphicsImageRenderer,这个方法是从 iOS 10 引入,在 iOS 12 上会自动选择最佳的图像格式,可以减少很多内存。
Downsampling(降低采样):ImageIO
在视图比较小,图片比较大的场景下,直接展示原图片会造成不必要的内存和CPU消耗,这里就可以使用ImageIO的接口,它会按照取平均值的办法把多个像素点变成一个像素点,这个过程称为 Downsampling,也就是生成缩略图。
直接使用UIImage的方式:
- UIImage 在设置和调整大小的时候,需要将原始图像解压到内存中,然后对内部坐标空间做一系列转换,整个过程会消耗很多资源。
ImageIO的方式:
- 加载:在Decode前插入创建缩略图的过程。即对image进行预处理,采用缩小解码后Image Buffer的size的方式,减少内存的占用。
- 缩放:ImageIO 能够在不产生 dirty memory 的情况下读取到图片尺寸和元信息,其内存损耗等于缩减后的图片尺寸产生的内存占用。

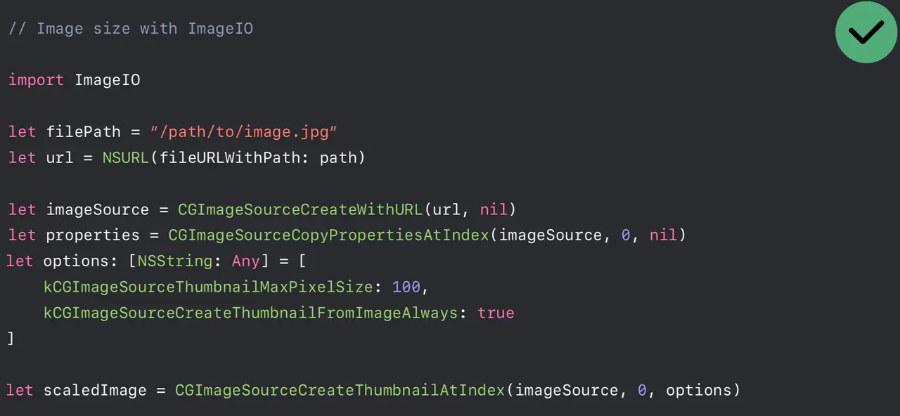
这里options有不同的选项来控制ImageIO的处理方式:
- 设置
kCGImageSourceShouldCache为false,避免缓存解码后的数据,64位设置上默认是开启缓存的,(很好理解,因为下次使用该图片的时候,可能场景不同,需要生成的缩略图大小是不同的,显然不能做缓存处理) - 设置
kCGImageSourceShouldCacheImmediately为true,避免在需要渲染的时候才做解码,默认选项是false
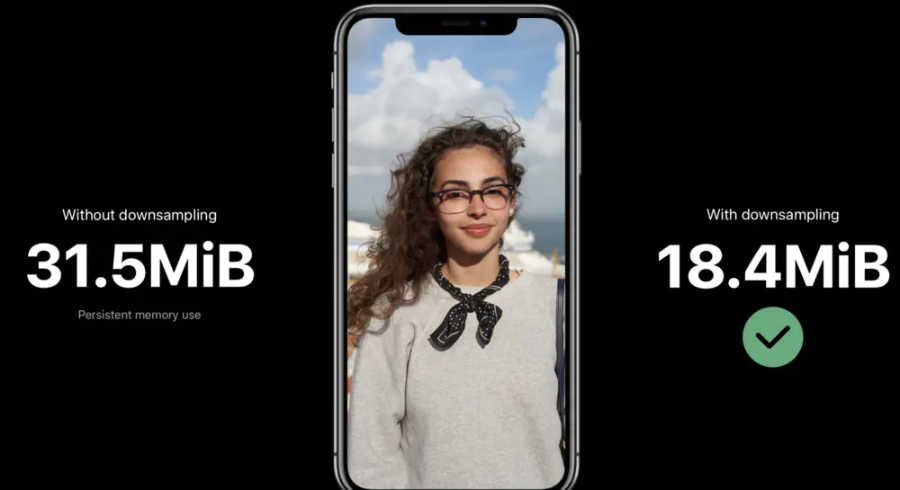
这样的缩略图方式可以省去大量的内存和CPU消耗,官方Case给出的前后内存对比:
缩放大图片
这里的缩放大图片也就是用的上面的ImageIO的方式。
以往图片缩放接口是这样写的:
- (UIImage *)scaleImage:(UIImage *)image newSize:(CGSize)newSize{UIGraphicsBeginImageContextWithOptions(newSize, NO, 0);[image drawInRect:CGRectMake(0, 0, newSize.width, newSize.height)];UIImage *newImage = UIGraphicsGetImageFromCurrentImageContext();UIGraphicsEndImageContext();return newImage;}
处理大分辨率图片时,往往容易出现OOM,原因是-[UIImage drawInRect:]在绘制时,先解码图片,再生成原始分辨率大小的bitmap,这是很耗内存的。解决方法是使用更低层的ImageIO接口,避免中间bitmap产生:
- (UIImage *)scaleImageWithData:(NSData *)data newSize:(CGSize)newSize scale:(CGFloat)scale orientation:(UIImageOrientation)orientation{CGFloat maxPixelSize = MAX(newSize.width, newSize.height);CGImageSourceRef sourceRef = CGImageSourceCreateWithData((__bridge CFDataRef)data, nil);NSDictionary *options = @{(__bridge id)kCGImageSourceCreateThumbnailFromImageAlways:(__bridge id)kCFBooleanTrue,(__bridge id)kCGImageSourceThumbnailMaxPixelSize:[NSNumber numberWithFloat:maxPixelSize]};CGImageRef imageRef = CGImageSourceCreateThumbnailAtIndex(sourceRef, 0, (__bridge CFDictionaryRef)options);UIImage *resultImage = [UIImage imageWithCGImage:imageRef scale:scale orientation:orientation];CGImageRelease(imageRef);CFRelease(sourceRef);return resultImage;}
imageNamed和imageWithContentsOfFile
- UIImage的
imageNamed:方法会将图片数据缓存在内存中,缓存使用的时NSCache,收到内存警告会释放。 - 而
imageWithContentsOfFile:方法则不会进行缓存,不需要的时候就立即释放掉了。
所以
- 对于频繁使用的小图,可以放到Assets.xcassets中,使用
imageNamed:方法。 - 对于不经常使用的大图,不要放到Assets.xcassets中,且使用
imageWithContentsOfFile:方法。
UIImage的异步解码和渲染
UIImage只有在屏幕上渲染(self.imageView.image = image)的时候,才去解码的,解码操作在主线程执行。所以,如果有非常多(如滑动界面下载大量网络图片)或者较大图片的解码渲染操作,则会阻塞主线程。可以添加异步解码的一些使用技巧。
可以通过如下方式,避免图片使用时候的一些阻塞、资源消耗过大、频繁解码等的情况。
- 异步下载网络图片,进行内存和磁盘缓存
- 对图片进行异步解码,将解码后的数据放到内存缓存
- 主线程进行图片的渲染
具体可参考SDWebimage的实现。
缓存优化
对于缓存数据或可重建数据,尽量使用NSCache或NSPurableData,具有以下优点。
- NSCache是线程安全的,NSMutableDictionary线程不安全
- 当内存不足收到内存警告时,NSCache会自动释放内存(所以从缓存中取数据的时候总要判断是否为空)
- NSCache可以指定缓存的限额,当缓存超出限额自动释放内存
下边代码是SDWebImage的cache, SDMemoryCache继承自NSCache:
// A memory cache which auto purge the cache on memory warning and support weak cache.@interface SDMemoryCache <KeyType, ObjectType> : NSCache <KeyType, ObjectType>@end// Private@interface SDMemoryCache <KeyType, ObjectType> ()@property (nonatomic, strong, nonnull) SDImageCacheConfig *config;@property (nonatomic, strong, nonnull) NSMapTable<KeyType, ObjectType> *weakCache; // strong-weak cache@property (nonatomic, strong, nonnull) dispatch_semaphore_t weakCacheLock; // a lock to keep the access to `weakCache` thread-safe- (instancetype)init NS_UNAVAILABLE;- (instancetype)initWithConfig:(nonnull SDImageCacheConfig *)config;@end@implementation SDMemoryCache// Current this seems no use on macOS (macOS use virtual memory and do not clear cache when memory warning). So we only override on iOS/tvOS platform.// But in the future there may be more options and features for this subclass.#if SD_UIKIT- (void)dealloc {[[NSNotificationCenter defaultCenter] removeObserver:self name:UIApplicationDidReceiveMemoryWarningNotification object:nil];}- (instancetype)initWithConfig:(SDImageCacheConfig *)config {self = [super init];if (self) {// Use a strong-weak maptable storing the secondary cache. Follow the doc that NSCache does not copy keys// This is useful when the memory warning, the cache was purged. However, the image instance can be retained by other instance such as imageViews and alive.// At this case, we can sync weak cache back and do not need to load from disk cacheself.weakCache = [[NSMapTable alloc] initWithKeyOptions:NSPointerFunctionsStrongMemory valueOptions:NSPointerFunctionsWeakMemory capacity:0];self.weakCacheLock = dispatch_semaphore_create(1);self.config = config;[[NSNotificationCenter defaultCenter] addObserver:selfselector:@selector(didReceiveMemoryWarning:)name:UIApplicationDidReceiveMemoryWarningNotificationobject:nil];}return self;}- (void)didReceiveMemoryWarning:(NSNotification *)notification {// Only remove cache, but keep weak cache[super removeAllObjects];}// `setObject:forKey:` just call this with 0 cost. Override this is enough- (void)setObject:(id)obj forKey:(id)key cost:(NSUInteger)g {[super setObject:obj forKey:key cost:g];if (!self.config.shouldUseWeakMemoryCache) {return;}if (key && obj) {// Store weak cacheLOCK(self.weakCacheLock);[self.weakCache setObject:obj forKey:key];UNLOCK(self.weakCacheLock);}}- (id)objectForKey:(id)key {id obj = [super objectForKey:key];if (!self.config.shouldUseWeakMemoryCache) {return obj;}/// 内存缓存中若没有,则从weakCache中找,找到了,再缓存到内存中?if (key && !obj) {// Check weak cacheLOCK(self.weakCacheLock);obj = [self.weakCache objectForKey:key];UNLOCK(self.weakCacheLock);if (obj) {// Sync cacheNSUInteger cost = 0;if ([obj isKindOfClass:[UIImage class]]) {cost = SDCacheCostForImage(obj);}[super setObject:obj forKey:key cost:cost];}}return obj;}- (void)removeObjectForKey:(id)key {[super removeObjectForKey:key];if (!self.config.shouldUseWeakMemoryCache) {return;}if (key) {// Remove weak cacheLOCK(self.weakCacheLock);[self.weakCache removeObjectForKey:key];UNLOCK(self.weakCacheLock);}}- (void)removeAllObjects {[super removeAllObjects];if (!self.config.shouldUseWeakMemoryCache) {return;}// Manually remove should also remove weak cacheLOCK(self.weakCacheLock);[self.weakCache removeAllObjects];UNLOCK(self.weakCacheLock);}
使用NSMapTable来存储strong-weak cache(key是strong,value是weak的)。
shouldUseWeakMemoryCache为YES,则将图片数据缓存到内存的同时,使用一个weak maptable存储该image,如image key(strong)->image(weak)。
若内存警告,则缓存的image被清除,一些image可以恢复,则该weak maptable就不受影响。否则,image被清除,则SD就要重新处理该内存缓存,如从disk查询或网络请求。
如App进入后台,释放掉内存,再进入前台时,view的cell中的image可以重建,然后放到weak maptable中,而不需要再从disk读取。
加载超大图片的正确姿势
对于一些微信长图/微博长图之类的,或者一些需要展示全图,然后拖动来查看细节的场景,可以使用CATiledLayer来进行分片加载,避免直接对图片的所有部分进行解码和渲染,以节省资源。在滑动时,指定目标位置,映射原图指定位置的部分图片进行解码和渲染。
SDWebImage是否使用解压缩的区别
SDWebImage默认是会提前子线程上对图片进行解码的,使用代码如下:
- (nullable UIImage *)sd_decompressedImageWithImage:(nullable UIImage *)image {if (![[self class] shouldDecodeImage:image]) {return image;}// autorelease the bitmap context and all vars to help system to free memory when there are memory warning.// on iOS7, do not forget to call [[SDImageCache sharedImageCache] clearMemory];@autoreleasepool{CGImageRef imageRef = image.CGImage;CGColorSpaceRef colorspaceRef = [[self class] colorSpaceForImageRef:imageRef];size_t width = CGImageGetWidth(imageRef);size_t height = CGImageGetHeight(imageRef);// kCGImageAlphaNone is not supported in CGBitmapContextCreate.// Since the original image here has no alpha info, use kCGImageAlphaNoneSkipLast// to create bitmap graphics contexts without alpha info.CGContextRef context = CGBitmapContextCreate(NULL,width,height,kBitsPerComponent,0,colorspaceRef,kCGBitmapByteOrderDefault|kCGImageAlphaNoneSkipLast);if (context == NULL) {return image;}// Draw the image into the context and retrieve the new bitmap image without alphaCGContextDrawImage(context, CGRectMake(0, 0, width, height), imageRef);CGImageRef imageRefWithoutAlpha = CGBitmapContextCreateImage(context);UIImage *imageWithoutAlpha = [UIImage imageWithCGImage:imageRefWithoutAlphascale:image.scaleorientation:image.imageOrientation];CGContextRelease(context);CGImageRelease(imageRefWithoutAlpha);return imageWithoutAlpha;}}
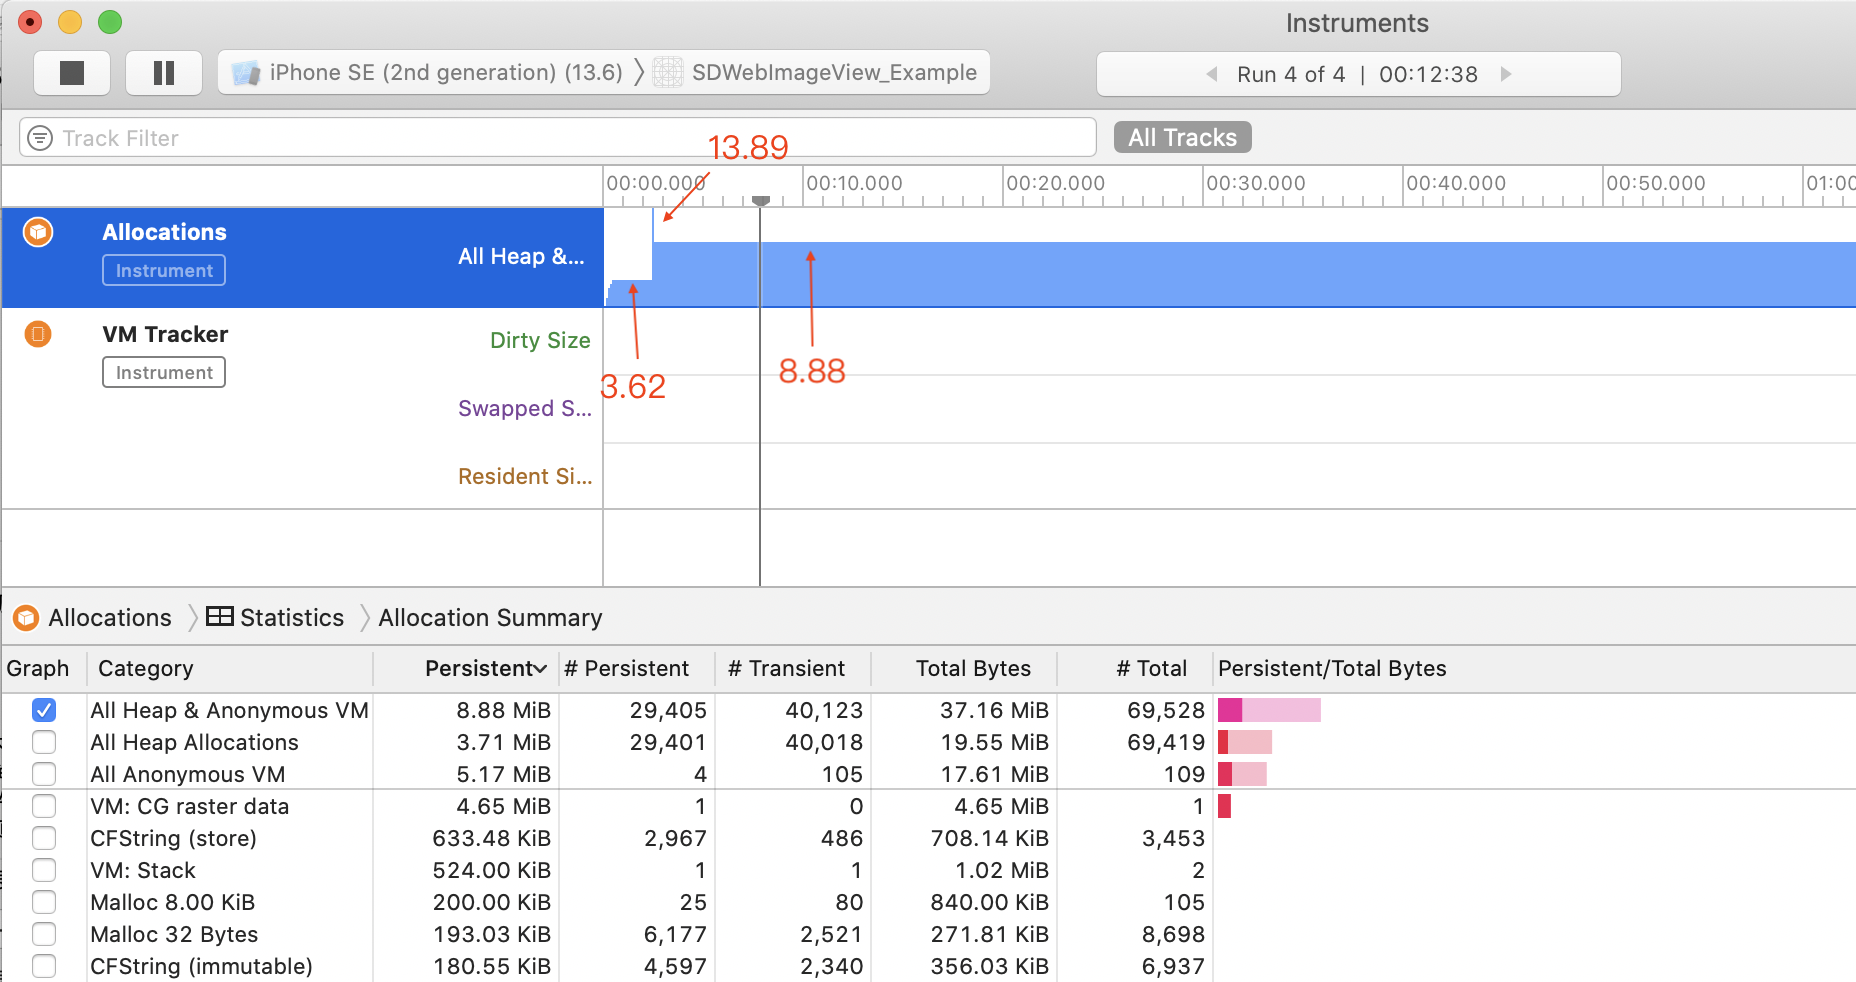
我们调用SDWebimage来显示一张1240 × 983的图片,用instruments来查看内存的变化。如下图所示,在创建位图的瞬间会有一个内存高峰,由方法CGBitmapContextCreate创建的位图上下文产生,当位图绘制完成之后,我们看到释放了上下文CGContextRelease(context);,内存又降了下来。
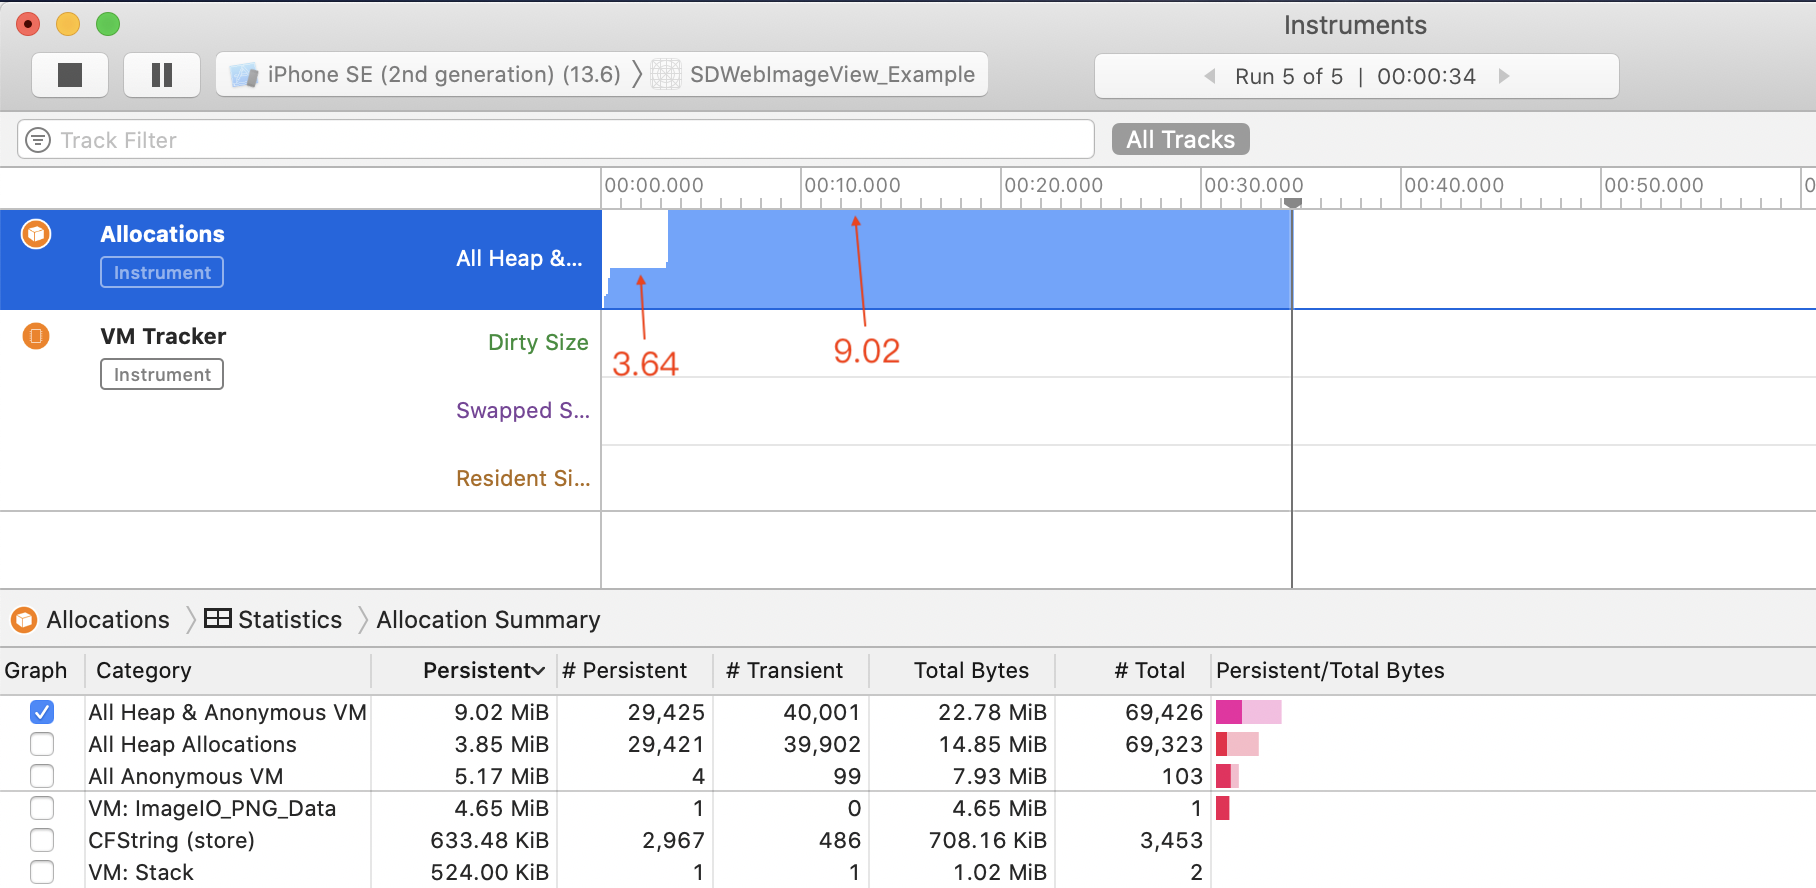
[[SDImageCache sharedImageCache] config].shouldDecompressImages = NO;[[SDWebImageDownloader sharedDownloader] setShouldDecompressImages:NO];
以上代码表示不提前解码,同样用instruments来查看内存的变化。如下图所示,我们看到并没有产生一个内存的高峰,这是由于系统在渲染时进行解码,并不产生我们自己解码绘制时创建的上下文:
其他
超大UIView相关的优化
如果UIView的size过大,如果全部绘制,则会消耗大量内存,以及阻塞主线程。
常见的场景如微信消息的超长文本,则可将其分割成多个UIView,然后放到UITableView中,利用cell的复用机制,减少不必要的渲染和内存占用。
离屏渲染
我们经常会需要预先渲染文字/图片以提高性能,此时需要尽可能保证这块 context 的大小与屏幕上的实际尺寸一致,避免浪费内存。可以通过 View Hierarchy 调试工具,打印一个 layer 的 contents 属性来查看其中的 CGImage(backing image)以及其大小。layer的contents属性即可看到其CGImage(backing store)的大小。
离屏渲染未必会导致性能降低,而是会额外加重GPU的负担,可能导致一个V-sync信号周期内,GPU的任务未能完成,最终结果就是可能导致卡顿。
启动优化
App启动时,加载相应的二进制文件或者dylib到内存中。当进程访问一个虚拟内存page,但该page未与物理内存形成映射关系,则会触发缺页中断,然后再分配物理内存。过多的缺页中断会导致一定的耗时。
二进制重排的启动优化方案,是通过减少App启动时候的缺页中断次数,来加速App启动。
字节对齐
当定义object的时候,尽量使得内存页对齐也会有帮助。小内存属性放一起,大内存属性放一起。
