@yulongsun
2018-08-16T16:04:13.000000Z
字数 8068
阅读 1782
网关技术调研 - 负载均衡器Nginx
网关技术调研
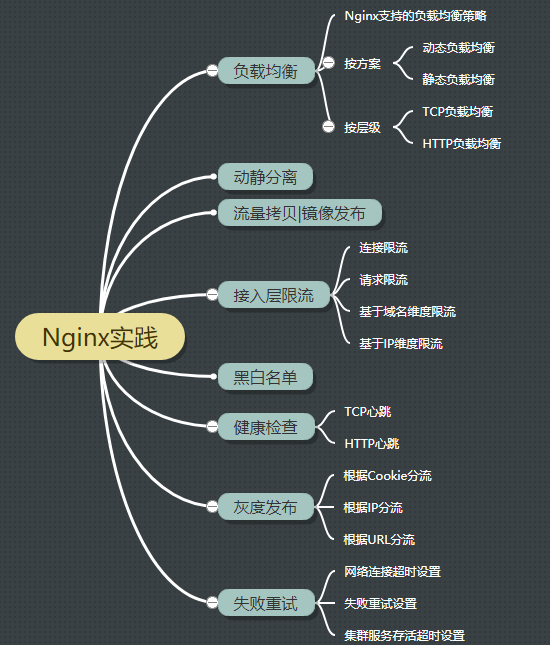
1. 简介
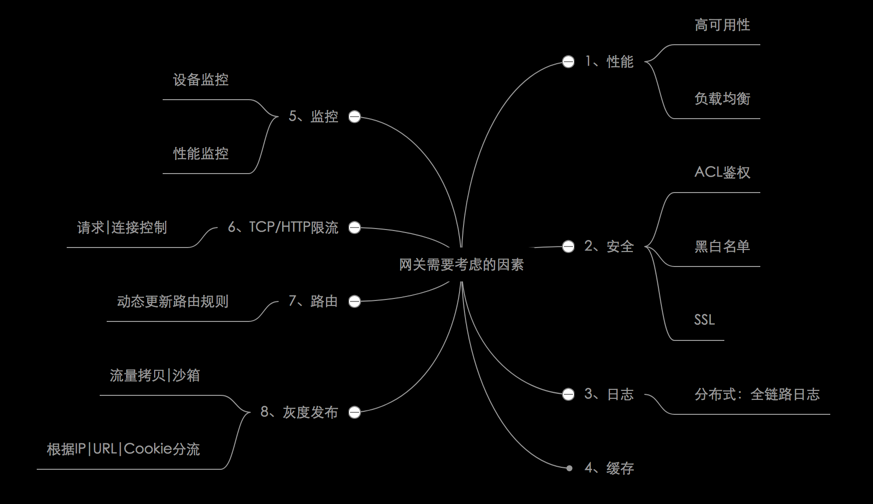
1.1 设计一个网关需要考虑的因素
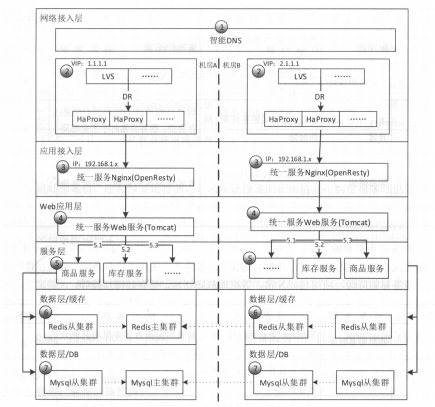
1.2 常见网站部署结构
2. Nginx介绍
2.1 为什么选择Nginx?
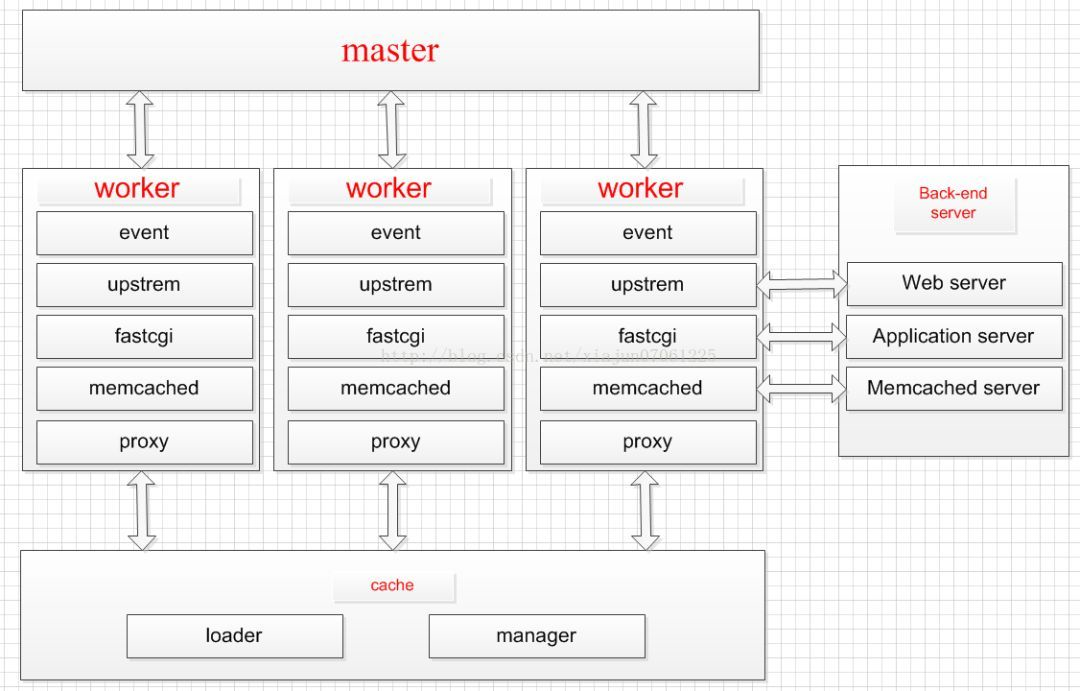
设计为一个主进程,多个工作进程,每个进程都是单线程处理请求;
- 优点:
- 占用较少的内存,单机支持5W并发;
- 非阻塞IO,减少上下文切换,性能高;
- 开源社区活跃,支持模块多;
- 可作为WEB服务器;
- 对网络依赖小,只要能ping通就可以;
- 可作为邮件服务器;
- 缺点:
- 仅支持http\https\tcp\udp\mail协议;
- 监控检查仅支持端口,无法使用url检查;
2.2 Nginx常见正则表达式使用
语法:location [=|~|~*|^~] /uri/
| 表达式 | 含义 |
|---|---|
| = | 表示开头精准匹配 |
| ^~ | 表示以某个常规字符串开头 |
| ~ | 表示区分大小写 |
| ~* | 表示不区分大小写 |
| !~ | 表示区分大小写不匹配 |
| !~* | 表示不区分大小写不匹配 |
| .* | .表示任意字符串,*表示0到正无穷 |
| \. | 转义字符,\.匹配. |
匹配顺序规则:= > ^~ >正则匹配顺序 > 通配符/
匹配成功之后,停止匹配,按当前匹配规则处理。
例如:
location = / {#规则A}location = /login {#规则B}location ^~ /static/ {#规则C}location ~ \.(gif|jpg|png|js|css)$ {#规则D}location ~* \.png$ {#规则E}location !~ \.xhtml$ {#规则F}location !~* \.xhtml$ {#规则G}location / {#规则H}
比如:
1. 访问localhost/会匹配规则A。
2. 访问localhost/login会匹配规则B, 访问localhost/register会匹配规则H。
3. 访问localhost/static/a.html会匹配规则C。
4. 访问localhost/a.png将匹配规则D/E。但是因为规则D顺序优先,所以规则D生效,E不生效。
5. 访问localhost/a.PNG会匹配规则E,不会匹配D,因为区分大小写。
6. 访问localhost/a.xhtml不会匹配F/G。访问localhost/a.XHTML不会匹配规则G。
7. 访问localhost/a/b/c/d,则最终匹配到规则H,因为以上规则都匹配。
3. Nginx实战
| 实验设备 | IP | 端口 | 备注 |
|---|---|---|---|
| node0 | 192.168.142.1 | 通讯机1:6610 通讯机2:7610 | |
| node1 | 192.168.142.21 | httpd:8001 nginx:80 | 图片资源服务器 |
| node2 | 192.168.142.22 | httpd:8002 tomcat:8080 | Tomcat服务器 |
| node3 | 192.168.142.23 | httpd:8003 | 镜像服务器 |
| node4 | 192.168.142.24 | nginx:80 | 自编译nginx代理服务器 |
3.1 负载均衡|反向代理
3.1.1 TCP负载均衡
Nginx1.9.0版本,新增支持TCP代理和负载均衡的stream模块。
【启用】./configure --with-stream
#设定TCP服务器stream{#上游服务器集群upstream commserver{server 192.168.142.1:6610;server 192.168.142.1:7610;}#虚拟节点server{listen 6610;proxy_pass commserver;}}
3.1.2 HTTP负载均衡
http{#上游服务器集群upstream backend{server 192.168.142.21:8001 weight=1;server 192.168.142.22:8002 weight=1;server 192.168.142.23:8003 weight=1;server 192.168.142.24:8004 weight=1;}#虚拟主机server {...}}
3.1.3 Nginx支持的负载均衡策略
- 1、轮询round-robin:配合weight实现基于权重的LB;
- 2、ip_hash:相同IP路由到同一个upsream server;
- 3、一致性hash:当添加或者删除一台Server时,只有少数Key将负载到到不同服务器。扩展(一致性Hash原理)。
- 4、最少连接least_conn:负载到最少活跃连接的upstream server;
3.1.4 实验
通讯机负载均衡实验
- 基于加权轮询
- 基于IP Hash
- 基于一致性Hash
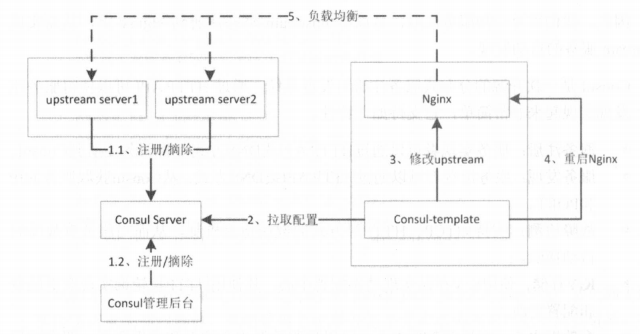
3.1.5 动态负载均衡
Nginx+Consul+Consul-template
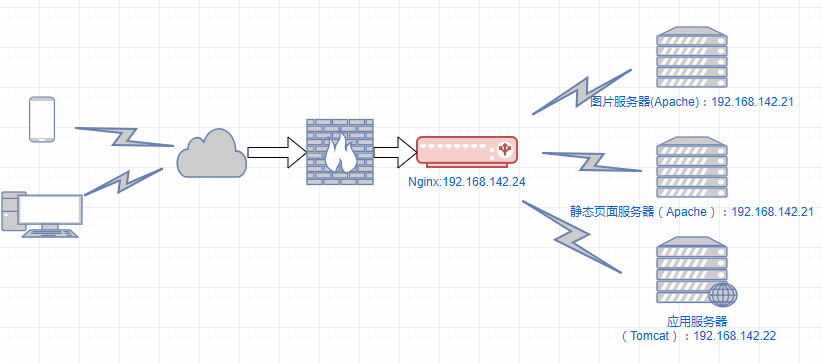
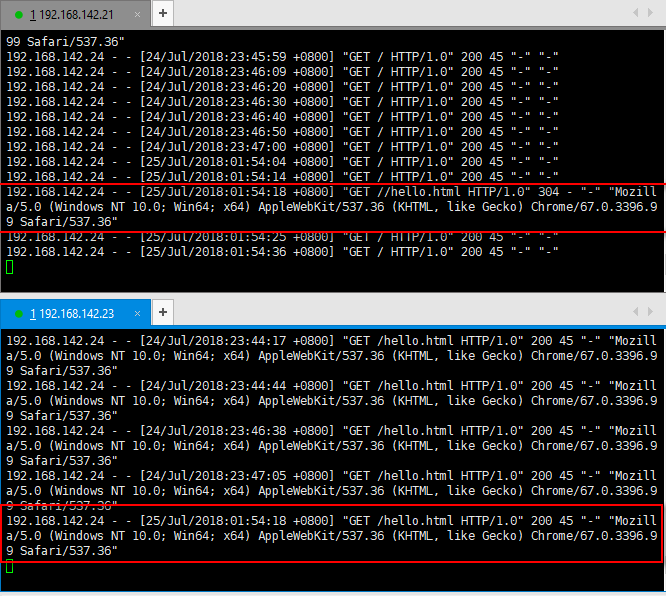
3.2 动静分离
3.2.1 部署图
3.2.2 配置
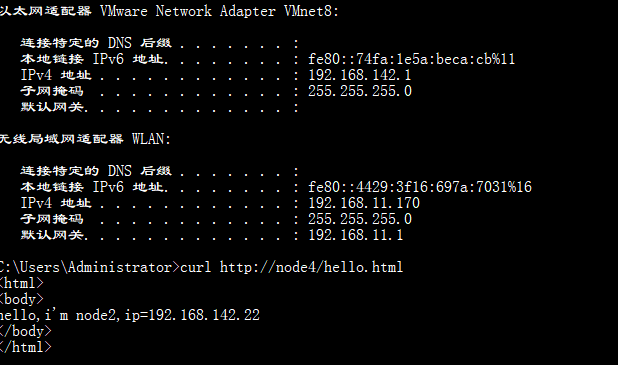
#定义静态资源集群upstream image{server 192.168.142.21:8001 weight=1 max_fails=2 fail_timeout=10s;}#静态页面集群upstream html{server 192.168.142.21:8001;server 192.168.142.22:8002 backup;}#动态资源集群upstream backend{server 192.168.142.22:8080;}server {#监听端口listen 80;#域名可以有多个,用空格隔开server_name node4;#转发图片资源location ~ .*\.(jpg)$ {proxy_pass http://image;}#静态资源location ~ .*\.(html|htm)$ {proxy_pass http://html;}#动态站点转发location ~ .*\.(do|jsp)$ {proxy_pass http://backend;}}
3.2.3 实验
静态页面:http://node4/index.html
图片:http://node4/icons/hundsun.jpg
JSP/Servlet:http://node4/demo/hello.do http://node4/demo/index.jsp
3.3 流量拷贝|镜像发布
3.3.1 需求
虽然经过多重测试,但是由于生产环境中的情况很复杂,测试环境很难完全模拟线上环境。为了能够更真实的测试,可以使用线上真实的流量来对测试环境中的服务器进行测试。通常用于仿真压测。
方案1:ngx_http_mirror_module
方案2:TcpCopy
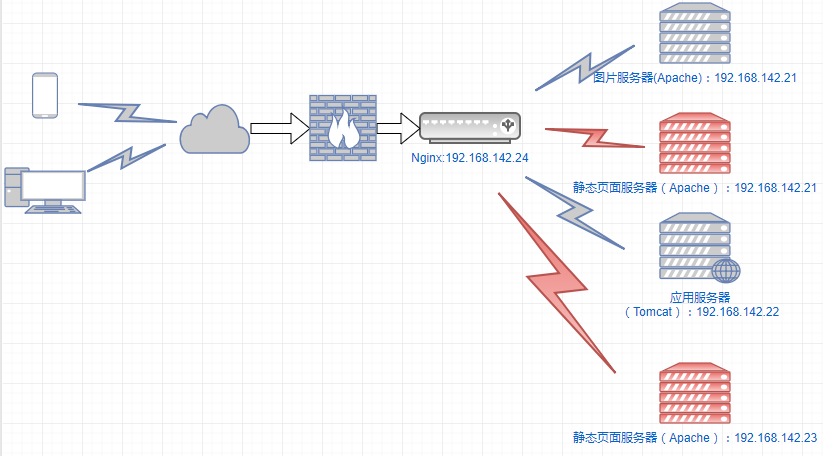
3.3.2 配置
#源地址配置location / {#指定镜像uri为/mirrormirror /mirror;#指定是否镜像请求body部分mirror_request_body on;proxy_pass http://192.168.142.21:8001/$request_uri;}#镜像地址配置location /mirror {proxy_pass http://192.168.142.23:8003$request_uri;}
3.3.3 实验
3.4 接入层限流
3.4.1 需求
电商平台营销时候,经常会碰到的大流量问题,除了做流量分流处理,可能还要做用户黑白名单、信誉分析,进而根据用户ip信誉权重做相应的流量拦截、限制流量。
Nginx自身有的请求限制模块ngx_http_limit_req_module、流量限制模块ngx_stream_limit_conn_module基于漏桶算法,可以方便的控制令牌速率,自定义调节限流,实现基本的限流控制。
高并发三大利器:目的是保证核心服务可用,即使是有损的。
- 限流:目的是防止恶意请求、或者恶意攻击。
- 按OSI模型分
- TCP限流
- HTTP限流
- 按部署层次分
- 接入层限流:Nginx
- 应用层限流:Hystrix
- 按机器分:
- 单点限流
- 分布式限流 Nginx+Lua脚本
- 限流算法:
- 计数法
- 令牌桶法
- 漏桶法
- 按OSI模型分
- 降级:
- 限流和降级的区别
- 缓存
- 浏览器缓存
- 代理层缓存
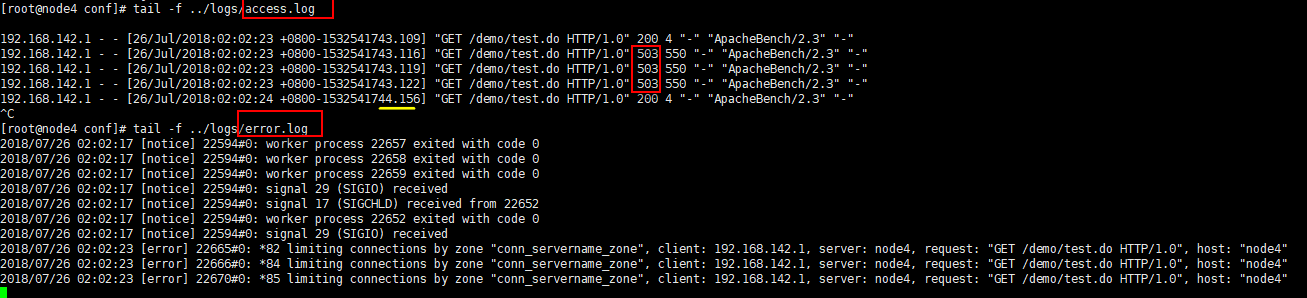
3.4.2 限流
1、连接限流
#limit_conn_zone用来配置限流Key和存放Key的内存大小。#$binary_remote_addr是IP维度限流。limit_conn_zone $binary_remote_addr zone=conn_ip_zone:10m;#$server_name是域名维度限流。limit_conn_zone $server_name zone=conn_servername_zone:10m;server {...location ~ .*\.(html|htm)$ {#配置限流后返回码limit_conn_status 503;#IP维度,每个IP最大并发连接数limit_conn conn_ip_zone 2;#配置限流后的日志级别limit_conn_log_level error;#域名维度。每个域名最大并发数limit_conn conn_servername_zone 1;}}
PS: Zone定义IP状态及URL访问频率的共享内存区域。zone=keyword标识区域的名字,以及冒号后面跟区域大小。16000个IP地址的状态信息约1MB,所以示例中区域可以存储160000个IP地址。
基于域名维度连接限流实验
前提:模拟每个请求耗时1s
第一次:
1. 每个域名最大并发数设置为1
2. 压测5个并发 ab -c 5 -n 5 http://node4/demo/test.do
3. 结果
第二次:
1. 每个域名最大并发数调整为5
2. 压测5个并发 ab -c 5 -n 5 http://node4/demo/test.do
3. 结果

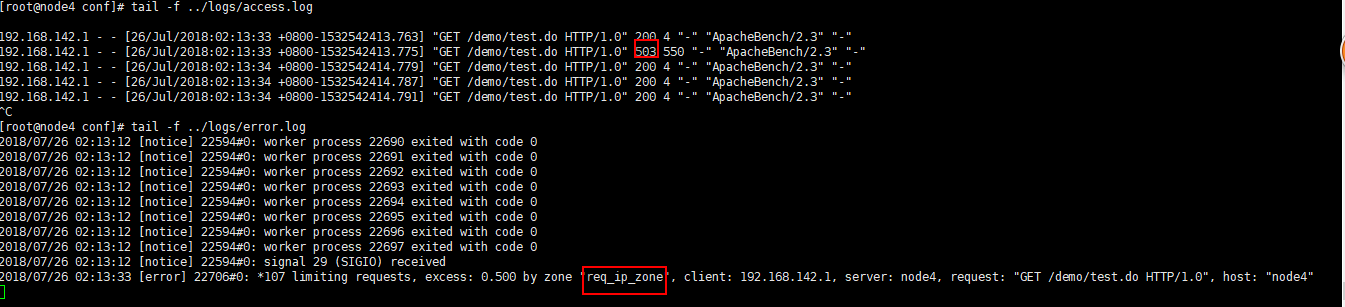
2、请求限流
#漏桶算法实现。配置Key及存放Key的内存大小。#rate固定请求速率。如rate=500r/s 即每秒500个请求,每2毫秒一个请求limit_req_zone $binary_remote_addr zone=req_ip_zone:10m rate=500r/s;server {...location ~ .*\.(html|htm)$ {#配置限流区域。桶容量(burst 默认为0) 是否延迟(默认延迟)limit_req zone=req_ip_zone burst=0 delay;#配置限流后返回码limit_req_status 503;#配置限流后的日志级别limit_conn_log_level error;}}
基于IP维度请求限流实验
前提:模拟每个请求耗时1s
第一次:
1. 桶容量=0,延迟
2. 压测5个并发 ab -c 5 -n 5 http://node4/demo/test.do
3. 结果
第二次:
1. 每个域名最大并发数调整为5
2. 压测5个并发 ab -c 5 -n 5 http://node4/demo/test.do
3. 结果

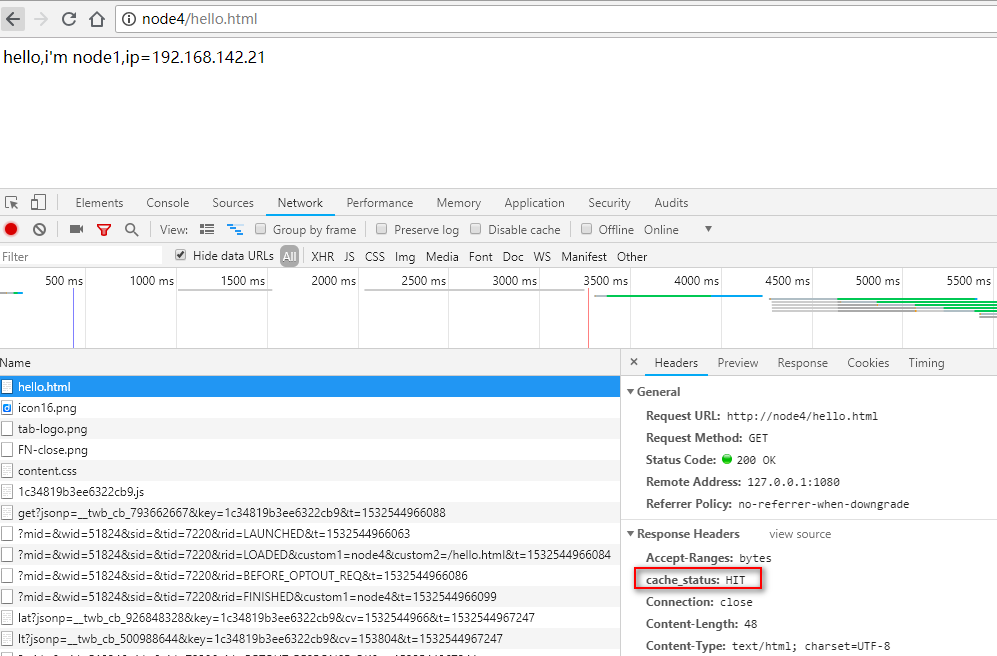
3.4.3 代理层缓存
#代理层缓存定义:#代理缓存路径。1:2表示创建2层目录。inactive表示缓存多久不被访问将被移除,默认10m。use_temp_path=on缓存会先被临时写入proxy_temp_pathproxy_cache_path /opt/nginx/cache levels=1:2 keys_zone=my_cache:200m inactive=10m max_size=1g use_temp_path=off;proxy_connect_timeout 90; #nginx跟后端服务器连接超时时间(代理连接超时)proxy_send_timeout 90; #后端服务器数据回传时间(代理发送超时)proxy_read_timeout 90; #连接成功后,后端服务器响应时间(代理接收超时)proxy_buffer_size 4k; #设置代理服务器(nginx)保存用户头信息的缓冲区大小proxy_buffers 4 32k; #proxy_buffers缓冲区,网页平均在32k以下的设置...location ...{#指定哪个缓存proxy_cache my_cache;#为不同状态码设定缓存时间proxy_cache_valid 200 1h;#响应头中添加缓存命中状态。 HIT命中 MISS未命中 EXPIRED过期add_header cache_status $upstream_cache_status;}
- 缓存清理:
开源模块:ngx_cache_purge
https://github.com/FRiCKLE/ngx_cache_purge
3.5 黑白名单
allow 127.0.0.1;deny all;
3.6 健康检查|心跳
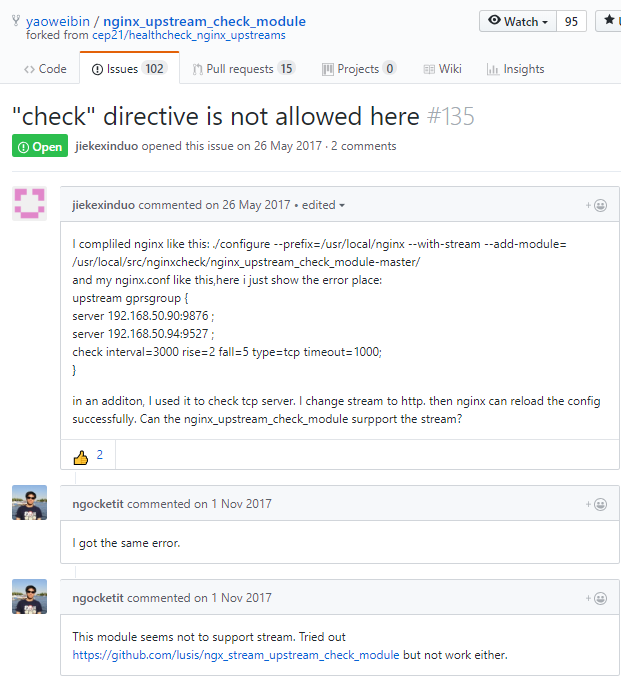
【依赖第三方模块】:nginx_upstream_check_module https://github.com/yaoweibin/nginx_upstream_check_module
3.6.1 TCP心跳检查
【踩坑】nginx_upstream_check_module不支持nginx_1.14.0。


Github Issues:
https://github.com/yaoweibin/nginx_upstream_check_module/issues/135
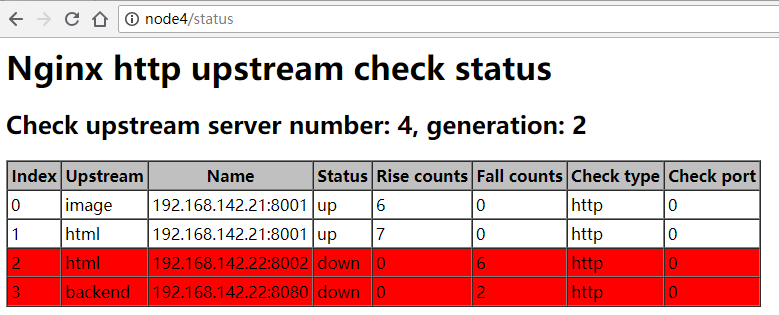
3.6.2 HTTP心跳检查
upstream backend{server 192.168.142.21:8001 weight=1;server 192.168.142.22:8002 weight=1;server 192.168.142.23:8003 weight=1;server 192.168.142.24:8004 weight=1;check interval=3000 rise=1 fall=3 timeout=2000 type=http;#check_http_send "HEAD /status HTTP /1.0\r\n\r\n";#check_http_expect_alive http_2XX http_3XX;}
- 参数解释:
- interval:检测请求间隔时间
- rise:检查成功多少次之后,上游服务器标识为成功
- fall:检查失败多少次之后,上游服务器标识为失败
- timeout:检测请求超时时间
注意:心跳时间不能太短,否则会导致上游服务器关掉。
效果图
3.7 灰度发布|分流
3.7.1 场景
我们可以将一个“新的版本代码”发布到集群中的少数几台(组)机器上,以便引入线上少量真实用户进行测试,用于验证产品改进的收益、小规模试错等
扩展:
nginx提供了“nginx_http_split_clients_module”、“nginx_stream_split_clients_module”,分别适用于http和tcp,可以帮助我们简单实现这些功能
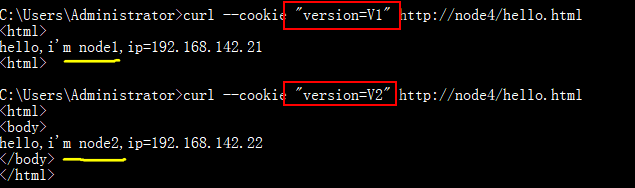
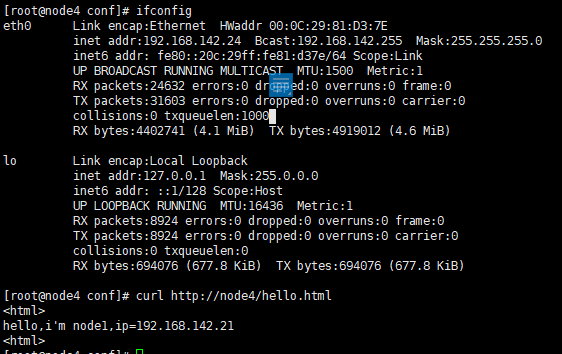
3.7.2 根据Cookide分流
#演示环境upstream staging{server 192.168.142.21:8001 weight=1;}#生产环境upstream prod{server 192.168.142.22:8002 weight=1;}server {listen 80;server_name node4;set $group "default";if ($http_cookie ~* "version=V1"){set $group staging;}if ($http_cookie ~* "version=V2"){set $group prod;}location / {proxy_set_header Host $host;proxy_set_header X-Real-IP $remote_addr;proxy_set_header X-Forwarded-For $proxy_add_x_forwarded_for;proxy_pass http://$group/$request_uri;}}
3.7.3 根据IP分流
#演示环境upstream staging{server 192.168.142.21:8001 weight=1;}#生产环境upstream prod{server 192.168.142.22:8002 weight=1;}server {listen 80;server_name node4;set $group "default";#本地走演示环境if ($remote_addr ~ "127.0.0.1"){set $group staging;}#外部走生产环境if ($remote_addr !~ "127.0.0.1"){set $group prod;}location / {proxy_set_header Host $host;proxy_set_header X-Real-IP $remote_addr;proxy_set_header X-Forwarded-For $proxy_add_x_forwarded_for;proxy_pass http://$group/$request_uri;}}
3.8 代理层失败重试
3.8.1 网络连接超时设置
location ~ .*.(html|htm)$ {#连接超时,默认60sproxy_connect_timeout 5s;#读取超时。默认60s。proxy_read_timeout 5s;#发送请求超时时间。默认60s。proxy_send_timeout 5s;proxy_pass http://backend$request_uri;}
备注:proxy_read_timeout、proxy_send_timeout:是指连续2次成功读取/发送的时间间隔,而不是读取/发送整个响应体的超时时间。如果超过这个时间间隔,则Nginx关闭此连接。
3.8.2 失败重试机制设置
location ~ .*.(html|htm)$ {#配置什么情况下需要重试。{error|timeout|http_500|http_502|http_503|http_403|http_404|off}#off表示禁用重试#timeout慎用proxy_next_upstream error timeout;#重试次数。0表示不限制。proxy_next_upstream_tries 2;#重试超时时间。0表示不限制。proxy_next_upstream_timeout 6s;proxy_pass http://backend$request_uri;}
3.8.3 upstream存活超时设置
#定义上游服务器upstream backend{server 192.168.142.21:8001 weight=1 max_fails=2 fail_timeout=10s;server 192.168.142.22:8002 weight=1 max_fails=2 fail_timeout=10s;}
fail_timeout时间内失败了max_fails次,则认为上游服务器不存活,然后移除上游服务器。
fail_timeout之后,再次加入存活服务器列表重试。

【问题】
一个请求被重复提交,原因是nginx代理后面挂着2个服务器,请求超时的时候(其实已经处理了),结果nginx发现超时,有把请求转给另外台服务器又做了次处理。
解决方案:去掉proxy_next_upstream的timeout
3.9 Tips
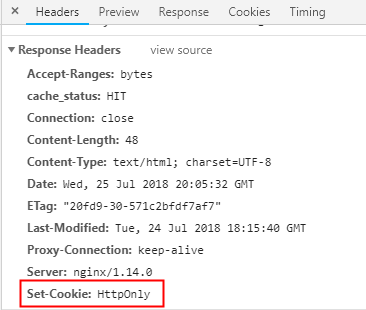
3.9.1 XSS防御
add_header Set-Cookie "HttpOnly";
Cookie的HttpOnly属性,指示浏览器不要在除HTTP(和HTTPS)请求之外暴露Cookie。一个有HttpOnly属性的Cookie,是不可以通过例如调用JavaScript(引用document.cookie)这种非HTTP方式来访问。因此,也不可能通过跨域脚本来偷走这种Cookie。
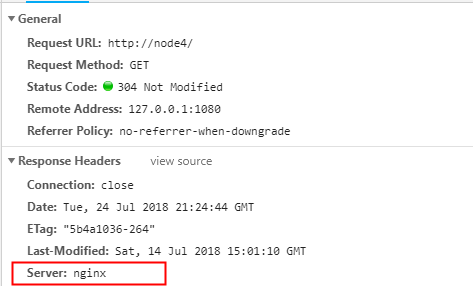
3.9.2 隐藏Nginx版本
#隐藏nginx版本号server_tokens off;
隐藏之前
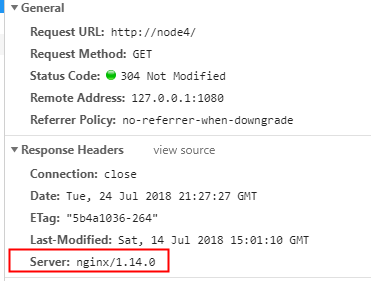
隐藏之后