@cdmonkey
2016-06-23T08:44:57.000000Z
字数 5925
阅读 1740
Redis(5)Codis
Redis
![]()
https://github.com/CodisLabs/codis
http://www.tuicool.com/articles/m6FR7zR
http://my.oschina.net/vampire/blog/639329
http://blog.csdn.net/dc_726/article/details/47052607
原理讲解请参考笔记内容。
Install Zookeeper
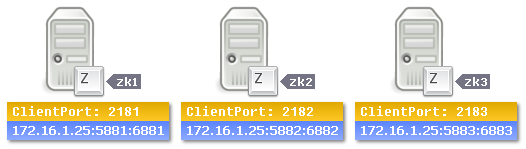
首先需要在同一台主机上模拟有三个节点的“Zookeeper”集群:
# Install JDK:# Install Zookeeper:[root@Node-A5 ~]# cd /opt/[root@Node-A5 opt]# mkdir zk1 zk2 zk3[root@Node-A5 opt]# echo "1" > zk1/myid[root@Node-A5 opt]# echo "2" > zk2/myid[root@Node-A5 opt]# echo "3" > zk3/myid#[root@Node-A5 tools]# tar zxvf zookeeper-3.4.8.tar.gz[root@Node-A5 tools]# mv zookeeper-3.4.8 /usr/local/zookeeper[root@Node-A5 tools]# cp /usr/local/zookeeper/conf/zoo_sample.cfg /opt/zoo.cfg[root@Node-A5 tools]# vim /opt/zoo.cfgdataDir=/tmp/zookeeper --> dataDir=/opt/zk1 # 每个节点的数据存储路径要对应自己的目录。clientPort=2181 # 因为是在同一台主机上进行模拟,所以每个节点进程对应的客户端的端口号也要不同。# 下面三个就是集群内的节点(每个节点都有唯一的ID,前一个端口是集群内的节点交换信息使用的端口,后一个端口用于重新选举)。# 下面三行在三个节点内的配置文件中是相同的。server.1=172.16.1.25:5881:6881server.2=172.16.1.25:5882:6882server.3=172.16.1.25:5883:6883-----------------[root@Node-A5 tools]# cd /opt/[root@Node-A5 opt]# cp zoo.cfg zk1/zk1.cfg[root@Node-A5 opt]# cp zoo.cfg zk2/zk2.cfg[root@Node-A5 opt]# cp zoo.cfg zk3/zk3.cfg# 针对不同的目录修改配置文件内的个性化信息,主要是客户端的端口号和数据存放目录(略)。# Startup Zookeeper:[root@Node-A5 opt]# /usr/local/zookeeper/bin/zkServer.sh start /opt/zk1/zk1.cfg[root@Node-A5 opt]# /usr/local/zookeeper/bin/zkServer.sh start /opt/zk2/zk2.cfg[root@Node-A5 opt]# /usr/local/zookeeper/bin/zkServer.sh start /opt/zk3/zk3.cfg# Check status:[root@Node-A5 opt]# /usr/local/zookeeper/bin/zkServer.sh status /opt/zk1/zk1.cfgZooKeeper JMX enabled by defaultUsing config: /opt/zk1/zk1.cfgMode: follower[root@Node-A5 opt]# /usr/local/zookeeper/bin/zkServer.sh status /opt/zk2/zk2.cfgZooKeeper JMX enabled by defaultUsing config: /opt/zk2/zk2.cfgMode: leader # 此处显示的节点状态为领导者,而其它节点的状态为跟随者。[root@Node-A5 opt]# /usr/local/zookeeper/bin/zkServer.sh status /opt/zk3/zk3.cfgZooKeeper JMX enabled by defaultUsing config: /opt/zk3/zk3.cfgMode: follower
Install Go tools
[root@Node-A5 tools]# tar zxvf go1.6.linux-amd64.tar.gz -C /opt/[root@Node-A5 tools]# vim ~/.bash_profileexport GO15VENDOREXPERIMENT=0export GOROOT=/usr/local/goexport GOPATH=/opt/gopathexport PATH=$GOROOT/bin:$GOPATH/bin:$PATH--------------[root@Node-A5 tools]# . ~/.bash_profile[root@Node-A5 ~]# go versiongo version go1.6 linux/amd64# Install godep:[root@Node-A5 tools]# go get github.com/tools/godep
该路径是本机所有“Go”项目(包括项目所依赖的第三方库)的目录,而并非单纯codis的所在目录。
Install Codis
# Install Codis:[root@Node-A5 ~]# go get -u -d github.com/CodisLabs/codispackage github.com/CodisLabs/codis: no buildable Go source files in /opt/gopath/src/github.com/CodisLabs/codis# 以上的输出内容可予以忽略。[root@Node-A5 ~]# cd $GOPATH/src/github.com/CodisLabs/codis[root@Node-A5 codis]# make[root@Node-A5 codis]# make gotest
Deployment
# Execute the instructions above all, generates three files in bin directory:# codis-config、codis-proxy、codis-server[root@Node-A5 codis]# ll bin/total 34956drwxr-xr-x 4 root root 4096 Oct 8 16:10 assets # Dashboard fils-rwxr-xr-x 1 root root 14812072 Oct 8 16:10 codis-config # Codis配置管理组件-rwxr-xr-x 1 root root 14660784 Oct 8 16:10 codis-proxy # Codis代理也就是核心组件-rwxr-xr-x 1 root root 6311107 Oct 8 16:11 codis-server # Codis使用的定制版本的Redis Server
两个可执行文件codis-config、codis-proxy不使用“-c”参数的时候,会默认读取当前目录下的config.ini文件。
1. Codis Server
# Create three Redis nodes at localhost:[root@Node-A5 ~]# mkdir -p /usr/local/codis/{log,conf}[root@Node-A5 ~]# mkdir /usr/local/codis/redis_{7881,7882,7883,7884}---[root@Node-A5 ~]# cd $GOPATH/src/github.com/CodisLabs/codis[root@Node-A5 codis]# cp -a bin/ /usr/local/codis/[root@Node-A5 codis]# cp config.ini /usr/local/codis/conf/---[root@Node-A5 codis]# cp extern/redis-test/conf/6379.conf /usr/local/codis/redis_7881/7881.conf[root@Node-A5 codis]# vim /usr/local/codis/redis_7881/7881.conf#daemonize no --> daemonize yespidfile /var/run/redis.pid --> pidfile /var/run/redis_7881.pidport 6379 --> port 7881logfile "" --> logfile "/usr/local/codis/log/redis_7881.log"save 900 1save 300 10save 60 10000dir ./ --> dir /usr/local/codis/redis_7881appendonly no --> appendonly yes-------------[root@Node-A5 codis]# cd /usr/local/codis/[root@Node-A5 codis]# sed 's/7881/7882/g' redis_7881/7881.conf >> redis_7882/7882.conf[root@Node-A5 codis]# sed 's/7881/7883/g' redis_7881/7881.conf >> redis_7883/7883.conf
2. Codis Proxy
[root@Node-A5 ~]# cd $GOPATH/src/github.com/CodisLabs/codis[root@Node-A5 codis]# cp -a bin/ /usr/local/codis/[root@Node-A5 codis]# cp config.ini /usr/local/codis/conf/config_p1.ini[root@Node-A5 codis]# cp config.ini /usr/local/codis/conf/config_p2.ini
说明:每个“Codis Proxy”都有自己的
config.ini文件,由于是于单台主机上进行的部署,因而特别说明。
Configuration file
[root@Node-A5 codis]# vim /usr/local/codis/conf/config_p1.ini##### Properties below are for dashboard and proxies# zookeeper or etcdcoordinator=zookeeper# The address of zookeeper (Use comma "," for multiple instances):# 如果是集群场景,则需要写成下面的形式(每个代理该部分内容要相同):zk=172.16.1.25:2181,172.16.1.25:2182,172.16.1.25:2183product=test #产品名称,该Codis集群的名字,可以认为是命名空间,不同命名空间的Codis没有交集。dashboard_addr=172.16.1.25:18087password=123456##### Properties below are only for proxies# Proxy will ping-pong backend redis periodly to keep-alivebackend_ping_period=5# If there is no request from client for a long time, the connection will be droped. Set 0 to disable.session_max_timeout=1800# Buffer size for each client connection.session_max_bufsize=131072# Number of buffered requests for each client connection.# Make sure this is higher than the max number of requests for each pipeline request, or your client may be blocked.session_max_pipeline=1024# If proxy don't send a heartbeat in timeout seconds which is usually because proxy has high load or even no response, zk will mark this proxy offline.# A higher timeout will recude the possibility of "session expired" but clients will not know the proxy has no response in time if the proxy is down indeed.# So we highly recommend you not to change this default timeout and use Jodis(https://github.com/wandoulabs/codis/tree/master/extern/jodis)# which watches the available proxies and will skip the offline proxy or add new online proxy automatically.# If you are not using Java in client, you can DIY a zk watcher accourding to Jodis source code.zk_session_timeout=30##### must be different for each proxyproxy_id=proxy_1
Start process
# Startup Dashboard:[root@Node-A3 codis]# bin/codis-config dashboard &# Initialize slots:[root@Node-A3 codis]# bin/codis-config slot init# Startup the Codis Redis:
