@cdmonkey
2017-12-20T08:23:42.000000Z
字数 7169
阅读 2679
HAProxy-RabbitMQ
网络服务
http://88250.b3log.org/rabbitmq-clustering-ha
http://www.tuicool.com/articles/viqAbe
http://blog.csdn.net/huithe/article/details/13971847
Official manual:http://cbonte.github.io/haproxy-dconv/configuration-1.5.html
一、安装
1. Install HAProxy
[root@Node-A3 tools]# tar zxvf haproxy-1.5.15.tar.gz[root@Node-A3 tools]# cd haproxy-1.5.15[root@Node-A3 haproxy-1.5.15]# make TARGET=linux26 PREFIX=/usr/local/haproxy[root@Node-A3 haproxy-1.5.15]# make install PREFIX=/usr/local/haproxy
调整相关的内核参数:
echo "net.ipv4.ip_forward = 1" >>/etc/sysctl.conf #打开内核的转发功能。echo "net.ipv4.ip_nonlocal_bind = 1" >>/etc/sysctl.conf #sysctl -p
创建服务启动文件及设置文件:
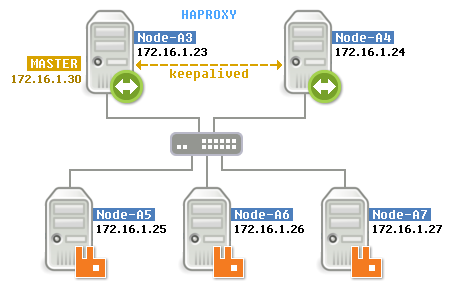
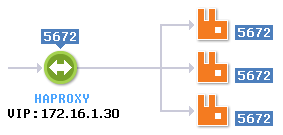
# Create service startup script:[root@Node-A3 ~]# cp tools/haproxy-1.5.15/examples/haproxy.init /etc/init.d/haproxy[root@Node-A3 ~]# chmod 755 /etc/init.d/haproxy[root@Node-A3 ~]# chkconfig --add haproxy[root@Node-A3 ~]# chkconfig --list | grep haproxyhaproxy 0:off 1:off 2:off 3:off 4:off 5:off 6:off# Create configure file:[root@Node-A3 ~]# mkdir /etc/haproxy[root@Node-A3 ~]# vim /etc/haproxy/haproxy.cfg# 可参考软件安装包内提供的配置文件示例进行设定:/root/tools/haproxy-1.5.15/examples/haproxy.cfg# 配置文件的内容基本分为五个部分:global ### 全局配置信息(参数是进程级的,通常和操作系统相关)###maxconn 100000 # 限制单个进程的最大连接数,该参数也是性能调优时最常被修改的。chroot /usr/local/haproxyuid 99 # 所属运行用户及用户组,默认值99为nobodygid 99daemon # 让服务进程作为守护进程于后台运行。nbproc 1 # 指定作为守护进程运行时的进程数,推荐设置为与CPU核心数相同。# 创建多个进程能够减少每个进程负担的任务数,但是过多的进程也会导致服务的崩溃。ulimit -n 65535 # 设定最大打开的文件描述符数量。注意:该配置项官方已不建议设定,而由进程自动计算。pidfile /usr/local/haproxy/logs/haproxy.pid # 启动进程的用户必须有权限访问该文件。log 127.0.0.1 local3 info # 设定日志级别defaults ### 默认的全局配置信息(这部分参数可以被默认配置到监控页面、前端及后端)###option http-keep-alive # Enable or disable HTTP keep-alive from client to serveroption dontlognull # 日志中将不会记录空连接。# 官方文档建议如果该服务上游没有其他负载均衡器的话,建议不要使用该参数。maxconn 100000mode http # 设定代理的模式,即四层还是七层(具体的说明见下面的表格,包括:http、tcp、health)log 127.0.0.1 local4 err # 设定使用本机的指定设备来记录错误日志。timeout connect 5000ms # 设置等待连接到服务器成功的最大时间(如果不写单位则默认为毫秒)。timeout client 50000ms # 设置客户端发送数据时成功连接的最长等待时间。timeout server 50000ms # 设置服务器回应客户端数据发送的最长等待时间。listen stats ### 监控页面的设置 ###mode httpbind 0.0.0.0:8888stats enablestats refresh 5s # 每隔五秒自动刷新监控页面。stats uri /haproxy-status # 设定监控页面的访问地址。stats auth haproxy:haproxy # 设定监控页面的用户和密码,这里可设置多个户名。stats hide-version # 隐藏版本号。frontend frontend_rabbitmq_cluster ### 自定义前端的名称 ###bind 172.16.1.30:5672 # 监听的地址及端口(如果是配置了高可用,则需要监听VIP)。mode httpoption httplog # 设定采用HTTP格式的日志。log globaldefault_backend backend_rabbitmq_clusterbackend backend_rabbitmq_cluster ### 自定义后端的名称 ###option forwardfor header X-REAL-IP # Set X-Forwarded-For# option httpchk <method> <uri> <version>option httpchk HEAD / HTTP/1.0balance sourceserver node1 172.16.1.25:5672 check inter 2000 rise 30 fall 15server node2 172.16.1.26:5672 check inter 2000 rise 30 fall 15server node3 172.16.1.27:5672 check inter 2000 rise 30 fall 15----------------# 修改完配置文件后需要重新加载(如果服务未启动则直接启动服务即可):[root@Node-A3 ~]# /etc/init.d/haproxy reload
更为详细的讲解请见田飞雨:http://www.tianfeiyu.com/?p=1061
http://www.tuicool.com/articles/viqAbe
2. Install keepalived
[root@Node-A3 tools]# tar zxvf keepalived-1.2.19.tar.gz[root@Node-A3 tools]# cd keepalived-1.2.19./configure --prefix=/usr/local/keepalived --disable-fwmarkmake && make install
创建服务启动文件及设置文件:
# Create service startup script:[root@Node-A3 ~]# cp /usr/local/keepalived/etc/rc.d/init.d/keepalived /etc/init.d/[root@Node-A3 ~]# chmod 755 /etc/init.d/keepalived# Create configure file:[root@Node-A3 ~]# cp /usr/local/keepalived/etc/sysconfig/keepalived /etc/sysconfig/[root@Node-A3 ~]# cp /usr/local/keepalived/sbin/keepalived /usr/sbin/[root@Node-A3 ~]# mkdir /etc/keepalived[root@Node-A3 ~]# vim /etc/keepalived/keepalived.conf! Configuration File for keepalivedglobal_defs {notification_email {saltstack@example.com}notification_email_from keepalived@example.comsmtp_server 127.0.0.1smtp_connect_timeout 30router_id Node-A3}vrrp_instance haproxy_ha {state MASTERinterface eth0virtual_router_id 36priority 150advert_int 1authentication {auth_type PASSauth_pass 1111}virtual_ipaddress {172.16.1.30/14}}--------------# Startup the service:[root@Node-A3 ~]# /etc/init.d/keepalived start
二、日志
http://www.shencan.net/index.php/2013/06/26/haproxy-%E6%97%A5%E5%BF%97%E8%AF%A6%E8%A7%A3
我们设定的日志记录条目为:
log 127.0.0.1 local3 info
因而相应的我们需要修改Rsyslog服务的设定内容:
[root@Node-A3 ~]# vim /etc/rsyslog.conf# Remove the comment symbol, Open UDP:$ModLoad imudp$UDPServerRun 514# Add the following:local3.* /var/log/haproxy.log-----------------[root@Node-A3 ~]# vim /etc/sysconfig/rsyslogSYSLOGD_OPTIONS="-c 5" --> SYSLOGD_OPTIONS="-r -m 0 -c 2"-----------------# Restart the rsyslog service:[root@Node-A3 ~]# /etc/init.d/rsyslog restart# 服务的访问日志设定完毕。
三、Health check
健康检查分为四层及七层,使用我们的示例进行解释:
server node1 172.16.1.25:5672 check inter 2000 rise 30 fall 15
四、On-line Maintenance
首先要说明,修改完设置文件后reload服务的话,当前的连接会断开并重新创建。因而使用重载的方法重新读取新的设置文件并不是一个很好的做法。因为“Haproxy”能够监听一个套接字,并经由该套接字接收维护指令,所以我们能够向该套接字对服务进行操作而无需重载服务。
# 首先我们需要在全局设置部分增加如下的内容:[root@Node-A3 ~]# vim /etc/haproxy/haproxy.cfgglobalstats socket /var/run/haproxy.sock mode 600 level adminstats timeout 2m
Use socat
我们使用“socat”进行相关的维护操作。
# Install socat:[root@Node-A3 ~]# yum install -y socat# View the help message:[root@Node-A3 ~]# echo "help"|socat stdio /var/run/haproxy.sockUnknown command. Please enter one of the following commands only :clear counters : clear max statistics counters (add 'all' for all counters)clear table : remove an entry from a tablehelp : this messageprompt : toggle interactive mode with promptquit : disconnectshow info : report information about the running processshow pools : report information about the memory pools usageshow stat : report counters for each proxy and servershow errors : report last request and response errors for each proxyshow sess [id] : report the list of current sessions or dump this sessionshow table [id]: report table usage stats or dump this table's contents'get weight : report a server's current weight'set weight : change a server's weight'set server : change a server's state or weight'set table [id] : update or create a table entry's data'set timeout : change a timeout settingset maxconn : change a maxconn settingset rate-limit : change a rate limiting valuedisable : put a server or frontend in maintenance modeenable : re-enable a server or frontend which is in maintenance modeshutdown : kill a session or a frontend (eg:to release listening ports)show acl [id] : report avalaible acls or dump an acl's contents'get acl : reports the patterns matching a sample for an ACLadd acl : add acl entrydel acl : delete acl entryclear acl <id> : clear the content of this aclshow map [id] : report avalaible maps or dump a map's contents'get map : reports the keys and values matching a sample for a mapset map : modify map entryadd map : add map entrydel map : delete map entryclear map <id> : clear the content of this mapset ssl <stmt> : set statement for ssl
# Show Haproxy info:[root@Node-A3 ~]# echo "show info"|socat stdio /var/run/haproxy.sockName: HAProxyVersion: 1.5.15Release_date: 2015/11/01...
# Set maximum number of connections:---------------# Turn off the backend server node:# 将指定的后端服务器离线后监控页面将会把该服务器显示为棕色,即维护的状态。echo "disable server backend_www_cdmonkey_com/web-node1" | socat stdio /var/run/haproxy.sock# Turn on the backend server node:echo "enable server backend_www_cdmonkey_com/web-node1" | socat stdio /var/run/haproxy.sock
五、长连接
http://cbonte.github.io/haproxy-dconv/configuration-1.5.html#option%20http-keep-alive
http://striven.wicp.net/haproxy%E5%B7%A5%E4%BD%9C%E6%A8%A1%E5%BC%8F
默认的情况下,它运行于长连接模式下,而下面几个设定选项能够将其改变:
option http-server-close# 对于某些服务器端不支持长连接的情况,利用该选项可使客户端到代理是长连接,而代理到服务器端是短连接。option httpclose# 强制使用短连接,使每个客户端或服务端于每次传输后,都会主动关闭连接,同下面的这个选项类似。option forceclose# 如果有服务器不正确的忽略掉头部信息,可使用该选项使服务端响应后主动关闭请求连接。# 该选项还能够及早的释放服务连接,而不必等到客户端的应答确认。option http-tunnel
当前端和后端的设定选项不同时,上面四个选项将优先于option http-keep-alive。
# 该选项能够保证在短连接情况之下,客户端能收到完成的数据包。option http-pretend-keepalive
