@code33
2019-07-01T09:50:24.000000Z
字数 11815
阅读 1786
迪联技术文档-内网穿透技术 1.4
frp ngrok 技术文档
modify by jyo on 2018-09-15
modify by jyo on 2018-07
modify by jyo on 2018-06-08
create by Bunm Jyo on 2017-05-13
contact code0515@gmail.com
概述
应用场景:
解决内网无固定IP,需要向外网开放服务端口请求的功能需求
用于外网向内网请求,而内网无需在路由器配置开放及映射端口
目前技术已有两种实现 ngrok 和 frp
原理:
外网需要一服务器长连接FRPSERVICE服务端,与内网保持长链接维持心跳,并与之通信,请求数据通过长连接通道实现,之间的通信以长连接的socks方式实现
注意:
但若是该穿透通道服务需要与指定域名进行绑定,则需对其进行特殊的headers HOST处理,以便让FRPSERVICE可识别到具体哪项通道服务
# 新建一个伪造header Host 的nginx端口服务server {listen 10335;server_name _;charset utf-8;location / {proxy_set_header X-Real-IP $remote_addr;proxy_set_header X-Forwarded-For $proxy_add_x_forwarded_for;# 伪造header Host 的nginx端口服务proxy_set_header Host bessnodeprepro.frp.1000hou.com:51901;#proxy_set_header X-NginX-Proxy true;proxy_pass http://bessnodeprepro.frp.1000hou.com:51901/;#health_check;add_header Access-Control-Allow-Headers X-Requested-With;add_header 'Access-Control-Allow-Credentials' 'true';add_header 'Access-Control-Allow-Methods' GET,POST,PUT,OPTIONS,DELETE,HEAD;proxy_redirect off;}}# 做成一个流服务映射upstream bessnodepreprorls-frp {server 127.0.0.1:10335;}server {listen 443;server_name hdzbessmana.1000hou.com;ssl on;ssl_certificate /etc/nginx/CA/hdzbessmana/hdzbessmana2018.pem;ssl_certificate_key /etc/nginx/CA/hdzbessmana/hdzbessmana2018.key;ssl_protocols TLSv1 TLSv1.1 TLSv1.2;ssl_ciphers ECDHE-RSA-AES128-GCM-SHA256:HIGH:!aNULL:!MD5:!RC4:!DHE;ssl_prefer_server_ciphers on;access_log /var/log/nginx/hdzbessmana.ssl.access.log;error_log /var/log/nginx/hdzbessmana.ssl.error.log;location /.well-known/pki-validation/fileauth.txt {proxy_pass http://hdzbessmana-ssl/;}location ~ ^/v1.1.2/bsmana/?((?<=/).*)?$ {proxy_set_header X-Real-IP $remote_addr;proxy_set_header X-Forwarded-For $proxy_add_x_forwarded_for;proxy_set_header Host $proxy_host;proxy_set_header X-NginX-Proxy true;proxy_set_header versionc '1.1.2';add_header versionc '1.1.2';# txc#proxy_pass http://bessnodepreprotxc-frp/$1$is_args$args;#release 这里就是代理到穿透通道nginx流服务proxy_pass http://bessnodepreprorls-frp/$1$is_args$args;#add_header Content-Type 'application/json; charset=utf-8';proxy_redirect off;}}
libqtSS
一款代理服务应用,通过它可以走宿主机的流量
输出为TCP协议
安装
windows-32 http://xyzsetup.dlhis.com/shadowsocks-libqss-v1.9.0-win32.7z
windows-64 http://xyzsetup.dlhis.com/shadowsocks-libqss-v1.9.0-win64.7z
运行
配置参数
保存为config.json
{"server":"0.0.0.0","server_port":14201,"password":"523186","timeout":300,"method":"rc4-md5","fast_open":false,"workers": 2}
运行命令附带参数
shadowsocks-libqss.exe -c config.json -S
frp
以下版本基于frp 0.9.3
支持 tcp, udp, http, https 等协议类型,并且 web 服务支持根据域名进行路由转发。
- 利用处于内网或防火墙后的机器,对外网环境提供 http 或 https 服务。
- 对于 http 服务支持基于域名的虚拟主机,支持自定义域名绑定,使多个域名可以共用一个端口。
- 利用处于内网或防火墙后的机器,对外网环境提供 tcp 服务,例如在家里通过 ssh 访问处于公司内网环境内的主机。
- 可查看通过代理的所有 http 请求和响应的详细信息。(待开发)
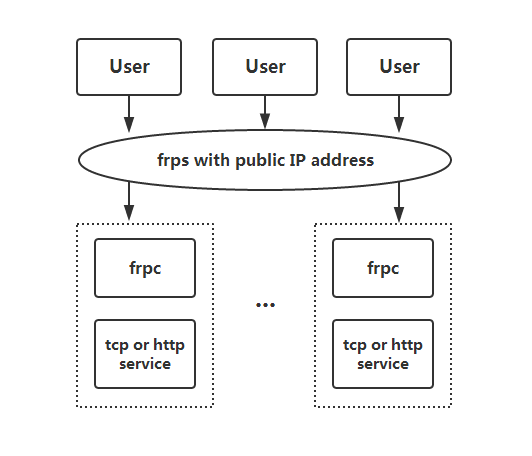
frp-架构
frp-安装 & 运行
frp-下载
源码 http://xyzsetup.dlhis.com/frp-0.9.3-source.tar.gz
arm http://xyzsetup.dlhis.com/frp_0.9.3_linux_arm.tar.gz
windows-64 http://xyzsetup.dlhis.com/frp_0.9.3_windows_amd64.zip
windows-32 http://xyzsetup.dlhis.com/frp_0.9.3_windows_386.zip
linux-64 http://xyzsetup.dlhis.com/frp_0.9.3_linux_amd64.tar.gz
frp-操作
根据自己的操作系统下载对应的包
还有更多版本 可以查看这里 Release
解压后 进入文件夹,可以看到这几个文件 (以下在Linux 64bit上操作举例)
- frps
- frps.ini
- frps-mini.ini
- frpc
- frpc.ini
- frpc-min.ini
其中无后缀的为可执行文件,ini为配置文件
服务端开启服务执行
./frps -c frps.ini
客户端开启服务执行
./frpc -c frpc.ini
frp-配置 & 说明
服务端ini配置参数说明
# 服务器组件连接配置# [common] is integral section[common]# A literal address or host name for IPv6 must be enclosed# in square brackets, as in "[::1]:80", "[ipv6-host]:http" or "[ipv6-host%zone]:80"# 允许的地址bind_addr = 0.0.0.0# 服务端供客户端连接的握手端口bind_port = 7000# if you want to support virtual host, you must set the http port for listening (optional)# 若是要对http服务支持,则必须配置该项目# vhost_http_port意为服务端对外开放的http协议的端口vhost_http_port = 80# vhost_https_port意为服务端对外开放的https协议的端口vhost_https_port = 443# 控制面板管理端口# if you want to configure or reload frps by dashboard, dashboard_port must be setdashboard_port = 7500# 控制面板用户名及口令# dashboard user and pwd for basic auth protect, if not set, both default value is admindashboard_user = admindashboard_pwd = admin# dashboard assets directory(only for debug mode)# assets_dir = ./static# console or real logFile path like ./frps.log# 日志文件路径log_file = ./frps.log# debug, info, warn, error# 日志级别log_level = info# 保留日志天数log_max_days = 3# if you enable privilege mode, frpc can create a proxy without pre-configure in frps when privilege_token is correct# 特权服务模式,无需对服务端配置文件变更,即可接收来自于客户端的配置增加及变更,令服务端接收其配置方案并生效(如新增一个http通道即可直接在客户端新增一个[web-someone]配置即可)privilege_mode = trueprivilege_token = 12345678# heartbeat configure, it's not recommended to modify the default value# the default value of heartbeat_timeout is 30# 心跳时间,默认30s# heartbeat_timeout = 30# 特权服务允许的端口范围# only allow frpc to bind ports you list, if you set nothing, there won't be any limitprivilege_allow_ports = 2000-3000,3001,3003,4000-60000# pool_count in each proxy will change to max_pool_count if they exceed the maximum value# 连接池通道数量max_pool_count = 100# authentication_timeout means the timeout interval (seconds) when the frpc connects frps# if authentication_timeout is zero, the time is not verified, default is 900s# 认证超时时间authentication_timeout = 900# if subdomain_host is not empty, you can set subdomain when type is http or https in frpc's configure file# when subdomain is test, the host used by routing is test.frps.com# 服务器绑定的域名,需要先在域名解析服务上配置# 这里建议使用泛域名符号 *# example: *.frps.comsubdomain_host = frps.com# 以下是各个子服务代理通道连接的服务端静态配置方案,[name] 改配置内可自定义其名称# ssh is the proxy name, client will use this name and auth_token to connect to server[ssh]type = tcpauth_token = 123bind_addr = 0.0.0.0listen_port = 6000[dns]type = udpauth_token = 123bind_addr = 0.0.0.0listen_port = 5353[web01]# if type equals http, vhost_http_port must be settype = httpauth_token = 123# if proxy type equals http, custom_domains must be set separated by commascustom_domains = web01.yourdomain.com,web01.yourdomain2.com[web02]# if type equals https, vhost_https_port must be settype = httpsauth_token = 123custom_domains = web02.yourdomain.com
客户端ini配置文件说明
# [common] is integral section# 连接至服务器的配置项[common]# A literal address or host name for IPv6 must be enclosed# in square brackets, as in "[::1]:80", "[ipv6-host]:http" or "[ipv6-host%zone]:80"# 服务器地址 可以是IP 也可以是domainserver_addr = 0.0.0.0# frp服务,服务连接端口server_port = 7000# if you want to connect frps by http proxy, you can set http_proxy here or in global environment variables# 通过代理的形式连接~好骚# http_proxy = http://user:pwd@192.168.1.128:8080# console or real logFile path like ./frpc.log# 客户端工作日志log_file = ./frpc.log# debug, info, warn, errorlog_level = infolog_max_days = 3# for authentication# 身份tokenauth_token = 123# 特权token# for privilege modeprivilege_token = 12345678# heartbeat configure, it's not recommended to modify the default value# the default value of heartbeat_interval is 10 and heartbeat_timeout is 30# 心跳,根据自己的需求也可以将心跳加快,当然服务端的负荷也会随之增加# heartbeat_interval = 10# heartbeat_timeout = 30# ssh is the proxy name same as server's configuration# 注意这里的项目名称[name],如果服务端是静态配置,客户端则需与之相符,否则就需要privilege_token,意为动态操作服务端配置[ssh]# tcp | http, default is tcptype = tcplocal_ip = 127.0.0.1local_port = 22# true or false, if true, messages between frps and frpc will be encrypted, default is false# 加密项,如果开启了该功能,则在服务端也要做对应的配置use_encryption = false# default is false# 压缩use_gzip = falseremote_port = 53001[dns]type = udplocal_ip = 114.114.114.114local_port = 53# Resolve your domain names to [server_addr] so you can use http://web01.yourdomain.com to browse web01 and http://web02.yourdomain.com to browse web02, the domains are set in frps.ini[web01]type = http# 客户端於local service需要穿透的内网IP(局域网IP)local_ip = 127.0.0.1# 需要穿透的local service端口local_port = 80# 压缩use_gzip = true# connections will be established in advance, default value is zero# 连接池数量pool_count = 20# http username and password are safety certification for http protocol# if not set, you can access this custom_domains without certification# http连接的用户名口令,个人认为并没有什么卵用http_user = adminhttp_pwd = admin# if domain for frps is frps.com, then you can access [web01] proxy by URL http://test.frps.com# 从域名subdomain = test[web02]type = httplocal_ip = 127.0.0.1local_port = 8000[privilege_ssh]# if privilege_mode is enabled, this proxy will be created automaticallyprivilege_mode = truetype = tcplocal_ip = 127.0.0.1local_port = 22use_encryption = trueuse_gzip = false# 注意该端口必须是外网服务已经开启了允许的范围值之端口remote_port = 6001[privilege_web]# 开启特权模式privilege_mode = truetype = httplocal_ip = 127.0.0.1local_port = 80use_gzip = true# 自定义域名custom_domains = web03.yourdomain.com# locations is only useful for http type# 连接仅限http service路径locations = /,/pic# 重写header 域名hosthost_header_rewrite = example.com# 从域名subdomain = dev
穿透服务进程化启动 run on daemon
import os, sys, timeclass bcolors:HEADER = '\033[95m'OKBLUE = '\033[94m'OKGREEN = '\033[92m'WARNING = '\033[93m'FAIL = '\033[91m'ENDC = '\033[0m'BOLD = '\033[1m'UNDERLINE = '\033[4m'def __init__(self):passdef fail(self,msg):print(self.FAIL+str(msg)+self.ENDC)def warn(self,params):print(self.WARNING+str(params)+self.ENDC)def info(self,msg):print(self.OKGREEN+str(msg) + self.ENDC)the_bcolors = bcolors()service_name = 'webdav_frpc'configfile = '/'+service_name+'.ini'class serviceStartDemo:def __init__(self):self.project_path = os.getcwd()self.service_name=service_nameself.user = self.project_path.replace('/home/','').split('/')[0]self.pid_file = self.project_path+'/'+ self.service_name + '.pid'# self.runCommond = self.project_path+'/frpc -- -c '+ self.project_path+'/panetrate-mana-frpc.ini'self.runCommond = self.project_path+'/frpc -- -c '+ self.project_path+configfiledef checkPidFile(self):return os.path.isfile(self.pid_file)def checkPortstatus(self):return self.getPid(self.service_port)def getPid(self,servciePort):#result = os.popen("lsof -i:"+str(servciePort)).readlines()#if (len(result) > 0):#resAry = result[1].split()#pidNum = resAry[1]#return pidNum#else:#return Nonewith open(self.pid_file, 'r') as f:servicePid = f.readline()return servicePiddef serverStart(self):if self.checkPidFile():the_bcolors.fail("pidfile is exist at "+str(self.pid_file)+" ,start failed!")return 0the_bcolors.info ("prepair to start "+self.service_name)os.chdir(self.project_path)fcmdStr="start-stop-daemon --start --quiet -b -v -m --pidfile=" + str(self.pid_file) + " --user " + str(self.user) + " -d "+self.project_path+" --exec " + str(self.runCommond) + " 2>/dev/null"os.system(fcmdStr)print(self.runCommond)checkCount = 0while checkCount < 10:if self.checkPidFile():the_bcolors.info("pidfile has been created!")breakelse:the_bcolors.warn ("pidfile still has not been created!")checkCount=checkCount+1time.sleep(6)if checkCount==10:the_bcolors.fail (self.service_name+" start failed")def serverStop(self):if self.checkPidFile():with open(self.pid_file, 'r') as f:servicePid = f.readline()if (servicePid is None) or (servicePid ==''):the_bcolors.info (self.service_name + " is already stoped!")else:os.system("kill -9 "+str(servicePid))the_bcolors.info (self.service_name + " is running with pid %s,prepro to kill it!"%(str(servicePid)))the_bcolors.info ("pidfile is exist at " + self.pid_file + " ,prepair to delete it!")os.system("rm -f " + self.pid_file)else:the_bcolors.warn ("pidfile is not exist!")return Truedef serverRestart(self):has_stop = self.serverStop()if(has_stop):self.serverStart()else:the_bcolors.fail("restart failed! plz try again")def serverStatus(self):runingStatus = 'false'if self.checkPidFile():pidfileStatus=self.pid_fileelse:pidfileStatus="not exists!"the_bcolors.info (""+self.service_name+" status:"+pidfileStatus)#the_bcolors.info (""+self.service_name+" status:")#the_bcolors.info ("running status: "+runingStatus)#the_bcolors.info ("running pid: "+ str(pid))#the_bcolors.info ("running pid file: "+pidfileStatus)pass;if __name__ == '__main__':try:operate = sys.argv[1]service = serviceStartDemo()if operate == "start":service.serverStart()elif operate == "stop":service.serverStop()elif operate == "restart":service.serverRestart()elif operate == "status":service.serverStatus()else:the_bcolors.fail ("param args only support start,stop,restart,status")except:the_bcolors.fail ("operate param must be required")
Ubuntu 16.04 以上的 systemd 脚本 使用 systemctl 进行服务维护操作
注意下列版本号为 0.21 版本,与上述不同
#系统服务文件路径sudo vim /etc/systemd/system/frpc.service
[Unit]Description=A frpc server#After=network.targetDescription=frpc daemonAfter=syslog.target network.targetWants=network.target[Service]Type=simple#注意这里的用户名,如果不存在,则先行创建User=nobodyPIDFile=/var/run/frpc.pid#ExecStartPre=/usr/sbin/nginx -t -q -g 'daemon on; master_process on;'ExecStart=/home/jyo/tools/frp_0.21.0_linux_amd64/frpc -c /home/jyo/tools/frp_0.21.0_linux_amd64/tcp-util.iniExecStop=/usr/bin/killall frpcTimeoutStopSec=5Restart=alwaysRestartSec=20KillMode=mixed[Install]WantedBy=multi-user.target
# 启动项目systemctl start frpc# 关闭项目systemctl stop frpc#将项目加入到系统字段启动systemctl enable frpc
技术文档
