@linux1s1s
2019-02-14T02:29:27.000000Z
字数 5203
阅读 3468
Android View 解析初步
AndroidView 2015-04
setContentView
Android遵循MVC框架,Android的项目中UI是通过XML开发的,业务逻辑通过Java实现,所以项目中才会有java目录用于存放业务逻辑代码,而res目录用于存放XML文件,而这部分XML是如何转换成UI的?这个问题比较大,这里仅仅简单说一下:先看一下我们熟知的 setContentView(...)
public class MainActivity extends ActionBarActivity{@Overridepublic void onActivityCreated(Bundle savedInstanceState){super.onActivityCreated(savedInstanceState);setContentView(R.layout.activity_main);}}
我们继续追踪下去:(注意此处的ActionBarActivity引用的是v7包)
public class ActionBarActivity extends FragmentActivity implements Callback, SupportParentable, DelegateProvider {ActionBarActivityDelegate mImpl;public ActionBarActivity() {}public void setContentView(int layoutResID) {this.mImpl.setContentView(layoutResID);}}
为了兼容API level 7以上即Android2.1 而设计的,很明显这里ActionBarActivityDelegate是个兼容代理类,进入到这个类里面看一下setContentView实现,发现是个抽象方法,那么找一下实现类即可,这里一共有两个实现类,我们列举一下:
ActionBarActivityDelegateICS 实现类
class ActionBarActivityDelegateICS extends ActionBarActivityDelegate {public void setContentView(int resId) {this.mActivity.superSetContentView(resId);}}
ActionBarActivityDelegateBase 实现类
class ActionBarActivityDelegateBase extends ActionBarActivityDelegate implements Callback, android.support.v7.internal.view.menu.MenuBuilder.Callback {public void setContentView(int resId) {this.ensureSubDecor();ViewGroup contentParent = (ViewGroup)this.mActivity.findViewById(16908290);contentParent.removeAllViews();this.mActivity.getLayoutInflater().inflate(resId, contentParent);this.mActivity.onSupportContentChanged();}}
可以发现上面这个类最终走向:inflate(...) 方法。
接着我们来继续追踪一下ActionBarActivityDelegateICS这类的实现
public class PhoneWindow extends Window implements MenuBuilder.Callback {@Overridepublic void setContentView(int layoutResID) {// Note: FEATURE_CONTENT_TRANSITIONS may be set in the process of installing the window// decor, when theme attributes and the like are crystalized. Do not check the feature// before this happens.if (mContentParent == null) {installDecor();} else if (!hasFeature(FEATURE_CONTENT_TRANSITIONS)) {mContentParent.removeAllViews();}if (hasFeature(FEATURE_CONTENT_TRANSITIONS)) {final Scene newScene = Scene.getSceneForLayout(mContentParent, layoutResID,getContext());transitionTo(newScene);} else {mLayoutInflater.inflate(layoutResID, mContentParent);}final Callback cb = getCallback();if (cb != null && !isDestroyed()) {cb.onContentChanged();}}}
代码比较长,我们重点关注一下Line 18 最终走到 inflate方法。
所以 这个 setContentView(...) 最终都是要调用 LayoutInflate.inflate()这个方法,接下来我们看看这个方法吧
inflate
public View inflate(XmlPullParser parser, ViewGroup root, boolean attachToRoot) {synchronized (mConstructorArgs) {Trace.traceBegin(Trace.TRACE_TAG_VIEW, "inflate");final AttributeSet attrs = Xml.asAttributeSet(parser);Context lastContext = (Context)mConstructorArgs[0];mConstructorArgs[0] = mContext;View result = root;try {// Look for the root node.int type;while ((type = parser.next()) != XmlPullParser.START_TAG &&type != XmlPullParser.END_DOCUMENT) {// Empty}if (type != XmlPullParser.START_TAG) {throw new InflateException(parser.getPositionDescription()+ ": No start tag found!");}final String name = parser.getName();if (DEBUG) {System.out.println("**************************");System.out.println("Creating root view: "+ name);System.out.println("**************************");}if (TAG_MERGE.equals(name)) {if (root == null || !attachToRoot) {throw new InflateException("<merge /> can be used only with a valid "+ "ViewGroup root and attachToRoot=true");}rInflate(parser, root, attrs, false, false);} else {// Temp is the root view that was found in the xmlfinal View temp = createViewFromTag(root, name, attrs, false);ViewGroup.LayoutParams params = null;if (root != null) {if (DEBUG) {System.out.println("Creating params from root: " +root);}// Create layout params that match root, if suppliedparams = root.generateLayoutParams(attrs);if (!attachToRoot) {// Set the layout params for temp if we are not// attaching. (If we are, we use addView, below)temp.setLayoutParams(params);}}if (DEBUG) {System.out.println("-----> start inflating children");}// Inflate all children under temprInflate(parser, temp, attrs, true, true);if (DEBUG) {System.out.println("-----> done inflating children");}// We are supposed to attach all the views we found (int temp)// to root. Do that now.if (root != null && attachToRoot) {root.addView(temp, params);}// Decide whether to return the root that was passed in or the// top view found in xml.if (root == null || !attachToRoot) {result = temp;}}} catch (XmlPullParserException e) {InflateException ex = new InflateException(e.getMessage());ex.initCause(e);throw ex;} catch (IOException e) {InflateException ex = new InflateException(parser.getPositionDescription()+ ": " + e.getMessage());ex.initCause(e);throw ex;} finally {// Don't retain static reference on context.mConstructorArgs[0] = lastContext;mConstructorArgs[1] = null;}Trace.traceEnd(Trace.TRACE_TAG_VIEW);return result;}}
从这里我们就可以清楚地看出,LayoutInflater 其实就是使用Android提供的pull解析方式来解析布局文件的。不熟悉pull解析方式的朋友可以网上搜一下,教程很多,我就不细讲了,这里我们注意看下第41行,调用了 createViewFromTag() 这个方法,并把节点名和参数传了进去。看到这个方法名,我们就应该能猜到,它是用于根据节点名来创建View对象的。确实如此,在 createViewFromTag() 方法的内部又会去调用 createView()方法,然后使用反射的方式创建出View的实例并返回。
当然上面只是创建了一个View,其他的View会通过第63行的 rInflate(parser, temp, attrs, true, true) 方法循环遍历这个根布局下的所有子View。
这里额外提高了setContentView(...)这个方法,多说一句:
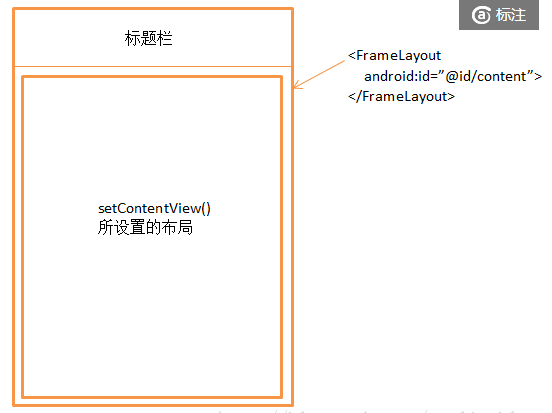
Android界面显示的原理要比我们所看到的东西复杂得多。任何一个Activity中显示的界面其实主要都由两部分组成,标题栏和内容布局。标题栏就是在很多界面顶部显示的那部分内容,比如刚刚我们的那个例子当中就有标题栏,可以在代码中控制让它是否显示。而内容布局就是一个FrameLayout,这个布局的id叫作content,我们调用setContentView()方法时所传入的布局其实就是放到这个FrameLayout中的,这也是为什么这个方法名叫作setContentView(),而不是叫setView()。来一张图大概说明一下:
接下来就是View的三部曲了:onMeasure()、onLayout()、onDraw()过程,然后才出现在屏幕上面。
