@linux1s1s
2019-02-21T07:20:16.000000Z
字数 8125
阅读 5164
Android View 分析(下)
AndroidView 2015-05
本文接着 Android View 分析(中)继续分析
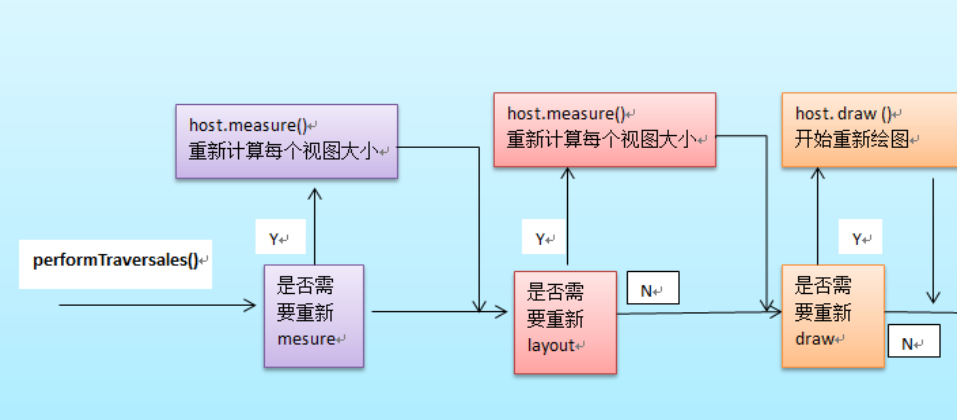
ViewRootImpl.performTraversals(...)
这个成员方法比较出名,也比较庞大,初看可能会迷失方向,所以我们先给出这个方法的执行路径图:
再看一下牛逼的源代码
private void performTraversals() {// cache mView since it is used so much below...//1 处理mAttachInfo的初始化,并根据resize、visibility改变的情况,给相应的变量赋值。final View host = mView;final View.AttachInfo attachInfo = mAttachInfo;final int viewVisibility = getHostVisibility();boolean viewVisibilityChanged = mViewVisibility != viewVisibility|| mNewSurfaceNeeded;float appScale = mAttachInfo.mApplicationScale;WindowManager.LayoutParams params = null;if (mWindowAttributesChanged) {mWindowAttributesChanged = false;surfaceChanged = true;params = lp;}Rect frame = mWinFrame;if (mFirst) {// For the very first time, tell the view hierarchy that it// is attached to the window. Note that at this point the surface// object is not initialized to its backing store, but soon it// will be (assuming the window is visible).attachInfo.mSurface = mSurface;attachInfo.mUse32BitDrawingCache = PixelFormat.formatHasAlpha(lp.format) ||lp.format == PixelFormat.RGBX_8888;attachInfo.mHasWindowFocus = false;attachInfo.mWindowVisibility = viewVisibility;......}//2 如果mLayoutRequested判断为true,那么说明需要重新layout,不过在此之前那必须重新measure。if (mLayoutRequested) {// Execute enqueued actions on every layout in case a view that was detached// enqueued an action after being detachedgetRunQueue().executeActions(attachInfo.mHandler);if (mFirst) {......}}//3 判断是否有子视图的属性发生变化,ViewRoot需要获取这些变化。if (attachInfo.mRecomputeGlobalAttributes) {......}if (mFirst || attachInfo.mViewVisibilityChanged) {......}//4 根据上面得到的变量数值,确定我们的view需要多大尺寸才能装下。于是就得measure了,有viewgroup的weight属性还得再做些处理// Ask host how big it wants to behost.measure(childWidthMeasureSpec, childHeightMeasureSpec);mLayoutRequested = true;}}//5 measure完毕,接下来可以layout了。final boolean didLayout = mLayoutRequested;boolean triggerGlobalLayoutListener = didLayout|| attachInfo.mRecomputeGlobalAttributes;if (didLayout) {host.layout(0, 0, host.mMeasuredWidth, host.mMeasuredHeight);}//6 如果mFirst为true,那么会进行view获取焦点的动作。if (mFirst) {mRealFocusedView = mView.findFocus();}boolean cancelDraw = attachInfo.mTreeObserver.dispatchOnPreDraw();//7 终于,来到最后一步,前面的工作可以说都是铺垫,都是为了draw而准备的。if (!cancelDraw && !newSurface) {mFullRedrawNeeded = false;draw(fullRedrawNeeded);}
上面代码片段主要功能包括了measure、layout、draw、这三个方法被称为View三部曲,接下来看看View著名三部曲
onMesure
为整个View树计算实际的大小,即设置实际的高(对应属性:mMeasuredHeight)和宽(对应属性:mMeasureWidth),每个View的控件的实际宽高都是由父视图和本身视图决定的,整个measure调用流程就是个树形的递归过程。
//回调View视图里的onMeasure过程private void onMeasure(int height , int width){//设置该view的实际宽(mMeasuredWidth)高(mMeasuredHeight)//1、该方法必须在onMeasure调用,否者报异常。setMeasuredDimension(h , l) ;//2、如果该View是ViewGroup类型,则对它的每个子View进行measure()过程int childCount = getChildCount() ;for(int i=0 ;i<childCount ;i++){//2.1、获得每个子View对象引用View child = getChildAt(i) ;//整个measure()过程就是个递归过程//该方法只是一个过滤器,最后会调用measure()过程 ;或者 measureChild(child , h, i)方法都measureChildWithMargins(child , h, i) ;//其实,对于我们自己写的应用来说,最好的办法是去掉框架里的该方法,直接调用view.measure(),如下://child.measure(h, l)}}//该方法具体实现在ViewGroup.java里 。protected void measureChildWithMargins(View v, int height , int width){v.measure(h,l)}
onLayout
为将整个根据子视图的大小以及布局参数将View树放到合适的位置上。
//回调View视图里的onLayout过程 ,该方法只由ViewGroup类型实现private void onLayout(int left , int top , right , bottom){//如果该View不是ViewGroup类型//调用setFrame()方法设置该控件的在父视图上的坐标轴setFrame(l ,t , r ,b) ;//--------------------------//如果该View是ViewGroup类型,则对它的每个子View进行layout()过程int childCount = getChildCount() ;for(int i=0 ;i<childCount ;i++){//2.1、获得每个子View对象引用View child = getChildAt(i) ;//整个layout()过程就是个递归过程child.layout(l, t, r, b) ;}}
onDraw
由ViewRoot对象的 performTraversals() 方法调用 draw() 方法发起绘制该View树,值得注意的是每次发起绘图时,并不会重新绘制每个View树的视图,而只会重新绘制那些“需要重绘”的视图,View类内部变量包含了一个标志位DRAWN,当该视图需要重绘时,就会为该View添加该标志位。
mView.draw() 开始绘制,draw() 方法实现的功能如下:
- 绘制该View的背景
- 为显示渐变框做一些准备操作(见5,大多数情况下,不需要改渐变框)
- 调用onDraw()方法绘制视图本身 (每个View都需要重载该方法,ViewGroup不需要实现该方法)
- 调用dispatchDraw ()方法绘制子视图(如果该View类型不为ViewGroup,即不包含子视图,不需要重载该方法)值得说明的是,ViewGroup类已经为我们重写了dispatchDraw ()的功能实现,应用程序一般不需要重写该方法,但可以重载父类函数实现具体的功能。
- dispatchDraw()方法内部会遍历每个子视图,调用drawChild()去重新回调每个子视图的draw()方法(注意,这个地方“需要重绘”的视图才会调用draw()方法)。值得说明的是,ViewGroup类已经为我们重写了dispatchDraw()的功能实现,应用程序一般不需要重写该方法,但可以重载父类函数实现具体的功能。
- 绘制滚动条
于是,整个调用链就这样递归下去了。
/ draw()过程 ViewRoot.java// 发起draw()的"发号者"在ViewRoot.java里的performTraversals()方法, 该方法会继续调用draw()方法开始绘图private void draw(){//...View mView ;mView.draw(canvas) ;//....}//回调View视图里的onLayout过程 ,该方法只由ViewGroup类型实现private void draw(Canvas canvas){//该方法会做如下事情//1 、绘制该View的背景//2、为绘制渐变框做一些准备操作//3、调用onDraw()方法绘制视图本身//4、调用dispatchDraw()方法绘制每个子视图,dispatchDraw()已经在Android框架中实现了,在ViewGroup方法中。// 应用程序程序一般不需要重写该方法,但可以捕获该方法的发生,做一些特别的事情。//5、绘制滚动条}//ViewGroup.java中的dispatchDraw()方法,应用程序一般不需要重写该方法@Overrideprotected void dispatchDraw(Canvas canvas) {////其实现方法类似如下:int childCount = getChildCount() ;for(int i=0 ;i<childCount ;i++){View child = getChildAt(i) ;//调用drawChild完成drawChild(child,canvas) ;}}//ViewGroup.java中的dispatchDraw()方法,应用程序一般不需要重写该方法protected void drawChild(View child,Canvas canvas) {// ....//简单的回调View对象的draw()方法,递归就这么产生了。child.draw(canvas) ;//.........}
关于绘制Drawable背景的进一步说明,可以参考博客 Android Drawable 分析
这里对于View的分析基本告一段落了,接下来我们小结一下比较重要的几个方法
- invalidate()
下面几种情况会触发invalidate()方法
- 直接调用invalidate()方法,有点废话啊,请求重新draw(),但只会绘制调用者本身
- setSelection()方法 :请求重新draw(),但只会绘制调用者本身。
- setVisibility()方法 : 当View可视状态在INVISIBLE转换VISIBLE时,会间接调用invalidate()方法,继而绘制该View。
- setEnabled()方法 : 请求重新draw(),但不会重新绘制任何视图包括该调用者本身。
以上四点,你可以直接跟踪代码,看看是不是最终要Call invalidate().
requestLayout()
只是对View树重新布局layout过程包括measure()和layout()过程,不会调用draw()过程,但不会重新绘制任何视图包括该调用者本身。
以下几种情况会触发requestLayout()方法- 直接调用requestLayout()方法,有点废话啊,重新布局layout过程包括measure()和layout()过程,不会调用draw()过程。
- setVisibility()方法,当View的可视状态在INVISIBLE/ VISIBLE 转换为GONE状态时,会间接调用requestLayout() 和invalidate方法。同时,由于整个个View树大小发生了变化,会请求measure()过程以及draw()过程,同样地,只绘制需要“重新绘制”的视图。
- requestFocus()
请求View树的draw()过程,但只绘制“需要重绘”的视图。
- setVisibility()方法,会调用measure、layout、draw方法,整个过程潇洒的走了一遍。
- setSelection()方法 & setEnabled()方法,都只会调用draw方法
补充
这里补充一下View分析中没有加以讨论的几个比较重要的类
Window
该类为抽象类,提供了一些窗口绘制的通用API接口,简单看一下
public abstract class Window {//...//指定Activity窗口的风格类型public static final int FEATURE_NO_TITLE = 1;public static final int FEATURE_INDETERMINATE_PROGRESS = 5;//设置布局文件public abstract void setContentView(int layoutResID);public abstract void setContentView(View view);//请求指定Activity窗口的风格类型public boolean requestFeature(int featureId) {final int flag = 1<<featureId;mFeatures |= flag;mLocalFeatures |= mContainer != null ? (flag&~mContainer.mFeatures) : flag;return (mFeatures&flag) != 0;}//...}
PhoneWindow
该类是Windows的子类,也是最基本的Windows实现类,需要重点关注的是该类持有DecorView实例,而DecorView是应用程序界面Activity的根View。
public class PhoneWindow extends Window implements MenuBuilder.Callback {//...// This is the top-level view of the window, containing the window decor.private DecorView mDecor; //该对象是所有应用窗口的根视图 , 是FrameLayout的子类//该对象是Activity布局文件的父视图,一般来说是一个FrameLayout型的ViewGroup// 同时也是DecorView对象的一个子视图// This is the view in which the window contents are placed. It is either// mDecor itself, or a child of mDecor where the contents go.private ViewGroup mContentParent;//设置标题@Overridepublic void setTitle(CharSequence title) {if (mTitleView != null) {mTitleView.setText(title);}mTitle = title;}//设置背景图片@Overridepublic final void setBackgroundDrawable(Drawable drawable) {if (drawable != mBackgroundDrawable || mBackgroundResource != 0) {mBackgroundResource = 0;mBackgroundDrawable = drawable;if (mDecor != null) {mDecor.setWindowBackground(drawable);}}}//...}
DecorView
该类是一个FrameLayout的子类,并且是PhoneWindow的子类,该类就是对普通的FrameLayout进行功能的扩展,更确切点可以说是修饰(Decor的英文全称是Decoration,即“修饰”的意思),比如说添加TitleBar(标题栏),以及TitleBar上的滚动条等 。最重要的一点是,它是所有应用窗口的根View 。
private final class DecorView extends FrameLayout {//...//触摸事件处理@Overridepublic boolean onTouchEvent(MotionEvent event) {return onInterceptTouchEvent(event);}//...}
小结
- Activity的顶层View是DecorView, 而我们在onCreate函数中通过setContentView设置的View只不过是这个DecorView的一部分罢了。DecorView是一个FrameLayout类型的ViewGroup。
- Activity包含一个Window(类型为PoneWindow)和一个WindowManager(类型为WindowManagerGlobal)对象。这两个对象将控制Activity的显示。
- LocalWindowManager使用了WindowManagerImpl作为最最终处理对象(设计模式中的代理模式),这个WindowManagerImpl中有一个ViewRootImpl对象。
- ViewRootImpl实现了ViewParent接口,它有2个重要的成员,一个是mView,它指向Activity的顶层UI单元的DecorView,另外一个是mSurface,这个mSurface包含了一个Canvas。除此之外,ViewRootImpl其中内部类还通过binder机制和WindowManagerService进行跨进程交互。
- ViewRootImpl其中内部类是一个Handler,可以处理Handler的消息,Activity的显示就是由ViewRoot在它的performTraversals函数中完成的。
- 整个Activity的绘图流程就是从mSurface中lock一块Canvas,然后交给mView(DecorView)去draw整个视图层次(包括mView的所有子view)。最后调用unlockCanvasAndPost释放这块Canvas,将绘制的内容渲染到屏幕。
本博文参考:http://blog.csdn.net/qinjuning/article/details/7110211,特此说明。
