@linux1s1s
2019-02-14T02:28:08.000000Z
字数 7394
阅读 3574
Android 进程间通信IPC_AIDL
AndroidProcess 2015-04
AIDL概念
AIDL (Android Interface Definition Language) 是一种IDL 语言,用于生成可以在Android设备上两个进程之间进行进程间通信(interprocess communication, IPC)的代码。如果在一个进程中(例如Activity)要调用另一个进程中(例如Service)对象的操作,就可以使用AIDL生成可序列化的参数。
AIDL IPC机制是面向接口的,像COM或Corba一样,但是更加轻量级。它是使用代理类在客户端和实现端传递数据。
上面概念性的东西比较浓重,简单的说就是通常两个App之间如何交互信息?这个就是IPC。
AIDL服务端App
新建 com.ryg.sayhi.aidl 包,然后在这个包下新建四个类
分别是:
- Student 需要传输对象类,实现Parcelable接口;
- Student aidl声明 这里声明了可以传输的Parcelable 对象类;
- IMyService aidl声明,这里声明了两个方法,分别是getStudent()和addStudent()方法;
- Service Service端逻辑类。
Student.java
注意,必须实现Parcelable接口,这是android sdk提供的更轻量级更方便的方法。
package com.ryg.sayhi.aidl;import java.util.Locale;import android.os.Parcel;import android.os.Parcelable;public final class Student implements Parcelable {public static final int SEX_MALE = 1;public static final int SEX_FEMALE = 2;public int sno;public String name;public int sex;public int age;public Student() {}public static final Parcelable.Creator<Student> CREATOR = newParcelable.Creator<Student>() {public Student createFromParcel(Parcel in) {return new Student(in);}public Student[] newArray(int size) {return new Student[size];}};private Student(Parcel in) {readFromParcel(in);}@Overridepublic int describeContents() {return 0;}@Overridepublic void writeToParcel(Parcel dest, int flags) {dest.writeInt(sno);dest.writeString(name);dest.writeInt(sex);dest.writeInt(age);}public void readFromParcel(Parcel in) {sno = in.readInt();name = in.readString();sex = in.readInt();age = in.readInt();}@Overridepublic String toString() {return String.format(Locale.ENGLISH, "Student[ %d, %s, %d, %d ]", sno, name, sex, age);}}
Student.aidl
package com.ryg.sayhi.aidl;parcelable Student;
这里parcelable是个类型,首字母是小写的,和Parcelable接口不是一个东西,要注意。
IMyService.aidl
package com.ryg.sayhi.aidl;import com.ryg.sayhi.aidl.Student;interface IMyService {List<Student> getStudent();void addStudent(in Student student);}
aidl中支持的参数类型为:基本类型(int,long,char,boolean等),String,CharSequence,List,Map,其他类型必须使用import导入,即使它们可能在同一个包里,比如上面的Student,尽管它和IMyService在同一个包中,但是还是需要显示的import进来。
另外,接口中的参数除了aidl支持的类型,其他类型必须标识其方向:到底是输入还是输出抑或两者兼之,用in,out或者inout来表示,上面的代码我们用in标记,因为它是输入型参数。
在gen下面可以看到,eclipse为我们自动生成了一个代理类
public static abstract class Stub extends android.os.Binder implements com.ryg.sayhi.aidl.IMyService
可见这个Stub类就是一个普通的Binder,只不过它实现了我们定义的aidl接口。它还有一个静态方法
public static com.ryg.sayhi.aidl.IMyService asInterface(android.os.IBinder obj)
这个方法很有用,通过它,我们就可以在客户端中得到IMyService的实例,进而通过实例来调用其方法。
Service
public class MyService extends Service{private final static String TAG = "MyService";private static final String PACKAGE_SAYHI = "com.example.test";private NotificationManager mNotificationManager;private boolean mCanRun = true;private List<Student> mStudents = new ArrayList<Student>();//这里实现了aidl中的抽象函数private final IMyService.Stub mBinder = new IMyService.Stub() {@Overridepublic List<Student> getStudent() throws RemoteException {synchronized (mStudents) {return mStudents;}}@Overridepublic void addStudent(Student student) throws RemoteException {synchronized (mStudents) {if (!mStudents.contains(student)) {mStudents.add(student);}}}//在这里可以做权限认证,return false意味着客户端的调用就会失败,比如下面,只允许包名为com.example.test的客户端通过,//其他apk将无法完成调用过程public boolean onTransact(int code, Parcel data, Parcel reply, int flags)throws RemoteException {String packageName = null;String[] packages = MyService.this.getPackageManager().getPackagesForUid(getCallingUid());if (packages != null && packages.length > 0) {packageName = packages[0];}Log.d(TAG, "onTransact: " + packageName);if (!PACKAGE_SAYHI.equals(packageName)) {return false;}return super.onTransact(code, data, reply, flags);}};@Overridepublic void onCreate(){Thread thr = new Thread(null, new ServiceWorker(), "BackgroundService");thr.start();synchronized (mStudents) {for (int i = 1; i < 6; i++) {Student student = new Student();student.name = "student#" + i;student.age = i * 5;mStudents.add(student);}}mNotificationManager = (NotificationManager) getSystemService(NOTIFICATION_SERVICE);super.onCreate();}@Overridepublic IBinder onBind(Intent intent){Log.d(TAG, String.format("on bind,intent = %s", intent.toString()));displayNotificationMessage("服务已启动");return mBinder;}@Overridepublic int onStartCommand(Intent intent, int flags, int startId){return super.onStartCommand(intent, flags, startId);}@Overridepublic void onDestroy(){mCanRun = false;super.onDestroy();}private void displayNotificationMessage(String message){Notification notification = new Notification(R.drawable.icon, message,System.currentTimeMillis());notification.flags = Notification.FLAG_AUTO_CANCEL;notification.defaults |= Notification.DEFAULT_ALL;PendingIntent contentIntent = PendingIntent.getActivity(this, 0,new Intent(this, MyActivity.class), 0);notification.setLatestEventInfo(this, "我的通知", message,contentIntent);mNotificationManager.notify(R.id.app_notification_id + 1, notification);}class ServiceWorker implements Runnable{long counter = 0;@Overridepublic void run(){// do background processing here.....while (mCanRun){Log.d("scott", "" + counter);counter++;try{Thread.sleep(2000);} catch (InterruptedException e){e.printStackTrace();}}}}}
为了表示service的确在活着,我通过打log的方式,每2s打印一次计数。上述代码的关键在于onBind函数,当客户端bind上来的时候,将IMyService.Stub mBinder返回给客户端,这个mBinder是aidl的存根,其实现了之前定义的aidl接口中的抽象函数。
另外有个地方需要注意:有可能你的service只想让某个特定的apk使用,而不是所有apk都能使用,这个时候,你需要重写Stub中的onTransact方法,根据调用者的uid来获得其信息,然后做权限认证,如果返回true,则调用成功,否则调用会失败
AIDL客户端App
新建一个客户端工程,将服务端工程中的com.ryg.sayhi.aidl包整个拷贝到客户端工程的src下,这个时候,客户端com.ryg.sayhi.aidl包是和服务端工程完全一样的。如果客户端工程中不采用服务端的包名,客户端将无法正常工作,比如你把客户端中com.ryg.sayhi.aidl改一下名字,你运行程序的时候将会crash,也就是说,客户端存放aidl文件的包必须和服务端一样。客户端bindService的代码就比较简单了,如下:
MainActivity
import com.ryg.sayhi.aidl.IMyService;import com.ryg.sayhi.aidl.Student;public class MainActivity extends Activity implements OnClickListener {private static final String ACTION_BIND_SERVICE = "com.ryg.sayhi.MyService";private IMyService mIMyService;private ServiceConnection mServiceConnection = new ServiceConnection(){@Overridepublic void onServiceDisconnected(ComponentName name){mIMyService = null;}@Overridepublic void onServiceConnected(ComponentName name, IBinder service){//通过服务端onBind方法返回的binder对象得到IMyService的实例,得到实例就可以调用它的方法了mIMyService = IMyService.Stub.asInterface(service);try {Student student = mIMyService.getStudent().get(0);showDialog(student.toString());} catch (RemoteException e) {e.printStackTrace();}}};@Overrideprotected void onCreate(Bundle savedInstanceState) {super.onCreate(savedInstanceState);setContentView(R.layout.activity_main);Button button1 = (Button) findViewById(R.id.button1);button1.setOnClickListener(new OnClickListener() {@Overridepublic void onClick(View view) {if (view.getId() == R.id.button1) {Intent intentService = new Intent(ACTION_BIND_SERVICE);intentService.setFlags(Intent.FLAG_ACTIVITY_NEW_TASK);MainActivity.this.bindService(intentService, mServiceConnection, BIND_AUTO_CREATE);}}public void showDialog(String message){new AlertDialog.Builder(MainActivity.this).setTitle("scott").setMessage(message).setPositiveButton("确定", null).show();}@Overrideprotected void onDestroy() {if (mIMyService != null) {unbindService(mServiceConnection);}super.onDestroy();}}
AndroidMenifest
<serviceandroid:name="com.ryg.sayhi.MyService"android:process=":remote"android:exported="true" ><intent-filter><category android:name="android.intent.category.DEFAULT" /><action android:name="com.ryg.sayhi.MyService" /></intent-filter></service>
上述的 是为了能让其他apk隐式bindService,通过隐式调用的方式来起activity或者service,需要把category设为default,这是因为,隐式调用的时候,intent中的category默认会被设置为default。
运行结果
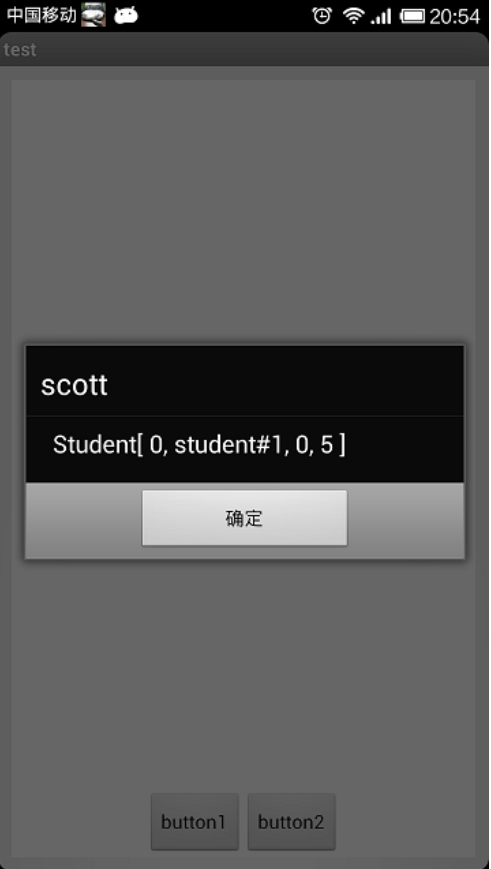
可以看到,当点击按钮1的时候,客户端bindService到服务端apk,并且调用服务端的接口mIMyService.getStudent()来获取学生列表,并且把返回列表中第一个学生的信息显示出来,这就是整个ipc过程,需要注意的是:学生列表是另一个apk中的数据,通过aidl,我们才得到的。另外,如果你在onTransact中返回false,将会发现,获取的学生列表是空的,这意味着方法调用失败了,也就是实现了权限认证。
本文转载和修改与博客:http://blog.csdn.net/singwhatiwanna/article/details/17041691
