@zhangsiming65965
2019-02-14T03:22:38.000000Z
字数 15308
阅读 277
Redis主从复制及Sentinel高可用哨兵
云计算
---Author:张思明 ZhangSiming
---Mail:1151004164@cnu.edu.cn
---QQ:1030728296
如果有梦想,就放开的去追;
因为只有奋斗,才能改变命运。
一、Redis主从复制
1.1实验环境
| 主机名 | IP | 用途 |
|---|---|---|
| Redis01 | 192.168.17.250 | Redis-Master |
| Redis02 | 192.168.17.251 | Redis-Slave1 |
| Redis03 | 192.168.17.252 | Redis-Slave2 |
[root@ZhangSiming ~]# cat /etc/redhat-releaseCentOS Linux release 7.5.1804 (Core)[root@ZhangSiming ~]# uname -r3.10.0-862.el7.x86_64[root@ZhangSiming ~]# systemctl stop firewalld[root@ZhangSiming ~]# systemctl disable firewalld[root@ZhangSiming ~]# getenforce 0Disabled
1.2利用ansible-playbook一键给redis集群部署redis服务
入口触发配置文件
[root@Zhangsiming zhangsiming]# cat redis.yaml---- hosts: Nginxremote_user: rootgather_facts: Trueroles:- redis
tasks主.yaml文件
[root@Zhangsiming zhangsiming]# cat roles/redis/tasks/main.yaml---- name: transfercopy: src=redis-4.0.11.tar.gz dest=/tmp/- name: installscript: redis.sh- name: configcopy: src=redis.conf dest=/usr/local/redis/conf/redis.conf- name: data dirfile: path=/data/redis/ state=directory owner=root group=root- name: youhuacopy: src=limits.conf dest=/etc/security/limits.conf- name: youhua1shell: echo "net.core.somaxconn = 10240" >> /etc/sysctl.conf- name: youhua2shell: echo "vm.overcommit_memory = 1" >> /etc/sysctl.conf- name: youhua3shell: echo 'echo never > /sys/kernel/mm/transparent_hugepage/enabled' >> /etc/rc.local ; echo 'echo never > /sys/kernel/mm/transparent_hugepage/defrag' >> /etc/rc.local ; echo never > /sys/kernel/mm/transparent_hugepage/enabled ; echo never > /sys/kernel/mm/transparent_hugepage/defrag
安装剧本tree
.├── redis.yaml└── roles└── redis├── files│ ├── limits.conf│ ├── redis-4.0.11.tar.gz│ ├── redis.conf│ └── redis.sh└── tasks└── main.yaml4 directories, 6 files
部署过程
[root@Zhangsiming zhangsiming]# ansible-playbook redis.yamlPLAY [Nginx] ***********************************************************************TASK [Gathering Facts] *************************************************************ok: [web01]ok: [web02]ok: [web03]TASK [redis : transfer] ************************************************************changed: [web02]changed: [web03]changed: [web01]TASK [redis : install] *************************************************************changed: [web02]changed: [web01]changed: [web03]TASK [redis : config] **************************************************************changed: [web03]changed: [web01]changed: [web02]TASK [redis : data dir] ************************************************************changed: [web02]changed: [web03]changed: [web01]TASK [redis : youhua] **************************************************************changed: [web01]changed: [web02]changed: [web03]TASK [redis : youhua1] *************************************************************changed: [web02]changed: [web03]changed: [web01]TASK [redis : youhua2] *************************************************************changed: [web01]changed: [web02]changed: [web03]TASK [redis : youhua3] *************************************************************changed: [web02]changed: [web03]changed: [web01]TASK [redis : youhua4] *************************************************************changed: [web01]changed: [web02]changed: [web03]TASK [redis : youhua5] *************************************************************changed: [web02]changed: [web03]changed: [web01]PLAY RECAP *************************************************************************web01 : ok=11 changed=10 unreachable=0 failed=0web02 : ok=11 changed=10 unreachable=0 failed=0web03 : ok=11 changed=10 unreachable=0 failed=0#成功部署
注意:由于sysctl -p ,exit等命令不能在剧本中执行,所以需要到每个节点手动执行
[root@ZhangSiming ~]# sysctl -pnet.core.somaxconn = 10240vm.overcommit_memory = 1[root@ZhangSiming ~]# exitlogout#执行完毕启动redis-server,查看日志文件[root@ZhangSiming ~]# redis-server /usr/local/redis/conf/redis.conf[root@ZhangSiming ~]# netstat -antup | grep redistcp 0 0 0.0.0.0:6379 0.0.0.0:* LISTEN 15888/redis-server[root@ZhangSiming ~]# cat /data/redis/redis.log15887:C 10 Feb 13:01:32.314 # oO0OoO0OoO0Oo Redis is starting oO0OoO0OoO0Oo15887:C 10 Feb 13:01:32.314 # Redis version=4.0.11, bits=64, commit=00000000, modified=0, pid=15887, just started15887:C 10 Feb 13:01:32.314 # Configuration loaded_.__.-``__ ''-.__.-`` `. `_. ''-._ Redis 4.0.11 (00000000/0) 64 bit.-`` .-```. ```\/ _.,_ ''-._( ' , .-` | `, ) Running in standalone mode|`-._`-...-` __...-.``-._|'` _.-'| Port: 6379| `-._ `._ / _.-' | PID: 15888`-._ `-._ `-./ _.-' _.-'|`-._`-._ `-.__.-' _.-'_.-'|| `-._`-._ _.-'_.-' | http://redis.io`-._ `-._`-.__.-'_.-' _.-'|`-._`-._ `-.__.-' _.-'_.-'|| `-._`-._ _.-'_.-' |`-._ `-._`-.__.-'_.-' _.-'`-._ `-.__.-' _.-'`-._ _.-'`-.__.-'15888:M 10 Feb 13:01:32.317 # Server initialized15888:M 10 Feb 13:01:32.318 * Ready to accept connections#启动成功,日志没有警告(已经优化完毕)
1.3开启主从同步
开启方法很简单,只需在从库指定主库的IP和端口即可。
[root@ZhangSiming ~]# tail -1 /usr/local/redis/conf/redis.confSLAVEOF 192.168.17.250 6379#指定完主库IP端口,重启Redis[root@ZhangSiming ~]# redis-cli shutdown[root@ZhangSiming ~]# redis-server /usr/local/redis/conf/redis.conf
交互界面开启主从复制(无需重启Redis)
[root@ZhangSiming ~]# redis-cli slaveof 192.168.17.134 6379OK#开启主从复制[root@ZhangSiming ~]# cat /data/redis/redis.log...省略...16103:S 10 Feb 14:57:40.045 * Full resync from master: 196da898afbb5c81683dcb7b8e6bc29a1dbcb570:106916103:S 10 Feb 14:57:40.045 * Discarding previously cached master state.16103:S 10 Feb 14:57:40.076 * MASTER <-> SLAVE sync: receiving 197 bytes from master16103:S 10 Feb 14:57:40.076 * MASTER <-> SLAVE sync: Flushing old data16103:S 10 Feb 14:57:40.077 * MASTER <-> SLAVE sync: Loading DB in memory16103:S 10 Feb 14:57:40.077 * MASTER <-> SLAVE sync: Finished with success#开启主从复制且为全部模式
如果从来没有同步过数据,会完整地把主库的所有数据同步过来,这种方式叫主从全部同步;
如果曾经同步过一些数据,就会有一些主库数据的缓存,就可以增量同步新增加的部分过来到从库,这种方式叫主从部分同步。
日志分析
[root@ZhangSiming ~]# cat /data/redis/redis.log...省略...16088:S 10 Feb 14:44:15.127 * Connecting to MASTER 192.168.17.250:637916088:S 10 Feb 14:44:15.127 * MASTER <-> SLAVE sync started16088:S 10 Feb 14:44:15.128 * Non blocking connect for SYNC fired the event.16088:S 10 Feb 14:44:15.128 * Master replied to PING, replication can continue...16088:S 10 Feb 14:44:15.129 * Partial resynchronization not possible (no cached master)16088:S 10 Feb 14:44:15.129 * Full resync from master: 196da898afbb5c81683dcb7b8e6bc29a1dbcb570:644...省略...#这种日志显示表示是一个主从全部同步,即从库没有缓存[root@ZhangSiming ~]# cat /data/redis/redis.log...省略...16103:S 10 Feb 14:45:13.859 * Trying a partial resynchronization (request 196da898afbb5c81683dcb7b8e6bc29a1dbcb570:776).16103:S 10 Feb 14:45:13.860 * Successful partial resynchronization with master.16103:S 10 Feb 14:45:13.860 * MASTER <-> SLAVE sync: Master accepted a Partial Resynchronization....省略...#这种日志显示表示是一个主从部分同步,即从库有缓存
1.4Redis主从同步的停止
关闭主从复制只需要交互界面输入:redis-cli slaveof no one。
[root@ZhangSiming ~]# redis-cli slaveof no oneOK#关闭主从复制[root@ZhangSiming ~]# cat /data/redis/redis.log...省略...16103:M 10 Feb 14:56:36.385 * MASTER MODE enabled (user request from 'id=4 addr=127.0.0.1:35242 fd=8 name= age=0 idle=0 flags=N db=0 sub=0 psub=0 multi=-1 qbuf=0 qbuf-free=32768 obl=0 oll=0 omem=0 events=r cmd=slaveof')#启动了主动模式
1.5给主从同步加密
MySQL主从复制从库找主库连接都需要验证账户,Redis同样可以设置。
1.5.1为Redis-master平滑设置链接密码
[root@ZhangSiming ~]# redis-cli config set requirepass 666666OK[root@ZhangSiming ~]# redis-cli -a 666666 config rewriteWarning: Using a password with '-a' option on the command line interface may not be safe.OK#设置密码为666666
1.5.2为从库提供主从同步密码验证
[root@ZhangSiming ~]# redis-cli config set masterauth "666666"OK[root@ZhangSiming ~]# redis-cli config rewriteOK#添加验证成功#看一下从库日志[root@ZhangSiming ~]# cat /data/redis/redis.log...省略...16028:S 10 Feb 15:07:33.540 # Error condition on socket for SYNC: No route to host16028:S 10 Feb 15:07:33.642 * Connecting to MASTER 192.168.17.250:637916028:S 10 Feb 15:07:33.642 * MASTER <-> SLAVE sync started16028:S 10 Feb 15:07:36.546 # Error condition on socket for SYNC: No route to host16028:S 10 Feb 15:07:36.660 * Connecting to MASTER 192.168.17.250:637916028:S 10 Feb 15:07:36.660 * MASTER <-> SLAVE sync started#之前因为没有auth验证找主库一直返回"No route to host",验证之后才开始主从同步
二、Redis-Sentinel高可用哨兵
2.1Redis-Sentinel高可用哨兵应用场景,及原理剖析
应用场景图
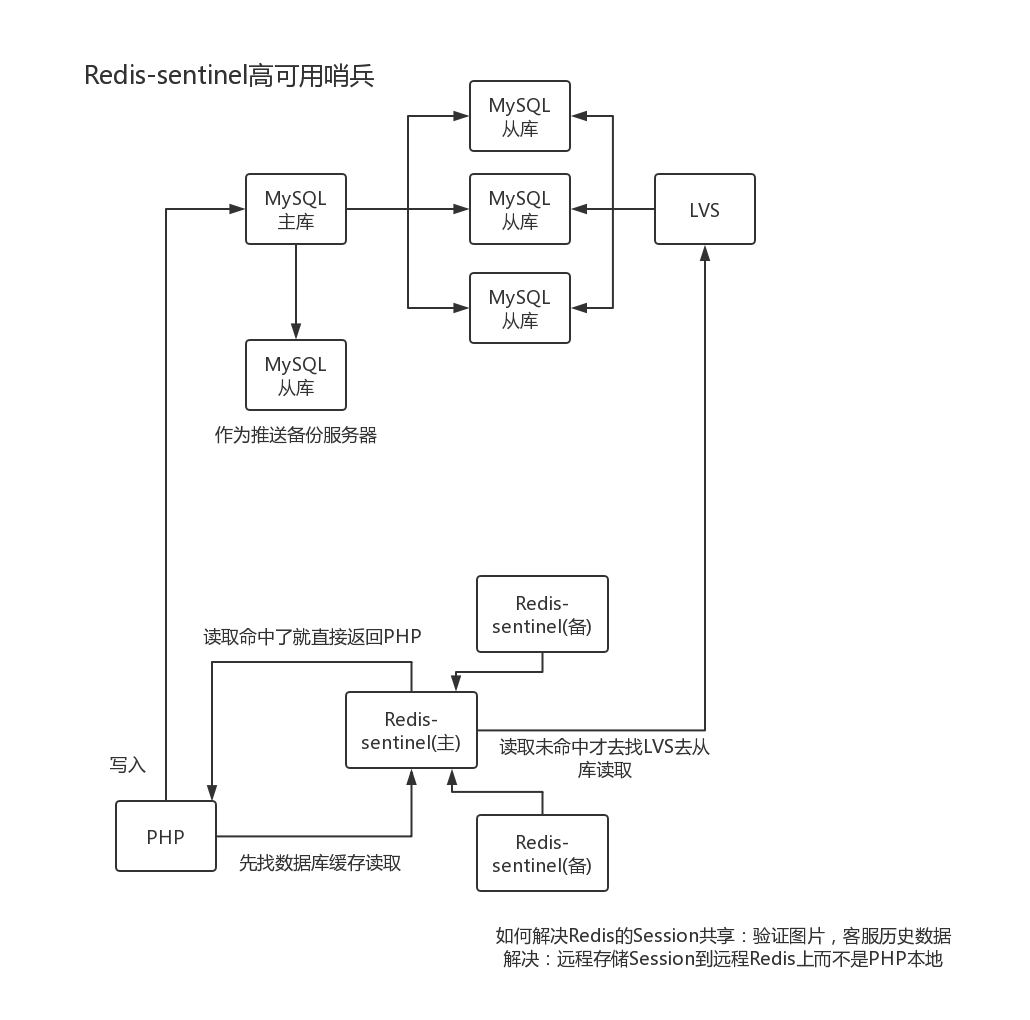
原理剖析
当系统中只有一台redis运行时,一旦该redis挂了,会导致整个系统无法运行;
于是我们架构Redis主从复制架构,进行数据备份,保证了安全性。
自动故障转移机制:
主从复制的Redis虽然有备份冗余,但是一旦主Redis宕机的话,就会使整个主从复制体系因为没有主Redis而崩溃;
Redis-Sentinel就是当主Redis挂了,让从Redis升级成为主Redis的一种高可用方案
Redis-Sentinel的主要功能
- 实时地监控redis是否按照预期良好地运行;
- 如果发现某个redis节点运行出现状况,能够通知另外一个进程(例如它的客户端);
- 能够进行自动切换。当一个master节点不可用时,能够选举出master的多个slave(如果有超过一个slave的话)中的一个来作为新的master,其他的slave节点会将它所追随的master的地址改为被提升为master的slave的新地址。
监控---->通知---->选举,自动切换
2.2部署三台Redis主从复制
#利用ansible-playbook一键部署[root@Zhangsiming zhangsiming]# ansible-playbook redis.yamlPLAY [Nginx] ***********************************************************************TASK [Gathering Facts] *************************************************************ok: [web01]ok: [web02]ok: [web03]TASK [redis : transfer] ************************************************************changed: [web02]changed: [web03]changed: [web01]TASK [redis : install] *************************************************************changed: [web02]changed: [web01]changed: [web03]TASK [redis : config] **************************************************************changed: [web03]changed: [web01]changed: [web02]TASK [redis : data dir] ************************************************************changed: [web02]changed: [web03]changed: [web01]TASK [redis : youhua] **************************************************************changed: [web01]changed: [web02]changed: [web03]TASK [redis : youhua1] *************************************************************changed: [web02]changed: [web03]changed: [web01]TASK [redis : youhua2] *************************************************************changed: [web01]changed: [web02]changed: [web03]TASK [redis : youhua3] *************************************************************changed: [web02]changed: [web03]changed: [web01]TASK [redis : youhua4] *************************************************************changed: [web01]changed: [web02]changed: [web03]TASK [redis : youhua5] *************************************************************changed: [web02]changed: [web03]changed: [web01]PLAY RECAP *************************************************************************web01 : ok=11 changed=10 unreachable=0 failed=0web02 : ok=11 changed=10 unreachable=0 failed=0web03 : ok=11 changed=10 unreachable=0 failed=0#成功部署
开启主从复制,查看主从复制状态
[root@ZhangSiming ~]# redis-cli slaveof 192.168.17.134 6379OK Already connected to specified master[root@ZhangSiming ~]# redis-cli config set masterauth "666666"OK[root@ZhangSiming ~]# redis-cli config rewriteOK#从库添加验证密码,开启主从复制#主库查看主从复制信息[root@ZhangSiming ~]# redis-cli -a 666666 info replicationWarning: Using a password with '-a' option on the command line interface may not be safe.# Replicationrole:master#自身是masterconnected_slaves:2#连接到两个从库slave0:ip=192.168.17.253,port=6379,state=online,offset=1895,lag=0slave1:ip=192.168.17.148,port=6379,state=online,offset=1895,lag=0#这两条是从库的IP端口master_replid:196da898afbb5c81683dcb7b8e6bc29a1dbcb570master_replid2:0000000000000000000000000000000000000000master_repl_offset:1895second_repl_offset:-1repl_backlog_active:1repl_backlog_size:1048576repl_backlog_first_byte_offset:1repl_backlog_histlen:1895
2.3redis主从辅助主库的高可用部署(redis-sentinel)
2.3.1修改配置三台Redis服务器的sentinel.conf配置文件(安装的时候从源码包拷贝到conf目录下的)
[root@ZhangSiming ~]# cd /usr/local/redis/conf/[root@ZhangSiming conf]# lsredis.conf sentinel.conf[root@ZhangSiming conf]# vim sentinel.conf[root@ZhangSiming conf]# sed -n "21p;69p;98p;106p;131p;206p;207p;208p;209p" sentinel.confport 6800#sentinel监听6800端口sentinel monitor mymaster 192.168.17.134 6379 2#监听主从复制master为192.168.17.134机器,6379端口,2表示同时两台sentinel发现问题就进行故障转移sentinel down-after-milliseconds mymaster 5000#master节点宕机多少时间后检查sentinel parallel-syncs mymaster 1#减轻master压力sentinel failover-timeout mymaster 15000#故障转移超时时间daemonize yes#守护进程模式logfile "/var/log/redis/sentinel.log"#Sentinel日志文件,记得提前创建/var/log/redis/目录pidfile "/var/run/sentinel.pid"#SentinelPID文件protected-mode no#禁止保护模式
尤其注意:每个sentinel的ID不能相同!
2.3.1启动三台的redis-sentinel服务
[root@ZhangSiming conf]# redis-sentinel /usr/local/redis/conf/sentinel.conf[root@ZhangSiming conf]# redis-cli -p 6800 info sentinel# Sentinelsentinel_masters:1sentinel_tilt:0sentinel_running_scripts:0sentinel_scripts_queue_length:0sentinel_simulate_failure_flags:0master0:name=mymaster,status=ok,address=192.168.17.134:6379,slaves=2,sentinels=3#master下有两个从库,三个哨兵监控master节点存活#注意,主从复制必须开
测试
[root@ZhangSiming conf]# redis-cli -p 6379 shutdown#停掉redis主从复制master节点[root@ZhangSiming conf]# cat /var/log/redis/sentinel.log23233:X 10 Feb 16:29:13.113 # +sdown master mymaster 192.168.17.134 637923233:X 10 Feb 16:29:13.187 # +new-epoch 123233:X 10 Feb 16:29:13.187 # +vote-for-leader c2f28b2bfbfdf33253e0731bdef987fcd0af077d 123233:X 10 Feb 16:29:13.980 # +config-update-from sentinel c2f28b2bfbfdf33253e0731bdef987fcd0af077d 192.168.17.253 6800 @ mymaster 192.168.17.134 637923233:X 10 Feb 16:29:13.980 # +switch-master mymaster 192.168.17.134 6379 192.168.17.148 6379#观察sentinel日志,发现自动转移master为192.168.17.14823233:X 10 Feb 16:29:13.981 * +slave slave 192.168.17.253:6379 192.168.17.253 6379 @ mymaster 192.168.17.148 637923233:X 10 Feb 16:29:13.981 * +slave slave 192.168.17.134:6379 192.168.17.134 6379 @ mymaster 192.168.17.148 6379[root@ZhangSiming conf]# redis-cli -p 6800 info sentinel# Sentinelsentinel_masters:1sentinel_tilt:0sentinel_running_scripts:0sentinel_scripts_queue_length:0sentinel_simulate_failure_flags:0master0:name=mymaster,status=ok,address=192.168.17.148:6379,slaves=2,sentinels=3#info sentinel中查看果然192.168.17.148变为了新的主从复制master,被继续监控[root@ZhangSiming conf]# redis-server /usr/local/redis/conf/redis.conf[root@ZhangSiming ~]# redis-cli -p 6379 shutdown#启动原来的主机,把新的master宕掉[root@ZhangSiming conf]# redis-cli -p 6800 info sentinel# Sentinelsentinel_masters:1sentinel_tilt:0sentinel_running_scripts:0sentinel_scripts_queue_length:0sentinel_simulate_failure_flags:0master0:name=mymaster,status=ok,address=192.168.17.134:6379,slaves=2,sentinels=3#Redis主从复制master又变回来了
2.3Redis-Sentinel的VIP机制
上述方式已经实现了Redis主从复制master节点的高可用,可以在master节点宕机的时候自动提升一个从节点为master主节点;
但是这总方法会改变开发连接的IP地址,事实上Redis虽然高可用了,但是IP地址来回变,这也是麻烦的;
所以可以写一个VIP漂移脚本,使得即使Redismaster宕机了,用户或者开发访问的VIP始终不变。
修改配置文件
[root@ZhangSiming conf]# tail -1 /usr/local/redis/conf/sentinel.confsentinel client-reconfig-script mymaster /usr/local/redis/mymaster.sh#指定漂移VIP脚本的路径[root@ZhangSiming conf]# cat /usr/local/redis/mymaster.sh#!/bin/bashMASTER_IP=$6#$6为Sentinel检测到需要切换master时候传入的参数,为新的masterIP地址LOCAL_IP="192.168.17.134"#服务器自身的IP,每个Sentinel服务器不同VIP="192.168.17.177"#自己设置的VIPNETMASK="24"INTERFACE="ens32"if [ "${MASTER_IP}" == "${LOCAL_IP}" ];then/usr/sbin/ip addr add ${VIP}/${NETMASK} dev ${INTERFACE}#上VIP/usr/sbin/arping -q -c 3 -A ${VIP} -I ${INTERFACE}#使网卡配置立即生效exit 0else/usr/sbin/ip addr del ${VIP}/${NETMASK} dev ${INTERFACE}#下VIPexit 0fiexit1
重启所有Redis-Sentinel,测试VIP漂移
[root@ZhangSiming conf]# redis-cli -p 6800 shutdown[root@ZhangSiming conf]# redis-sentinel /usr/local/redis/conf/sentinel.conf#重启Redis-Sentinel[root@ZhangSiming conf]# redis-cli -p 6800 info sentinel# Sentinelsentinel_masters:1sentinel_tilt:0sentinel_running_scripts:0sentinel_scripts_queue_length:0sentinel_simulate_failure_flags:0master0:name=mymaster,status=ok,address=192.168.17.134:6379,slaves=2,sentinels=3#查看info sentinel[root@ZhangSiming conf]# ip addr add 192.168.17.177/24 dev ens32[root@ZhangSiming conf]# arping -q -c 3 -A 192.168.17.177 -I ens32#第一次先在master上添加VIP,并立即生效[root@ZhangSiming conf]# ip addr show ens32 | grep 192.168.17inet 192.168.17.134/24 brd 192.168.17.255 scope global noprefixroute dynamic ens32inet 192.168.17.177/24 scope global secondary ens32#停止Redis-server的服务[root@ZhangSiming ~]# redis-cli -p 6379 shutdown[root@ZhangSiming ~]# redis-cli -p 6800 info sentinel# Sentinelsentinel_masters:1sentinel_tilt:0sentinel_running_scripts:0sentinel_scripts_queue_length:0sentinel_simulate_failure_flags:0master0:name=mymaster,status=ok,address=192.168.17.253:6379,slaves=2,sentinels=3[root@ZhangSiming ~]# ip addr show ens32 | grep 192.168inet 192.168.17.134/24 brd 192.168.17.255 scope global noprefixroute dynamic ens32#master切换为192.168.17.253,VIP也在这里消失了#切换为192.168.17.253查看[root@ZhangSiming ~]# ip addr show ens32 | grep 192.168inet 192.168.17.253/24 brd 192.168.17.255 scope global noprefixroute dynamic ens32inet 192.168.17.177/24 scope global secondary ens32#出现VIP,VIP漂移成功
最后的最后,一定要注意每个Sentinel哨兵的ID不能相同,否则info Sentinel检测不出来,也不能实现Redis高可用故障转移!!!
