@zhangsiming65965
2019-02-23T12:54:04.000000Z
字数 22592
阅读 269
基于GTID的MySQL主从复制及MySQL-MHA高可用方案实践
云计算
---Author:张思明 ZhangSiming
---Mail:1151004164@cnu.edu.cn
---QQ:1030728296
如果有梦想,就放开的去追;
因为只有奋斗,才能改变命运;
一,MySQL-MHA环境准备
1.1实验环境
| 主机名 | IP地址 | 描述 |
|---|---|---|
| MHA1 | 192.168.17.109 | CentOS6.5,MySQL5.6 |
| MHA2 | 192.168.17.110 | CentOS6.5,MySQL5.6 |
| MHA3 | 192.168.17.111 | CentOS6.5,MySQL5.6 |
1.2主机名映射
[root@MHA1 ~]# vim /etc/hosts[root@MHA1 ~]# cat /etc/hosts127.0.0.1 localhost localhost.localdomain localhost4 localhost4.localdomain4::1 localhost localhost.localdomain localhost6 localhost6.localdomain6192.168.17.109 MHA1192.168.17.110 MHA2192.168.17.111 MHA3
1.3关闭selinux和iptables
[root@MHA1 ~]# cat /etc/redhat-releaseCentOS release 6.5 (Final)[root@MHA1 ~]# uname -r2.6.32-431.el6.x86_64[root@MHA1 ~]# service iptables stop[root@MHA1 ~]# chkconfig iptables off[root@MHA1 ~]# vim /etc/sysconfig/selinux[root@MHA1 ~]# getenforce 0Disabled
二、MHA介绍
2.1MHA软件简介
MHA(Master High Availability)目前在MySQL高可用方面是一个相对成熟的解决方案,是一套优秀的作为MySQL高可用性环境下故障切换和主从提升的高可用软件;
在MySQL故障切换过程中,MHA能做到0~30秒之内自动完成数据库的故障切换操作,并且在进行故障切换过程中,MHA能最大程度上保证数据库的一致性,以达到真正意义上的高可用;
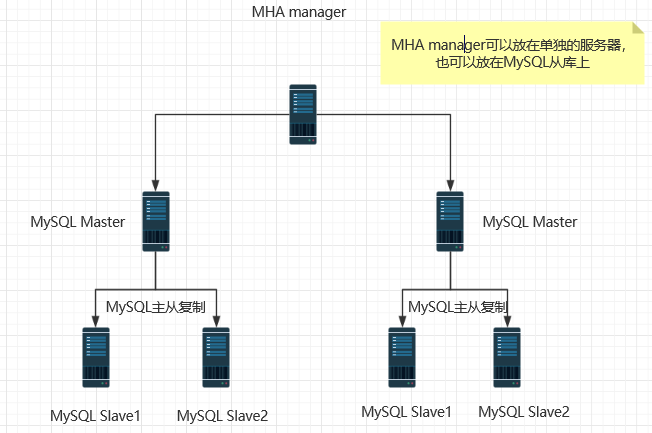
MHA由两部分组成:MHA Manager(管理节点)和MHA Node(数据节点)。MHA Manager可以独立部署在一台独立的机器上管理多个Master-Slave集群,也可以部署在一台Slave上。当Master出现故障时,它可以自动将最新数据的Slave提升为新的Master,然后将所有其他的Slave重新指向新的Master。整个故障转移过程对应程序是完全透明的。
2.2工作流程
- 从宕机崩溃的master保存二进制日志事件(binlog events);
- 识别含有最新更新的slave;
- 应用差异的中继日志(relay log)到其他的slave;
- 应用从master保存的二进制日志事件(binlog events);
- 提升一个slave为新的master;
- 使其他的slave连接新的master进行复制;
2.3MHA架构图
三、MySQL主从复制环境准备
3.1利用ansible一键部署三台MySQL5.6
[root@Zhangsiming ~]# vim /etc/ansible/hosts[root@Zhangsiming ~]# cat /etc/ansible/hosts[Nginx]web01 ansible_ssh_host=192.168.17.109 ansible_ssh_port=22 ansible_ssh_user=root ansible_ssh_pass=666666web02 ansible_ssh_host=192.168.17.110 ansible_ssh_port=22 ansible_ssh_user=root ansible_ssh_pass=666666web03 ansible_ssh_host=192.168.17.111 ansible_ssh_port=22 ansible_ssh_user=root ansible_ssh_pass=666666#ansible添加Nginx主机组,包括三台MHA节点[root@Zhangsiming ~]# cat mysql.sh#!/bin/bash#designed by ZhangSimingid mysqlif [ $? -ne 0 ];thenuseradd -M -s /sbin/nologin mysqlfiyum -y install ncurses-develyum -y install libaiocd ~tar xf mysql-5.6.17-linux-glibc2.5-x86_64.tar.gz -C /usr/localln -s /usr/local/mysql-5.6.17-linux-glibc2.5-x86_64 /usr/local/mysql/bin/cp /usr/local/mysql/support-files/my-default.cnf /etc/my.cnf/bin/cp /usr/local/mysql/support-files/mysql.server /etc/init.d/mysqldchmod a+x /etc/init.d/mysqldchkconfig --add mysqldchkconfig mysqld onln -s /usr/local/mysql/bin/* /usr/local/bin/usr/local/mysql/scripts/mysql_install_db --user=mysql --basedir=/usr/local/mysql --datadir=/usr/local/mysql/data//etc/init.d/mysqld startsleep 5mysqladmin -uroot password "666666"chown -R mysql.mysql /usr/local/mysql#MySQL安装脚本
ansible执行脚本
[root@Zhangsiming ~]# ansible Nginx -m script -a "/root/mysql.sh"#测试结果[root@MHA1 ~]# netstat -antup | grep mysqltcp 0 0 :::3306 :::* LISTEN 1332/mysqld[root@MHA1 ~]# mysql -uroot -p666666 -e "show databases;"Warning: Using a password on the command line interface can be insecure.+--------------------+| Database |+--------------------+| information_schema || mysql || performance_schema || test |+--------------------+#脚本一键部署成功
3.2部署基于GTID的主从复制
3.2.1什么是GTID?
GTID(Global Transaction)全局事务标识符:是一个唯一的标识符,它创建并与源服务器(主)上提交的每个事务相关联。此标识符不仅对其发起的服务器是唯一的,而且在给定复制设置中的所有服务器上都是唯一的。所有交易和所有GTID之间都有1对1的映射。
GTID实际上是由UUID+TID组成的。其中UUID是一个MySQL实例的唯一标识。TID代表了该实例上已经提交的事务数量,并且随着事务提交单调递增。
3.2.2基于GTID的主从复制与传统主从复制的对比
| 对比 | 基于GTID的主从复制 | 传统主从复制 |
|---|---|---|
| 基于什么复制 | GTID | 二进制日志的POS |
| slave端是否需要开启binlog日志 | 需要 | 不需要 |
3.2.3基于GTID的主从复制工作原理
1.当一个事务在主库端执行并提交时,产生GTID,一同记录到主库binlog日志中;
2.binlog传输到slave,并存储到slave的relaylog后,读取这个GTID的这个值设置gtid_next变量,即告诉Slave,下一个要执行的GTID值;
3.sql线程从relay log中获取GTID,然后对比slave端的binlog是否有该GTID;
4.如果有记录,说明该GTID的事务已经执行,slave会忽略;
5.如果没有记录,slave就会执行该GTID事务,并记录该GTID到自身的binlog,
在读取执行事务前会先检查其他session持有该GTID,确保不被重复执行;
6.在解析过程中会判断是否有主键,如果没有就用二级索引,如果没有就用全部扫描。
3.2.3MySQL5.6版本新特性
- 支持多线程复制:事实上是针对每个database开启相应的独立线程,即每个库有一个单独的(sql thread);从库支持多SQL线程;
- 支持启用GTID,在配置主从复制,传统的方式里,你需要找到binlog和POS点,然后change master to 指向。在mysql5.6里,无须再知道binlog和POS点,只需要知道master的IP/端口/账号密码即可,因为同步复制是自动的,MySQL通过内部机制GTID自动找点同步。
- 基于Row复制只保存改变的列,大大节省磁盘空间,网络,内存等
- 支持把Master和Slave的相关信息记录在Table中;原来是记录在文件里,现在则记录在表里,增强可用性
- 支持延迟复制
3.2.4修改MySQL主库配置文件
[root@MHA1 ~]# cat /etc/my.cnf[client]socket = /usr/local/mysql/data/mysql.sock#MySQL连接实例[mysqld]gtid_mode = ONlog_slave_updatesenforce_gtid_consistency#上三句话开启GTID功能,MySQL5.6才有的新功能lower_case_table_names = 1default-storage-engine = InnoDB#InnoDB存储引擎port = 3306#3306端口datadir = /usr/local/mysql/data#数据目录character-set-server = utf8#支持中文socket = /usr/local/mysql/data/mysql.socklog_bin = mysql-bin #开启binlog日志binlog_format = row#强烈建议二进制日志用row格式,虽然占用空间大,但是严谨,不会产生数据错误server_id = 1 #设置server_idinnodb_buffer_pool_size = 200Mslave-parallel-workers = 8thread_cache_size = 600back_log = 600slave_net_timeout = 60max_binlog_size = 512Mkey_buffer_size = 8Mquery_cache_size = 64Mjoin_buffer_size = 2Msort_buffer_size = 2Mquery_cache_type = 1thread_stack = 192K#一些优化配置
3.2.4修改MySQL从库配置文件
[root@MHA3 ~]# cat /etc/my.cnf[client]socket = /usr/local/mysql/data/mysql.sock[mysqld]gtid_mode = ONlog_slave_updatesenforce_gtid_consistencylower_case_table_names = 1default-storage-engine = InnoDBport = 3306datadir = /usr/local/mysql/datacharacter-set-server = utf8socket = /usr/local/mysql/data/mysql.socklog_bin = mysql-bin#从库也必须开启binlog日志,目的是记录同步过的GTIDbinlog_format = row#强烈建议二进制日志用row格式,虽然占用空间大,但是严谨,不会产生数据错误relay-log = /usr/local/mysql/data/relay-bin#从库开启relay-logrelay_log_purge = 0#因为从库SQL线程需要从relay-log获取GTID和自身二进制文件GTID对比,所以做好关闭自动清除relay-log的功能server_id = 10 #设置不同的server_idinnodb_buffer_pool_size = 200Mslave-parallel-workers = 8thread_cache_size = 600back_log = 600slave_net_timeout = 60max_binlog_size = 512Mkey_buffer_size = 8Mquery_cache_size = 64Mjoin_buffer_size = 2Msort_buffer_size = 2Mquery_cache_type = 1thread_stack = 192Kread-only = 1#从库设置只读
两个从库和主库配置文件完全一致,需要打开二进制日志功能,GTID功能,只是三者的server ID需要两两不同,这里我设置的主为1,从为5和10。
特别提示:
在以往如果是基于binlog日志的主从复制,则必须要记住主库的master状态信息。
但是在MySQL5.6版本里多了一个Gtid的功能,可以自动记录主从复制位置点的信息,并在日志中输出出来。
3.2.5配置并开启基于GTID的MySQL一主二从的主从复制架构
STEP1:启动MySQL主库服务,添加主从复制账号
[root@MHA1 ~]# /etc/init.d/mysqld restartStarting MySQL. SUCCESS![root@MHA1 ~]# mysql -uroot -p666666 -e "grant replication slave on *.* to rep@'192.168.17.%' identified by '666666';"Warning: Using a password on the command line interface can be insecure.[root@MHA1 ~]# mysql -uroot -p666666 -e "show grants for rep@'192.168.17.%';"Warning: Using a password on the command line interface can be insecure.+---------------------------------------------------------------------------------------------------------------------------+| Grants for rep@192.168.17.% |+---------------------------------------------------------------------------------------------------------------------------+| GRANT REPLICATION SLAVE ON *.* TO 'rep'@'192.168.17.%' IDENTIFIED BY PASSWORD '*B2B366CA5C4697F31D4C55D61F0B17E70E5664EC' |+---------------------------------------------------------------------------------------------------------------------------+#创建成功
STEP2:启动MySQL从库服务,查看主库和从库GTID状态
#确定主库从库都开启了GTID,查看GTID状态#主库[root@MHA1 ~]# mysql -uroot -p666666 -e "show global variables like '%gtid%';"Warning: Using a password on the command line interface can be insecure.+--------------------------+----------------------------------------+| Variable_name | Value |+--------------------------+----------------------------------------+| enforce_gtid_consistency | ON || gtid_executed | d21eed35-2eeb-11e9-94d2-000c2987f310:1 || gtid_mode | ON || gtid_owned | || gtid_purged | |+--------------------------+----------------------------------------+#从库[root@MHA2 ~]# /etc/init.d/mysqld startStarting MySQL SUCCESS![root@MHA2 ~]# mysql -uroot -p666666 -e "show global variables like '%gtid%';"Warning: Using a password on the command line interface can be insecure.+--------------------------+-------+| Variable_name | Value |+--------------------------+-------+| enforce_gtid_consistency | ON || gtid_executed | || gtid_mode | ON || gtid_owned | || gtid_purged | |+--------------------------+-------+
STEP3:在从库配置基于GTID的主从复制
[root@MHA2 ~]# mysql -uroot -p666666 -e "change master to master_host='192.168.17.109',master_user='rep',master_password='666666',master_auto_position=1;"#master_auto_position=1代表开启GTID自动追踪主从复制需要同步的positionWarning: Using a password on the command line interface can be insecure.[root@MHA2 ~]# mysql -uroot -p666666 -e "start slave;"Warning: Using a password on the command line interface can be insecure.#两个从库都这样配置,并开启主从复制
STEP4:查看主从复制状态
[root@MHA3 ~]# mysql -uroot -p666666 -e "show slave status\G" | egrep "Slave_IO_Running|Slave_SQL_Running|Seconds_Behind_Master"Warning: Using a password on the command line interface can be insecure.Slave_IO_Running: YesSlave_SQL_Running: YesSeconds_Behind_Master: 0#从库IO线程、SQL线程工作正常,主从复制延迟为0
四、部署MHA高可用
4.1部署MHA环境(所有节点)
[root@MHA1 ~]# yum -y install perl-DBD-MySQL#安装依赖包[root@MHA1 ~]# rpm -ivh mha4mysql-node-0.56-0.el6.noarch.rpm#安装MHA节点rpm包Preparing... ########################################### [100%]1:mha4mysql-node ########################################### [100%][root@MHA1 ~]# mysql -uroot -p666666 -e "grant all privileges on *.* to mha@'192.168.17.%' identified by '666666';"Warning: Using a password on the command line interface can be insecure.#因为开启主从复制,主库创建的账号自动同步到从库
4.2部署MHA管理节点
#MHA管理节点可以是独立的,也可以在MySQL主从架构的从库上,这里部署在MHA3上#使用epel源安装依赖包[root@MHA3 ~]# wget -O /etc/yum.repos.d/CentOS-Base.repo http://mirrors.aliyun.com/repo/Centos-6.repo[root@MHA3 ~]# yum -y install perl-Config-Tiny epel-release perl-Log-Dispatch perl-Parallel-ForkManager perl-Time-HiRes#自定义MHA管理rpm包的yum依赖源,之后用localinstall方式安装MHA管理rpm包[root@MHA3 ~]# ls /rpmAtlas-2.2.1.el6.x86_64.rpmepel-release-6-8.noarch.rpmmha4mysql-manager-0.56-0.el6.noarch.rpmmha4mysql-node-0.56-0.el6.noarch.rpmperl-5.10.1-144.el6.x86_64.rpmperl-Config-Tiny-2.12-7.1.el6.noarch.rpmperl-Email-Date-Format-1.002-5.el6.noarch.rpmperl-libs-5.10.1-144.el6.x86_64.rpmperl-Log-Dispatch-2.27-1.el6.noarch.rpmperl-Mail-Sender-0.8.16-3.el6.noarch.rpmperl-Mail-Sendmail-0.79-12.el6.noarch.rpmperl-MailTools-2.04-4.el6.noarch.rpmperl-MIME-Lite-3.027-2.el6.noarch.rpmperl-MIME-Types-1.28-2.el6.noarch.rpmperl-Module-Pluggable-3.90-144.el6.x86_64.rpmperl-Parallel-ForkManager-0.7.9-1.el6.noarch.rpmperl-Params-Validate-0.92-3.el6.x86_64.rpmperl-Pod-Escapes-1.04-144.el6.x86_64.rpmperl-Pod-Simple-3.13-144.el6.x86_64.rpmperl-TimeDate-1.16-13.el6.noarch.rpmperl-Time-HiRes-1.9721-144.el6.x86_64.rpmperl-version-0.77-144.el6.x86_64.rpmrepodata[root@MHA3 ~]# cat /etc/yum.repos.d/CentOS-Media.repo[c6-media]name=CentOS-$releasever - Mediabaseurl=file:///media/CentOS/file:///media/cdrom/file:///rpm自定义/rpm的yum源gpgcheck=1enabled=1gpgkey=file:///etc/pki/rpm-gpg/RPM-GPG-KEY-CentOS-6[root@MHA3 ~]# yum -y localinstall mha4mysql-manager-0.56-0.el6.noarch.rpm
4.3编辑MHA配置文件
[root@MHA3 ~]# mkdir -p /etc/mha#创建MHA的文件目录[root@MHA3 ~]# mkdir -p /var/log/mha/mha1#创建MHA的日志目录[root@MHA3 ~]# vim /etc/mha/mha1.cnf[root@MHA3 ~]# cat /etc/mha/mha1.cnf[server default]manager_log=/var/log/mha/mha1/manager#MHA管理日志的位置manager_workdir=/var/log/mha/mha1#MHA管理日志的目录路径master_binlog_dir=/usr/local/mysql/data#MySQL二进制文件位置user=mhapassword=666666#MHA用户密码ping_interval=2#健康检测监控时间repl_user=reprepl_password=666666#MySQL主从复制用户密码ssh_user=root#ssh连接主机用户#下面是三个主从复制架构节点[server1]hostname=192.168.17.109port=3306[server2]hostname=192.168.17.110port=3306candidate_master=1#候选MySQL主check_repl_delay=0#忽略延迟,MHA默认不会选择主从复制延迟大的从提升为主,这两句一般情况下一起用[server3]hostname=192.168.17.111port=3306
4.4MySQL三个主从复制节点配置ssh信任
#注意一定是两两配置信任(自己也需要)[root@MHA1 ~]# ssh-keygen -t dsa -P "" -f ~/.ssh/id_dsa[root@MHA1 ~]# ssh-copy-id -i /root/.ssh/id_dsa.pub root@192.168.17.109[root@MHA1 ~]# ssh-copy-id -i /root/.ssh/id_dsa.pub root@192.168.17.110[root@MHA1 ~]# ssh-copy-id -i /root/.ssh/id_dsa.pub root@192.168.17.111#在三台服务器都运行一遍!
4.5MHA启动前测试
4.5.1ssh健康检查
[root@MHA3 ~]# masterha_check_ssh --conf=/etc/mha/mha1.cnfThu Feb 14 04:04:26 2019 - [warning] Global configuration file /etc/masterha_default.cnf not found. Skipping.Thu Feb 14 04:04:26 2019 - [info] Reading application default configuration from /etc/mha/mha1.cnf..Thu Feb 14 04:04:26 2019 - [info] Reading server configuration from /etc/mha/mha1.cnf..Thu Feb 14 04:04:26 2019 - [info] Starting SSH connection tests..Thu Feb 14 04:04:27 2019 - [debug]Thu Feb 14 04:04:26 2019 - [debug] Connecting via SSH from root@192.168.17.109(192.168.17.109:22) to root@192.168.17.110(192.168.17.110:22)..Thu Feb 14 04:04:26 2019 - [debug] ok.Thu Feb 14 04:04:26 2019 - [debug] Connecting via SSH from root@192.168.17.109(192.168.17.109:22) to root@192.168.17.111(192.168.17.111:22)..Thu Feb 14 04:04:27 2019 - [debug] ok.Thu Feb 14 04:04:28 2019 - [debug]Thu Feb 14 04:04:26 2019 - [debug] Connecting via SSH from root@192.168.17.110(192.168.17.110:22) to root@192.168.17.109(192.168.17.109:22)..Thu Feb 14 04:04:27 2019 - [debug] ok.Thu Feb 14 04:04:27 2019 - [debug] Connecting via SSH from root@192.168.17.110(192.168.17.110:22) to root@192.168.17.111(192.168.17.111:22)..Thu Feb 14 04:04:28 2019 - [debug] ok.Thu Feb 14 04:04:28 2019 - [debug]Thu Feb 14 04:04:27 2019 - [debug] Connecting via SSH from root@192.168.17.111(192.168.17.111:22) to root@192.168.17.109(192.168.17.109:22)..Thu Feb 14 04:04:27 2019 - [debug] ok.Thu Feb 14 04:04:27 2019 - [debug] Connecting via SSH from root@192.168.17.111(192.168.17.111:22) to root@192.168.17.110(192.168.17.110:22)..Thu Feb 14 04:04:28 2019 - [debug] ok.Thu Feb 14 04:04:28 2019 - [info] All SSH connection tests passed successfully.#三台MySQL主从复制节点ssh健康检测成功
4.5.2主从复制检测
#这里注意了,需要给所有节点都上一个MySQL主从复制账号,因为切换之后如果没有主从复制账号还咋验证?[root@MHA2 data]# mysql -uroot -p666666 -e "grant replication slave on *.* to rep@'192.168.17.%' identified by '666666';"[root@MHA3 data]# mysql -uroot -p666666 -e "grant replication slave on *.* to rep@'192.168.17.%' identified by '666666';"#主从复制检测[root@MHA3 ~]# which masterha_check_repl/usr/bin/masterha_check_repl[root@MHA3 ~]# masterha_check_repl --conf=/etc/mha/mha1.cnfThu Feb 14 04:06:37 2019 - [warning] Global configuration file /etc/masterha_default.cnf not found. Skipping.Thu Feb 14 04:06:37 2019 - [info] Reading application default configuration from /etc/mha/mha1.cnf..Thu Feb 14 04:06:37 2019 - [info] Reading server configuration from /etc/mha/mha1.cnf..Thu Feb 14 04:06:37 2019 - [info] MHA::MasterMonitor version 0.56.Thu Feb 14 04:06:38 2019 - [info] GTID failover mode = 1Thu Feb 14 04:06:38 2019 - [info] Dead Servers:Thu Feb 14 04:06:38 2019 - [info] Alive Servers:Thu Feb 14 04:06:38 2019 - [info] 192.168.17.109(192.168.17.109:3306)Thu Feb 14 04:06:38 2019 - [info] 192.168.17.110(192.168.17.110:3306)Thu Feb 14 04:06:38 2019 - [info] 192.168.17.111(192.168.17.111:3306)Thu Feb 14 04:06:38 2019 - [info] Alive Slaves:Thu Feb 14 04:06:38 2019 - [info] 192.168.17.110(192.168.17.110:3306) Version=5.6.17-log (oldest major version between slaves) log-bin:enabledThu Feb 14 04:06:38 2019 - [info] GTID ONThu Feb 14 04:06:38 2019 - [info] Replicating from 192.168.17.109(192.168.17.109:3306)Thu Feb 14 04:06:38 2019 - [info] Primary candidate for the new Master (candidate_master is set)Thu Feb 14 04:06:38 2019 - [info] 192.168.17.111(192.168.17.111:3306) Version=5.6.17-log (oldest major version between slaves) log-bin:enabledThu Feb 14 04:06:38 2019 - [info] GTID ONThu Feb 14 04:06:38 2019 - [info] Replicating from 192.168.17.109(192.168.17.109:3306)Thu Feb 14 04:06:38 2019 - [info] Current Alive Master: 192.168.17.109(192.168.17.109:3306)Thu Feb 14 04:06:38 2019 - [info] Checking slave configurations..Thu Feb 14 04:06:38 2019 - [info] Checking replication filtering settings..Thu Feb 14 04:06:38 2019 - [info] binlog_do_db= , binlog_ignore_db=Thu Feb 14 04:06:38 2019 - [info] Replication filtering check ok.Thu Feb 14 04:06:38 2019 - [info] GTID (with auto-pos) is supported. Skipping all SSH and Node package checking.Thu Feb 14 04:06:38 2019 - [info] Checking SSH publickey authentication settings on the current master..Thu Feb 14 04:06:38 2019 - [info] HealthCheck: SSH to 192.168.17.109 is reachable.Thu Feb 14 04:06:38 2019 - [info]192.168.17.109(192.168.17.109:3306) (current master)+--192.168.17.110(192.168.17.110:3306)+--192.168.17.111(192.168.17.111:3306)Thu Feb 14 04:06:38 2019 - [info] Checking replication health on 192.168.17.110..Thu Feb 14 04:06:38 2019 - [info] ok.Thu Feb 14 04:06:38 2019 - [info] Checking replication health on 192.168.17.111..Thu Feb 14 04:06:38 2019 - [info] ok.Thu Feb 14 04:06:38 2019 - [warning] master_ip_failover_script is not defined.Thu Feb 14 04:06:38 2019 - [warning] shutdown_script is not defined.Thu Feb 14 04:06:38 2019 - [info] Got exit code 0 (Not master dead).MySQL Replication Health is OK.#主从复制检测成功
4.6启动MHA
[root@MHA3 ~]# which masterha_manager/usr/bin/masterha_manager[root@MHA3 ~]# nohup masterha_manager --conf=/etc/mha/mha1.cnf --remove_dead_master_conf --ignore_last_failover < /dev/null > /var/log/mha/mha1/manager.log 2>&1 &[1] 2340#nohup ... &:常用于禁止session(nohup)关闭或者ctrl+c(&)停止进程[root@MHA3 ~]# ps -elf | grep perl | grep -v grep0 S root 2340 2077 0 80 0 - 48831 hrtime 04:14 pts/0 00:00:00 perl /usr/bin/masterha_manager --conf=/etc/mha/mha1.cnf --remove_dead_master_conf --ignore_last_failover#启动成功
4.7测试MHA自动切换master
STEP1:登录候选master(MHA2)查看信息状态
[root@MHA2 ~]# mysql -uroot -p666666 -e "show slave status\G"Warning: Using a password on the command line interface can be insecure.*************************** 1. row ***************************Slave_IO_State: Waiting for master to send eventMaster_Host: 192.168.17.109#主库IP为192.168.17。109Master_User: repMaster_Port: 3306Connect_Retry: 60Master_Log_File: mysql-bin.000001Read_Master_Log_Pos: 660Relay_Log_File: relay-bin.000002Relay_Log_Pos: 870Relay_Master_Log_File: mysql-bin.000001Slave_IO_Running: YesSlave_SQL_Running: Yes
STEP2:停止MHA1上的MySQL服务
[root@MHA1 ~]# /etc/init.d/mysqld stopShutting down MySQL....... SUCCESS!#停止成功
STEP3:查看MHA3上的主从同步状态
[root@MHA3 data]# mysql -uroot -p666666 -e "show slave status\G"Warning: Using a password on the command line interface can be insecure.*************************** 1. row ***************************Slave_IO_State: Waiting for master to send eventMaster_Host: 192.168.17.110#master变为了MHA2Master_User: repMaster_Port: 3306Connect_Retry: 60Master_Log_File: mysql-bin.000004Read_Master_Log_Pos: 231Relay_Log_File: relay-bin.000003Relay_Log_Pos: 401Relay_Master_Log_File: mysql-bin.000004Slave_IO_Running: YesSlave_SQL_Running: Yes
STEP4:查看MHA2上的主从同步状态
[root@MHA2 data]# mysql -uroot -p666666 -e "show master status;"Warning: Using a password on the command line interface can be insecure.+------------------+----------+--------------+------------------+----------------------------------------------------------------------------------+| File | Position | Binlog_Do_DB | Binlog_Ignore_DB | Executed_Gtid_Set |+------------------+----------+--------------+------------------+----------------------------------------------------------------------------------+| mysql-bin.000004 | 231 | | | 76efda2a-2fc2-11e9-9a4a-000c2987f310:1-2,b4654a7e-2fcd-11e9-9a93-000c2967becd:1 |+------------------+----------+--------------+------------------+----------------------------------------------------------------------------------+#MHA2作为了MySQL主从同步的主
STEP5:查看MHA状态
[root@MHA3 data]# nohup masterha_manager --conf=/etc/mha/mha1.cnf --remove_dead_master_conf --ignore_last_failover < /dev/null > /var/log/mha/mha1/manager.log 2>&1 &[1] 3721#MHA后台进程自动终止了[root@MHA3 data]# cat /etc/mha/mha1.cnf[server default]manager_log=/var/log/mha/mha1/managermanager_workdir=/var/log/mha/mha1master_binlog_dir=/usr/local/mysql/datapassword=666666ping_interval=2repl_password=666666repl_user=repssh_user=rootuser=mha#查看MHA配置文件发现server1自动消失了[server2]candidate_master=1check_repl_delay=0hostname=192.168.17.110port=3306[server3]hostname=192.168.17.111port=3306
STEP6:查看MHA日志
cat /var/log/mha/mha1/manager...省略...Thu Feb 14 04:43:26 2019 - [info] Resetting slave info on the new master..#把从库信息录入到新的主上Thu Feb 14 04:43:27 2019 - [info] 192.168.17.110: Resetting slave info succeeded.Thu Feb 14 04:43:27 2019 - [info] Master failover to 192.168.17.110(192.168.17.110:3306) completed successfully.#成功热备master切换Thu Feb 14 04:43:27 2019 - [info] Deleted server1 entry from /etc/mha/mha1.cnf .#删除/etc/mha/mha1.cnf中的server1模块...省略...
4.8进行MHA故障完善恢复
我们需要重启MHA1的MySQL,然后配置作为从库MHA2的从库;由于切换后MHA进程停止了,我们需要重新配置并启动。
STEP1:重启MHA1,并配置作为MHA2的从库
[root@MHA1 ~]# /etc/init.d/mysqld startStarting MySQL.. SUCCESS![root@MHA1 ~]# mysql -uroot -p666666 -e "change master to master_host='192.168.17.110',master_user='rep',master_password='666666',master_auto_position=1;"[root@MHA1 ~]# mysql -uroot -p666666 -e "start slave;"[root@MHA1 ~]# mysql -uroot -p666666 -e "show slave status\G"Warning: Using a password on the command line interface can be insecure.*************************** 1. row ***************************Slave_IO_State: Waiting for master to send eventMaster_Host: 192.168.17.110Master_User: repMaster_Port: 3306Connect_Retry: 60Master_Log_File: mysql-bin.000006Read_Master_Log_Pos: 231Relay_Log_File: MHA1-relay-bin.000005Relay_Log_Pos: 401Relay_Master_Log_File: mysql-bin.000006Slave_IO_Running: YesSlave_SQL_Running: Yes
STEP2:将MHA配置文件里面缺失的部分补齐
因为MHA故障转移切换之后,MHA1服务器在MHA配置文件里面的部分就自动消失了,我们需要手动重新写回来。
[root@MHA3 ~]# vim /etc/mha/mha1.cnf[root@MHA3 ~]# cat /etc/mha/mha1.cnf[server default]manager_log=/var/log/mha/mha1/managermanager_workdir=/var/log/mha/mha1master_binlog_dir=/usr/local/mysql/datapassword=666666ping_interval=2repl_password=666666repl_user=repssh_user=rootuser=mha[server1]hostname=192.168.17.109port=3306candidate_master=1check_repl_delay=0#将MHA1的server补回来作为首选固定切换的MySQL主[server2]hostname=192.168.17.110port=3306[server3]hostname=192.168.17.111port=3306
STEP3:再次启动MHA进程
[root@MHA3 ~]# nohup masterha_manager --conf=/etc/mha/mha1.cnf --remove_dead_master_conf --ignore_last_failover < /dev/null > /var/log/mha/mha1/manager.log 2>&1 &[1] 1573[root@MHA3 ~]# ps -elf | grep perl | grep -v grep0 S root 1573 1527 1 80 0 - 48831 hrtime 02:06 pts/0 00:00:00 perl /usr/bin/masterha_manager --conf=/etc/mha/mha1.cnf --remove_dead_master_conf --ignore_last_failover#成功启动
STEP4:停止MHA2服务器上的MySQL服务
[root@MHA2 ~]# /etc/init.d/mysqld stopShutting down MySQL..... SUCCESS!
STEP5:查看MHA3服务器上的MySQL主从同步状态
[root@MHA3 ~]# mysql -uroot -p666666 -e "show slave status\G"Warning: Using a password on the command line interface can be insecure.*************************** 1. row ***************************Slave_IO_State: Waiting for master to send eventMaster_Host: 192.168.17.109#MHA3的主自动换回了MHA1服务器的MySQLMaster_User: repMaster_Port: 3306Connect_Retry: 60Master_Log_File: mysql-bin.000006Read_Master_Log_Pos: 447Relay_Log_File: relay-bin.000002Relay_Log_Pos: 408Relay_Master_Log_File: mysql-bin.000006Slave_IO_Running: YesSlave_SQL_Running: Yes
STEP6:重启MHA2服务器的MySQL,重新配置MHA配置文件并启动MHA进程,恢复到初始状态
#MHA2服务器[root@MHA2 ~]# /etc/init.d/mysqld startStarting MySQL. SUCCESS!#MHA3服务器[root@MHA3 ~]# vim /etc/mha/mha1.cnf[root@MHA3 ~]# cat /etc/mha/mha1.cnf[server default]manager_log=/var/log/mha/mha1/managermanager_workdir=/var/log/mha/mha1master_binlog_dir=/usr/local/mysql/datapassword=666666ping_interval=2repl_password=666666repl_user=repssh_user=rootuser=mha[server1]hostname=192.168.17.109port=3306[server2]candidate_master=1check_repl_delay=0hostname=192.168.17.110port=3306[server3]hostname=192.168.17.111port=3306[root@MHA3 ~]# nohup masterha_manager --conf=/etc/mha/mha1.cnf --remove_dead_master_conf --ignore_last_failover < /dev/null > /var/log/mha/mha1/manager.log 2>&1 &[1] 1653
附录:源码安装MHA的方法
上面部署MHA我们用的是rpm方式,源码方式部署代码如下
#MHA-Node部署[root@mysql-db01 ~]# yum -y install perl-DBD-MySQL perl-Config-Tiny perl-Params-Validate perl-CPAN perl-devel perl-ExtUtils-CBuilder perl-ExtUtils-MakeMaker[root@mysql-db01 ~]# tar xf mha4mysql-node-0.56.tar.gz -C /usr/src/[root@mysql-db01 ~]# cd /usr/src/mha4mysql-node-0.56/[root@mysql-db01 mha4mysql-node-0.56]# perl Makefile.PL[root@mysql-db01 mha4mysql-node-0.56]# make && make install#MHA-manager部署[root@mysql-db01 ~]# yum -y install perl-DBD-MySQL perl-Config-Tiny perl-Params-Validate perl-CPAN perl-devel perl-ExtUtils-CBuilder perl-ExtUtils-MakeMaker[root@mysql-db01 ~]# tar xf mha4mysql-manager-0.56.tar.gz -C /usr/src/[root@mysql-db01 ~]# cd /usr/src/mha4mysql-manager-0.56/[root@mysql-db01 mha4mysql-manager-0.56]# perl Makefile.PL[root@mysql-db01 mha4mysql-manager-0.56]# make && make install
