@2890594972
2019-05-03T19:00:04.000000Z
字数 1551
阅读 1483
国金投资 vue-cli3+muse-ui开发
muse-ui
apicloud打包vue项目:
https://www.cnblogs.com/undefined000/p/9559694.html
1、创建项目:
vue create guojintz-vue-webapp
启动命令:yarn serve
待了解:vue ui
2、支持less: https://www.zybuluo.com/mdeditor#931687
npm install less less-loader --save-dev
3、安装和引入muse-ui: https://muse-ui.org/#/zh-CN/usage
npm i muse-ui -S
4、安装axios数据请求
vue add axios 测试
5、需要配置代理:vue.config.js
6、这是单页面应用,所有需要vue-router支持
内置了,不需要npm i vue-router
7、安装toast支持 用于消息提示
https://github.com/museui/muse-ui-toast

this.$toast.message('hello world');this.$toast.success('hello world');this.$toast.info('hello world');this.$toast.warning('hello world');this.$toast.error('hello world');
tips:需要引入字体图标样式:
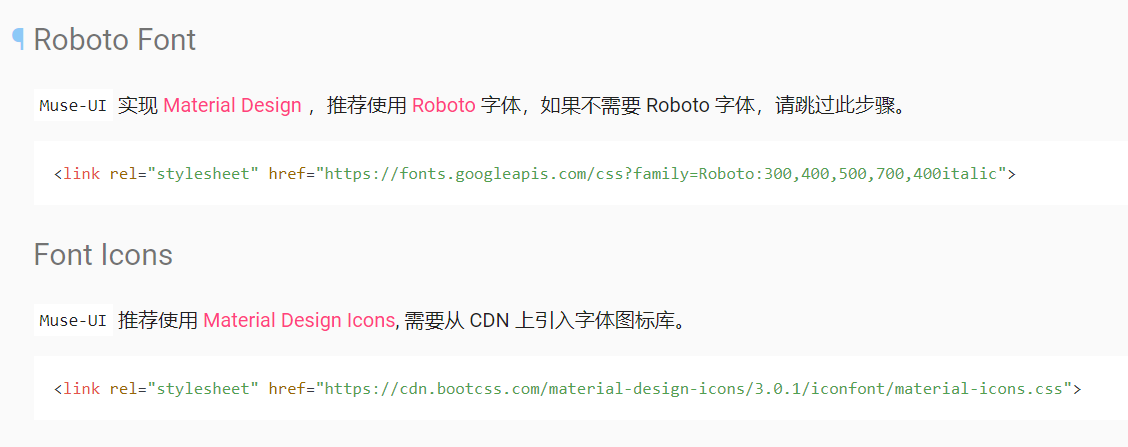
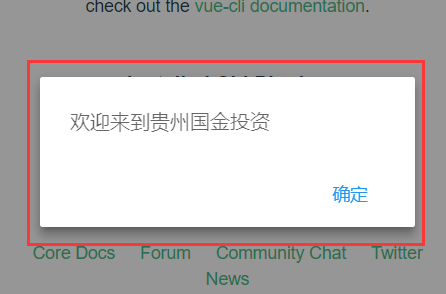
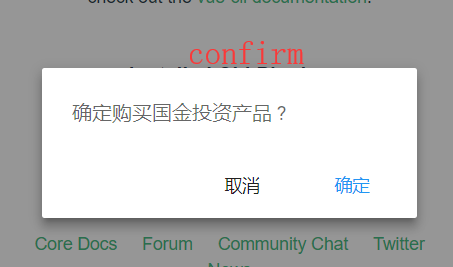
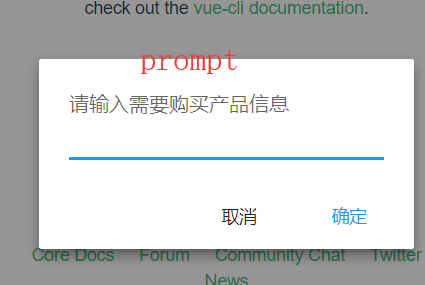
8、安装dialog支持 用于美化系统默认的对话框
https://github.com/museui/muse-ui-message
9、安装支持muse-ui-loading 用于显示加载
https://github.com/museui/muse-ui-loading

10、muse-ui-progress用于页面加载进度
https://github.com/museui/muse-ui-progress
module.exports = {// 配置 axios 代理请求devServer: {proxy: {'/api': {target: 'http://apigtz.damoxueyuan.com/index.php',// 在本地会创建一个虚拟服务端,然后发送请求的数据,并同时接收请求的数据,这样服务端和服务端进行数据的交互就不会有跨域问题changeOrigin: true,ws: true,pathRewrite: {// 替换target中的请求地址,也就是说以后你在请求http://api.jisuapi.com/XXXXX这个地址的时候直接写成/api即可'^/api': '/'}}}},}
6、这是单页面应用,所有需要vue-router支持
内置了,不需要npm i vue-router
Vue CLI v3.7.0? Please pick a preset: Manually select features? Check the features needed for your project: (Press <space> to select, <a> to toggle all, <i> to invert selection)>(*) Babel( ) TypeScript( ) Progressive Web App (PWA) Support( ) Router( ) Vuex( ) CSS Pre-processors(*) Linter / Formatter( ) Unit Testing( ) E2E Testing
tips: 安装vgc辅助快捷工具
https://www.zybuluo.com/mdeditor#1055583
以前总喜欢把通用的部分抽出来,比如头部。 如果用Muse-ui,就不用了。先开发,后续再考虑
