@Yano
2018-04-16T05:48:04.000000Z
字数 33815
阅读 3167
Java面试通关要点汇总集
面试
基本功
- 面向对象的特征
- final, finally, finalize 的区别
- int 和 Integer 有什么区别
- 重载和重写的区别
- 抽象类和接口有什么区别
- 说说反射的用途及实现
- 说说自定义注解的场景及实现
- HTTP 请求的 GET 与 POST 方式的区别
- session 与 cookie 区别
- session 分布式处理
- JDBC 流程
- MVC 设计思想
- equals 与 == 的区别
面向对象的特征
- 抽象:数据抽象、逻辑抽象
- 封装:把过程和数据包围起来
- 继承:鼓励类的重用
- 多态:允许将子类类型赋值给父类类型的引用,将类型泛化
final, finally, finalize 的区别
final:
- 变量:不可修改
- 对象:引用不可修改
- 方法:不可被重写
- 类:不可被继承
finally:异常处理的关键字,无论是否抛出异常,finally 块都会被执行
finalize:finalize()是Object的protected方法,子类可以覆盖该方法以实现资源清理工作,GC在回收对象之前调用该方法。
protected void finalize() throws Throwable { }
大致描述一下finalize流程:当对象变成(GC Roots)不可达时,GC会判断该对象是否覆盖了finalize方法,若未覆盖,则直接将其回收。否则,若对象未执行过finalize方法,将其放入F-Queue队列,由一低优先级线程执行该队列中对象的finalize方法。执行finalize方法完毕后,GC会再次判断该对象是否可达,若不可达,则进行回收,否则,对象“复活”。
int 和 Integer 有什么区别
1、Integer是int的包装类,int则是java的一种基本数据类型
2、Integer变量必须实例化后才能使用,而int变量不需要
3、Integer实际是对象的引用,当new一个Integer时,实际上是生成一个指针指向此对象;而int则是直接存储数据值
4、Integer的默认值是null,int的默认值是0
延伸:
关于Integer和int的比较
1、由于Integer变量实际上是对一个Integer对象的引用,所以两个通过new生成的Integer变量永远是不相等的(因为new生成的是两个对象,其内存地址不同)。
Integer i = new Integer(100);
Integer j = new Integer(100);
System.out.print(i == j); //false
2、Integer变量和int变量比较时,只要两个变量的值是向等的,则结果为true(因为包装类Integer和基本数据类型int比较时,java会自动拆包装为int,然后进行比较,实际上就变为两个int变量的比较)
Integer i = new Integer(100);
int j = 100;
System.out.print(i == j); //true
3、非new生成的Integer变量和new Integer()生成的变量比较时,结果为false。(因为非new生成的Integer变量指向的是java常量池中的对象,而new Integer()生成的变量指向堆中新建的对象,两者在内存中的地址不同)
Integer i = new Integer(100);
Integer j = 100;
System.out.print(i == j); //false
4、对于两个非new生成的Integer对象,进行比较时,如果两个变量的值在区间-128到127之间,则比较结果为true,如果两个变量的值不在此区间,则比较结果为false
Integer i = 100;
Integer j = 100;
System.out.print(i == j); //true
Integer i = 128;
Integer j = 128;
System.out.print(i == j); //false
对于第4条的原因:
java在编译Integer i = 100 ;时,会翻译成为Integer i = Integer.valueOf(100);,而java API中对Integer类型的valueOf的定义如下:
public static Integer valueOf(int i){
    assert IntegerCache.high >= 127;
    if (i >= IntegerCache.low && i <= IntegerCache.high){
        return IntegerCache.cache[i + (-IntegerCache.low)];
    }
    return new Integer(i);
}
java对于-128到127之间的数,会进行缓存,Integer i = 127时,会将127进行缓存,下次再写Integer j = 127时,就会直接从缓存中取,就不会new了
抽象类和接口有什么区别
1、抽象类和接口都不能直接实例化,如果要实例化,抽象类变量必须指向实现所有抽象方法的子类对象,接口变量必须指向实现所有接口方法的类对象。
2、抽象类要被子类继承,接口要被类实现。
3、接口只能做方法申明,抽象类中可以做方法申明,也可以做方法实现
4、接口里定义的变量只能是公共的静态的常量,抽象类中的变量是普通变量。
5、抽象类里的抽象方法必须全部被子类所实现,如果子类不能全部实现父类抽象方法,那么该子类只能是抽象类。同样,一个实现接口的时候,如不能全部实现接口方法,那么该类也只能为抽象类。
6、抽象方法只能申明,不能实现,接口是设计的结果 ,抽象类是重构的结果
7、抽象类里可以没有抽象方法
8、如果一个类里有抽象方法,那么这个类只能是抽象类
9、抽象方法要被实现,所以不能是静态的,也不能是私有的。
10、接口可继承接口,并可多继承接口,但类只能单根继承。
说说反射的用途及实现
见打印资料。
说说自定义注解的场景及实现
它提供了一种安全的类似注释的机制,用来将任何的信息或元数据(metadata)与程序元素(类、方法、成员变量等)进行关联。为程序的元素(类、方法、成员变量)加上更直观更明了的说明,这些说明信息是与程序的业务逻辑无关,并且供指定的工具或框架使用。
1、生成文档。这是最常见的,也是java 最早提供的注解。常用的有@param @return 等
2、跟踪代码依赖性,实现替代配置文件功能。比如Dagger 2依赖注入,未来java开发,将大量注解配置,具有很大用处;
3、在编译时进行格式检查。如@override 放在方法前,如果你这个方法并不是覆盖了超类方法,则编译时就能检查出。
元注解
ava.lang.annotation提供了四种元注解,专门注解其他的注解(在自定义注解的时候,需要使用到元注解):
@Documented –注解是否将包含在JavaDoc中
@Retention –什么时候使用该注解
@Target –注解用于什么地方
@Inherited – 是否允许子类继承该注解
1.)@Retention– 定义该注解的生命周期
● RetentionPolicy.SOURCE : 在编译阶段丢弃。这些注解在编译结束之后就不再有任何意义,所以它们不会写入字节码。@Override, @SuppressWarnings都属于这类注解。
● RetentionPolicy.CLASS : 在类加载的时候丢弃。在字节码文件的处理中有用。注解默认使用这种方式
● RetentionPolicy.RUNTIME : 始终不会丢弃,运行期也保留该注解,因此可以使用反射机制读取该注解的信息。我们自定义的注解通常使用这种方式。
2.)Target – 表示该注解用于什么地方。默认值为任何元素,表示该注解用于什么地方。可用的ElementType参数包括
● ElementType.CONSTRUCTOR:用于描述构造器
● ElementType.FIELD:成员变量、对象、属性(包括enum实例)
● ElementType.LOCAL_VARIABLE:用于描述局部变量
● ElementType.METHOD:用于描述方法
● ElementType.PACKAGE:用于描述包
● ElementType.PARAMETER:用于描述参数
● ElementType.TYPE:用于描述类、接口(包括注解类型) 或enum声明
3.)@Documented–一个简单的Annotations标记注解,表示是否将注解信息添加在java文档中。
4.)@Inherited – 定义该注释和子类的关系
@Inherited 元注解是一个标记注解,@Inherited阐述了某个被标注的类型是被继承的。如果一个使用了@Inherited修饰的annotation类型被用于一个class,则这个annotation将被用于该class的子类。
注解的原理
注解本质是一个继承了Annotation的特殊接口,其具体实现类是Java运行时生成的动态代理类。而我们通过反射获取注解时,返回的是Java运行时生成的动态代理对象$Proxy1。通过代理对象调用自定义注解(接口)的方法,会最终调用AnnotationInvocationHandler的invoke方法。该方法会从memberValues这个Map中索引出对应的值。而memberValues的来源是Java常量池。
常见标准的Annotation:
1.)Override
java.lang.Override是一个标记类型注解,它被用作标注方法。它说明了被标注的方法重载了父类的方法,起到了断言的作用。如果我们使用了这种注解在一个没有覆盖父类方法的方法时,java编译器将以一个编译错误来警示。
2.)Deprecated
Deprecated也是一种标记类型注解。当一个类型或者类型成员使用@Deprecated修饰的话,编译器将不鼓励使用这个被标注的程序元素。所以使用这种修饰具有一定的“延续性”:如果我们在代码中通过继承或者覆盖的方式使用了这个过时的类型或者成员,虽然继承或者覆盖后的类型或者成员并不是被声明为@Deprecated,但编译器仍然要报警。
3.)SuppressWarnings
SuppressWarning不是一个标记类型注解。它有一个类型为String[]的成员,这个成员的值为被禁止的警告名。对于javac编译器来讲,被-Xlint选项有效的警告名也同样对@SuppressWarings有效,同时编译器忽略掉无法识别的警告名。
@SuppressWarnings("unchecked")
实现自定义注解
鱼组的注解,记录下来。
protobuf的枚举类,当客户端发送请求时,根据传过来的数值确定调用哪个类,用来标识是哪个类。在服务器启动时,会扫描特定包下面的所有带有这个注解的类,并将其枚举-handler类组成一个map。
HTTP 请求的 GET 与 POST 方式的区别
HTTP在客户端和服务器之间以request-response protocol(请求-回复协议)工作。
GET方法:
使用GET方法时,查询字符串(键值对)被附加在URL地址后面一起发送到服务器:
/test/demo_form.jsp?name1=value1&name2=value2
特点:
GET请求能够被缓存
GET请求会保存在浏览器的浏览记录中
以GET请求的URL能够保存为浏览器书签
GET请求有长度限制
GET请求主要用以获取数据
POST方法:
使用POST方法时,查询字符串在POST信息中单独存在,和HTTP请求一起发送到服务器:
POST/test/demo_form.jsp HTTP/1.1
Host:w3schools.com
name1=value1&name2=value2
特点:
POST请求不能被缓存下来
POST请求不会保存在浏览器浏览记录中
以POST请求的URL无法保存为浏览器书签
POST请求没有长度限制
session 与 cookie 区别
让我们用几个例子来描述一下cookie和session机制之间的区别与联系。笔者曾经常去的一家咖啡店有喝5杯咖啡免费赠一杯咖啡的优惠,然而一次性消费5杯咖啡的机会微乎其微,这时就需要某种方式来纪录某位顾客的消费数量。想象一下其实也无外乎下面的几种方案:
1、该店的店员很厉害,能记住每位顾客的消费数量,只要顾客一走进咖啡店,店员就知道该怎么对待了。这种做法就是协议本身支持状态。

2、发给顾客一张卡片,上面记录着消费的数量,一般还有个有效期限。每次消费时,如果顾客出示这张卡片,则此次消费就会与以前或以后的消费相联系起来。这种做法就是在客户端保持状态。

3、发给顾客一张会员卡,除了卡号之外什么信息也不纪录,每次消费时,如果顾客出示该卡片,则店员在店里的纪录本上找到这个卡号对应的纪录添加一些消费信息。这种做法就是在服务器端保持状态。

由于HTTP协议是无状态的,而出于种种考虑也不希望使之成为有状态的,因此,后面两种方案就成为现实的选择。具体来说cookie机制采用的是在客户端保持状态的方案,而session机制采用的是在服务器端保持状态的方案。同时我们也看到,由于采用服务器端保持状态的方案在客户端也需要保存一个标识,所以session机制可能需要借助于cookie机制来达到保存标识的目的,但实际上它还有其他选择。
分布式系统 Session 一致性问题
什么是session?
服务器为每个用户创建一个会话,存储用户的相关信息,以便多次请求能够定位到同一个上下文。这样,当用户在应用程序的 Web 页之间跳转时,存储在 Session 对象中的变量将不会丢失,而是在整个用户会话中一直存在下去。当用户请求来自应用程序的 Web 页时,如果该用户还没有会话,则 Web 服务器将自动创建一个 Session 对象。当会话过期或被放弃后,服务器将终止该会话。
Web开发中,web-server可以自动为同一个浏览器的访问用户自动创建session,提供数据存储功能。最常见的,会把用户的登录信息、用户信息存储在session中,以保持登录状态。
什么是session一致性问题?
只要用户不重启浏览器,每次http短连接请求,理论上服务端都能定位到session,保持会话。
当高并发量的请求到达服务端的时候通过负载均衡的方式分发到集群中的某个服务器,这样就有可能导致同一个用户的多次请求被分发到集群的不同服务器上,就会出现取不到session数据的情况,于是session的共享就成了一个问题。
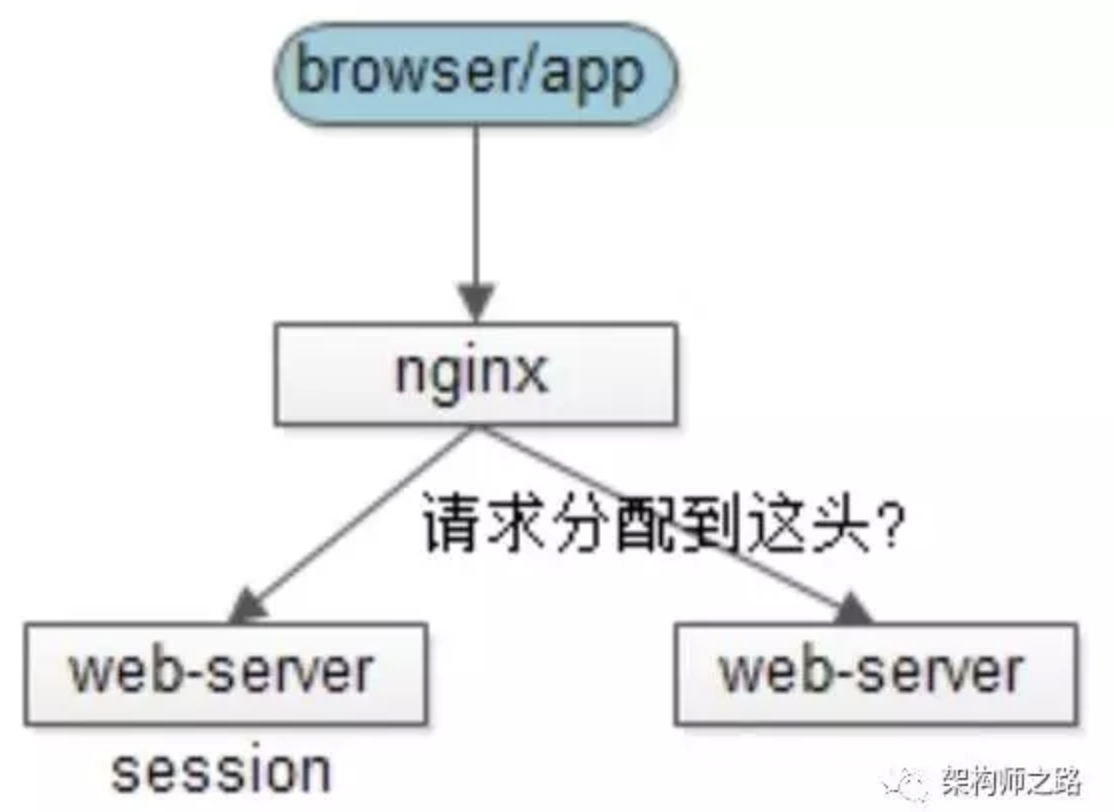
假设用户包含登录信息的session都记录在第一台web-server上,反向代理如果将请求路由到另一台web-server上,可能就找不到相关信息,而导致用户需要重新登录。
3.反向代理hash一致性
思路:web-server为了保证高可用,有多台冗余,反向代理层能不能做一些事情,让同一个用户的请求保证落在一台web-server上呢?
方案一:四层代理hash
反向代理层使用用户ip来做hash,以保证同一个ip的请求落在同一个web-server上
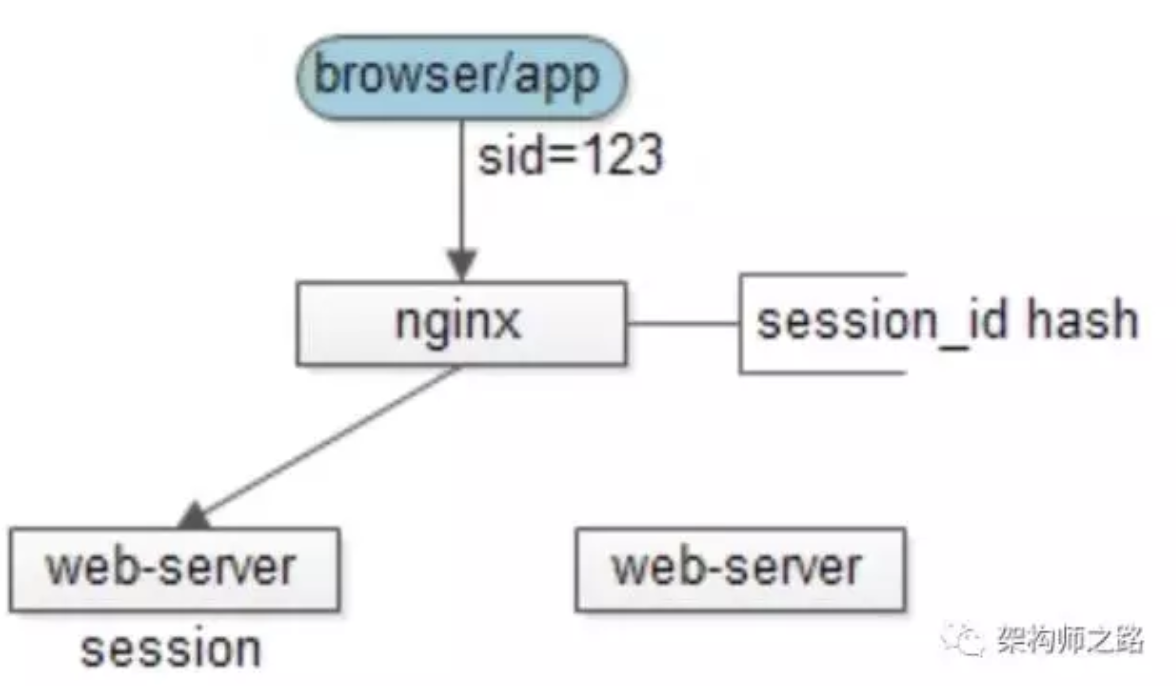
方案二:七层代理hash
反向代理使用http协议中的某些业务属性来做hash,例如sid,city_id,user_id等,能够更加灵活的实施hash策略,以保证同一个浏览器用户的请求落在同一个web-server上
优点:
只需要改nginx配置,不需要修改应用代码
负载均衡,只要hash属性是均匀的,多台web-server的负载是均衡的
可以支持web-server水平扩展(session同步法是不行的,受内存限制)
不足:
如果web-server重启,一部分session会丢失,产生业务影响,例如部分用户重新登录
如果web-server水平扩展,rehash后session重新分布,也会有一部分用户路由不到正确的session
session一般是有有效期的,所有不足中的两点,可以认为等同于部分session失效,一般问题不大。
对于四层hash还是七层hash,个人推荐前者:让专业的软件做专业的事情,反向代理就负责转发,尽量不要引入应用层业务属性,除非不得不这么做(例如,有时候多机房多活需要按照业务属性路由到不同机房的web-server)。
4.后端统一集中存储

思路:将session存储在web-server后端的存储层,数据库或者缓存
优点:
- 没有安全隐患
- 可以水平扩展,数据库/缓存水平切分即可
- web-server重启或者扩容都不会有session丢失
不足:增加了一次网络调用,并且需要修改应用代码
对于db存储还是cache,个人推荐后者:session读取的频率会很高,数据库压力会比较大。如果有session高可用需求,cache可以做高可用,但大部分情况下session可以丢失,一般也不需要考虑高可用。
总结
- 保证session一致性的架构设计常见方法:
- session同步法:多台web-server相互同步数据
- 客户端存储法:一个用户只存储自己的数据
- 反向代理hash一致性:四层hash和七层hash都可以做,保证一个用户的请求落在一台web-server上
- 后端统一存储:web-server重启和扩容,session也不会丢失
对于方案3和方案4,个人建议推荐后者:
web层、service层无状态是大规模分布式系统设计原则之一,session属于状态,不宜放在web层
让专业的软件做专业的事情,web-server存session?还是让cache去做这样的事情吧。
JDBC 流程
(详见为知笔记的打印)
加载JDBC驱动程序 → 建立数据库连接Connection → 创建执行SQL的语句Statement → 处理执行结果ResultSet → 释放资源
equals 与 == 的区别
==:
== 比较的是变量(栈)内存中存放的对象的(堆)内存地址,用来判断两个对象的地址是否相同,即是否是指相同一个对象。比较的是真正意义上的指针操作。
1、比较的是操作符两端的操作数是否是同一个对象。
2、两边的操作数必须是同一类型的(可以是父子类之间)才能编译通过。
3、比较的是地址,如果是具体的阿拉伯数字的比较,值相等则为true,如:
int a=10 与 long b=10L 与 double c=10.0都是相同的(为true),因为他们都指向地址为10的堆。
equals:
equals用来比较的是两个对象的内容是否相等,由于所有的类都是继承自java.lang.Object类的,所以适用于所有对象,如果没有对该方法进行覆盖的话,调用的仍然是Object类中的方法,而Object中的equals方法返回的却是==的判断。
String s="abce"是一种非常特殊的形式,和new 有本质的区别。它是java中唯一不需要new 就可以产生对象的途径。以String s="abce";形式赋值在java中叫直接量,它是在常量池中而不是象new一样放在压缩堆中。这种形式的字符串,在JVM内部发生字符串拘留,即当声明这样的一个字符串后,JVM会在常量池中先查找有有没有一个值为"abcd"的对象,如果有,就会把它赋给当前引用.即原来那个引用和现在这个引用指点向了同一对象,如果没有,则在常量池中新创建一个"abcd",下一次如果有String s1 = "abcd";又会将s1指向"abcd"这个对象,即以这形式声明的字符串,只要值相等,任何多个引用都指向同一对象.
而String s = new String("abcd");和其它任何对象一样.每调用一次就产生一个对象,只要它们调用。
集合
List 和 Set 区别
List 和 Map 区别
Arraylist 与 LinkedList 区别
ArrayList 与 Vector 区别
HashMap 和 Hashtable 的区别
HashSet 和 HashMap 区别
HashMap 和 ConcurrentHashMap 的区别
HashMap 的工作原理及代码实现
ConcurrentHashMap 的工作原理及代码实现
说明:关于集合的已经分析过,不用赘述
线程
创建线程的方式及实现
sleep() 、join()、yield()有什么区别
说说 CountDownLatch 原理
说说 CyclicBarrier 原理
说说 Semaphore 原理
说说 Exchanger 原理
说说 CountDownLatch 与 CyclicBarrier 区别
ThreadLocal 原理分析
讲讲线程池的实现原理
线程池的几种方式
线程的生命周期
创建线程的方式及实现
- 实现Runnable接口
- 继承Thread类
- 使用Callable和Future创建线程(与Runnable很像,但是有返回值)
sleep() 、join()、yield()有什么区别
- sleep()。在指定时间内让当前正在执行的线程暂停执行,但不会释放“锁标志”。不推荐使用。sleep()使当前线程进入阻塞状态,在指定时间内不会执行。
- join()。等待该线程终止。等待调用join方法的线程结束,再继续执行。
- yield()。暂停当前正在执行的线程对象。yield()只是使当前线程重新回到可执行状态,所以执行yield()的线程有可能在进入到可执行状态后马上又被执行。yield()只能使同优先级或更高优先级的线程有执行的机会。 并不释放锁!只是让出CPU使用权,可让其他线程运行。但是sleep连CPU使用权都不让出。
说说 CountDownLatch 原理
CountDownLatch是一个同步辅助类,在完成一组正在其他线程中执行的操作之前,它允许一个或多个线程一直等待。
例子:
@Testpublic void testCountDown() throws InterruptedException {CountDownLatch doneSignal = new CountDownLatch(5);for (int i = 0; i < 5; i++) {new CountDownThread(doneSignal).start();}// "主线程"等待线程池中5个任务的完成,才被唤醒doneSignal.await();System.out.println("main exit... ");}private class CountDownThread extends Thread {private final CountDownLatch latch;public CountDownThread(CountDownLatch latch) {this.latch = latch;}@Overridepublic void run() {try {TimeUnit.SECONDS.sleep(1);System.out.println(Thread.currentThread().getName() + " has slept 1s");latch.countDown();} catch (Exception e) {// TODO: handle exception}}}
countdownlatch await() 的说明:
Causes the current thread to wait until the latch has counted down to zero, unless the thread is interrupted.

If the current count is zero then this method returns immediately.

If the current count is greater than zero then the current thread becomes disabled for thread scheduling purposes and lies dormant until one of two things happen:

The count reaches zero due to invocations of the countDown method; or
Some other thread interrupts the current thread.
If the current thread:

has its interrupted status set on entry to this method; or
is interrupted while waiting,
then InterruptedException is thrown and the current thread's interrupted status is cleared.
public void await() throws InterruptedException {
    sync.acquireSharedInterruptibly(1);
}
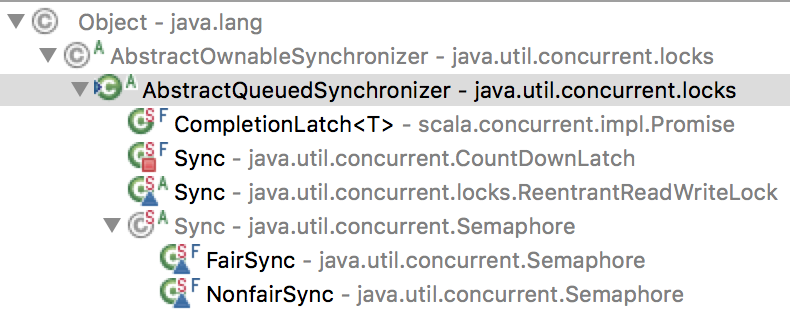
那么 sync 是什么?其继承了AbstractQueuedSynchronizer,整个类也是极其简单,主要使用 state 变量作为 await 的标志,如果到0则认为到条件,否则就没有到条件,一直await。
/*** Synchronization control For CountDownLatch.* Uses AQS state to represent count.*/private static final class Sync extends AbstractQueuedSynchronizer {private static final long serialVersionUID = 4982264981922014374L;Sync(int count) {setState(count);}int getCount() {return getState();}protected int tryAcquireShared(int acquires) {return (getState() == 0) ? 1 : -1;}protected boolean tryReleaseShared(int releases) {// Decrement count; signal when transition to zerofor (;;) {int c = getState();if (c == 0)return false;int nextc = c-1;if (compareAndSetState(c, nextc))return nextc == 0;}}}
其中 await 主体是在执行下面的函数:
    protected int tryAcquireShared(int acquires) {
        return (getState() == 0) ? 1 : -1;
    }
state 是 AbstractQueuedSynchronizer 类中的一个变量,类型是 volatile 的。
/**
 * The synchronization state.
 */
private volatile int state;
其实 tryAcquireShared 函数是 AbstractQueuedSynchronizer 中的 protected 方法,并没有实现体,直接抛出异常,需要子类实现它。
如果获取状态<0,即count>0,则会调用
/**
 * Acquires in shared interruptible mode.
 * @param arg the acquire argument
 */
private void doAcquireSharedInterruptibly(int arg)
    throws InterruptedException {
    final Node node = addWaiter(Node.SHARED);
    boolean failed = true;
    try {
        for (;;) {
            final Node p = node.predecessor();
            if (p == head) {
                int r = tryAcquireShared(arg);
                if (r >= 0) {
                    setHeadAndPropagate(node, r);
                    p.next = null; // help GC
                    failed = false;
                    return;
                }
            }
            if (shouldParkAfterFailedAcquire(p, node) &&
                parkAndCheckInterrupt())
                throw new InterruptedException();
        }
    } finally {
        if (failed)
            cancelAcquire(node);
    }
}
其核心函数是:
/**
 * Sets head of queue, and checks if successor may be waiting
 * in shared mode, if so propagating if either propagate > 0 or
 * PROPAGATE status was set.
 *
 * @param node the node
 * @param propagate the return value from a tryAcquireShared
 */
private void setHeadAndPropagate(Node node, int propagate) {
    Node h = head; // Record old head for check below
    setHead(node);
    /*
     * Try to signal next queued node if:
     *   Propagation was indicated by caller,
     *     or was recorded (as h.waitStatus either before
     *     or after setHead) by a previous operation
     *     (note: this uses sign-check of waitStatus because
     *      PROPAGATE status may transition to SIGNAL.)
     * and
     *   The next node is waiting in shared mode,
     *     or we don't know, because it appears null
     *
     * The conservatism in both of these checks may cause
     * unnecessary wake-ups, but only when there are multiple
     * racing acquires/releases, so most need signals now or soon
     * anyway.
     */
    if (propagate > 0 || h == null || h.waitStatus < 0 ||
        (h = head) == null || h.waitStatus < 0) {
        Node s = node.next;
        if (s == null || s.isShared())
            doReleaseShared();
    }
}
问题:为什么在await的时候,要两次 getState()?设置队列到底有什么用?为什么要设置这么多状态?也就是说:等待队列的实现原理究竟是什么?
上面的核心函数:
/**
 * Release action for shared mode -- signals successor and ensures
 * propagation. (Note: For exclusive mode, release just amounts
 * to calling unparkSuccessor of head if it needs signal.)
 */
private void doReleaseShared() {
    /*
     * Ensure that a release propagates, even if there are other
     * in-progress acquires/releases.  This proceeds in the usual
     * way of trying to unparkSuccessor of head if it needs
     * signal. But if it does not, status is set to PROPAGATE to
     * ensure that upon release, propagation continues.
     * Additionally, we must loop in case a new node is added
     * while we are doing this. Also, unlike other uses of
     * unparkSuccessor, we need to know if CAS to reset status
     * fails, if so rechecking.
     */
    for (;;) {
        Node h = head;
        if (h != null && h != tail) {
            int ws = h.waitStatus;
            if (ws == Node.SIGNAL) {
                if (!compareAndSetWaitStatus(h, Node.SIGNAL, 0))
                    continue;            // loop to recheck cases
                unparkSuccessor(h);
            }
            else if (ws == 0 &&
                     !compareAndSetWaitStatus(h, 0, Node.PROPAGATE))
                continue;                // loop on failed CAS
        }
        if (h == head)                   // loop if head changed
            break;
    }
}
其核心是:unparkSuccessor
LockSupport.unpark(s.thread);
unpark可以终止一个挂起的线程,使其恢复正常。这也就是为什么当 countDownLatch 的 count = 0 时,能够直接将挂起的线程唤醒。
unpark的底层,是调用了sun.misc.Unsafe类,里面是native方法。
一篇比较详细的文章:https://www.cnblogs.com/leesf456/p/5406191.html
经过分析CountDownLatch的源码可知,其底层结构仍然是AQS,对其线程所封装的结点是采用共享模式,而ReentrantLock是采用独占模式。由于采用的共享模式,所以会导致后面的操作会有所差异,通过阅读源码就会很容易掌握CountDownLatch实现机制。
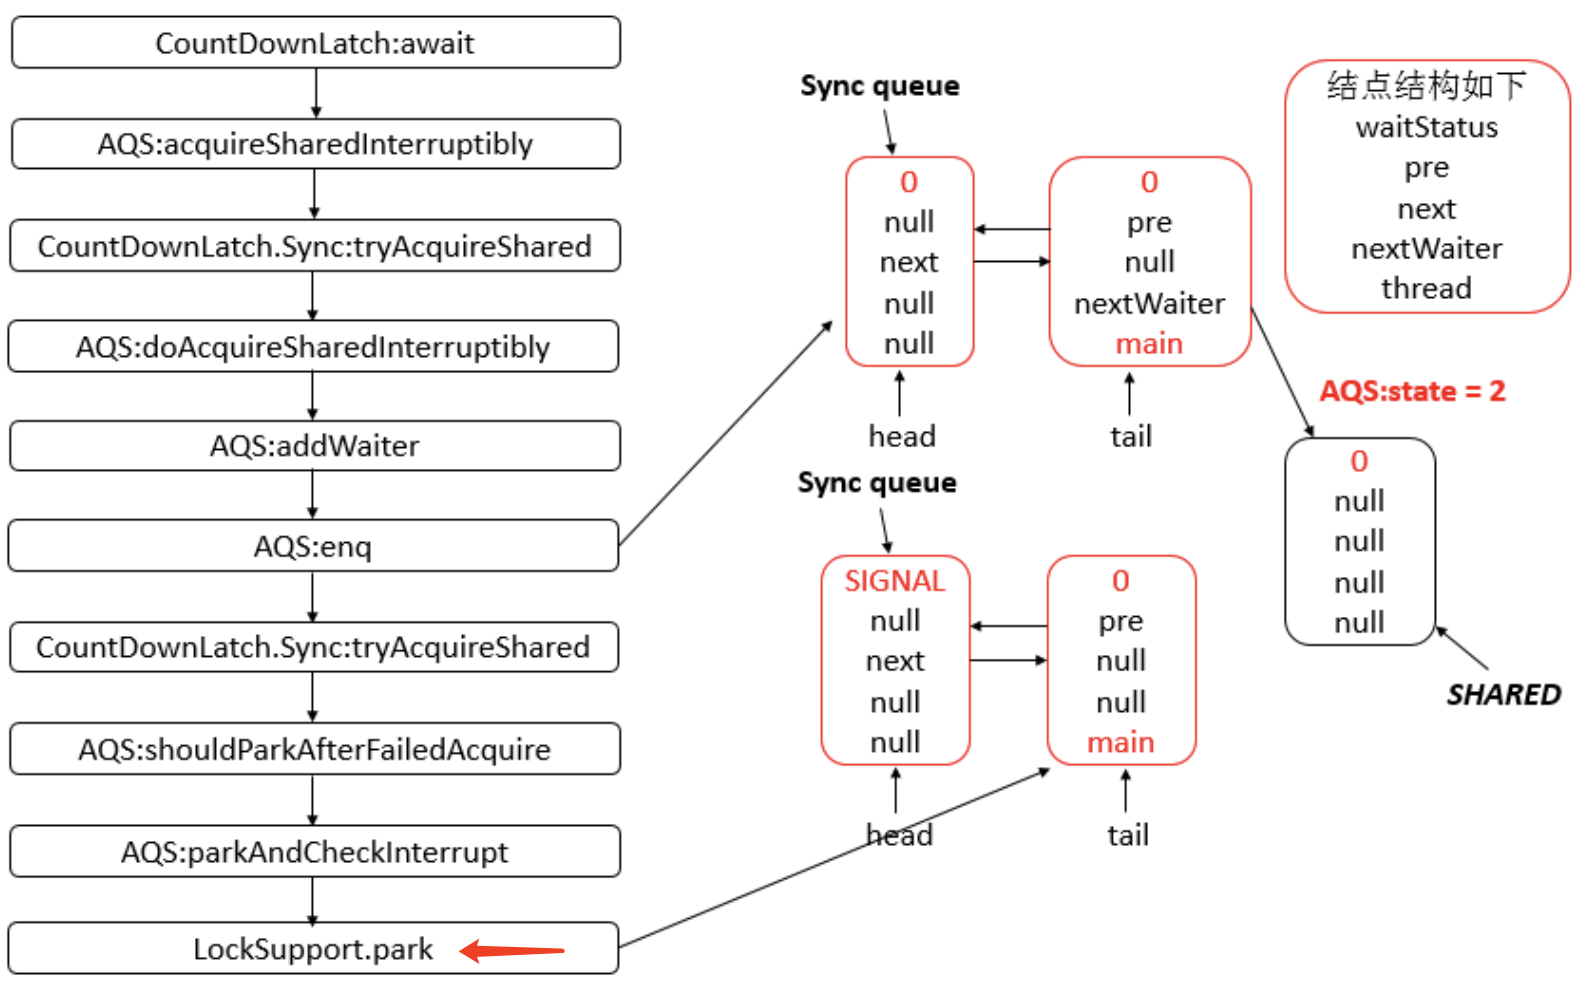
虽然代码中写的是队列,但是 AQS 中只定义了两个节点而已!
/**
 * Head of the wait queue, lazily initialized.  Except for
 * initialization, it is modified only via method setHead.  Note:
 * If head exists, its waitStatus is guaranteed not to be
 * CANCELLED.
 */
private transient volatile Node head;

/**
 * Tail of the wait queue, lazily initialized.  Modified only via
 * method enq to add new wait node.
 */
private transient volatile Node tail;
一张图,不作具体分析了。
说说 CyclicBarrier 原理
CyclicBarrier 的字面意思是可循环使用(Cyclic)的屏障(Barrier)。它要做的事情是,让一组线程到达一个屏障(也可以叫同步点)时被阻塞,直到最后一个线程到达屏障时,屏障才会开门,所有被屏障拦截的线程才会继续干活。CyclicBarrier默认的构造方法是CyclicBarrier(int parties),其参数表示屏障拦截的线程数量,每个线程调用await方法告诉CyclicBarrier我已经到达了屏障,然后当前线程被阻塞。
使用实例:
@Testpublic void testCyclicBarrier() {final int SIZE = 5;CyclicBarrier cyclicBarrier = new CyclicBarrier(SIZE);for(int i = 0; i < SIZE; i++) {new BarrierThread(cyclicBarrier).start();}}class BarrierThread extends Thread {final CyclicBarrier cyclicBarrier;public BarrierThread(CyclicBarrier cyclicBarrier) {this.cyclicBarrier = cyclicBarrier;}@Overridepublic void run() {System.out.println(Thread.currentThread().getName() + " wait for CyclicBarrier.");// 参与者数量 +1try {cyclicBarrier.await();// 参与者数量为5,才能继续执行System.out.println(Thread.currentThread().getName() + " continued.");} catch (InterruptedException e) {e.printStackTrace();} catch (BrokenBarrierException e) {e.printStackTrace();}}}
输出
Thread-0 wait for CyclicBarrier.
Thread-2 wait for CyclicBarrier.
Thread-1 wait for CyclicBarrier.
Thread-3 wait for CyclicBarrier.
Thread-4 wait for CyclicBarrier.
Thread-4 continued.
Thread-0 continued.
Thread-2 continued.
Thread-3 continued.
Thread-1 continued.
CyclicBarrier 的基本数据结构
/**
 * Each use of the barrier is represented as a generation instance.
 * The generation changes whenever the barrier is tripped, or
 * is reset. There can be many generations associated with threads
 * using the barrier - due to the non-deterministic way the lock
 * may be allocated to waiting threads - but only one of these
 * can be active at a time (the one to which {@code count} applies)
 * and all the rest are either broken or tripped.
 * There need not be an active generation if there has been a break
 * but no subsequent reset.
 */
private static class Generation {
    boolean broken = false;
}

/** The lock for guarding barrier entry */
private final ReentrantLock lock = new ReentrantLock();
/** Condition to wait on until tripped */
private final Condition trip = lock.newCondition();
/** The number of parties */
private final int parties;
/* The command to run when tripped */
private final Runnable barrierCommand;
/** The current generation */
private Generation generation = new Generation();

/**
 * Number of parties still waiting. Counts down from parties to 0
 * on each generation.  It is reset to parties on each new
 * generation or when broken.
 */
private int count;
其核心代码是:
cyclicBarrier.await();
核心代码:
/**
 * Main barrier code, covering the various policies.
 */
private int dowait(boolean timed, long nanos)
    throws InterruptedException, BrokenBarrierException,
           TimeoutException {
    final ReentrantLock lock = this.lock;
    lock.lock();
    try {
        final Generation g = generation;

        if (g.broken)
            throw new BrokenBarrierException();

        if (Thread.interrupted()) {
            breakBarrier();
            throw new InterruptedException();
        }

        int index = --count;
        if (index == 0) {  // tripped
            boolean ranAction = false;
            try {
                final Runnable command = barrierCommand;
                if (command != null)
                    command.run();
                ranAction = true;
                nextGeneration();
                return 0;
            } finally {
                if (!ranAction)
                    breakBarrier();
            }
        }

        // loop until tripped, broken, interrupted, or timed out
        for (;;) {
            try {
                if (!timed)
                    trip.await();
                else if (nanos > 0L)
                    nanos = trip.awaitNanos(nanos);
            } catch (InterruptedException ie) {
                if (g == generation && ! g.broken) {
                    breakBarrier();
                    throw ie;
                } else {
                    // We're about to finish waiting even if we had not
                    // been interrupted, so this interrupt is deemed to
                    // "belong" to subsequent execution.
                    Thread.currentThread().interrupt();
                }
            }

            if (g.broken)
                throw new BrokenBarrierException();

            if (g != generation)
                return index;

            if (timed && nanos <= 0L) {
                breakBarrier();
                throw new TimeoutException();
            }
        }
    } finally {
        lock.unlock();
    }
}

/**
 * Sets current barrier generation as broken and wakes up everyone.
 * Called only while holding lock.
 */
private void breakBarrier() {
    generation.broken = true;
    count = parties;
    trip.signalAll();
}

/**
 * Updates state on barrier trip and wakes up everyone.
 * Called only while holding lock.
 */
private void nextGeneration() {
    // signal completion of last generation
    trip.signalAll();
    // set up next generation
    count = parties;
    generation = new Generation();
}
其中 trip 是 ReentrantLock 的 condition。那么线程是如何阻塞的呢?
trip.await();
其中对 await() 的描述:
Causes the current thread to wait until it is signalled or interrupted.

The lock associated with this Condition is atomically released and the current thread becomes disabled for thread scheduling purposes and lies dormant until one of four things happens:

Some other thread invokes the signal method for this Condition and the current thread happens to be chosen as the thread to be awakened; or
Some other thread invokes the signalAll method for this Condition; or
Some other thread interrupts the current thread, and interruption of thread suspension is supported; or
A "spurious wakeup" occurs.
这就话调用时,await的是当前线程,所以在线程中调用 CylicBarrier.await(),能够阻塞那个线程。
概括下CyclicBarrier的整体工作流程:
- 调用构造函数,初始化 私有类 Generation(里面只有一个布尔变量 broken,用来标识是否中断,达到条件后会初始化一个新的对象)
- 在线程中调用 CyclicBarrier的 await() 方法时,如果里面的count没有减到0,则会阻塞当前线程(使用Condition.await()方法)。如果减到0了,则调用 signalAll 方法,唤醒所有线程,同时初始化一些变量。
CyclicBarrier 重点在 Cyclic,这个对象是可循环使用的。
说说 Semaphore 原理
发音:英[ˈseməfɔ:(r)]
功能: 控制并发线程数
Semaphore(信号量)是用来控制同时访问特定资源的线程数量,它通过协调各个线程,以保证合理的使用公共资源。很多年以来,我都觉得从字面上很难理解Semaphore所表达的含义,只能把它比作是控制流量的红绿灯,比如XX马路要限制流量,只允许同时有一百辆车在这条路上行使,其他的都必须在路口等待,所以前一百辆车会看到绿灯,可以开进这条马路,后面的车会看到红灯,不能驶入XX马路,但是如果前一百辆中有五辆车已经离开了XX马路,那么后面就允许有5辆车驶入马路,这个例子里说的车就是线程,驶入马路就表示线程在执行,离开马路就表示线程执行完成,看见红灯就表示线程被阻塞,不能执行。
使用示例:
public class SemaphoreTest {private static final int THREAD_COUNT = 30;private static ExecutorService threadPool = Executors.newFixedThreadPool(THREAD_COUNT);private static Semaphore s = new Semaphore(10);public static void main(String[] args) {for (int i = 0; i < THREAD_COUNT; i++) {threadPool.execute(new Runnable() {@Overridepublic void run() {try {s.acquire();System.out.println("save data");s.release();} catch (InterruptedException e) {}}});}threadPool.shutdown();}}
在代码中,虽然有30个线程在执行,但是只允许10个并发的执行。Semaphore的构造方法Semaphore(int permits) 接受一个整型的数字,表示可用的许可证数量。Semaphore(10)表示允许10个线程获取许可证,也就是最大并发数是10。Semaphore的用法也很简单,首先线程使用Semaphore的acquire()获取一个许可证,使用完之后调用release()归还许可证。
Semaphore 只有一个成员变量:private final Sync sync;
其有3个内部类:
1. 抽象类Sync
2. 实现类NonfairSync
3. 实现类FairSync
抽象类 Sync 继承 AQS,提供了下面两个类的骨架实现:
abstract static class Sync extends AbstractQueuedSynchronizer {
    private static final long serialVersionUID = 1192457210091910933L;

    Sync(int permits) {
        setState(permits);
    }

    final int getPermits() {
        return getState();
    }

    final int nonfairTryAcquireShared(int acquires) {
        for (;;) {
            int available = getState();
            int remaining = available - acquires;
            if (remaining < 0 ||
                compareAndSetState(available, remaining))
                return remaining;
        }
    }

    protected final boolean tryReleaseShared(int releases) {
        for (;;) {
            int current = getState();
            int next = current + releases;
            if (next < current) // overflow
                throw new Error("Maximum permit count exceeded");
            if (compareAndSetState(current, next))
                return true;
        }
    }

    final void reducePermits(int reductions) {
        for (;;) {
            int current = getState();
            int next = current - reductions;
            if (next > current) // underflow
                throw new Error("Permit count underflow");
            if (compareAndSetState(current, next))
                return;
        }
    }

    final int drainPermits() {
        for (;;) {
            int current = getState();
            if (current == 0 || compareAndSetState(current, 0))
                return current;
        }
    }
}
具体实现类只需要重写 AQS 中的 tryAcquireShared 方法即可。
/*** NonFair version*/static final class NonfairSync extends Sync {private static final long serialVersionUID = -2694183684443567898L;NonfairSync(int permits) {super(permits);}protected int tryAcquireShared(int acquires) {return nonfairTryAcquireShared(acquires);}}/*** Fair version*/static final class FairSync extends Sync {private static final long serialVersionUID = 2014338818796000944L;FairSync(int permits) {super(permits);}protected int tryAcquireShared(int acquires) {for (;;) {if (hasQueuedPredecessors())return -1;int available = getState();int remaining = available - acquires;if (remaining < 0 ||compareAndSetState(available, remaining))return remaining;}}}
其中公平仅比非公平多了一句话:
if (hasQueuedPredecessors())
    return -1;
而 hasQueuedPredecessors 方法的作用就是:
Queries whether any threads have been waiting to acquire longer than the current thread.
public final boolean hasQueuedPredecessors() {// The correctness of this depends on head being initialized// before tail and on head.next being accurate if the current// thread is first in queue.Node t = tail; // Read fields in reverse initialization orderNode h = head;Node s;return h != t &&((s = h.next) == null || s.thread != Thread.currentThread());}
从注释上来看,如果当前的 thread 就在 head,那么就没有比它等待时间长的线程(也就是说这是一个优先队列?如何实现的?)
其中调用 acquire 方法,会阻塞当前线程,直到条件到达获取到其中一个锁。acquire 方法最终会调用到 tryAcquireShared,这是需要子类实现的,上面分析了。
信号量维护了一个信号量许可集。线程可以通过调用acquire()来获取信号量的许可;当信号量中有可用的许可时,线程能获取该许可;否则线程必须等待,直到有可用的许可为止。 线程可以通过release()来释放它所持有的信号量许可。

说说 Exchanger 原理
当一个线程到达exchange调用点时,如果它的伙伴线程此前已经调用了此方法,那么它的伙伴会被调度唤醒并与之进行对象交换,然后各自返回。如果它的伙伴还没到达交换点,那么当前线程将会被挂起,直至伙伴线程到达——完成交换正常返回;或者当前线程被中断——抛出中断异常;又或者是等候超时——抛出超时异常。
使用示例:
public class ExchangerTest {private static final Exchanger<String> exgr = new Exchanger<String>();private static ExecutorService threadPool = Executors.newFixedThreadPool(2);public static void main(String[] args) {threadPool.execute(new Runnable() {@Overridepublic void run() {try {String exchange = exgr.exchange("A");System.out.println("线程1的exchage:" + exchange);} catch (InterruptedException e) {}}});threadPool.execute(new Runnable() {@Overridepublic void run() {try {String exchange = exgr.exchange("B");System.out.println("线程2的exchage:" + exchange);} catch (InterruptedException e) {}}});threadPool.shutdown();}}
核心算法:具体不做分析。
/*
 * Overview: The core algorithm is, for an exchange "slot",
 * and a participant (caller) with an item:
 *
 * for (;;) {
 *   if (slot is empty) {                       // offer
 *     place item in a Node;
 *     if (can CAS slot from empty to node) {
 *       wait for release;
 *       return matching item in node;
 *     }
 *   }
 *   else if (can CAS slot from node to empty) { // release
 *     get the item in node;
 *     set matching item in node;
 *     release waiting thread;
 *   }
 *   // else retry on CAS failure
 * }
说说 CountDownLatch 与 CyclicBarrier 区别
- CountDownLatch:在完成一组正在其他线程中执行的操作之前,它允许一个或多个线程一直等待。描述的是线程继续运行的条件:其余线程都到达了某个条件。
- CyclicBarrier:让一组线程到达一个屏障(也可以叫同步点)时被阻塞,直到最后一个线程到达屏障时,屏障才会开门,所有被屏障拦截的线程才会继续干活。它描述的是一组线程都到达某个条件,线程才能继续运行。
- Semaphore:控制同时访问特定资源的线程数量。
- Exchanger:两个线程间的数据交换,第一个线程调用时会阻塞,直到第二个线程也交换了数据,这两个线程分别获得对方的数据,并继续运行。
ThreadLocal 原理分析
以前写过非常详细的文章。这里不做分析。
讲讲线程池的实现原理

当提交一个新任务到线程池时,线程池的处理流程:
- 核心线程池里的线程是否都在执行任务?否,则创建新的工作线程执行任务;是,则下个流程。
- 工作队列是否已满?否,则将新提交的任务存储在这个工作队列;是,进入下个流程。
- 线程池中的线程是否都处于工作状态?否,则创建新的工作线程执行任务(线程不是满了么,为什么还能够创建新的线程?线程的数量是否就不对了?);是,交给饱和策略处理。

几个核心概念:
1. 核心线程池:
2. 最大线程池
3. 工作队列:
(1)如果当前运行的线程少于 corePoolSize,则创建新的线程执行任务(需要获取全局锁)
(2)如果运行的线程数>= corePoolSize,则将任务加入到 BlockingQueue
(3)如果无法将任务加入BlockingQueue(队列已满),则创建新的线程来处理任务(需要获取全局锁)
(4)如果创建新线程会使当前运行的线程超过 maximumPoolSize,任务将拒绝,并调用 RejectedExecutionHandler.rejectedExecution() 方法。
源码分析:
成员变量
/*** The queue used for holding tasks and handing off to worker* threads. We do not require that workQueue.poll() returning* null necessarily means that workQueue.isEmpty(), so rely* solely on isEmpty to see if the queue is empty (which we must* do for example when deciding whether to transition from* SHUTDOWN to TIDYING). This accommodates special-purpose* queues such as DelayQueues for which poll() is allowed to* return null even if it may later return non-null when delays* expire.*/private final BlockingQueue<Runnable> workQueue;/*** Lock held on access to workers set and related bookkeeping.* While we could use a concurrent set of some sort, it turns out* to be generally preferable to use a lock. Among the reasons is* that this serializes interruptIdleWorkers, which avoids* unnecessary interrupt storms, especially during shutdown.* Otherwise exiting threads would concurrently interrupt those* that have not yet interrupted. It also simplifies some of the* associated statistics bookkeeping of largestPoolSize etc. We* also hold mainLock on shutdown and shutdownNow, for the sake of* ensuring workers set is stable while separately checking* permission to interrupt and actually interrupting.*/private final ReentrantLock mainLock = new ReentrantLock();/*** Set containing all worker threads in pool. Accessed only when* holding mainLock.*/private final HashSet<Worker> workers = new HashSet<Worker>();/*** Wait condition to support awaitTermination*/private final Condition termination = mainLock.newCondition();/*** Tracks largest attained pool size. Accessed only under* mainLock.*/private int largestPoolSize;/*** Counter for completed tasks. Updated only on termination of* worker threads. Accessed only under mainLock.*/private long completedTaskCount;/** All user control parameters are declared as volatiles so that* ongoing actions are based on freshest values, but without need* for locking, since no internal invariants depend on them* changing synchronously with respect to other actions.*//*** Factory for new threads. All threads are created using this* factory (via method addWorker). All callers must be prepared* for addWorker to fail, which may reflect a system or user's* policy limiting the number of threads. Even though it is not* treated as an error, failure to create threads may result in* new tasks being rejected or existing ones remaining stuck in* the queue.** We go further and preserve pool invariants even in the face of* errors such as OutOfMemoryError, that might be thrown while* trying to create threads. Such errors are rather common due to* the need to allocate a native stack in Thread.start, and users* will want to perform clean pool shutdown to clean up. There* will likely be enough memory available for the cleanup code to* complete without encountering yet another OutOfMemoryError.*/private volatile ThreadFactory threadFactory;/*** Handler called when saturated or shutdown in execute.*/private volatile RejectedExecutionHandler handler;/*** Timeout in nanoseconds for idle threads waiting for work.* Threads use this timeout when there are more than corePoolSize* present or if allowCoreThreadTimeOut. Otherwise they wait* forever for new work.*/private volatile long keepAliveTime;/*** If false (default), core threads stay alive even when idle.* If true, core threads use keepAliveTime to time out waiting* for work.*/private volatile boolean allowCoreThreadTimeOut;/*** Core pool size is the minimum number of workers to keep alive* (and not allow to time out etc) unless allowCoreThreadTimeOut* is set, in which case the minimum is zero.*/private volatile int corePoolSize;/*** Maximum pool size. Note that the actual maximum is internally* bounded by CAPACITY.*/private volatile int maximumPoolSize;/*** The default rejected execution handler*/private static final RejectedExecutionHandler defaultHandler =new AbortPolicy();
构造方法:
/*** Creates a new {@code ThreadPoolExecutor} with the given initial* parameters and default thread factory and rejected execution handler.* It may be more convenient to use one of the {@link Executors} factory* methods instead of this general purpose constructor.** @param corePoolSize the number of threads to keep in the pool, even* if they are idle, unless {@code allowCoreThreadTimeOut} is set* @param maximumPoolSize the maximum number of threads to allow in the* pool* @param keepAliveTime when the number of threads is greater than* the core, this is the maximum time that excess idle threads* will wait for new tasks before terminating.* @param unit the time unit for the {@code keepAliveTime} argument* @param workQueue the queue to use for holding tasks before they are* executed. This queue will hold only the {@code Runnable}* tasks submitted by the {@code execute} method.* @throws IllegalArgumentException if one of the following holds:<br>* {@code corePoolSize < 0}<br>* {@code keepAliveTime < 0}<br>* {@code maximumPoolSize <= 0}<br>* {@code maximumPoolSize < corePoolSize}* @throws NullPointerException if {@code workQueue} is null*/public ThreadPoolExecutor(int corePoolSize,int maximumPoolSize,long keepAliveTime,TimeUnit unit,BlockingQueue<Runnable> workQueue) {this(corePoolSize, maximumPoolSize, keepAliveTime, unit, workQueue,Executors.defaultThreadFactory(), defaultHandler);}
核心的 execute 方法:
/*** Executes the given task sometime in the future. The task* may execute in a new thread or in an existing pooled thread.** If the task cannot be submitted for execution, either because this* executor has been shutdown or because its capacity has been reached,* the task is handled by the current {@code RejectedExecutionHandler}.** @param command the task to execute* @throws RejectedExecutionException at discretion of* {@code RejectedExecutionHandler}, if the task* cannot be accepted for execution* @throws NullPointerException if {@code command} is null*/public void execute(Runnable command) {if (command == null)throw new NullPointerException();/** Proceed in 3 steps:** 1. If fewer than corePoolSize threads are running, try to* start a new thread with the given command as its first* task. The call to addWorker atomically checks runState and* workerCount, and so prevents false alarms that would add* threads when it shouldn't, by returning false.** 2. If a task can be successfully queued, then we still need* to double-check whether we should have added a thread* (because existing ones died since last checking) or that* the pool shut down since entry into this method. So we* recheck state and if necessary roll back the enqueuing if* stopped, or start a new thread if there are none.** 3. If we cannot queue task, then we try to add a new* thread. If it fails, we know we are shut down or saturated* and so reject the task.*/int c = ctl.get();if (workerCountOf(c) < corePoolSize) {if (addWorker(command, true))return;c = ctl.get();}if (isRunning(c) && workQueue.offer(command)) {int recheck = ctl.get();if (! isRunning(recheck) && remove(command))reject(command);else if (workerCountOf(recheck) == 0)addWorker(null, false);}else if (!addWorker(command, false))reject(command);}
最重要的添加线程的方法:
/*** Checks if a new worker can be added with respect to current* pool state and the given bound (either core or maximum). If so,* the worker count is adjusted accordingly, and, if possible, a* new worker is created and started, running firstTask as its* first task. This method returns false if the pool is stopped or* eligible to shut down. It also returns false if the thread* factory fails to create a thread when asked. If the thread* creation fails, either due to the thread factory returning* null, or due to an exception (typically OutOfMemoryError in* Thread.start()), we roll back cleanly.** @param firstTask the task the new thread should run first (or* null if none). Workers are created with an initial first task* (in method execute()) to bypass queuing when there are fewer* than corePoolSize threads (in which case we always start one),* or when the queue is full (in which case we must bypass queue).* Initially idle threads are usually created via* prestartCoreThread or to replace other dying workers.** @param core if true use corePoolSize as bound, else* maximumPoolSize. (A boolean indicator is used here rather than a* value to ensure reads of fresh values after checking other pool* state).* @return true if successful*/private boolean addWorker(Runnable firstTask, boolean core) {retry:for (;;) {int c = ctl.get();int rs = runStateOf(c);// Check if queue empty only if necessary.if (rs >= SHUTDOWN &&! (rs == SHUTDOWN &&firstTask == null &&! workQueue.isEmpty()))return false;for (;;) {int wc = workerCountOf(c);if (wc >= CAPACITY ||wc >= (core ? corePoolSize : maximumPoolSize))return false;if (compareAndIncrementWorkerCount(c))break retry;c = ctl.get(); // Re-read ctlif (runStateOf(c) != rs)continue retry;// else CAS failed due to workerCount change; retry inner loop}}boolean workerStarted = false;boolean workerAdded = false;Worker w = null;try {w = new Worker(firstTask);final Thread t = w.thread;if (t != null) {final ReentrantLock mainLock = this.mainLock;mainLock.lock();try {// Recheck while holding lock.// Back out on ThreadFactory failure or if// shut down before lock acquired.int rs = runStateOf(ctl.get());if (rs < SHUTDOWN ||(rs == SHUTDOWN && firstTask == null)) {if (t.isAlive()) // precheck that t is startablethrow new IllegalThreadStateException();workers.add(w);int s = workers.size();if (s > largestPoolSize)largestPoolSize = s;workerAdded = true;}} finally {mainLock.unlock();}if (workerAdded) {t.start();workerStarted = true;}}} finally {if (! workerStarted)addWorkerFailed(w);}return workerStarted;}
那么主线程在哪里?在线程执行结束后,如果将死亡的线程清除?如何维护队列和工作线程池?
线程池的几种方式
- newCachedThreadPool:如果长时间没有往线程池中提交任务,即如果工作线程空闲了指定的时间(默认为1分钟),则该工作线程将自动终止。终止后,如果你又提交了新的任务,则线程池重新创建一个工作线程。在使用CachedThreadPool时,一定要注意控制任务的数量,否则,由于大量线程同时运行,很有会造成系统瘫痪。
- newFixedThreadPool:创建一个指定工作线程数量的线程池。每当提交一个任务就创建一个工作线程,如果工作线程数量达到线程池初始的最大数,则将提交的任务存入到池队列中。FixedThreadPool是一个典型且优秀的线程池,它具有线程池提高程序效率和节省创建线程时所耗的开销的优点。但是,在线程池空闲时,即线程池中没有可运行任务时,它不会释放工作线程,还会占用一定的系统资源。
- newSingleThreadExecutor:创建一个单线程化的Executor,即只创建唯一的工作者线程来执行任务,它只会用唯一的工作线程来执行任务,保证所有任务按照指定顺序(FIFO, LIFO, 优先级)执行。如果这个线程异常结束,会有另一个取代它,保证顺序执行。
- newScheduleThreadPool:创建一个定长的线程池,而且支持定时的以及周期性的任务执行,支持定时及周期性任务执行。
线程的生命周期
新建(new Thread)
当创建Thread类的一个实例(对象)时,此线程进入新建状态(未被启动)。
例如:Thread t1=new Thread();
就绪(runnable)
线程已经被启动,正在等待被分配给CPU时间片,也就是说此时线程正在就绪队列中排队等候得到CPU资源。例如:t1.start();
运行(running)
线程获得CPU资源正在执行任务(run()方法),此时除非此线程自动放弃CPU资源或者有优先级更高的线程进入,线程将一直运行到结束。
死亡(dead)
当线程执行完毕或被其它线程杀死,线程就进入死亡状态,这时线程不可能再进入就绪状态等待执行。
自然终止:正常运行run()方法后终止
异常终止:调用stop()方法让一个线程终止运行
堵塞(blocked)
由于某种原因导致正在运行的线程让出CPU并暂停自己的执行,即进入堵塞状态。
正在睡眠:用sleep(long t) 方法可使线程进入睡眠方式。一个睡眠着的线程在指定的时间过去可进入就绪状态。
正在等待:调用wait()方法。(调用motify()方法回到就绪状态)
被另一个线程所阻塞:调用suspend()方法。(调用resume()方法恢复)
锁机制
说说线程安全问题
在多个线程的情况下,类和变量的逻辑是正常的,不会因为多个线程并发而导致不可预期的操作。
volatile 实现原理
可见性。对一个 volatile 变量的读,总是能看到(任意线程)对这个 volatile 变量最后的写入。
原子性。对任意单个 volatile 变量的读写具有原子性,但类似于 volatile++ 这种复合操作不具有原子性。
synchronize 实现原理
见打印资料
synchronized 与 lock 的区别
见打印资料
CAS 乐观锁
ABA 问题
乐观锁的业务场景及实现方式
定义:
悲观锁(Pessimistic Lock):
每次获取数据的时候,都会担心数据被修改,所以每次获取数据的时候都会进行加锁,确保在自己使用的过程中数据不会被别人修改,使用完成后进行数据解锁。由于数据进行加锁,期间对该数据进行读写的其他线程都会进行等待。
乐观锁(Optimistic Lock):
每次获取数据的时候,都不会担心数据被修改,所以每次获取数据的时候都不会进行加锁,但是在更新数据的时候需要判断该数据是否被别人修改过。如果数据被其他线程修改,则不进行数据更新,如果数据没有被其他线程修改,则进行数据更新。由于数据没有进行加锁,期间该数据可以被其他线程进行读写操作。
适用场景:
悲观锁:比较适合写入操作比较频繁的场景,如果出现大量的读取操作,每次读取的时候都会进行加锁,这样会增加大量的锁的开销,降低了系统的吞吐量。
乐观锁:比较适合读取操作比较频繁的场景,如果出现大量的写入操作,数据发生冲突的可能性就会增大,为了保证数据的一致性,应用层需要不断的重新获取数据,这样会增加大量的查询操作,降低了系统的吞吐量。
总结:两种所各有优缺点,读取频繁使用乐观锁,写入频繁使用悲观锁。
