@liyuj
2016-12-25T09:04:55.000000Z
字数 61491
阅读 9637
Apache-Ignite-1.8.0-中文开发手册
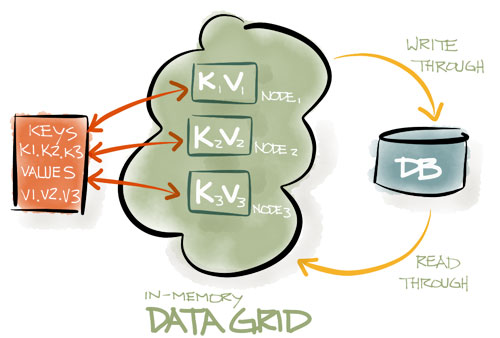
3.数据网格
3.1.数据网格
Ignite针对越来越火的水平扩展概念而构建,具有实时按需增加节点的能力。他可以支持线性扩展到几百个节点,通过数据位置的强语义以及数据关系路由来降低冗余数据噪声。
Ignite数据网格是一个基于内存的分布式键值存储,他可以视为一个分布式的分区化哈希,每个集群节点都持有所有数据的一部分,这意味着随着集群节点的增加,就可以缓存更多的数据。
与其他键值存储系统不同,Ignite通过可插拔的哈希算法来决定数据的位置,每个客户端都可以通过一个加入一个哈希函数决定一个键属于哪个节点,而不需要任何特定的映射服务器或者name节点。
Ignite数据网格支持本地、复制的、分区化的数据集,允许使用标准SQL语法方便地进行跨数据集查询,同时还支持在内存数据中进行分布式SQL关联。
Ignite数据网格轻量快速,是目前在集群中支持数据的事务性和原子性的最快的实现之一。
数据一致性
只要集群仍然处于活动状态,即使节点崩溃或者网络拓扑发生变化,Ignite都会保证不同集群节点中的数据的一致性。
JCache (JSR107)
Ignite实现了JCache(JSR107)规范。
3.2.超越JCache
3.2.1.摘要
Ignite是JCache(JSR107)规范的一个实现,JCache为数据访问提供了简单易用且功能强大的API。然而规范忽略了任何有关数据分布以及一致性的细节来允许开发商在自己的实现中有足够的自由度。
可以通过JCache实现:
- 基本缓存操作
- ConcurrentMap API
- 并行处理(EntryProcessor)
- 事件和度量
- 可插拔的持久化
在JCache之外,Ignite还提供了ACID事务,数据查询的能力(包括SQL),各种内存模型等。
3.2.2.IgniteCache
IgniteCache接口是Ignite缓存实现的一个入口,提供了保存和获取数据,执行查询,包括SQL,迭代和扫描等等的方法。
IgniteCache是基于JCache(JSR107)的,所以在非常基本的API上可以减少到javax.cache.Cache接口,然而IgniteCache还提供了JCache规范之外的、有用的功能,比如数据加载,查询,异步模型等。
可以从Ignite中直接获得IgniteCache的实例:
Ignite ignite = Ignition.ignite();// Obtain instance of cache named "myCache".// Note that different caches may have different generics.IgniteCache<Integer, String> cache = ignite.cache("myCache");
动态缓存
也可以动态地创建缓存的一个实例,这时,Ignite会在所有的集群成员中创建和部署该缓存。
Ignite ignite = Ignition.ignite();CacheConfiguration cfg = new CacheConfiguration();cfg.setName("myCache");cfg.setAtomicityMode(TRANSACTIONAL);// Create cache with given name, if it does not exist.IgniteCache<Integer, String> cache = ignite.getOrCreateCache(cfg);
XML配置
在任意的缓存节点上定义的基于Spring的XML配置的所有缓存同时会自动地在所有的集群节点上创建和部署(不需要在每个集群节点上指定同样的配置)。
3.2.3.基本操作
下面是一些JCache基本原子操作的例子:
try (Ignite ignite = Ignition.start("examples/config/example-cache.xml")) {IgniteCache<Integer, String> cache = ignite.cache(CACHE_NAME);// Store keys in cache (values will end up on different cache nodes).for (int i = 0; i < 10; i++)cache.put(i, Integer.toString(i));for (int i = 0; i < 10; i++)System.out.println("Got [key=" + i + ", val=" + cache.get(i) + ']');}
3.2.4.EntryProcessor
当在缓存中执行puts和updates操作时,通常需要在网络中发送完整的状态数据,而EntryProcessor可以直接在主节点上处理数据,只需要传输增量数据而不是全量数据。
此外,可以在EntryProcessor中嵌入自定义逻辑,比如,获取之前缓存的数据然后加1.
Java8:
IgniteCache<String, Integer> cache = ignite.cache("mycache");// Increment cache value 10 times.for (int i = 0; i < 10; i++)cache.invoke("mykey", (entry, args) -> {Integer val = entry.getValue();entry.setValue(val == null ? 1 : val + 1);return null;});
Java7:
IgniteCache<String, Integer> cache = ignite.jcache("mycache");// Increment cache value 10 times.for (int i = 0; i < 10; i++)cache.invoke("mykey", new EntryProcessor<String, Integer, Void>() {@Overridepublic Object process(MutableEntry<Integer, String> entry, Object... args) {Integer val = entry.getValue();entry.setValue(val == null ? 1 : val + 1);return null;}});
原子性:
EntryProcessor通过给键加锁以原子性方式执行。
3.2.5.异步支持
和Ignite中的所有API一样,IgniteCache实现了IgniteAsynchronousSupport接口,因此可以以异步的方式使用。
// Enable asynchronous mode.IgniteCache<String, Integer> asyncCache = ignite.cache("mycache").withAsync();// Asynhronously store value in cache.asyncCache.getAndPut("1", 1);// Get future for the above invocation.IgniteFuture<Integer> fut = asyncCache.future();// Asynchronously listen for the operation to complete.fut.listenAsync(f -> System.out.println("Previous cache value: " + f.get()));
3.3.缓存模式
3.3.1.摘要
Ignite提供了三种不同的缓存操作模式,分区、复制和本地。缓存模型可以为每个缓存单独配置,缓存模型是通过CacheMode枚举定义的。
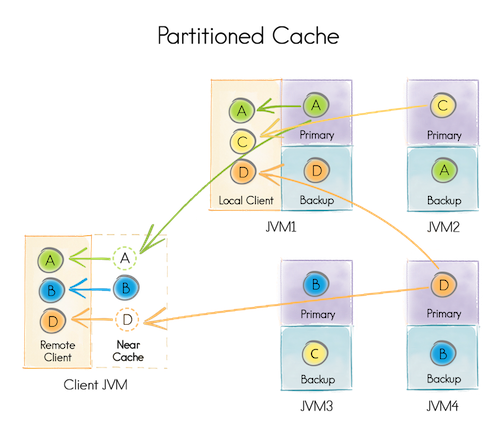
3.3.2.分区模式
分区模式是扩展性最好的分布式缓存模式,这种模式下,所有数据被均等地分布在分区中,所有的分区也被均等地拆分在相关的节点中,实际上就是为缓存的数据创建了一个巨大的内存内分布式存储。这个方式可以在所有节点上只要匹配总可用内存就可以存储尽可能多的数据,因此,可以在集群的所有节点的内存中可以存储TB级的数据,也就是说,只要有足够多的节点,就可以存储足够多的数据。
与复制模式不同,它更新是很昂贵的,因为集群内的每个节点都需要更新,而分区模式更新就很廉价,因为对于每个键只需要更新一个主节点(可选择一个或者多个备份节点),然而,读取变得较为昂贵,因为只有特定节点才持有缓存的数据。
为了避免额外的数据移动,总是访问恰好缓存有要访问的数据的节点是很重要的,这个方法叫做关系并置,当工作在分区化缓存时强烈建议使用。
分区化缓存适合于数据量很大而更新频繁的场合。
下图简单描述了一下一个分区缓存,实际上,键A赋予了运行在JVM1上的节点,B赋予了运行在JVM3上的节点,等等。
下面的配置章节显示了如何配置缓存模式的例子。
3.3.3.复制模式
复制模式中,所有数据都被复制到集群内的每个节点,因为每个节点都有效所以这个缓存模式提供了最大的数据可用性。然而,这个模式每个数据更新都要传播到其他所有节点,因而会对性能和可扩展性产生影响。
Ignite中,复制缓存是通过分区缓存实现的,每个键都有一个主拷贝而且在集群内的其他节点也会有备份。
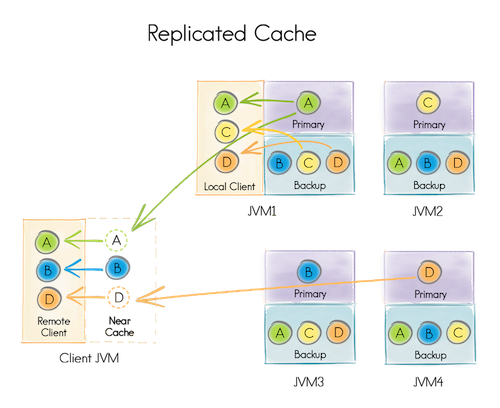
因为相同的数据被存储在所有的集群节点中,复制缓存的大小受到RAM最小的节点的有效内存限制。这个模式适用于读缓存比写缓存频繁的多而且数据集较小的场景,如果应用超过80%的时间用于查找缓存,那么就要考虑使用复制缓存模式了。
复制缓存适用于数据集不大而且更新不频繁的场合。
3.3.4.本地模式
本地模式是最轻量的模式,因为没有数据被分布化到其他节点。他适用于或者数据是只读的,或者需要定期刷新的场景中。当缓存数据失效需要从持久化存储中加载数据时,他也可以工作与通读模式。除了分布化以外,本地缓存包括了分布式缓存的所有功能,比如自动数据回收,过期,磁盘交换,数据查询以及事务。
3.3.5.配置
缓存可以每个缓存分别配置,通过设置CacheConfiguration的cacheMode属性实现:
XML:
<bean class="org.apache.ignite.configuration.IgniteConfiguration">...<property name="cacheConfiguration"><bean class="org.apache.ignite.configuration.CacheConfiguration"><!-- Set a cache name. --><property name="name" value="cacheName"/><!-- Set cache mode. --><property name="cacheMode" value="PARTITIONED"/>...</bean></property></bean>
Java:
CacheConfiguration cacheCfg = new CacheConfiguration("myCache");cacheCfg.setCacheMode(CacheMode.PARTITIONED);IgniteConfiguration cfg = new IgniteConfiguration();cfg.setCacheConfiguration(cacheCfg);// Start Ignite node.Ignition.start(cfg);
3.3.6.原子有序写模式
当分区缓存使用CacheAtomicityMode.ATOMIC模式时,可以配置成原子有序写模式,原子有序写决定哪个节点会赋予写版本(发送者或者主节点),它由CacheAtomicWriteOrderMode枚举定义,它有两种模式:CLOCK和PRIMARY。
CLOCK有序写模式中,写版本被赋予在一个发送者节点上,当使用CacheWriteSynchronizationMode.FULL_SYNC时CLOCK模式会被自动开启,因为它性能更好,因为到主节点和备份节点的写请求是被同时发送的。
PRIMARY有序写模式中,写版本只被赋予到主节点上,这种模式下发送者只会将写请求发送到主节点上然后分配写版本再转发到备份节点上。
原子有序写模式可以通过CacheConfiguration的atomicWriteOrderMode属性进行配置。
XML:
<bean class="org.apache.ignite.configuration.IgniteConfiguration">...<property name="cacheConfiguration"><bean class="org.apache.ignite.configuration.CacheConfiguration"><!-- Set a cache name. --><property name="name" value="cacheName"/><!-- Atomic write order mode. --><property name="atomicWriteOrderMode" value="PRIMARY"/>...</bean></property></bean>
Java:
CacheConfiguration cacheCfg = new CacheConfiguration();cacheCfg.setName("cacheName");cacheCfg.setAtomicWriteOrderMode(CacheAtomicWriteOrderMode.CLOCK);IgniteConfiguration cfg = new IgniteConfiguration();cfg.setCacheConfiguration(cacheCfg);// Start Ignite node.Ignition.start(cfg);
要了解有关
原子模式的更多信息,请参照:3.9.事务章节。
XML:
<bean class="org.apache.ignite.configuration.IgniteConfiguration">...<property name="cacheConfiguration"><bean class="org.apache.ignite.configuration.CacheConfiguration"><!-- Set a cache name. --><property name="name" value="cacheName"/><!-- Set cache mode. --><property name="cacheMode" value="PARTITIONED"/><!-- Number of backup nodes. --><property name="backups" value="1"/>...</bean></property></bean>
Java:
CacheConfiguration cacheCfg = new CacheConfiguration();cacheCfg.setName("cacheName");cacheCfg.setCacheMode(CacheMode.PARTITIONED);cacheCfg.setBackups(1);IgniteConfiguration cfg = new IgniteConfiguration();cfg.setCacheConfiguration(cacheCfg);// Start Ignite node.Ignition.start(cfg);
3.4.主节点和备份副本
3.4.1.摘要
在分区模式下,赋予键的节点叫做这些键的主节点,对于缓存的数据,也可以有选择地配置任意多个备份节点。如果副本数量大于0,那么Ignite会自动地为每个独立的键赋予备份节点,比如,如果副本数量为1,那么数据网格内缓存的每个键都会有2个备份,一主一备。
因为性能原因备份默认是被关闭的。
3.4.2.配置备份
备份可以通过CacheConfiguration的backups属性进行配置,像下面这样:
XML:
<bean class="org.apache.ignite.configuration.IgniteConfiguration">...<property name="cacheConfiguration"><bean class="org.apache.ignite.configuration.CacheConfiguration"><!-- Set a cache name. --><property name="name" value="cacheName"/><!-- Set cache mode. --><property name="cacheMode" value="PARTITIONED"/><!-- Number of backup nodes. --><property name="backups" value="1"/>...</bean></property></bean>
Java:
CacheConfiguration cacheCfg = new CacheConfiguration();cacheCfg.setName("cacheName");cacheCfg.setCacheMode(CacheMode.PARTITIONED);cacheCfg.setBackups(1);IgniteConfiguration cfg = new IgniteConfiguration();cfg.setCacheConfiguration(cacheCfg);// Start Ignite node.Ignition.start(cfg);
3.4.3.同步和异步备份
CacheWriteSynchronizationMode枚举可以用来配置主节点和备份部分的同步和异步更新。同步写模式告诉Ignite在完成写或者提交之前客户端节点是否要等待来自远程节点的响应。
同步写模式可以设置为下面的三种之一:
| 同步写模式 | 描述 |
|---|---|
FULL_SYNC |
客户端节点要等待所有相关远程节点的写入或者提交完成(主和备)。 |
FULL_ASYNC |
这种情况下,客户端不需要等待来自相关节点的响应。这时远程节点会在获得他们的状态在任意的缓存写操作完成或者Transaction.commit()方法调用完成之后进行小幅更新。 |
PRIMARY_SYNC |
这是默认模式,客户端节点会等待主节点的写或者提交完成,但不会等待备份节点的更新完成。 |
缓存数据一致性
注意不管那种写同步模式,缓存数据都会保持在所有相关节点上的完整一致性。
写同步模式可以通过CacheConfiguration的writeSynchronizationMode属性进行配置,像下面这样:
XML:
<bean class="org.apache.ignite.configuration.IgniteConfiguration">...<property name="cacheConfiguration"><bean class="org.apache.ignite.configuration.CacheConfiguration"><!-- Set a cache name. --><property name="name" value="cacheName"/><!-- Set write synchronization mode. --><property name="writeSynchronizationMode" value="FULL_SYNC"/>...</bean></property></bean>
Java:
CacheConfiguration cacheCfg = new CacheConfiguration();cacheCfg.setName("cacheName");cacheCfg.setWriteSynchronizationMode(CacheWriteSynchronizationMode.FULL_SYNC);IgniteConfiguration cfg = new IgniteConfiguration();cfg.setCacheConfiguration(cacheCfg);// Start Ignite node.Ignition.start(cfg);
3.5.近缓存
分区化的缓存也可以通过近缓存前移,他是一个较小的本地缓存,可以用来存储最近或者最频繁访问的数据。和分区缓存一样,可以控制近缓存的大小以及回收策略。
近缓存可以通过在Ignite.createNearCache(NearConfiguration)中传入NearConfiguration或者通过调用Ignite.getOrCreateNearCache(NearConfiguration)方法在客户端节点直接创建。使用Ignite.getOrCreateCache(CacheConfiguration, NearCacheConfiguration),可以在动态启动一个分布式缓存的同时为其创建一个近缓存。
Java:
// Create near-cache configuration for "myCache".NearCacheConfiguration<Integer, Integer> nearCfg =new NearCacheConfiguration<>();// Use LRU eviction policy to automatically evict entries// from near-cache, whenever it reaches 100_000 in size.nearCfg.setNearEvictionPolicy(new LruEvictionPolicy<>(100_000));// Create a distributed cache on server nodes and// a near cache on the local node, named "myCache".IgniteCache<Integer, Integer> cache = ignite.getOrCreateCache(new CacheConfiguration<Integer, Integer>("myCache"), nearCfg);
在大多数情况下,只要用了Ignite的关系并置,近缓存就不应该用了。如果计算与相应的分区化缓存节点是并置的,那么近缓存根本就不需要了,因为所有数据只在分区化缓存的本地才有效。
然而,有时没有必要将计算任务发送给远端节点,比如近缓存可以显著提升可扩展性或者提升应用的整体性能。
事务
近缓存是完全事务性的,当服务端的数据发生改变时会自动地获得更新或者失效。
服务端节点的近缓存
每当以一个非托管的方式从服务器端的分区缓存中访问数据时,都需要通过CacheConfiguration.setNearConfiguration(...)方法在服务端节点上配置近缓存。
3.5.1.配置
CacheConfiguration中与近缓存有关的大部分参数都会继承于服务端的配置,比如,如果服务端缓存有一个ExpiryPolicy,近缓存中的条目也会基于同样的策略。
下表中列出的参数是不会从服务端配置中继承的,是通过NearCacheConfiguration对象单独提供的:
| setter方法 | 描述 | 默认值 |
|---|---|---|
| setNearEvictionPolicy(CacheEvictionPolicy) | 近缓存回收策略 | 无 |
| setNearStartSize(int) | 缓存初始大小 | 375,000 |
3.6.缓存查询
3.6.1.摘要
Ignite提供了非常优雅的查询API,支持基于谓词的扫描查询、SQL查询(ANSI-99兼容)、文本查询。对于SQL查询,Ignite提供了内存内的索引,因此所有的数据检索都是非常快的,如果是在堆外内存中缓存数据的,那么查询索引也会缓存在堆外内存中。
Ignite也通过IndexingSpi和SpiQuery类提供对自定义索引的支持。
3.6.2.主要的抽象
IgniteCache有若干个查询方法,这些方法可以获得一些Query的子类以及返回QueryCursor。
查询
Query抽象类表示一个在分布式缓存上执行的抽象分页查询。可以通过Query.setPageSize(...)方法设置返回游标的每页大小(默认值是1024)。
查询游标
QueryCursor表示查询的结果集,可以透明地进行一页一页地迭代。每当迭代到每页的最后时,会自动地在后台请求下一页的数据,当不需要分页时,可以使用QueryCursor.getAll()方法,他会获得整个查询结果集然后存储在集合里。
关闭游标
如果调用了QueryCursor.getAll()方法,游标会自动关闭。如果通过for循环迭代一个游标或者显式地获得Iterator,必须显式地关闭或者使用AutoCloseable语法。
3.6.3.扫描查询
扫描查询可以通过用户定义的谓词以分布式的形式进行缓存的查询。
Java8:
IgniteCache<Long, Person> cache = ignite.cache("mycache");// Find only persons earning more than 1,000.try (QueryCursor cursor = cache.query(new ScanQuery((k, p) -> p.getSalary() > 1000)) {for (Person p : cursor)System.out.println(p.toString());}
Java7:
IgniteCache<Long, Person> cache = ignite.cache("mycache");// Find only persons earning more than 1,000.IgniteBiPredicate<Long, Person> filter = new IgniteBiPredicate<>() {@Override public boolean apply(Long key, Perons p) {return p.getSalary() > 1000;}};try (QueryCursor cursor = cache.query(new ScanQuery(filter)) {for (Person p : cursor)System.out.println(p.toString());}
扫描查询还支持可选的转换器闭包,它可以在服务端节点在将数据发送到客户端之前对其进行转换。这个很有用,比如,当只是希望从一个大的对象获取少量字段时,这样可以最小化网络的数据传输量,下面的示例显示了如何只获取对象的键,而不发送对象的值。
Java8:
IgniteCache<Long, Person> cache = ignite.cache("mycache");// Get only keys for persons earning more than 1,000.List<Long> keys = cache.query(new ScanQuery<Long, Person>((k, p) -> p.getSalary() > 1000), // Remote filter.Cache.Entry::getKey // Transformer.).getAll();
Java7:
IgniteCache<Long, Person> cache = ignite.cache("mycache");// Get only keys for persons earning more than 1,000.List<Long> keys = cache.query(new ScanQuery<>(// Remote filter.new IgniteBiPredicate<Long, Person>() {@Override public boolean apply(Long k, Person p) {return p.getSalary() > 1000;}}),// Transformer.new IgniteClosure<Cache.Entry<Long, Person>, Long>() {@Override public Long apply(Cache.Entry<Long, Person> e) {return e.getKey();}}).getAll();
3.6.4.SQL查询
Ignite的SQL查询请参照SQL网格的相关章节。
3.6.5.文本查询
Ignite也支持通过Lucene索引实现的基于文本的查询。
文本查询:
IgniteCache<Long, Person> cache = ignite.cache("mycache");// Query for all people with "Master Degree" in their resumes.TextQuery txt = new TextQuery(Person.class, "Master Degree");try (QueryCursor<Entry<Long, Person>> masters = cache.query(txt)) {for (Entry<Long, Person> e : cursor)System.out.println(e.getValue().toString());}
3.6.6.通过注解进行查询的配置
索引可以在代码中通过@QuerySqlField注解进行配置,来告诉Ignite那个类型要被索引,键值对可以传入CacheConfiguration.setIndexedTypes(MyKey.class, MyValue.class)方法。注意这个方法只会接受成对的类型,一个是键类型,一个是值类型。
Java:
public class Person implements Serializable {/** Person ID (indexed). */@QuerySqlField(index = true)private long id;/** Organization ID (indexed). */@QuerySqlField(index = true)private long orgId;/** First name (not-indexed). */@QuerySqlFieldprivate String firstName;/** Last name (not indexed). */@QuerySqlFieldprivate String lastName;/** Resume text (create LUCENE-based TEXT index for this field). */@QueryTextFieldprivate String resume;/** Salary (indexed). */@QuerySqlField(index = true)private double salary;...}
3.6.7.使用QueryEntity进行查询配置
索引和字段也可以通过org.apache.ignite.cache.QueryEntity进行配置,他便于通过Spring使用XML进行配置,详细信息可以参照JavaDoc。他与@QuerySqlField注解是等价的,因为在内部类注解会被转换成查询实体。
XML:
<bean class="org.apache.ignite.configuration.CacheConfiguration"><property name="name" value="mycache"/><!-- Configure query entities --><property name="queryEntities"><list><bean class="org.apache.ignite.cache.QueryEntity"><property name="keyType" value="java.lang.Long"/><property name="valueType" value="org.apache.ignite.examples.Person"/><property name="fields"><map><entry key="id" value="java.lang.Long"/><entry key="orgId" value="java.lang.Long"/><entry key="firstName" value="java.lang.String"/><entry key="lastName" value="java.lang.String"/><entry key="resume" value="java.lang.String"/><entry key="salary" value="java.lang.Double"/></map></property><property name="indexes"><list><bean class="org.apache.ignite.cache.QueryIndex"><constructor-arg value="id"/></bean><bean class="org.apache.ignite.cache.QueryIndex"><constructor-arg value="orgId"/></bean><bean class="org.apache.ignite.cache.QueryIndex"><constructor-arg value="salary"/></bean></list></property></bean></list></property></bean>
Java:
CacheConfiguration<Long, Person> cacheCfg = new CacheConfiguration<>();...cacheCfg.setName("mycache");// Setting up query entity.QueryEntity queryEntity = new QueryEntity();queryEntity.setKeyType(Long.class.getName());queryEntity.setValueType(Person.class.getName());// Listing query fields.LinkedHashMap<String, String> fields = new LinkedHashMap();fields.put("id", Long.class.getName());fields.put("orgId", Long.class.getName());fields.put("firstName", String.class.getName());fields.put("lastName", String.class.getName());fields.put("resume", String.class.getName());fields.put("salary", Double.class.getName());queryEntity.setFields(fields);// Listing indexes.Collection<QueryIndex> indexes = new ArrayList<>(3);indexes.add(new QueryIndex("id"));indexes.add(new QueryIndex("orgId"));indexes.add(new QueryIndex("salary"));queryEntity.setIndexes(indexes);...cacheCfg.setQueryEntities(Arrays.asList(queryEntity));...
3.7.持续查询
3.7.1.ContinuousQuery API
持续查询对于当执行一个查询之后希望持续地获得该查询结果数据更新的通知时,是很有用的。
持续查询是通过ContinuousQuery类实现的,他支持如下特性:
初始化查询
当执行持续查询时,在开始监听更新之前可以有选择地执行初始化查询。初始化查询可以通过ContinuousQuery.setInitialQuery(Query)方法进行设置,并且可以是任意查询类型,包括扫描查询,SQL查询和文本查询。这个参数是可选的,并且如果不设置,这个功能是不会启用的。
远程过滤器
过滤器在给定键对应的主和备节点上执行,然后评估事件是否会被传播给监听器。如果监听器返回true,那么监听器就会收到通知,否则事件会被忽略。发生监听事件的节点会最大限度地减少监听通知的网络流量。远程过滤器可以通过ContinuousQuery.setRemoteFilter(CacheEntryEventFilter<K, V>)方法进行设置。
本地监听器
每当事件通过远程过滤器,他们会被发送给客户端来通知本地的监听器,本地监听器是通过ContinuousQuery.setLocalListener(CacheEntryUpdatedListener<K, V>)方法设置的。
Java8:
IgniteCache<Integer, String> cache = ignite.cache("mycache");// Create new continuous query.ContinuousQuery<Integer, String> qry = new ContinuousQuery<>();// Optional initial query to select all keys greater than 10.qry.setInitialQuery(new ScanQuery<Integer, String>((k, v) -> k > 10)):// Callback that is called locally when update notifications are received.qry.setLocalListener((evts) ->evts.stream().forEach(e -> System.out.println("key=" + e.getKey() + ", val=" + e.getValue())));// This filter will be evaluated remotely on all nodes.// Entry that pass this filter will be sent to the caller.qry.setRemoteFilter(e -> e.getKey() > 10);// Execute query.try (QueryCursor<Cache.Entry<Integer, String>> cur = cache.query(qry)) {// Iterate through existing data stored in cache.for (Cache.Entry<Integer, String> e : cur)System.out.println("key=" + e.getKey() + ", val=" + e.getValue());// Add a few more keys and watch a few more query notifications.for (int i = 5; i < 15; i++)cache.put(i, Integer.toString(i));}
Java7:
IgniteCache<Integer, String> cache = ignite.cache(CACHE_NAME);// Create new continuous query.ContinuousQuery<Integer, String> qry = new ContinuousQuery<>();qry.setInitialQuery(new ScanQuery<Integer, String>(new IgniteBiPredicate<Integer, String>() {@Override public boolean apply(Integer key, String val) {return key > 10;}}));// Callback that is called locally when update notifications are received.qry.setLocalListener(new CacheEntryUpdatedListener<Integer, String>() {@Override public void onUpdated(Iterable<CacheEntryEvent<? extends Integer, ? extends String>> evts) {for (CacheEntryEvent<Integer, String> e : evts)System.out.println("key=" + e.getKey() + ", val=" + e.getValue());}});// This filter will be evaluated remotely on all nodes.// Entry that pass this filter will be sent to the caller.qry.setRemoteFilter(new CacheEntryEventFilter<Integer, String>() {@Override public boolean evaluate(CacheEntryEvent<? extends Integer, ? extends String> e) {return e.getKey() > 10;}});// Execute query.try (QueryCursor<Cache.Entry<Integer, String>> cur = cache.query(qry)) {// Iterate through existing data.for (Cache.Entry<Integer, String> e : cur)System.out.println("key=" + e.getKey() + ", val=" + e.getValue());// Add a few more keys and watch more query notifications.for (int i = keyCnt; i < keyCnt + 10; i++)cache.put(i, Integer.toString(i));}
事件传递保证
持续查询的实现提供明确的一次保证,将一个事件传递给客户端的本地监听器。因为除了主节点,在每个备份节点维护一个更新队列是可能的。如果主节点故障或者由于某些其他原因网络发生了改变,之后每个备份节点会刷新他的内部队列的内容给客户端来确保事件都会被传递给客户端的本地监听器。
为了避免重复通知,当所有的备份节点都刷新他们的队列给客户端时,Ignite会为每个分区维护一个更新计数器。一旦某个分区的一个条目已经更新,这个分区的计数器在主节点和备份节点都会增加。这个计数器的值会和事件通知一起发给客户端,该客户端还维护该映射的副本。如果客户端收到了一个更新,对应的计数小于它的本地映射,这个更新会被视为重复的然后被忽略。
一旦客户端确认一个事件已经收到,主节点和备份节点会从它们的备份队列中删除该事件的记录。
3.8.事务
3.8.1.原子化模式
Ignite支持两种类型的缓存操作,事务性和原子性,在事务性模式中可以在一个事务中组合多个缓存操作,而原子性模式支持多个原子性操作,一次一个。
这些原子化模式是在CacheAtomicityMode枚举中定义的:
TRANSACTIONALATOMIC
TRANSACTIONAL模式开启了完全遵守ACID的事务,但是,如果只需要原子语义,因为性能原因还是建议使用ATOMIC模式。
ATOMIC模式因为避免了事务锁,所以性能更好,但是仍然提供了数据的原子性和一致性。ATOMIC模式的另一个不同是批量写,比如putAll(...)和removeAll(...)方法不再可以在一个事务中执行并且可能部分失败,在部分失败时,会抛出CachePartialUpdateException,它里面包含了更新失败的键列表。
原子化模式是在CacheAtomicityMode枚举中定义的,可以在CacheConfiguration的atomicityMode属性进行配置。
XML:
<bean class="org.apache.ignite.configuration.IgniteConfiguration">...<property name="cacheConfiguration"><bean class="org.apache.ignite.configuration.CacheConfiguration"><!-- Set a cache name. --><property name="name" value="myCache"/><!-- Set atomicity mode, can be ATOMIC or TRANSACTIONAL.ATOMIC is default. --><property name="atomicityMode" value="TRANSACTIONAL"/>...</bean></property><!-- Optional transaction configuration. --><property name="transactionConfiguration"><bean class="org.apache.ignite.configuration.TransactionConfiguration"><!-- Configure TM lookup here. --></bean></property></bean>
Java:
CacheConfiguration cacheCfg = new CacheConfiguration();cacheCfg.setName("cacheName");cacheCfg.setAtomicityMode(CacheAtomicityMode.ATOMIC);IgniteConfiguration cfg = new IgniteConfiguration();cfg.setCacheConfiguration(cacheCfg);// Optional transaction configuration. Configure TM lookup here.TransactionConfiguration txCfg = new TransactionConfiguration();cfg.setTransactionConfiguration(txCfg);// Start Ignite node.Ignition.start(cfg);
性能
注意当使用ATOMIC模式时,事务是被禁用的,因为不需要事务,因此可以获得更高的性能和吞吐量。
3.8.2.IgniteTransactions
IgniteTransactions接口包括了启动和结束事务的功能,以及订阅监听器或者获得指标数据。
跨缓存事务
可以在一个事务中组合来自不同缓存的多个操作。注意它可以在一个事务中更新不同类型的缓存,比如复制和分区缓存。
近缓存事务
近缓存是完全事务化的,当数据在服务端改变时,会自动地获得更新或者失效。
可以像下面这样获得IgniteTransactions的一个实例:
Java:
Ignite ignite = Ignition.ignite();IgniteTransactions transactions = ignite.transactions();
下面是一个事务如何在Ignite中执行的例子:
try (Transaction tx = transactions.txStart()) {Integer hello = cache.get("Hello");if (hello == 1)cache.put("Hello", 11);cache.put("World", 22);tx.commit();}
3.8.3.2阶段提交(2PC)
Ignite在事务中使用了2阶段提交的协议,但是只要适用也带有很多一阶段提交的优化。在一个事务中当数据更新时,Ignite会在本地事务映射中保持事务状态直到调用了commit()方法,在这一点,只要需要,数据都会被传输到远程节点。
对于Ignite2阶段提交是怎么工作的更多信息,可以参照如下博客:
ACID完整性
Ignite提供了完整的ACID(原子性,一致性,隔离性和持久性)兼容事务来确保一致性。
3.8.4.并发模型和隔离级别
当原子化模式配置为事务时,Ignite对事务支持乐观和悲观的并发模型。并发模型决定了何时获得一个条目级的事务锁-在访问数据时或者在prepare阶段。锁定可以防止对一个对象的并发访问。比如,当试图用悲观锁更新一个ToDo列表项时,服务端会在该对象上置一个锁以使其他的事务或者操作无法更新同一个条目,直到提交或者回滚该事务。不管在一个事务中使用那种并发模型,在提交之前都存在事务中的所有条目被锁定的时刻。
隔离级别定义了并发事务如何"看"以及处理针对同一个键的操作。Ignite支持读提交、可重复读、可序列化隔离级别。
并发模型和隔离级别的所有组合都是可以同时使用的。下面是针对Ignite提供的每一个并发-隔离组合的行为和保证的描述。
3.8.5.悲观事务
在悲观事务中,锁是在第一次读或者写访问期间获得(取决于隔离级别)然后被事务持有直到其被提交或者回滚。该模式中,锁首先在主节点获得然后在准备阶段提升至备份节点。下面的隔离级别可以配置为悲观并发模型。
读提交:数据被无锁地读取并且不会被事务本身缓存。如果缓存配置允许的话数据是可能从一个备份节点中读取的。在这个隔离级别中,可以有所谓的非可重复读,因为当在自己的事务中读取数据两次时,一个并发事务可以改变该数据。锁只有在第一次写访问时才会获得(包括EntryProcessor调用)。这意味着事务中已经读取的一个条目在该事务提交时可能有一个不同的值,这种情况是不会抛出异常的。可重复读:获得条目锁以及第一次读或者写访问时从主节点获得数据,然后就存储在本地事务映射中。之后对同一数据的所有连续访问都是本地化的,并且返回最后一次读或者被更新的事务值。这意味着没有其他的并发事务可以改变锁定的数据,这样就获得了事务的可重复读。可序列化:在悲观模式中,这个隔离级别与可重复读是一样的工作方式。
注意,在悲观模式中,锁的顺序是很重要的。此外,Ignite可以按照用户提供的顺序依次并且准确地获得锁。
性能考量
设想网络中有三个节点(A、B、C),并且在事务中针对键[1, 2, 3, 4, 5, 6]执行一个putAll。假定这些键以如下形式映射到节点:{A: 1, 4}, {B: 2, 5}, {C: 3, 6},因为Ignite在悲观模式中无法改变获得锁的顺序,他会产生6次连续地网络往返:[A, B, C, A, B, C]。在键的锁定顺序对于一个事务的语义不重要的情况下,将键按照分区进行分组然后将在一个分区的键一起锁定是明智的。这在一个大的事务中可以显著地降低网络消息的数量。在这个示例中,如果对于一个putAll键按照如下的方式排序:[1, 4, 2, 5, 3, 6],之后只需要3次的连续网络访问。
拓扑变化约束
注意,如果至少获得一个悲观事务锁,都不可能改变缓存的拓扑,直到事务被提交或者回滚,因此,不建议长时间地持有事务锁。
3.8.6.悲观事务的死锁检测
当处理分布式事务时必须要遵守的主要规则是参与一个事务的键的锁,必须按照同样的顺序获得,违反这个规则就可能导致分布式死锁。
Ignite无法避免分布式死锁,而是有一个内建的功能来使调试和解决这个问题更容易。
目前死锁检测过程只支持悲观事务,对乐观事务的支持会在Ignite的下一个版本中提供。
就像下面的代码片段所示,一个带有超时时间的事务启动。如果过了超时时间,死锁检测过程就会试图查找一个触发这个超时的可能的死锁。当超过超时时间时,会抛出TransactionTimeoutException并且像触发CacheException那样传播到应用层而不会管死锁。然而,如果检测到了一个死锁,返回的TransactionTimeoutException的cause会是TransactionDeadlockException(至少涉及死锁的一个事务)。
try (Transaction tx = ignite.transactions().txStart(TransactionConcurrency.PESSIMISTIC,TransactionIsolation.READ_COMMITTED, 300, 0)) {cache.put(1, 1);cache.put(2, 1);tx.commit();}catch (CacheException e) {if (e.getCause() instanceof TransactionTimeoutException &&e.getCause().getCause() instanceof TransactionDeadlockException)System.out.println(e.getCause().getCause().getMessage());}
TransactionDeadlockException里面包含了有用的信息,有助于找到导致死锁的原因。
Deadlock detected:K1: TX1 holds lock, TX2 waits lock.K2: TX2 holds lock, TX1 waits lock.Transactions:TX1 [txId=GridCacheVersion [topVer=74949328, time=1463469328421, order=1463469326211, nodeOrder=1], nodeId=ad68354d-07b8-4be5-85bb-f5f2362fbb88, threadId=73]TX2 [txId=GridCacheVersion [topVer=74949328, time=1463469328421, order=1463469326210, nodeOrder=1], nodeId=ad68354d-07b8-4be5-85bb-f5f2362fbb88, threadId=74]Keys:K1 [key=1, cache=default]K2 [key=2, cache=default]
死锁检测是一个多步过程,依赖于集群中节点的数量、键以及可能导致死锁涉及的事务数,可能需要做很多次迭代。一个死锁检测的发起者是发起事务并且出现TransactionTimeoutException错误的那个节点,这个节点会检查是否发生了死锁,通过与其他远程节点交换请求/响应,并且准备一个与死锁有关的、由TransactionDeadlockException提供的报告,每个这样的消息(请求/响应)都会被称为一个迭代器。
因为死锁检测过程不结束,事务就不会回滚,有时,如果希望对于事务回滚有一个可预测的时间,调整一下参数还是有意义的(下面会描述)。
IgniteSystemProperties.IGNITE_TX_DEADLOCK_DETECTION_MAX_ITERS:指定死锁检测过程迭代器的最大数,如果这个属性的值小于等于0,死锁检测会被禁用(默认为1000);IgniteSystemProperties.IGNITE_TX_DEADLOCK_DETECTION_TIMEOUT:指定死锁检测机制的超时时间(默认为1分钟)。
注意如果迭代器太少的话,可能获得一个不完整的死锁检测报告。
如果想彻底避免死锁,可以看下面的无死锁事务章节。
3.8.7.乐观事务
在乐观事务中,条目锁是在准备阶段从主节点获得的,然后提升至备份节点,该锁在事务提交时被释放。如果用户回滚事务没有试图做提交,是不会获得锁的。下面的隔离级别可以与乐观并发模型配置在一起。
读提交:应该作用于缓存的改变是在源节点上收集的,然后事务提交后生效。事务数据无锁地读取并且不会在事务中缓存。如果缓存配置允许的话该数据是可能从备份节点中读取的。在这个隔离级别中,可以有一个所谓的非可重复读,因为在自己的事务中读取数据两次时另一个事务可以修改数据。这个模式组合在第一次读或者写操作后如果条目值被修改是不会做校验的,并且不会抛出异常。可重复读:这个隔离级别的事务的工作方式类似于乐观读提交的事务,只有一个不同-读取值缓存于源节点并且所有的后续读保证都是本地化的。这个模式组合在第一次读或者写操作后如果条目值被修改是不会做校验的,并且不会抛出异常。可序列化:在第一次读访问之后会存储一个条目的版本,如果Ignite引擎检测到发起事务中的条目只要有一个被修改,Ignite就会在提交阶段放弃该事务,这是在提交阶段对网格内的事务中记载的条目的版本进行内部检查实现的。简而言之,这意味着Ignite如果在一个事务的提交阶段检测到一个冲突,就会放弃这个事务并且抛出TransactionOptimisticException异常以及回滚已经做出的任何改变,开发者应该处理这个异常并且重试该事务。
IgniteTransactions txs = ignite.transactions();// Start transaction in optimistic mode with serializable isolation level.while (true) {try (Transaction tx =ignite.transactions().txStart(TransactionConcurrency.OPTIMISTIC,TransactionIsolation.SERIALIZABLE)) {// Modify cache entires as part of this transacation.....// commit transaction.tx.commit();// Transaction succeeded. Leave the while loop.break;}catch (TransactionOptimisticException e) {// Transaction has failed. Retry.}}
这里另外一个需要注意的重要的点是,即使一个条目只是简单地读取(没有改变,cache.put(...)),一个事务仍然可能失败,因为该条目的值对于发起事务中的逻辑很重要。
注意,对于读提交和可重复读事务,键的顺序是很重要的,因为这些模式中锁也是按顺序获得的。
3.8.8.无死锁事务
对于乐观的可序列化事务,锁不是按顺序获得的。该模式中键可以按照任何顺序访问,因为事务锁是通过一个额外的检查以并行的方式获得的,这使得Ignite可以避免死锁。
这里需要引入几个概念来描述可序列化的事务锁是如何工作的。Ignite中的每个事务都会被赋予一个叫做XidVersion的可比较的版本号,事务提交时该事务中修改的每个条目都会被赋予一个叫做EntryVersion的新的版本号,一个版本号为XidVersionA的乐观可序列化事务在如下情况下会抛出TransactionOptimisticException异常而失败:
- 有一个进行中的
悲观的或者非可序列化乐观事务在可序列化事务中的一个条目上持有了一个锁; - 有另外一个进行中的版本号为
XidVersionB的乐观可序列化事务,在XidVersionB > XidVersionA时以及这个事务在可序列化事务中的一个条目上持有了一个锁; - 在该
乐观可序列化事务获得所有必要的锁时,存在在提交之前的版本与当前版本不同的条目;
在一个高并发环境中,乐观锁可能导致一个很高的事务失败率。但是悲观锁如果锁被事务以一个不同的顺序获得可能导致死锁。
然而,在一个同质化的环境中,乐观可序列化锁对于大的事务可能提供更好的性能,因为网络交互的数量只取决于事务相关的节点的数量,而不取决于事务中的键的数量。
3.8.9.集成JTA
Ignite可以通过TransactionConfiguration#setTxManagerFactory方法配置一个JTA事务管理器搜索类,事务管理器工厂是一个工厂,他给Ignite提供了一个JTA事务管理器的实例。
Ignite提供了一个CacheJndiTmFactory工厂,他是一个通过JNDI名字查找事务管理器的开箱即用的事务管理器工厂实现。
设置了之后,在事务中的每一次缓存操作,Ignite都会检查是否存在一个进行中的JTA事务。如果JTA事务开启了,Ignite也会开启一个事务然后通过他自己的一个XAResource的内部实现来将其加入JTA事务,Ignite事务会准备,提交或者干脆回滚相应的JTA事务。
下面是一个在Ignite中使用JTA事务管理器的示例:
Java:
// Get an instance of JTA transaction manager.TMService tms = appCtx.getComponent(TMService.class);// Get an instance of Ignite cache.IgniteCache<String, Integer> cache = cache();UserTransaction jtaTx = tms.getUserTransaction();// Start JTA transaction.jtaTx.begin();try {// Do some cache operations.cache.put("key1", 1);cache.put("key2", 2);// Commit the transaction.jtaTx.commit();}finally {// Rollback in a case of exception.if (jtaTx.getStatus() == Status.STATUS_ACTIVE)jtaTx.rollback();}
3.9.锁
缓存事务会隐式地获得锁,然而,有些情况下显式锁是很有用的。IgniteCacheAPI的lock()方法会返回一个java.util.concurrent.locks.Lock的实例,他可以在任意给定的键上定义显式的分布式锁,也可以通过IgniteCache.lockAll()方法给集合对象加锁。
IgniteCache<String, Integer> cache = ignite.cache("myCache");// Create a lock for the given key.Lock lock = cache.lock("keyLock");try {// Aquire the lock.lock.lock();cache.put("Hello", 11);cache.put("World", 22);}finally {// Release the lock.lock.unlock();}
原子化模式
Ignite中,只有在TRANSACTIONAL原子化模式中才支持锁,他可以通过CacheConfiguration的atomicityMode属性进行配置。
锁和事务
显式锁是非事务性的,不能在事务中使用(会抛出异常)。如果确实需要在事务中使用显式锁,那么需要使用事务的TransactionConcurrency.PESSIMISTIC并发控制,他会为相关的缓存操作获得显式锁。
3.10.堆外内存
3.10.1.摘要
当堆上的数据集特别大时,堆外内存通过将缓存数据保存在Java主堆空间之外来避免因为JVM长时间的垃圾回收导致的暂停,但是数据仍然在内存中。
堆外索引
注意当配置了堆外存储时,Ignite同时也会把查询索引保存在堆外,这意味着索引也不会占用任何的堆内空间。
堆外内存与多进程
也可以通过在同一台物理机上以小型堆开启多个进程来管理垃圾回收导致的停顿,然而,当使用复制缓存时这个做法是浪费的。因为对于开启的每个JVM进程,最终都会缓存完全一致的复制数据。
3.10.1.分层堆外存储
Ignite提供了分层存储模型,使数据可以在堆内、堆外和交换空间之间保存和移动。越往上的层提供了更大的存储能力,逐渐地延迟也会增加。
Ignite提供了三种存储模型,是在CacheMemoryMode中定义的。
| 存储模型 | 描述 |
|---|---|
ONHEAP_TIERED |
保存在堆内,退出到堆外以及可选的存储在交换空间 |
OFFHEAP_TIERED |
保存在堆外,避开堆内以及可选的退出到交换空间 |
OFFHEAP_VALUES |
将键存储在堆内,将值存储在堆外 |
3.10.2.堆内层
Ignite中,ONHEAP_TIERED是默认的存储模型,所有的缓存数据都会存储在堆内,数据可以从堆内移动到堆外存储,如果配置了还可以移动到交换空间。
要配置ONHEAP_TIERED存储模型,需要:
- 将
CacheConfiguration的memoryMode属性设置为ONHEAP_TIERED. - 启动堆外内存(可选)
- 配置堆内内存的退出策略
XML:
<bean class="org.apache.ignite.configuration.CacheConfiguration">...<!-- Store cache entries on-heap. --><property name="memoryMode" value="ONHEAP_TIERED"/><!-- Enable Off-Heap memory with max size of 10 Gigabytes (0 for unlimited). --><property name="offHeapMaxMemory" value="#{10 * 1024L * 1024L * 1024L}"/><!-- Configure eviction policy. --><property name="evictionPolicy"><bean class="org.apache.ignite.cache.eviction.fifo.FifoEvictionPolicy"><!-- Evict to off-heap after cache size reaches maxSize. --><property name="maxSize" value="100000"/></bean></property>...</bean>
Java:
CacheConfiguration cacheCfg = new CacheConfiguration();cacheCfg.setMemoryMode(CacheMemoryMode.ONHEAP_TIERED);// Set off-heap memory to 10GB (0 for unlimited)cacheCfg.setOffHeapMaxMemory(10 * 1024L * 1024L * 1024L);FifoEvictionPolicy evctPolicy = new FifoEvictionPolicy();// Store only 100,000 entries on-heap.evctPolicy.setMaxSize(100000);cacheCfg.setEvictionPolicy(evctPolicy);IgniteConfiguration cfg = new IgniteConfiguration();cfg.setCacheConfiguration(cacheCfg);// Start Ignite node.Ignition.start(cfg);
退出策略
注意如果在ONHEAP_TIERED模式中没有启用退出策略,数据是不会从堆内移动到堆外的。
3.10.3.堆外层
这个存储模型可以配置将缓存数据直接存储在堆外内存空间,避开堆内内存。如果所有数据都存储在堆外,那么就没有必要显式地配置退出策略。如果存储超过了限制(0为没有限制),那么LRU退出策略就会被用于将数据从堆外存储可选地移动到交换空间,如果配置了的话。
要配置OFFHEAP_TIERED存储模型,需要:
- 将
CacheConfiguration的memoryMode属性设置为OFFHEAP_TIERED. - 启用堆外存储(可选)
XML:
<bean class="org.apache.ignite.configuration.CacheConfiguration">...<!-- Always store cache entries in off-heap memory. --><property name="memoryMode" value="OFFHEAP_TIERED"/><!-- Enable Off-Heap memory with max size of 10 Gigabytes (0 for unlimited). --><property name="offHeapMaxMemory" value="#{10 * 1024L * 1024L * 1024L}"/>...</bean>
Java:
CacheConfiguration cacheCfg = new CacheConfiguration();cacheCfg.setMemoryMode(CacheMemoryMode.OFFHEAP_TIERED);// Set off-heap memory to 10GB (0 for unlimited)cacheCfg.setOffHeapMaxMemory(10 * 1024L * 1024L * 1024L);IgniteConfiguration cfg = new IgniteConfiguration();cfg.setCacheConfiguration(cacheCfg);// Start Ignite node.Ignition.start(cfg);
3.10.4.堆外值
这个存储模型可以将键存储在堆内,将值存储在堆外,这个存储模型适用于键较小和值较大的场景。
要配置OFFHEAP_VALUES存储模型,需要:
- 将
CacheConfiguration的memoryMode属性设置为OFFHEAP_VALUES. - 启用堆外存储
- 配置堆外存储的退出策略(可选)
XML:
<bean class="org.apache.ignite.configuration.CacheConfiguration">...<!-- Always store cache entries in off-heap memory. --><property name="memoryMode" value="OFFHEAP_VALUES"/><!-- Enable Off-Heap memory with max size of 10 Gigabytes (0 for unlimited). --><property name="offHeapMaxMemory" value="#{10 * 1024L * 1024L * 1024L}"/>...</bean>
Java:
CacheConfiguration cacheCfg = new CacheConfiguration();cacheCfg.setMemoryMode(CacheMemoryMode.OFFHEAP_VALUES);IgniteConfiguration cfg = new IgniteConfiguration();cfg.setCacheConfiguration(cacheCfg);// Start Ignite node.Ignition.start(cfg);
3.10.5.交换空间
当数据集超过了堆内和堆外存储的限值,需要配置交换空间以使Ignite可以将数据退出到磁盘而不是抛弃他们。
交换空间性能
因为交换空间是磁盘上的,所以性能会显著慢于堆内和堆外内存。
XML:
<bean class="org.apache.ignite.configuration.CacheConfiguration">...<!-- Enable swap. --><property name="swapEnabled" value="true"/>...</bean>
Java:
CacheConfiguration cacheCfg = new CacheConfiguration();cacheCfg.setSwapEnabled(true);IgniteConfiguration cfg = new IgniteConfiguration();cfg.setCacheConfiguration(cacheCfg);// Start Ignite node.Ignition.start(cfg);
3.11.关系并置
数据和计算以及数据和数据的并置可以显著地提升应用的性能和可扩展性。
3.11.1.数据与数据的并置
在许多情况下,如果不同的缓存键被同时访问的话那么将他们并置在一起是很有利的。通常来说业务逻辑需要访问不止一个的缓存键,通过将他们并置在一起可以确保具有同一个affinityKey的所有键都会缓存在同一个处理节点上,从而避免从远程节点获取数据的昂贵网络开销。
例如,有一个Person和Company对象,然后希望将Person对象和其工作的Company对象并置在一起。要做到这一点,用于缓存Person对象的缓存键应该有一个属性或者方法加注了@AffinityKeyMapped注解,他会提供用于并置的Company键的值,方便起见,也可以可选地使用AffinityKey类。
Scala中的注解
注意,如果Scala的case class用于键类并且它的构造函数参数之一加注了@AffinityKeyMapped注解,默认这个注解并不会正确地用于生成的字段,因此也就不会被Ignite识别。要覆盖这个行为,可以使用@field元注解而不是@AffinityKeyMapped(看下面的示例)。
使用PersonKey:
public class PersonKey {// Person ID used to identify a person.private String personId;// Company ID which will be used for affinity.@AffinityKeyMappedprivate String companyId;...}// Instantiate person keys with the same company ID which is used as affinity key.Object personKey1 = new PersonKey("myPersonId1", "myCompanyId");Object personKey2 = new PersonKey("myPersonId2", "myCompanyId");Person p1 = new Person(personKey1, ...);Person p2 = new Person(personKey2, ...);// Both, the company and the person objects will be cached on the same node.cache.put("myCompanyId", new Company(...));cache.put(personKey1, p1);cache.put(personKey2, p2);
使用PersonKey(Scala)
case class PersonKey (// Person ID used to identify a person.personId: String,// Company ID which will be used for affinity.@(AffinityKeyMapped @field)companyId: String)// Instantiate person keys with the same company ID which is used as affinity key.val personKey1 = PersonKey("myPersonId1", "myCompanyId");val personKey2 = PersonKey("myPersonId2", "myCompanyId");val p1 = new Person(personKey1, ...);val p2 = new Person(personKey2, ...);// Both, the company and the person objects will be cached on the same node.compCache.put("myCompanyId", Company(...));perCache.put(personKey1, p1);perCache.put(personKey2, p2);
使用AffinityKey:
Object personKey1 = new AffinityKey("myPersonId1", "myCompanyId");Object personKey2 = new AffinityKey("myPersonId2", "myCompanyId");Person p1 = new Person(personKey1, ...);Person p2 = new Person(personKey2, ...);// Both, the company and the person objects will be cached on the same node.cache.put("myCompanyId", new Company(..));cache.put(personKey1, p1);cache.put(personKey2, p2);
SQL关联
当在分区缓存上的数据执行SQL分布式关联时,一定要确保关联的键是并置的。
3.11.2.数据和计算的并置
也有可能向缓存数据的节点发送计算,这是一个被称为数据和计算的并置的概念,他可以向特定的节点发送整个的工作单元。
要将数据和计算并置在一起,需要使用IgniteCompute.affinityRun(...)和IgniteCompute.affinityCall(...)方法。
下面的例子显示了如何和上面提到的缓存Person和Company对象的同一个集群节点进行并置计算:
Java8:
String companyId = "myCompanyId";// Execute Runnable on the node where the key is cached.ignite.compute().affinityRun("myCache", companyId, () -> {Company company = cache.get(companyId);// Since we collocated persons with the company in the above example,// access to the persons objects is local.Person person1 = cache.get(personKey1);Person person2 = cache.get(personKey2);...});
Java7:
final String companyId = "myCompanyId";// Execute Runnable on the node where the key is cached.ignite.compute().affinityRun("myCache", companyId, new IgniteRunnable() {@Override public void run() {Company company = cache.get(companyId);Person person1 = cache.get(personKey1);Person person2 = cache.get(personKey2);...}};
3.11.3.IgniteCompute和EntryProcessor
IgniteCompute.affinityRun(...)和IgniteCache.invoke(...)方法都提供了数据和计算的并置。主要的不同在于invoke(...)方法是原子的并且执行时在键上加了锁,无法从EntryProcessor逻辑内部访问其他的键,因为它会触发一个死锁。
另一方面,affinityRun(...)和affinityCall(...)不持有任何锁。比如,在这些方法内开启多个事务或者执行缓存查询是绝对合法的,不用担心死锁。这时Ignite会自动检测处理是并置的然后对事务采用优化过的一阶段提交而不是二阶段提交。
关于
IgniteCache.invoke(...)方法的更多信息,请参照3.2.超越JCache文档。
3.11.4.关系函数
分区的关系控制一个分区缓存在哪个网格节点或者哪些节点上。AffinityFunction是一个可插拔的API用于确定网格中分区到节点的一个理想映射。当集群网络发生变化时,分区到节点的映射可能不同于关系函数提供的理想分布,直到再平衡结束。
Ignite附带了两个预定义的关系函数实现:
RendezvousAffinityFunction:这个函数允许分区到节点的映射有点区别(即一些节点可能比其他节点负责稍微多一点的分区数量)。然而,它保证当网络发生变化时,分区只会迁移到一个新加入的节点或者只来自一个离开的节点,集群内已有的节点间不会发生数据的交换。FairAffinityFunction:这个函数试图确保分区在集群节点间均衡分布,这可能导致集群内的已有节点间产生分区迁移的开销。
注意,缓存关系函数不会直接映射键和节点,它映射的是键和分区。分区只是来自一个有限集合的简单的数字(默认0-1024)。在键映射到他们的分区之后(即获得了他们的分区号),已有的分区到节点的映射会用于当前的网络版本,键到分区的映射在时间上并不会改变。
关系的故障安全
主备副本不位于同一台物理机上,以这样的方式调整集群内的分区是很有用的,要确保这个属性,可以在RendezvousAffinityFunction和FairAffinityFunction上设置excludeNeighbors标志。
有时将一个分区的主备副本放在不同的机架上也是很有用的。这时,可以为每个节点赋予一个特别的属性然后在RendezvousAffinityFunction和FairAffinityFunction上使用backupFilter属性来排除同一个机架中分配用于备份副本的若干节点。
AffinityFunction是一个可插拔的API,也可以提供这个函数的自定义实现,AffinityFunctionAPI的三个主要方法是:
partitions():获取一个缓存的分区总数量,集群启动之后无法改变。partition(...):给定一个键,这个方法确定一个键属于哪个分区,这个映射在时间上不会改变。assignPartitions(...):这个方法在集群网络发生变化时每次都会被调用,这个方法对于给定的集群网络返回一个分区到节点的映射。
3.11.5.CacheAffinityKeyMapper
CacheAffinityKeyMapper是一个可插拔的API,负责为一个缓存键获取关系键。通常缓存键本身就用于关系键,然而为了与其他的缓存键并置,有时改变一个缓存键的关系是很重要的。
CacheAffinityKeyMapper的主要方法是affinityKey(key),他会为一个缓存键返回一个affinityKey。Ignite默认会查找加注@CacheAffinityKeyMapped注解的所有属性和方法。如果没有找到这样的属性或者方法,那么缓存键本身就会用做关系键。如果找到了这样的属性或者方法,那么这个属性或者方法的值就会从CacheAffinityKeyMapper.affinityKey(key)方法返回,这样只要需要,就可以指定一个替代的关系键,而不是缓存键本身。
3.12.持久化存储
3.12.1.摘要
JCache提供了javax.cache.integration.CacheLoader和javax.cache.integration.CacheWriterAPI,他们分别用于底层持久化存储的通读和通写(比如RDBMS中的Oracle或者MySQL,以及NoSQL数据库中的MongoDB或者CouchDB)。
虽然Ignite可以单独地配置CacheRLoader和CacheWriter,但是在两个单独的类中实现事务化存储是非常尴尬的,因为多个load和put操作需要在同一个事务中的同一个连接中共享状态。为了缓解这个问题,Ignite提供了·org.apacche.ignite.cache.store.CacheStore·接口,他同时扩展了CacheLoader和CacheWriter。
事务
CacheStore是完整事务性的,他会自动地融入当前的缓存事务。
CacheJdbcPojoStore
Ignite附带了他自己的CacheJdbcPojoStore,他会自动地建立Java POJO和数据库模式之间的映射,可以参照3.13.自动持久化章节。
3.12.2.通读和通写
当希望通读和通写时,提供一个正常的缓存存储的实现是很重要的。通读意味着当缓存无效时会从持久化存储中读取,通写意味着当缓存更新时会自动地进行持久化。所有的通读和通写都会参与整体的缓存事务以及作为一个整体提交或者回滚。
要配置通读和通写,需要实现CacheStore接口以及设置CacheConfiguration中cacheStoreFactory的readThrough和writeThrough属性,下面的例子会有说明。
3.12.3.后写缓存
在一个简单的通写模式中每个缓存的put和remove操作都会涉及一个持久化存储的请求,因此整个缓存更新的持续时间可能是相对比较长的。另外,密集的缓存更新频率也会导致非常高的存储负载。
对于这种情况,Ignite提供了一个选项来执行异步化的持久化存储更新,也叫做后写,这个方法的主要概念是累加更新操作然后作为一个批量操作异步化地刷新入持久化存储中。真实的数据持久化可以被基于时间的事件触发(数据输入的最大时间受到队列的限制),也可以被队列的大小触发(当队列大小达到一个限值后队列就被刷新了),或者通过两者的组合触发,这时任何事件都会触发刷新。
更新顺序
对于后写的方式只有数据的最后一次更新会被写入底层存储。如果键为key1的缓存数据分别依次地更新为值value1、value2和value3,那么只有(key1,value3)对这一个存储请求会被传播到持久化存储。
更新性能
批量的存储操作通常比按顺序的单一存储操作更有效率,因此可以通过开启后写模式的批量操作来利用这个特性。简单类型(put和remove)的简单顺序更新操作可以被组合成一个批量操作。比如,连续地往缓存中加入(key1,value1),(key2,value2),(key3,value3)可以通过一个单一的CacheStore.putAll(...)操作批量处理。
后写缓存可以通过CacheConfiguration.setWriteBehindEnabled(boolean)配置项来开启,下面的3.12.6.配置章节显示了一个完整的配置属性列表来进行后写缓存行为的定制。
3.12.4.CacheStore
Ignite中的CacheStore接口用于向底层的数据存储写入或者加载数据。除了标准的JCache加载和存储方法,他还引入了最终事务划界以及从底层数据存储批量载入数据的能力。
loadCache()
CacheStore.loadCache()方法可以加载缓存,即使没有传入要加载的所有键,它通常用于启动时缓存的热加载,但是也可以在缓存加载完之后的任何时间点调用。
在每一个相关的集群节点,IgniteCache.loadCache()方法会分配给CacheStore.loadCache()方法,如果只想在本地节点上进行加载,可以用IgniteCache.localLoadCache()方法。
对于分区缓存,不管是主节点还是备份节点,如果键没有被映射到该节点,会被缓存自动丢弃。
load(), write(), delete()
当IgniteCache接口的get,put,remove方法被调用时,相对应的CacheStore的load(),write()和delete()方法会被调用,当与单个缓存数据工作时,这些方法会用于启用通读和通写行为。
loadAll(), writeAll(), deleteAll()
当IgniteCache接口的getAll,putAll,removeAll方法被调用时,相对应的CacheStore的loadAll(),writeAll()和deleteAll()方法会被调用,当与多个缓存数据工作时,这些方法会用于启用通读和通写行为,他们通常用批量操作的方式实现以提供更好的性能。
CacheStoreAdapter提供了loadAll(),writeAll()和deleteAll()方法的默认实现,他只是简单地对键进行一个一个地迭代。
sessionEnd()
Ignite有一个存储会话的概念,他可以跨越不止一个的缓存存储操作,会话对于事务非常有用。
对于原子化的缓存,sessionEnd()方法会在每个CacheStore方法完成之后被调用,对于事务化的缓存,不管是在底层持久化存储进行提交或者回滚多个操作,sessionEnd()方法都会在每个事务结束后被调用。
CacheStoreAdapater提供了sessionEnd()方法的默认的空实现。
Cassandra Cache Store
Ignite提供了将Apache Cassandra作为内存网格级CacheStore的开箱即用的集成,要了解更多的信息,可以查看相关的文档。
3.12.5.CacheStoreSession
缓存存储会话的主要目的是当CacheStore用于事务中时在多个存储操作中持有一个上下文。比如,如果使用JDBC,可以通过CacheStoreSession.attach()方法保存数据库的连接,然后可以在CacheStore.sessionEnd(boolean)方法中提交这个连接。
CacheStoreSession可以通过@GridCacheStoreSessionResource注解注入自定义的缓存存储实现中。
3.12.6.CacheStore示例
下面是几个不同场景的缓存存储的实现,注意事务化的实现用还是没用事务。
JDBC非事务:
public class CacheJdbcPersonStore extends CacheStoreAdapter<Long, Person> {// This mehtod is called whenever "get(...)" methods are called on IgniteCache.@Override public Person load(Long key) {try (Connection conn = connection()) {try (PreparedStatement st = conn.prepareStatement("select * from PERSONS where id=?")) {st.setLong(1, key);ResultSet rs = st.executeQuery();return rs.next() ? new Person(rs.getLong(1), rs.getString(2), rs.getString(3)) : null;}}catch (SQLException e) {throw new CacheLoaderException("Failed to load: " + key, e);}}// This mehtod is called whenever "put(...)" methods are called on IgniteCache.@Override public void write(Cache.Entry<Long, Person> entry) {try (Connection conn = connection()) {// Syntax of MERGE statement is database specific and should be adopted for your database.// If your database does not support MERGE statement then use sequentially update, insert statements.try (PreparedStatement st = conn.prepareStatement("merge into PERSONS (id, firstName, lastName) key (id) VALUES (?, ?, ?)")) {for (Cache.Entry<Long, Person> entry : entries) {Person val = entry.getValue();st.setLong(1, entry.getKey());st.setString(2, val.getFirstName());st.setString(3, val.getLastName());st.executeUpdate();}}}catch (SQLException e) {throw new CacheWriterException("Failed to write [key=" + key + ", val=" + val + ']', e);}}// This mehtod is called whenever "remove(...)" methods are called on IgniteCache.@Override public void delete(Object key) {try (Connection conn = connection()) {try (PreparedStatement st = conn.prepareStatement("delete from PERSONS where id=?")) {st.setLong(1, (Long)key);st.executeUpdate();}}catch (SQLException e) {throw new CacheWriterException("Failed to delete: " + key, e);}}// This mehtod is called whenever "loadCache()" and "localLoadCache()"// methods are called on IgniteCache. It is used for bulk-loading the cache.// If you don't need to bulk-load the cache, skip this method.@Override public void loadCache(IgniteBiInClosure<Long, Person> clo, Object... args) {if (args == null || args.length == 0 || args[0] == null)throw new CacheLoaderException("Expected entry count parameter is not provided.");final int entryCnt = (Integer)args[0];try (Connection conn = connection()) {try (PreparedStatement st = conn.prepareStatement("select * from PERSONS")) {try (ResultSet rs = st.executeQuery()) {int cnt = 0;while (cnt < entryCnt && rs.next()) {Person person = new Person(rs.getLong(1), rs.getString(2), rs.getString(3));clo.apply(person.getId(), person);cnt++;}}}}catch (SQLException e) {throw new CacheLoaderException("Failed to load values from cache store.", e);}}// Open JDBC connection.private Connection connection() throws SQLException {// Open connection to your RDBMS systems (Oracle, MySQL, Postgres, DB2, Microsoft SQL, etc.)// In this example we use H2 Database for simplification.Connection conn = DriverManager.getConnection("jdbc:h2:mem:example;DB_CLOSE_DELAY=-1");conn.setAutoCommit(true);return conn;}}
JDBC事务:
public class CacheJdbcPersonStore extends CacheStoreAdapter<Long, Person> {/** Auto-injected store session. */@CacheStoreSessionResourceprivate CacheStoreSession ses;// Complete transaction or simply close connection if there is no transaction.@Override public void sessionEnd(boolean commit) {try (Connection conn = ses.getAttached()) {if (conn != null && ses.isWithinTransaction()) {if (commit)conn.commit();elseconn.rollback();}}catch (SQLException e) {throw new CacheWriterException("Failed to end store session.", e);}}// This mehtod is called whenever "get(...)" methods are called on IgniteCache.@Override public Person load(Long key) {try (Connection conn = connection()) {try (PreparedStatement st = conn.prepareStatement("select * from PERSONS where id=?")) {st.setLong(1, key);ResultSet rs = st.executeQuery();return rs.next() ? new Person(rs.getLong(1), rs.getString(2), rs.getString(3)) : null;}}catch (SQLException e) {throw new CacheLoaderException("Failed to load: " + key, e);}}// This mehtod is called whenever "put(...)" methods are called on IgniteCache.@Override public void write(Cache.Entry<Long, Person> entry) {try (Connection conn = connection()) {// Syntax of MERGE statement is database specific and should be adopted for your database.// If your database does not support MERGE statement then use sequentially update, insert statements.try (PreparedStatement st = conn.prepareStatement("merge into PERSONS (id, firstName, lastName) key (id) VALUES (?, ?, ?)")) {for (Cache.Entry<Long, Person> entry : entries) {Person val = entry.getValue();st.setLong(1, entry.getKey());st.setString(2, val.getFirstName());st.setString(3, val.getLastName());st.executeUpdate();}}}catch (SQLException e) {throw new CacheWriterException("Failed to write [key=" + key + ", val=" + val + ']', e);}}// This mehtod is called whenever "remove(...)" methods are called on IgniteCache.@Override public void delete(Object key) {try (Connection conn = connection()) {try (PreparedStatement st = conn.prepareStatement("delete from PERSONS where id=?")) {st.setLong(1, (Long)key);st.executeUpdate();}}catch (SQLException e) {throw new CacheWriterException("Failed to delete: " + key, e);}}// This mehtod is called whenever "loadCache()" and "localLoadCache()"// methods are called on IgniteCache. It is used for bulk-loading the cache.// If you don't need to bulk-load the cache, skip this method.@Override public void loadCache(IgniteBiInClosure<Long, Person> clo, Object... args) {if (args == null || args.length == 0 || args[0] == null)throw new CacheLoaderException("Expected entry count parameter is not provided.");final int entryCnt = (Integer)args[0];try (Connection conn = connection()) {try (PreparedStatement st = conn.prepareStatement("select * from PERSONS")) {try (ResultSet rs = st.executeQuery()) {int cnt = 0;while (cnt < entryCnt && rs.next()) {Person person = new Person(rs.getLong(1), rs.getString(2), rs.getString(3));clo.apply(person.getId(), person);cnt++;}}}}catch (SQLException e) {throw new CacheLoaderException("Failed to load values from cache store.", e);}}// Opens JDBC connection and attaches it to the ongoing// session if within a transaction.private Connection connection() throws SQLException {if (ses.isWithinTransaction()) {Connection conn = ses.getAttached();if (conn == null) {conn = openConnection(false);// Store connection in the session, so it can be accessed// for other operations within the same transaction.ses.attach(conn);}return conn;}// Transaction can be null in case of simple load or put operation.elsereturn openConnection(true);}// Opens JDBC connection.private Connection openConnection(boolean autocommit) throws SQLException {// Open connection to your RDBMS systems (Oracle, MySQL, Postgres, DB2, Microsoft SQL, etc.)// In this example we use H2 Database for simplification.Connection conn = DriverManager.getConnection("jdbc:h2:mem:example;DB_CLOSE_DELAY=-1");conn.setAutoCommit(autocommit);return conn;}}
JDBC批量操作
public class CacheJdbcPersonStore extends CacheStore<Long, Person> {// Skip single operations and open connection methods.// You can copy them from jdbc non-transactional or jdbc transactional examples....// This mehtod is called whenever "getAll(...)" methods are called on IgniteCache.@Override public Map<K, V> loadAll(Iterable<Long> keys) {try (Connection conn = connection()) {try (PreparedStatement st = conn.prepareStatement("select firstName, lastName from PERSONS where id=?")) {Map<K, V> loaded = new HashMap<>();for (Long key : keys) {st.setLong(1, key);try(ResultSet rs = st.executeQuery()) {if (rs.next())loaded.put(key, new Person(key, rs.getString(1), rs.getString(2));}}return loaded;}}catch (SQLException e) {throw new CacheLoaderException("Failed to loadAll: " + keys, e);}}// This mehtod is called whenever "putAll(...)" methods are called on IgniteCache.@Override public void writeAll(Collection<Cache.Entry<Long, Person>> entries) {try (Connection conn = connection()) {// Syntax of MERGE statement is database specific and should be adopted for your database.// If your database does not support MERGE statement then use sequentially update, insert statements.try (PreparedStatement st = conn.prepareStatement("merge into PERSONS (id, firstName, lastName) key (id) VALUES (?, ?, ?)")) {for (Cache.Entry<Long, Person> entry : entries) {Person val = entry.getValue();st.setLong(1, entry.getKey());st.setString(2, val.getFirstName());st.setString(3, val.getLastName());st.addBatch();}st.executeBatch();}}catch (SQLException e) {throw new CacheWriterException("Failed to writeAll: " + entries, e);}}// This mehtod is called whenever "removeAll(...)" methods are called on IgniteCache.@Override public void deleteAll(Collection<Long> keys) {try (Connection conn = connection()) {try (PreparedStatement st = conn.prepareStatement("delete from PERSONS where id=?")) {for (Long key : keys) {st.setLong(1, key);st.addBatch();}st.executeBatch();}}catch (SQLException e) {throw new CacheWriterException("Failed to deleteAll: " + keys, e);}}}
3.12.7.配置
下面的配置参数可以通过CacheConfiguration用于启用以及配置通写缓存:
| setter方法 | 描述 | 默认值 |
|---|---|---|
| setWriteBehindEnabled(boolean) | 设置后写是否启用的标志 | false |
| setWriteBehindFlushSize(int) | 后写缓存的最大值,如果超过了这个限值,所有的缓存数据都会被刷入缓存存储然后写缓存被清空。如果值为0,刷新操作将会依据刷新频率间隔,注意不能将写缓存大小和刷新频率都设置为0 | 10240 |
| setWriteBehindFlushFrequency(long) | 后写缓存的刷新频率,单位为毫秒,该值定义了从对缓存对象进行插入/删除和当相应的操作被施加到缓存存储的时刻之间的最大时间间隔。如果值为0,刷新会依据写缓存大小,注意不能将写缓存大小和刷新频率都设置为0 | 5000 |
| setWriteBehindFlushThreadCount(int) | 执行缓存刷新的线程数 | 1 |
| setWriteBehindBatchSize(int) | 后写缓存存储操作的操作数最大值 | 512 |
CacheStore接口可以在IgniteConfiguration上通过一个工厂进行设置,就和CacheLoader和CacheWriter同样的方式。
对于分布式缓存配置的
factory应该是序列化的。
XML:
<bean class="org.apache.ignite.configuration.IgniteConfiguration">...<property name="cacheConfiguration"><list><bean class="org.apache.ignite.configuration.CacheConfiguration">...<property name="cacheStoreFactory"><bean class="javax.cache.configuration.FactoryBuilder" factory-method="factoryOf"><constructor-arg value="foo.bar.MyPersonStore"/></bean></property><property name="readThrough" value="true"/><property name="writeThrough" value="true"/></bean></list></property>...</bean>
Java:
IgniteConfiguration cfg = new IgniteConfiguration();CacheConfiguration<Long, Person> cacheCfg = new CacheConfiguration<>();cacheCfg.setCacheStoreFactory(FactoryBuilder.factoryOf(MyPersonStore.class));cacheCfg.setReadThrough(true);cacheCfg.setWriteThrough(true);cfg.setCacheConfiguration(cacheCfg);// Start Ignite node.Ignition.start(cfg);
3.12.8.CacheJdbcBlobStore
CacheJdbcBlobStore实现基于JDBC,这个实现将对象以BLOB的格式存储在底层数据库中。存储会在数据库中创建名为ENTRIES的表来存储数据,表具有key和val两个字段。
如果提供了定制的DDL和DML语句,表和字段的名字要和所有的语句一致以及参数的顺序也要保留。
使用CacheJdbcBlobStoreFactory工厂来向CacheConfiguration传入CacheJdbcBlobStore:
Spring:
<bean id= "simpleDataSource" class="org.h2.jdbcx.JdbcDataSource"/><bean id="ignite.cfg" class="org.apache.ignite.configuration.IgniteConfiguration">...<property name="cacheConfiguration"><list><bean class="org.apache.ignite.configuration.CacheConfiguration">...<property name="cacheStoreFactory"><bean class="org.apache.ignite.cache.store.jdbc.CacheJdbcBlobStoreFactory"><property name="user" value = "user" /><property name="dataSourceBean" value = "simpleDataSource" /></bean></property></bean></list></property>...</bean>
3.12.9.CacheJdbcPojoStore
CacheJdbcPojoStore实现基于JDBC和基于反射的POJO,这个实现将对象用基于反射的Java Bean映射描述的形式存储在底层数据库中。
使用CacheJdbcPojoStoreFactory工厂来向CacheConfiguration传入CacheJdbcPojoStore:
Spring:
<bean id= "simpleDataSource" class="org.h2.jdbcx.JdbcDataSource"/><bean id="ignite.cfg" class="org.apache.ignite.configuration.IgniteConfiguration">...<property name="cacheConfiguration"><list><bean class="org.apache.ignite.configuration.CacheConfiguration">...<property name="cacheStoreFactory"><bean class="org.apache.ignite.cache.store.jdbc.CacheJdbcPojoStoreFactory"><property name="dataSourceBean" value = "simpleDataSource" /></bean></property></bean></list></property></bean>
3.12.10.CacheHibernateBlobStore
CacheHibernateBlobStore实现基于Hibernate,这个实现将对象以BLOB的格式存储在底层数据库中。
使用CacheHibernateBlobStoreFactory工厂来向CacheConfiguration传入CacheHibernateBlobStore:
Spring:
<bean id="ignite.cfg" class="org.apache.ignite.configuration.IgniteConfiguration">...<property name="cacheConfiguration"><list><bean class="org.apache.ignite.configuration.CacheConfiguration"><bean class="org.apache.ignite.cache.store.hibernate.CacheHibernateBlobStoreFactory"><property name="hibernateProperties"><props><prop key="connection.url">jdbc:h2:mem:</prop><prop key="hbm2ddl.auto">update</prop><prop key="show_sql">true</prop></props></property></bean></list></property>...</bean>
3.13.数据加载
3.13.1.摘要
数据加载通常用于启动时初始化缓存数据,用标准的缓存put(...)和putAll(...)操作加载大量的数据通常是比较低效的。Ignite提供了IgniteDataStreamerAPI和CacheStoreAPI,他们有助于以一个更高效的方式将大量数据注入Ignite缓存。
3.13.2.IgniteDataStreamer
数据流处理器是通过IgniteDataStreamerAPI定义的,他可以将大量的连续数据注入Ignite缓存。数据流处理器以可扩展和容错的方式在数据被发送到集群节点之前通过把定量数据放在一起以获得高性能。
数据流处理器可以用于任何时候将大量数据载入缓存,包括启动时的预加载。
想了解更多信息请参照4.2.数据流处理器。
3.13.3.IgniteCache.loadCache()
将大量数据载入缓存的另一个方法是通过CacheStore.loadCache()方法,他可以在不传入要加载的所有键的情况下进行缓存的数据加载。
在所有保存该缓存的每一个集群节点上IgniteCache.loadCache()方法会委托给CacheStore.loadCache()方法,如果只想在本地节点上加载,可以用IgniteCache.localLoadCache()方法。
对于分区缓存,如果键没有映射到某个节点,不管是主节点还是备份节点,都会被自动忽略。
下面是一个CacheStore.loadCache()实现的例子,对于CacheStore的完整例子,可以参照3.12.持久化存储章节。
public class CacheJdbcPersonStore extends CacheStoreAdapter<Long, Person> {...// This method is called whenever "IgniteCache.loadCache()" or// "IgniteCache.localLoadCache()" methods are called.@Override public void loadCache(IgniteBiInClosure<Long, Person> clo, Object... args) {if (args == null || args.length == 0 || args[0] == null)throw new CacheLoaderException("Expected entry count parameter is not provided.");final int entryCnt = (Integer)args[0];Connection conn = null;try (Connection conn = connection()) {try (PreparedStatement st = conn.prepareStatement("select * from PERSONS")) {try (ResultSet rs = st.executeQuery()) {int cnt = 0;while (cnt < entryCnt && rs.next()) {Person person = new Person(rs.getLong(1), rs.getString(2), rs.getString(3));clo.apply(person.getId(), person);cnt++;}}}}catch (SQLException e) {throw new CacheLoaderException("Failed to load values from cache store.", e);}}...}
分区感知的数据加载
在上面描述的场景中同样的查询会在所有节点上执行,每个节点会迭代所有的结果集,忽略掉不属于该节点的所有键,效率不是很高。
如果数据库中的每条记录都保存分区ID的话这个情况会有所改善。可以通过org.apache.ignite.cache.affinity.Affinity接口来获得要存储在缓存中的任何键的分区ID。
下面的代码片段可以获得每个要存储在缓存中的Person对象的分区ID。
IgniteCache cache = ignite.cache(cacheName);Affinity aff = ignite.affinity(cacheName);for (int personId = 0; personId < PERSONS_CNT; personId++) {// Get partition ID for the key under which person is stored in cache.int partId = aff.partition(personId);Person person = new Person(personId);person.setPartitionId(partId);// Fill other fields.cache.put(personId, person);}
当Person对象知道自己的分区ID,每个节点就可以只查询属于自己所属分区的数据。要做到这一点,可以将一个Ignite实例注入到自己的CacheStore,然后用它来确定本地节点所属的分区。
下面的代码片段演示了用Affinity来只加载本地分区的数据,注意例子代码是单线程的,然而它可以通过分区ID高效地并行化。
public class CacheJdbcPersonStore extends CacheStoreAdapter<Long, Person> {// Will be automatically injected.@IgniteInstanceResourceprivate Ignite ignite;...// This mehtod is called whenever "IgniteCache.loadCache()" or// "IgniteCache.localLoadCache()" methods are called.@Override public void loadCache(IgniteBiInClosure<Long, Person> clo, Object... args) {Affinity aff = ignite.affinity(cacheName);ClusterNode locNode = ignite.cluster().localNode();try (Connection conn = connection()) {for (int part : aff.primaryPartitions(locNode))loadPartition(conn, part, clo);for (int part : aff.backupPartitions(locNode))loadPartition(conn, part, clo);}}private void loadPartition(Connection conn, int part, IgniteBiInClosure<Long, Person> clo) {try (PreparedStatement st = conn.prepareStatement("select * from PERSONS where partId=?")) {st.setInt(1, part);try (ResultSet rs = st.executeQuery()) {while (rs.next()) {Person person = new Person(rs.getLong(1), rs.getString(2), rs.getString(3));clo.apply(person.getId(), person);}}}catch (SQLException e) {throw new CacheLoaderException("Failed to load values from cache store.", e);}}...}
注意键和分区的映射依赖于affinity函数中配置的分区数量(参照org.apache.ignite.cache.affinity.AffinityFunctio)。如果affinity函数配置改变,数据库中存储的分区ID必须相应地更新。
3.14.退出策略
3.14.1.摘要
退出策略控制着堆内内存中缓存可以存储的元素的最大值,如果可能的话当达到堆内缓存的最大值时,数据会被退出到堆外空间。
部分退出策略支持批量退出以及受到内存大小限制而退出。如果批量退出启用,那么当缓存大小加上batchSize数量大于最大缓存大小时退出就开始了,这时batchSize数量的元素会被退出。如果因为内存大小限制而退出启用,那么当以字节数计算的缓存数据大小超过内存大小最大值时退出就会发生。
批量退出只有当最大内存限制没有赋值时才会被支持。
Ignite中退出策略是可插拔的,通过EvictionPolicy接口来控制。一个退出策略的实现会在每个缓存数据发生变化时收到通知,他定义了从缓存中选择要退出数据的算法。
如果数据集可以装入内存,那么退出策略不会带来任何好处,因此可以关闭,这也是默认值。
3.14.2.最近最少使用(LRU)
LRU退出策略基于最近最少使用算法,他会确保最近最少使用的数据(即最久没有被访问的数据)会被首先退出。
支持批量退出以及受到内存大小限制的退出。
LRU退出策略适用于缓存的大多数使用场景。
这个策略通过LruEvictionPolicy实现,通过CacheConfiguration进行配置。
XML:
<bean class="org.apache.ignite.cache.CacheConfiguration"><property name="name" value="myCache"/>...<property name="evictionPolicy"><!-- LRU eviction policy. --><bean class="org.apache.ignite.cache.eviction.lru.LruEvictionPolicy"><!-- Set the maximum cache size to 1 million (default is 100,000). --><property name="maxSize" value="1000000"/></bean></property>...</bean>
Java:
CacheConfiguration cacheCfg = new CacheConfiguration();cacheCfg.setName("cacheName");// Set the maximum cache size to 1 million (default is 100,000).cacheCfg.setEvictionPolicy(new LruEvictionPolicy(1000000));IgniteConfiguration cfg = new IgniteConfiguration();cfg.setCacheConfiguration(cacheCfg);// Start Ignite node.Ignition.start(cfg);
3.14.3.先进先出(FIFO)
FIFO退出策略基于先进先出算法,他确保缓存中保存时间最久的数据会被首先退出,他与ruEvictionPolicy不同,因为他忽略了数据的访问顺序。
支持批量退出以及受到内存大小限制的退出。
这个策略通过FifoEvictionPolicy实现,通过CacheConfiguration进行配置。
XML:
<bean class="org.apache.ignite.cache.CacheConfiguration"><property name="name" value="myCache"/>...<property name="evictionPolicy"><!-- FIFO eviction policy. --><bean class="org.apache.ignite.cache.eviction.fifo.FifoEvictionPolicy"><!-- Set the maximum cache size to 1 million (default is 100,000). --><property name="maxSize" value="1000000"/></bean></property>...</bean>
Java:
CacheConfiguration cacheCfg = new CacheConfiguration();cacheCfg.setName("cacheName");// Set the maximum cache size to 1 million (default is 100,000).cacheCfg.setEvictionPolicy(new FifoEvictionPolicy(1000000));IgniteConfiguration cfg = new IgniteConfiguration();cfg.setCacheConfiguration(cacheCfg);// Start Ignite node.Ignition.start(cfg);
3.14.4.有序
有序退出策略和FIFO退出策略很像,不同点在于通过默认或者用户定义的比较器定义了数据的顺序,然后确保最小的数据(即排序数值最小的数据)会被退出。
默认的比较器用缓存条目的键作为比较器,他要求键必须实现Comparable接口。也可以提供自定义的比较器实现,可以通过键,值或者两者都用来进行条目的比较。
支持批量退出以及受到内存大小限制的退出。
这个策略通过SortedEvictionPolicy实现,通过CacheConfiguration进行配置。
XML:
<bean class="org.apache.ignite.cache.CacheConfiguration"><property name="name" value="myCache"/>...<property name="evictionPolicy"><!-- Sorted eviction policy. --><bean class="org.apache.ignite.cache.eviction.sorted.SortedEvictionPolicy"><!-- Set the maximum cache size to 1 million (default is 100,000) and use default comparator. --><property name="maxSize" value="1000000"/></bean></property>...</bean>
Java:
CacheConfiguration cacheCfg = new CacheConfiguration();cacheCfg.setName("cacheName");// Set the maximum cache size to 1 million (default is 100,000).cacheCfg.setEvictionPolicy(new SortedEvictionPolicy(1000000));IgniteConfiguration cfg = new IgniteConfiguration();cfg.setCacheConfiguration(cacheCfg);// Start Ignite node.Ignition.start(cfg);
3.14.5.随机
随机退出策略会随机地选择条目退出,这个退出策略主要用于调试或者基准测试的目的。
这个策略通过RandomEvictionPolicy实现,通过CacheConfiguration进行配置。
XML:
<bean class="org.apache.ignite.cache.CacheConfiguration"><property name="name" value="myCache"/>...<property name="evictionPolicy"><!-- Random eviction policy. --><bean class="org.apache.ignite.cache.eviction.random.RandomEvictionPolicy"> <!-- Set the maximum cache size to 1 million (default is 100,000). --><property name="maxSize" value="1000000"/></bean></property>...</bean>
Java:
CacheConfiguration cacheCfg = new CacheConfiguration();cacheCfg.setName("cacheName");// Set the maximum cache size to 1 million (default is 100,000).cacheCfg.setEvictionPolicy(new RandomEvictionPolicy(1000000));IgniteConfiguration cfg = new IgniteConfiguration();cfg.setCacheConfiguration(cacheCfg);// Start Ignite node.Ignition.start(cfg);
3.15.过期策略
过期策略指定了在缓存条目过期之前必须经过的时间量,时间可以从创建,最后访问或者修改时间开始计算。
过期策略可以通过任何预定义的ExpiryPolicy实现进行设置。
| 类名 | 创建时间 | 最后访问时间 | 最后更新时间 |
|---|---|---|---|
CreatedExpiryPolicy |
可用 | ||
AccessedExpiryPolicy |
可用 | 可用 | |
ModifiedExpiryPolicy |
可用 | 可用 | |
TouchedExpiryPolicy |
可用 | 可用 | 可用 |
EternalExpiryPolicy |
也可以自定义ExpiryPolicy实现。
过期策略可以在CacheConfiguration中进行设置,这个策略可以用于缓存内的所有条目。
cfg.setExpiryPolicyFactory(CreatedExpiryPolicy.factoryOf(Duration.ZERO));
也可以在对缓存进行单独操作时对过期策略进行设置或者修改。
IgniteCache<Object, Object> cache = cache.withExpiryPolicy(new CreatedExpiryPolicy(new Duration(TimeUnit.SECONDS, 5)));
此策略将用于在返回的缓存实例上调用的每个操作。
3.16.数据再平衡
3.16.1.摘要
当一个新节点加入集群时,已有节点会放弃一部分缓存条目的所有权转交给新的节点,以使整个网格在任何时候都保持键的均等平衡。
如果新的节点成为一些分区的主节点或者备份节点,他会从该分区之前的主节点获取数据,或者从该分区的备份节点之一获取数据。一旦分区全部载入新的节点,旧节点就会被标记为过时然后该节点在所有当前的事务完成之后最终会被退出。因此,在一些很短的时间段,在网络发生变化之后,有一种情况是在缓存中对于一个键备份的数量可能比事先配置的多。然而,一旦再平衡完成,额外的备份会被删除。
3.16.2.再平衡模式
下面的再平衡模式是在CacheRebalanceMode枚举中定义的:
| 缓存再平衡模式 | 描述 |
|---|---|
SYNC |
同步再平衡模式,直到所有必要的数据全部从其他有效节点加载完毕分布式缓存才会启动,这意味着所有对缓存的开放API的调用都会阻塞直到再平衡结束 |
ASYNC |
异步平衡模式,分布式缓存会马上启动,然后在后台会从其他节点加载所有必要的数据 |
NONE |
该模式下不会发生再平衡,这意味着要么在访问数据时从持久化存储载入,要么数据被显式地填充。 |
默认启用ASYNC再平衡模式,要使用其他的再平衡模式,可以像下面这样设置CacheConfiguration的rebalanceMode属性:
XML:
<bean class="org.apache.ignite.configuration.IgniteConfiguration">...<property name="cacheConfiguration"><bean class="org.apache.ignite.configuration.CacheConfiguration"><!-- Set synchronous rebalancing. --><property name="rebalanceMode" value="SYNC"/>...</bean</property></bean>
Java:
CacheConfiguration cacheCfg = new CacheConfiguration();cacheCfg.setRebalanceMode(CacheRebalanceMode.SYNC);IgniteConfiguration cfg = new IgniteConfiguration();cfg.setCacheConfiguration(cacheCfg);// Start Ignite node.Ignition.start(cfg);
3.16.3.再平衡线程池调节
IgniteConfiguration提供了一个setRebalanceThreadPoolSize方法,他可以为了再平衡的需要,从Ignite的系统线程池中获取一定数量的线程,每当一个节点需要向远程节点发送一批数据时,或者需要处理来自相反方向的一批数据时,都会从池中获取一个系统线程,这个远程节点既可能是一个分区的主节点,也可能是备份节点。这个线程在批处理发送或者接收完以及处理完之后,就会被释放。
默认只会有一个线程用于再平衡。这基本上意味着在一个特定的时间点只有一个线程用于从一个节点到另一节点传输批量数据,或者处理来自远端的批量数据。举例来说,如果集群有两个节点和一个缓存,那么所有缓存的分区都会一个一个地按照顺序进行再平衡。如果集群有两个节点和两个不同的缓存,那么这些缓存会以并行的方式进行再平衡,但是在一个特定的时间点,就像上面解释的那样,只会处理属于某一个特定缓存的批量数据。
每个缓存的分区数量不会影响再平衡的性能,有影响的是数据的总量,再平衡线程池大小以及下面章节列出的其他参数。
根据系统中缓存的数量以及缓存中存储的数据量,如果再平衡线程池的大小为1,要将所有的数据再平衡至一个节点上,会花费很长的时间。要加快预加载的进程,可以根据需要增加IgniteConfiguration.setRebalanceThreadPoolSize的值。
假定将IgniteConfiguration.setRebalanceThreadPoolSize的值设为4然后考虑上述的示例,再平衡的过程会如下所示:
- 如果集群有两个节点和一个缓存,那么缓存的分区逻辑上会分为4个不同的组,他们会以并行的方式进行处理,每个线程处理一个组,属于一个特定组的分区会按照顺序一个一个地进行再平衡。
- 如果集群有两个节点和两个不同的缓存,那么每个缓存的分区逻辑上都会分为四个不同的组(每个缓存都会有四个组,总共8个组),然后会有四个不同的线程并行地处理这些组,然而在一个特定的时间点,就像上面解释的那样,只有属于一个特定组(总共8个)的数据会被处理。
在内部,系统线程池广泛用于和缓存有关的所有操作(put,get等),SQL引擎和其他模块,因此将
IgniteConfiguration.setRebalanceThreadPoolSize设置为一个很大的值会显著提高再平衡的性能,但是会影响应用的性能。
3.16.4.再平衡消息调节
当再平衡器将数据从一个节点传输到另一个节点时,他会将整个数据集拆分为多个批次然后将每一个批次作为一个单独的消息进行发送。如果数据集很大的话那么就会有很多的消息要发送,CPU和网络就会过度的消耗,这时在再平衡消息之间进行等待是合理的,以使由于再平衡过程导致的性能下降冲击最小化。这个时间间隔可以通过CacheConfiguration的rebalanceThrottle属性进行控制,他的默认值是0,意味着在消息之间没有暂停,注意单个消息的大小也可以通过rebalanceBatchSize属性进行设置(默认值是512K)。
比如,如果希望再平衡器间隔100ms每个消息发送2MB数据,需要提供如下的配置:
XML:
<bean class="org.apache.ignite.configuration.IgniteConfiguration">...<property name="cacheConfiguration"><bean class="org.apache.ignite.configuration.CacheConfiguration"><!-- Set batch size. --><property name="rebalanceBatchSize" value="#{2 * 1024 * 1024}"/><!-- Set throttle interval. --><property name="rebalanceThrottle" value="100"/>...</bean</property></bean>
Java:
CacheConfiguration cacheCfg = new CacheConfiguration();cacheCfg.setRebalanceBatchSize(2 * 1024 * 1024);cacheCfg.setRebalanceThrottle(100);IgniteConfiguration cfg = new IgniteConfiguration();cfg.setCacheConfiguration(cacheCfg);// Start Ignite node.Ignition.start(cfg);
3.16.5.配置
缓存的再平衡行为可以有选择地通过下面的配置属性进行定制:
CacheConfiguration
| setter方法 | 描述 | 默认值 |
|---|---|---|
setRebalanceMode |
分布式缓存的再平衡模式,细节可以参照再平衡模式章节 | ASYNC |
setRebalancePartitionedDelay |
再平衡延迟时间(毫秒) | 0,无延迟 |
setRebalanceBatchSize |
单个再平衡消息的大小(byte),再平衡算法会在发送数据之前将每个节点的整个数据集拆分成多个批次。 | 512K |
setRebalanceThrottle |
不建议,再平衡消息之间的等待时间(毫秒),用来避免CPU和网络的过载,注意应用在再平衡的过程中仍然可以正确执行 | 0,无间隔 |
setRebalanceOrder |
要完成的再平衡的顺序,只有同步和异步再平衡模式的缓存才可以将再平衡顺序设置为非0值,具有更小值的缓存再平衡会被首先完成,再平衡默认是无序的 | 0 |
setRebalanceBatchesPrefetchCount |
为了达到更好的性能,数据提供者节点会在再平衡开始时提供不止一个批次然后在下一个请求时提供一个新的批次。这个方法会设置再平衡开始时数据提供者节点产生的批次的数量 | 2 |
setRebalanceTimeout |
节点间正在交换的等待再平衡消息的超时时间 | 10秒 |
IgniteConfiguration:
| setter方法 | 描述 | 默认值 |
|---|---|---|
setRebalanceThreadPoolSize |
用于再平衡的线程的最大值 | 1,对整个集群的操作影响最小 |
3.17.拓扑验证
拓扑验证器用于验证集群网络拓扑对于未来的缓存操作是否有效。
拓扑验证器在每次集群拓扑发生变化时都会被调用(或者新节点加入或者已有节点故障或者其他的)。如果没有配置拓扑验证器,那么集群拓扑会被认为一直有效。
当TopologyValidator.validate(Collection)方法返回true时,那么对于特定的缓存以及在这个缓存上的所有有效操作拓扑都会被认为是有效的,否则,该缓存上的所有更新操作都会抛出如下异常:
CacheException:所有试图更新的操作都会抛出(put,remove等)IgniteException:试图进行事务提交的操作会抛出
返回false以及声明拓扑无效后,当下一次拓扑发生变化时拓扑验证器可以返回正常状态。
示例:
...for (CacheConfiguration cCfg : iCfg.getCacheConfiguration()) {if (cCfg.getName() != null) {if (cCfg.getName().equals(CACHE_NAME_1))cCfg.setTopologyValidator(new TopologyValidator() {@Override public boolean validate(Collection<ClusterNode> nodes) {return nodes.size() == 2;}});else if (cCfg.getName().equals(CACHE_NAME_2))cCfg.setTopologyValidator(new TopologyValidator() {@Override public boolean validate(Collection<ClusterNode> nodes) {return nodes.size() >= 2;}});}}...
在这个例子中,对缓存允许更新操作情况如下:
CACHE_NAME_1:集群具有两个节点时CACHE_NAME_2:集群至少有两个节点时
配置
拓扑验证器通过CacheConfiguration.setTopologyValidator(TopologyValidator)方法既可以用代码也可以用XML进行配置。
