@zy-0815
2016-10-23T11:12:38.000000Z
字数 10015
阅读 1512
计算物理第六次作业
计算物理
摘要
本作业为L2的相关解答,将对2.10题进行进一步升级,发展“超级辅助精确打击系统”(考虑炮弹初始发射的时候发射角度误差,速度有5%的误差,迎面风阻误差10%,以炮弹落点与打击目标距离差平方均值最小为优胜)
背景介绍
上次课我们通过练习,初步掌握了使用欧勒法并引入多个变量下的对炮弹运行轨迹的计算,但实际上我们还需要进一步考虑实际模型,比如之前的运算只考虑确定情况,即确定角度,确定风阻,确定速度。但实际的炮弹运动过程中,往往存在不同的影响因素使打击存在误差,因此我们在本次作业中便着重分析此类问题。
正文
1. 首先我们考虑标准情况,即截至上次作业中提到的考虑风阻的情况并引入绝热模型分析海拔对风阻影响,
我们已知绝热模型公式:
其中,我们很快写出此时的方程如下:
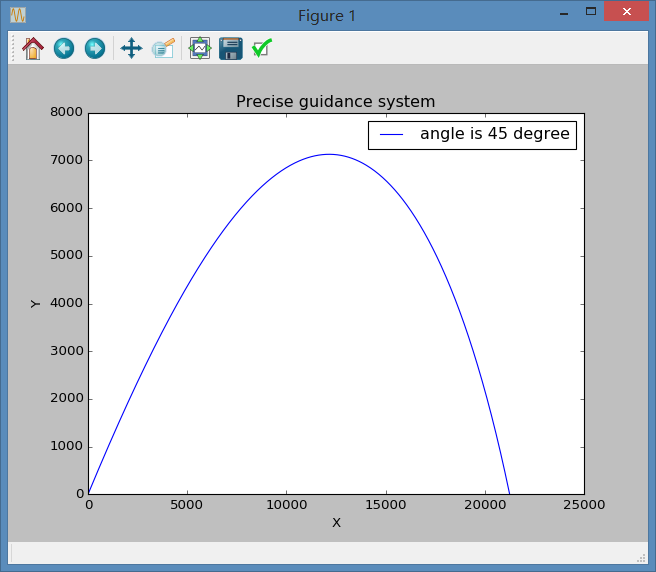
由此,我们可以写出程序果如下,注:为方便起见只做出的情况
import pylab as plimport mathclass cannon :def __init__(self,i=0,air_resistance=0.00004,power=10,mass = 1,time_step=0.1,\initial_velocity=700,initial_x=0,initial_y=0,\initial_velocity_x=700*math.cos(math.pi/4),\initial_velocity_y=700*math.sin(math.pi/4)):self.x = [initial_x]self.y = [initial_y]self.vx = [initial_velocity_x]self.vy = [initial_velocity_y]self.v = [initial_velocity]self.t = [0]self.m = massself.p = powerself.B_2 = air_resistanceself.dt = time_stepdef run(self):while(1):s1=self.x[-1] + self.vx[-1]*self.dts2=self.y[-1] + self.vy[-1]*self.dtv1=self.vx[-1] - self.dt *pow((1-(0.0065*self.y[-1])/300),2.5)*\(self.B_2 / self.m) *self.v[-1] * self.vx[-1]v2=self.vy[-1] - 9.8*self.dt - self.dt *\pow((1-(0.0065*self.y[-1])/300),2.5)*(self.B_2 / self.m) *\self.v[-1] * self.vx[-1]self.x.append(s1)self.y.append(s2)self.v.append(math.sqrt(self.vx[-1]*self.vx[-1] + self.vy[-1]*self.vy[-1]))self.vx.append(v1)self.vy.append(v2)if(s2<0):breakdef show_results(self):pl.plot(self.x,self.y,'b',label='angle is 45 degree')pl.title('Precise guidance system')pl.xlabel('X')pl.ylabel('Y')pl.legend()pl.ylim(0,)pl.show()a = cannon()a.run()a.show_results()
此程序运行效果如图:
2. 这时引入迎面风阻,我们根据(2.26)式可得:
其中,以及
所以我们修改部分程序如下:
v1=self.vx[-1] - self.dt *pow((1-(0.0065*self.y[-1])/300),2.5)*\(0.0039+0.0058/(1+math.exp((self.v[-1]-35)/5)))*\self.v[-1] * self.vx[-1]v2=self.vy[-1] - 9.8*self.dt - self.dt *\pow((1-(0.0065*self.y[-1])/300),2.5)*(0.0039+\0.0058/(1+math.exp((self.v[-1]-35)/5))) *\self.v[-1] * self.vx[-1]
运行程序我们可以得到两者的对比如图:
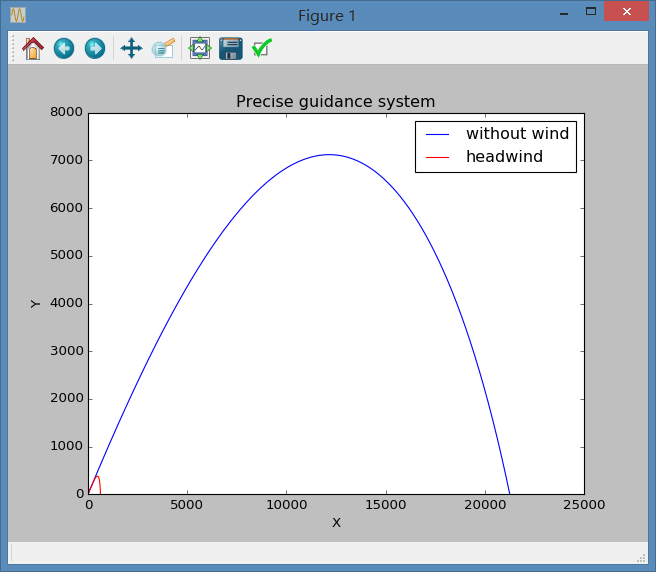
但是我们同时发现,由于我们设置的初始速度过大(700m/s),因此迎面风阻也相当大,以至于其最大射程远远减小。其实这也源于我们引入的风阻参数是基于2.3节里棒球的运动情况,因此必然存在严重误差。但在这里我们继续沿用这一设定。
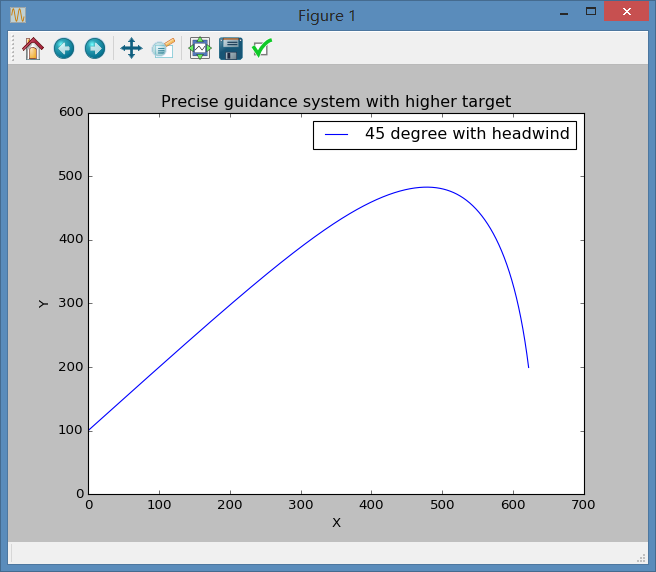
3. 现在我们考虑目标位置的改变,比如目标处于比炮台更高的地方,亦或者处于更低的位置,此时作图的手段也会出现相应的调整。基于上一步引入风阻后炮弹射程将为600m,因此我们不妨将炮台的初始海拔设为100m,而低海拔目标位置仍为0m,高海拔位置为200m,同时,为了方便下一步改变初射速度及角度,我也修改了初始值设定的函数,具体修改程序如下:
import pylab as plimport mathclass cannon :def __init__(self,i=0,air_resistance=0.00004,power=10,mass = 1,time_step=0.01,\total_time=100, initial_velocity=700,initial_x=0,initial_y=100,\initial_angle=45,angle_c=math.pi/180):self.x = [initial_x]self.y = [initial_y]self.v = [initial_velocity]self.vx= [initial_velocity*math.cos(initial_angle*angle_c)]self.vy= [initial_velocity*math.sin(initial_angle*angle_c)]self.t = [0]self.m = massself.p = powerself.B_2 = air_resistanceself.dt = time_stepself.time = total_timedef run(self):while(1):s1=self.x[-1] + self.vx[-1]*self.dts2=self.y[-1] + self.vy[-1]*self.dtv1=self.vx[-1] - self.dt *pow((1-(0.0065*self.y[-1])/300),2.5)*(0.0039+\0.0058/(1+math.exp((self.v[-1]-35)/5))) *\self.v[-1] * self.vx[-1]v2=self.vy[-1] - 9.8*self.dt - self.dt *\pow((1-(0.0065*self.y[-1])/300),2.5)*(0.0039+\0.0058/(1+math.exp((self.v[-1]-35)/5))) *\self.v[-1] * self.vx[-1]self.x.append(s1)self.y.append(s2)self.v.append(math.sqrt(self.vx[-1]*self.vx[-1] + self.vy[-1]*self.vy[-1]))self.vx.append(v1)self.vy.append(v2)if(v2<0 and s2<200):s1=self.x[-1] + self.vx[-1]*0.001s2=self.y[-1] + self.vy[-1]*0.001v1=self.vx[-1] - 0.001 *pow((1-(0.0065*self.y[-1])/300),2.5)*(0.0039+\0.0058/(1+math.exp((self.v[-1]-35)/5))) *\self.v[-1] * self.vx[-1]v2=self.vy[-1] - 9.8*0.001 - 0.001 *\pow((1-(0.0065*self.y[-1])/300),2.5)*(0.0039+\0.0058/(1+math.exp((self.v[-1]-35)/5))) *\self.v[-1] * self.vx[-1]self.x.append(s1)self.y.append(s2)self.v.append(math.sqrt(self.vx[-1]*self.vx[-1] + self.vy[-1]*self.vy[-1]))self.vx.append(v1)self.vy.append(v2)if(s2<200):breakbreakdef show_results(self):pl.plot(self.x,self.y,'b',label='45 degree with headwind')pl.title('Precise guidance system with higher target')pl.ylim(0,600)pl.xlabel('X')pl.ylabel('Y')pl.legend()pl.show()a = cannon()a.run()a.show_results()
以上所示程序为目标高度于200m时的情况,同样,修改循环终止的条件,即可得到位于海拔0m的目标时的图像,程序修改如下:
if(s2<0):s1=self.x[-1] + self.vx[-1]*0.001s2=self.y[-1] + self.vy[-1]*0.001v1=self.vx[-1] - 0.001 *pow((1-(0.0065*self.y[-1])/300),2.5)*(0.0039+\0.0058/(1+math.exp((self.v[-1]-35)/5))) *\self.v[-1] * self.vx[-1]v2=self.vy[-1] - 9.8*0.001 - 0.001 *\pow((1-(0.0065*self.y[-1])/300),2.5)*(0.0039+\0.0058/(1+math.exp((self.v[-1]-35)/5))) *\self.v[-1] * self.vx[-1]self.x.append(s1)self.y.append(s2)self.v.append(math.sqrt(self.vx[-1]*self.vx[-1] + self.vy[-1]*self.vy[-1]))self.vx.append(v1)self.vy.append(v2)if(s2<200):breakbreak
我们可以得到一组图像:
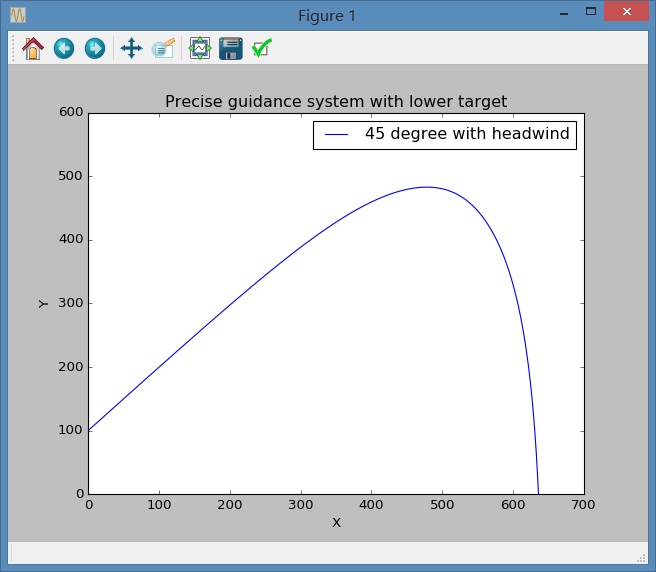
但其实我们也发现,在低海拔位置时,即图二情况,我们不需要使用上面所述的,当接近y=0时减小步长以得到精确节点的方式,而是可以通过限制图像y轴的取值域,即通过函数pl.ylim(0,)来实现自动滤掉x轴以下图像的功能。因此,我们只需当条件满足s2<0时终止循环即可,这样做会简便许多。
4. 当我们考虑实际应用时,莫过于能够通过计算,能够通过最小的发射速度,便可击中目标。为此,我们需要对程序进行进一步改进,即可以自动选择角度与速度,使炮弹能够击中目标。
4.1
首先我们需要通过循环,找出一确定初速度下,最远射程所对应的角度。
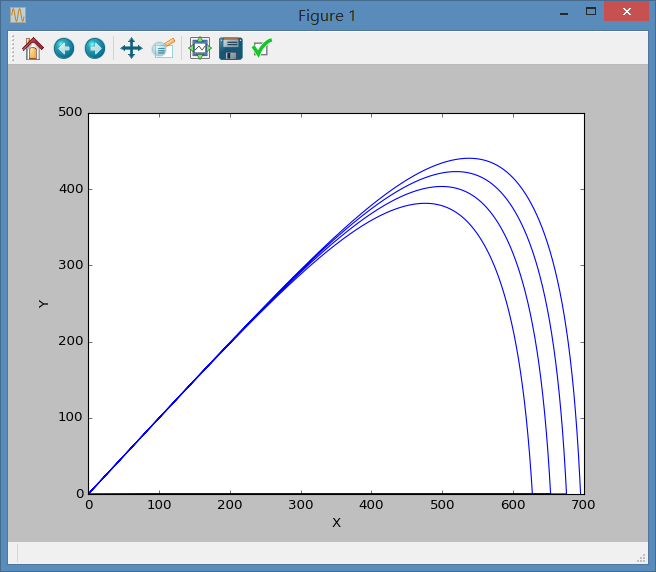
import pylab as plimport mathclass cannon :def __init__(self,i=0,air_resistance=0.00004,power=10,mass = 1,time_step=0.01,\total_time=100, initial_velocity=700,initial_x=0,initial_y=0,\initial_angle=40,angle_c=math.pi/180):self.x = [initial_x]self.y = [initial_y]self.v = [initial_velocity]self.x0 = [initial_x]self.y0 = [initial_y]self.v0 = [initial_velocity]self.t = [0]self.m = massself.p = powerself.B_2 = air_resistanceself.dt = time_stepself.time = total_timeself.a=[initial_angle]self.b=[angle_c]def run(self):a=45for a in range(0,90):self.x[-1]=self.x0[-1]self.y[-1]=self.y0[-1]self.v[-1]=self.v0[-1]self.vx= [self.v[-1]*math.cos(self.a[-1]*self.b[-1])]self.vy= [self.v[-1]*math.sin(self.a[-1]*self.b[-1])]while(1):s1=self.x[-1] + self.vx[-1]*self.dts2=self.y[-1] + self.vy[-1]*self.dtv1=self.vx[-1] - self.dt *pow((1-(0.0065*self.y[-1])/300),2.5)*(0.0039+\0.0058/(1+math.exp((self.v[-1]-35)/5))) *\self.v[-1] * self.vx[-1]v2=self.vy[-1] - 9.8*self.dt - self.dt *\pow((1-(0.0065*self.y[-1])/300),2.5)*(0.0039+\0.0058/(1+math.exp((self.v[-1]-35)/5))) *\self.v[-1] * self.vx[-1]self.x.append(s1)self.y.append(s2)self.v.append(math.sqrt(self.vx[-1]*self.vx[-1] + self.vy[-1]*self.vy[-1]))self.vx.append(v1)self.vy.append(v2)if(s2<0):breakself.a.append(self.a[-1]+1)if(self.a[-1]>50):breakdef show_results(self):pl.plot(self.x,self.y)pl.ylim(0,)pl.xlabel('X')pl.ylabel('Y')pl.legend()pl.show()a = cannon()a.run()a.show_results()
该程序可以绘出从的轨迹,关于这个范围的选择是运行几次后发现的,当角度大于时,距离会急剧减小,原因是整个下降过程都会变成自由落体而不再具有水平速度。程序中步长为,当然此精度在以后的步骤里会有所调整。整个程序运行结果如下:
4.2
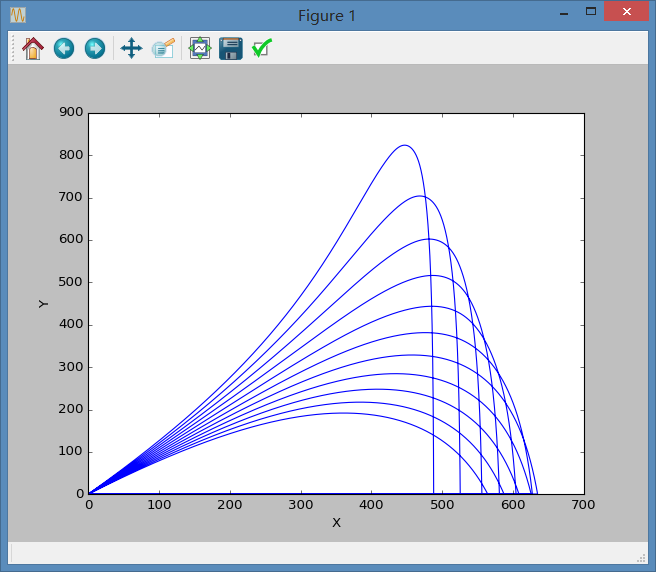
类似的,我们可以写出速度循环,当然,我们可以想象,速度越大,理应获得越远的距离,下面是程序运行后,700到1000m/s初速,间隔100m/s所花图像:
接下来,我们需要在程序中加入选择程序,即得到需要的最大距离。以改变出射角程序为基础,我们需要修改的部分程序如下:
def run_angle(self):a0=0s0=0for a in range(0,90):self.x[-1]=self.x0[-1]self.y[-1]=self.y0[-1]self.v[-1]=self.v0[-1]self.vx= [self.v[-1]*math.cos(self.a[-1]*self.b[-1])]self.vy= [self.v[-1]*math.sin(self.a[-1]*self.b[-1])]while(1):s1=self.x[-1] + self.vx[-1]*self.dts2=self.y[-1] + self.vy[-1]*self.dtv1=self.vx[-1] - self.dt *pow((1-(0.0065*self.y[-1])/300),2.5)*(0.0039+\0.0058/(1+math.exp((self.v[-1]-35)/5))) *\self.v[-1] * self.vx[-1]v2=self.vy[-1] - 9.8*self.dt - self.dt *\pow((1-(0.0065*self.y[-1])/300),2.5)*(0.0039+\0.0058/(1+math.exp((self.v[-1]-35)/5))) *\self.v[-1] * self.vx[-1]self.x.append(s1)self.y.append(s2)self.v.append(math.sqrt(self.vx[-1]*self.vx[-1] + self.vy[-1]*self.vy[-1]))self.vx.append(v1)self.vy.append(v2)if(s2<0):breakself.a.append(self.a[-1]+1)s=self.x[-1]a=self.a[-2]if(s>s0):s0=sa0=aif(self.a[-1]>50):breakprint s0print a0
这样,程序就可以绘出图像的同时输出最大距离及对应的角度。

4. 3
至此,我们需要的程序主体已经搭建出来,下一步的工作,就是根据目标的定位,修改结束循环的条件范围,从而确定出合适的速度和角度。不妨我们将目标位置定为坐标(500,0)。经过我们实验,可以大致确定相同初速的情况下,射程最远所需的角度在之间
主程序如下:
#最后主程序import pylab as plimport mathclass cannon :def __init__(self,i=0,air_resistance=0.00004,power=10,mass = 1,time_step=0.01,\total_time=100, initial_velocity=350,initial_x=0,initial_y=0,\initial_angle=43,angle_c=math.pi/180):self.x = [initial_x]self.y = [initial_y]self.v = [initial_velocity]self.x0 = [initial_x]self.y0 = [initial_y]self.v0 = [initial_velocity]self.t = [0]self.m = massself.p = powerself.B_2 = air_resistanceself.dt = time_stepself.time = total_timeself.a=[initial_angle]self.b=[angle_c]self.a0=[initial_angle]def run(self):a0=0s0=0v0=0d=100for v in range(350,361):self.x[-1]=self.x0[-1]self.y[-1]=self.y0[-1]self.v[-1]=self.v0[-1]for a in range(0,45):self.x[-1]=self.x0[-1]self.y[-1]=self.y0[-1]self.v[-1]=self.v0[-1]self.a[-1]=self.a0[-1]self.vx= [self.v[-1]*math.cos(self.a0[-1]*self.b[-1])]self.vy= [self.v[-1]*math.sin(self.a0[-1]*self.b[-1])]while(1):s1=self.x[-1] + self.vx[-1]*self.dts2=self.y[-1] + self.vy[-1]*self.dtv1=self.vx[-1] - self.dt *pow((1-(0.0065*self.y[-1])/300),2.5)*(0.0039+\0.0058/(1+math.exp((self.v[-1]-35)/5))) *\self.v[-1] * self.vx[-1]v2=self.vy[-1] - 9.8*self.dt - self.dt *\pow((1-(0.0065*self.y[-1])/300),2.5)*(0.0039+\0.0058/(1+math.exp((self.v[-1]-35)/5))) *\self.v[-1] * self.vx[-1]self.x.append(s1)self.y.append(s2)self.v.append(math.sqrt(self.vx[-1]*self.vx[-1] + self.vy[-1]*self.vy[-1]))self.vx.append(v1)self.vy.append(v2)if(s2<0):breakself.a.append(self.a[-1]+0.1)s=self.x[-1]a=self.a[-2]if(s>s0):s0=sa0=aif(self.a[-1]>45):breakself.v0.append(self.v0[-1]+1)delta = 500.00-s0if(abs(delta)<d):d=deltaV=self.v0[-2]A=a0print 'The proper veolcity is',Vprint 'The proper angle is',Aprint 'The erro range is',ddef show_results(self):pl.plot(self.x,self.y,'b')pl.title('Precise guidance system')pl.ylim(0,)pl.xlabel('X')pl.ylabel('Y')pl.legend()pl.show()a = cannon()a.run()a.show_results()
我们通过运行程序可得如下图像及数据:


至此,我们得到了对目标点(500,0)位置处的精确打击,理想射击初速为,角度为.
结论
1. 我们最终得到了确立精确打击的合适角度及初射速度,并且自动选择了最小的误差。
2.在写程序的时候发现了一个很有意思的小bug,即在解决第二阶段的问题时,偶然通过一个程序却得出了不同的运动轨迹,如图:
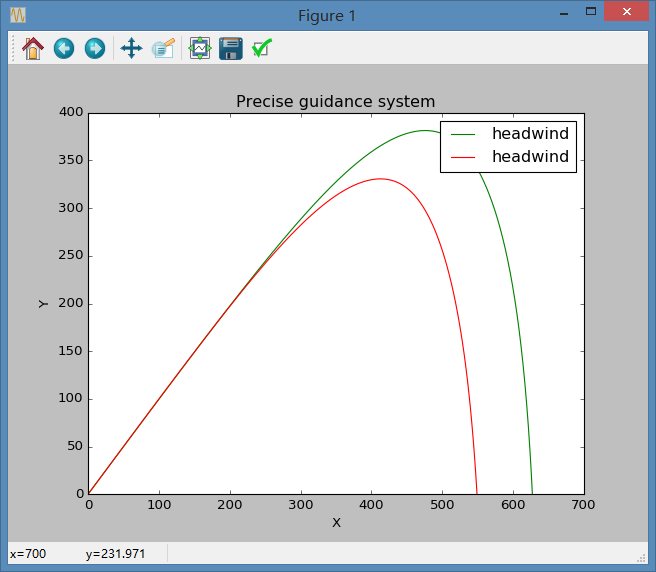
但当我检查的时候却发现,两者唯一的差别警示time step的选择,其中绿线代表的是0.01s的步长,而红线为0.1s的步长,可即使是这样的误差,在最终也达到了近100m的误差,而其实在无顶风的时候两者是完全重合的,这足以体现实际计算时小数点的重要性。但由于个人电脑的计算能力问题,最终我选择统一使用0.01s的步长。
3. 程序运行时需要先试运行之前的简单程序,方便确定最大射程的角度范围,然后再进一步通过4.1.3的主程序进行计算。这是因为计算量过大不得已而为之的方法,可即使这样做,运行程序时也会有一两秒的延时。
致谢
张梓桐同学提供了一个比较方便的函数pl.ylim(),其实在老师第二讲的ppt上也用过,即确定y轴的范围。在目标高度不高于火炮时,可用此方法将x轴以下的图像截掉。
