@zhuanxu
2017-11-08T09:35:35.000000Z
字数 6364
阅读 2513
第1章:Spring 基础
JavaEE开发的颠覆者SpringBoot实战
spring 简史
- xml配置
spring1.x,主要配置各种Bean - 注解配置
spring2.x,基本配置用xml,业务配置用注解 - Java 配置
spring3.x,spring boot 都推荐使用 Java 配置
spring 概述

包括内容很多,每一块都能单独拿出来讲。
spring 在 idea 中的搭建
为了体验spring,所以建立的是一个 maven quick start 的项目,建立后的 pom.xml 配置如下:
<project xmlns:xsi="http://www.w3.org/2001/XMLSchema-instance" xmlns="http://maven.apache.org/POM/4.0.0"xsi:schemaLocation="http://maven.apache.org/POM/4.0.0 http://maven.apache.org/xsd/maven-4.0.0.xsd"><modelVersion>4.0.0</modelVersion><groupId>com.wisely</groupId><artifactId>highlight_spring5_idea</artifactId><version>0.0.1-SNAPSHOT</version><packaging>jar</packaging><name>highlight_spring5_idea</name><url>http://maven.apache.org</url><properties><project.build.sourceEncoding>UTF-8</project.build.sourceEncoding><java.version>1.8</java.version></properties><dependencies><!-- https://mvnrepository.com/artifact/org.springframework/spring-context --><dependency><groupId>org.springframework</groupId><artifactId>spring-context</artifactId><version>5.0.1.RELEASE</version></dependency><dependency><groupId>junit</groupId><artifactId>junit</artifactId><version>3.8.1</version><scope>test</scope></dependency></dependencies><build><plugins><plugin><groupId>org.apache.maven.plugins</groupId><artifactId>maven-compiler-plugin</artifactId><version>3.7.0</version><configuration><source>${java.version}</source><target>${java.version}</target><!-- put your configurations here --></configuration></plugin></plugins></build></project>
spring 基础配置
spring 框架四大原则:
- 使用 POJO(Plain Old Java Object) 进行轻量级和最小侵入式开发
- 依靠依赖注入和接口实现松耦合
- 使用 AOP 和默认习惯进行声明式编程
- 使用 AOP 和模板减少代码冗余
依赖注入
依赖注入是通过配置+容器的方式实现的,配置可以通过 xml 配置、注解配置、java 配置实现,这些配置称为元配置数据,这些元配置本身不会有运行的能力,是通过程序解析代码后,根据元数据来做相应操作。
先介绍一个概念 Beans,Beans 是被 spring 容器管理的 POJO,Beans 以及 Beans 之间的依赖关系都是通过元数据来配置的,而这些元数据的使用方则是称为 IoC container 的容器。
Spring Framework 中 IoC container 主要代码是在 org.springframework.beans 和 org.springframework.context 两个包中。
在前面设置maven的依赖的时候,我们导入了 context, 看下依赖图:
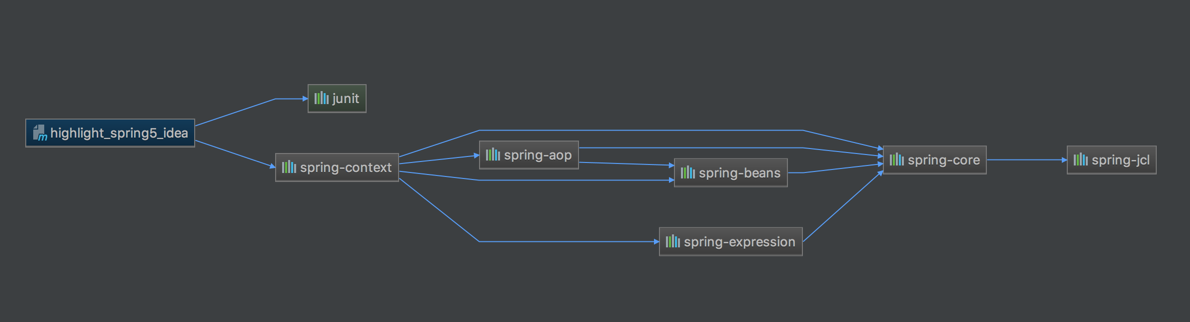
可以看到org.springframework.context本身依赖于org.springframework.beans
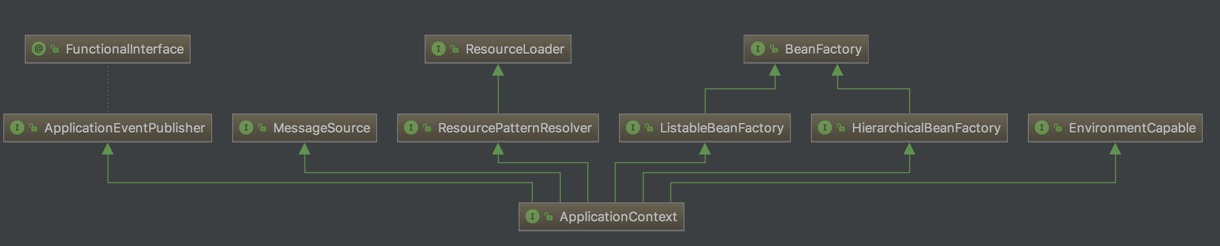
IoC 容器具体到具体的类是BeanFactory,里面定义了基本的接口来获取 Beans,而ApplicationContext是为了企业级应用而对BeanFactory的一个扩展,具体可以看依赖图:
接口org.springframework.context.ApplicationContext的职责是负责Beans的实例化,配置,组装等工作,而这些对Beans的具体操作都是通过配置数据来控制的。因为ApplicationContext是一个接口,只要实现这个接口,就可以作为一个容器来使用,常用的容器有ClassPathXmlApplicationContext和FileSystemXmlApplicationContext。
下面是一个ApplicationContext工作的概括图:
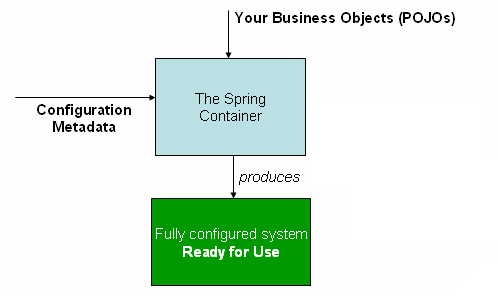
ApplicationContext通过我们配置的元数据,棒我们实例化、配置好我们需要的Beans,当具体的一个ApplicationContext对象生成结束的时候,我们的系统也就做好运行的准备了。
元配置数据
配置有3类方式:xml、注解和java,我们此处主要讲xml。一个典型的xml配置文件结构如下:
<?xml version="1.0" encoding="UTF-8"?><beans xmlns="http://www.springframework.org/schema/beans"xmlns:xsi="http://www.w3.org/2001/XMLSchema-instance"xsi:schemaLocation="http://www.springframework.org/schema/beanshttp://www.springframework.org/schema/beans/spring-beans.xsd"><bean id="..." class="..."><!-- collaborators and configuration for this bean go here --></bean><bean id="..." class="..."><!-- collaborators and configuration for this bean go here --></bean><!-- more bean definitions go here --></beans>
id 是对Bean的唯一标识,class则是具体的类名。
容器实例化
可以通过下面的代码得到一个具体的容器:
ApplicationContext context = new ClassPathXmlApplicationContext("services.xml", "daos.xml");
我们可以看到对于Beans的声明我们可以放到多个不同的xml文件中,还有另一个方式是在一个xml中导入其他的xml文件,如下:
<beans><import resource="services.xml"/><import resource="resources/messageSource.xml"/><bean id="bean1" class="..."/><bean id="bean2" class="..."/></beans>
Bean 概览
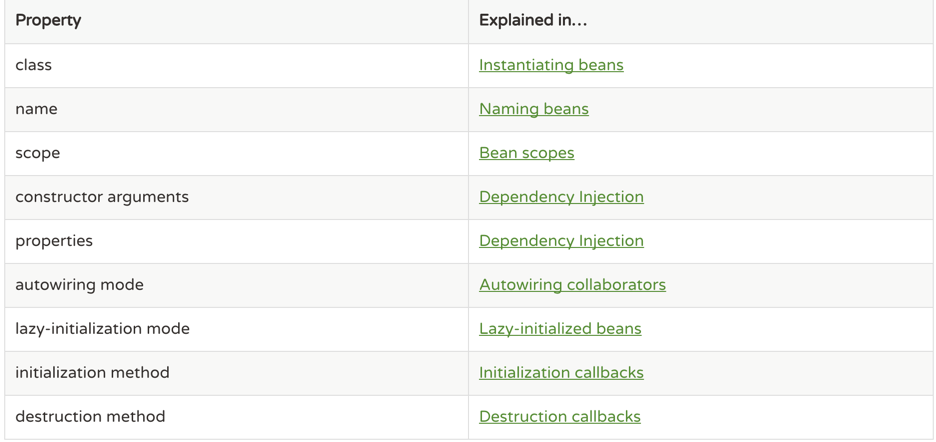
IoC 容器管理的Beans都是通过xml中定义的,在IoC中这些定义被表示为BeanDefinition对象,包含的信息有:
- bean 具体的实现类
- bean 在 IoC 中的行为(scope, lifecycle callbacks 等)
- bean 的依赖
- bean 的其他配置信息
下面是一个具体属性和作用:
name
一个Bean可以有多个名字,也可以没有名字,在xml中可以通过id or name来指定,id只能指定唯一一个名字,name可以通过","或者";"或者空格将多个名字隔开,另一种指定名字的方式是通过alias,如下:
<alias name="fromName" alias="toName"/>
如果我们没有指定id或者name,IoC容器会自动生成一个名字。
对于不指定名字的使用场景是:inner beans 和 autowiring collaborators,后面介绍。
实例化
实例化一个Bean的方式有两种
- 通过反射获取构造函数
- 静态工厂
先看第一种,构造函数的方式。
构造函数的方式一般要求Bean有个默认的构造函数(没有任何参数),然后通过set方式来设置Bean的属性,配置如下:
<bean id="exampleBean" class="examples.ExampleBean"/><bean name="anotherExample" class="examples.ExampleBeanTwo"/>
如果构造函数需要一些依赖注入,稍后介绍怎么完成。
另外一种方式是静态工厂,看配置:
<bean id="clientService"class="examples.ClientService"factory-method="createInstance"/>public class ClientService {private static ClientService clientService = new ClientService();private ClientService() {}public static ClientService createInstance() {return clientService;}}
另一种工厂是来自于另一个Bean的方法
<!-- the factory bean, which contains a method called createInstance() --><bean id="serviceLocator" class="examples.DefaultServiceLocator"><!-- inject any dependencies required by this locator bean --></bean><!-- the bean to be created via the factory bean --><bean id="clientService"factory-bean="serviceLocator"factory-method="createClientServiceInstance"/>public class DefaultServiceLocator {private static ClientService clientService = new ClientServiceImpl();public ClientService createClientServiceInstance() {return clientService;}}
依赖关系
依赖注入的种类
常见的依赖注入有构造函数注入和set方法注入,先来看构造函数注入。
构造函数注入
假设我们有下面的类:
package x.y;public class Foo {public Foo(Bar bar, Baz baz) {// ...}}
我们可以配置下面的xml,通过标签<constructor-arg/>来指定:
<beans><bean id="foo" class="x.y.Foo"><constructor-arg ref="bar"/><constructor-arg ref="baz"/></bean><bean id="bar" class="x.y.Bar"/><bean id="baz" class="x.y.Baz"/></beans>
另外一种是构造函数依赖的是普通的类型,如int,String等,看例子:
package examples;public class ExampleBean {// Number of years to calculate the Ultimate Answerprivate int years;// The Answer to Life, the Universe, and Everythingprivate String ultimateAnswer;public ExampleBean(int years, String ultimateAnswer) {this.years = years;this.ultimateAnswer = ultimateAnswer;}}
此时参数不再是Bean了,我们通过type,value的方式实现:
<bean id="exampleBean" class="examples.ExampleBean"><constructor-arg type="int" value="7500000"/><constructor-arg type="java.lang.String" value="42"/></bean>
也可以通过index-value的方式:
<bean id="exampleBean" class="examples.ExampleBean"><constructor-arg index="0" value="7500000"/><constructor-arg index="1" value="42"/></bean>
另外一种是在开启debug模式下使用的name-value,
<bean id="exampleBean" class="examples.ExampleBean"><constructor-arg name="years" value="7500000"/><constructor-arg name="ultimateAnswer" value="42"/></bean>
当然不想开启debug,也可以通过java的注释@ConstructorProperties来做:
package examples;public class ExampleBean {// Fields omitted@ConstructorProperties({"years", "ultimateAnswer"})public ExampleBean(int years, String ultimateAnswer) {this.years = years;this.ultimateAnswer = ultimateAnswer;}}
下面总结下依赖解析的整个过程:
ApplicationContext创建并且读取元配置信息生成BeanDefinition对象- 对于每个Bean,其依赖通过
properties,constructor arguments ,static-factory method来声明的。 - 每个
properties,constructor arguments是以值的形式或者对其他Bean的引用提供的。 - 每个
properties,constructor arguments如果是值的话,能自动转换到对应的类型(int,long,boolean等)。
下一篇将会详细介绍下依赖。
