@StarSky
2017-04-13T12:31:18.000000Z
字数 5255
阅读 3516
文字识别:基于灰度图像 vs 自适应二值化算法优化
工作日记
两条路:对灰度图像的识别,或者对二值化算法的优化。
各有利弊,识别灰度图像现在的思路是根据不同的光照环境/图片压缩噪点,模拟现实环境,增大样本量;图片二值化优化目的则是将不同条件下的图像归一成优质可识别的二值化结果。
灰度图像生成的几个点:
1. 文字数量同字间距的关系
2. 对比度及明暗度[1](区间调整)
3. 光斑/阴影模拟
4. 图片模糊程度(区间调整)
5. 背景图案获取
同样的二值化的过程也就是把上文的几个要点归约的过程。
中间试过几次,调整到最终感觉可以的流程(没加光斑):
1. 获取底纹图片,确定字体(经比较选用华文细黑)
2. 从底纹图中随机选取
3. 区间内随机取值调整底纹图亮度(区间[0.3, 1.0]最佳)
4. 获得调整后图片到评价颜色值[2] [3] [4] [5]
5. 根据上值,计算合适的字体颜色值码(调试得系数0.3最佳)
6. 叠加背景与字体水印[6]
7. 区间内随机取值加高斯模糊[7](区间[0.5, 1.0]最佳)
8. 转换成灰度图并保存
关于步骤1,本来想用两张图片相叠用lighter函数[8]抹去黑色的文字,后来发现不太好使,强行ps了一些底纹图跟已剪切的图片叠取了一些底纹图。
文字的叠加用的加水印的方法能使文字与背景有一点混叠噪点,非常漂亮非常自然,是我想要的东西2333。
然后偶尔发现了一篇文章。。噫。。Python图像压缩和增强手写笔记感觉可以用来优化文字识别原图像的图像质量啊,其实图像压缩与增强是很有意思的。
关于第三点,思路感觉还是可以用两张图片运算去做。
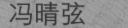
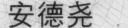
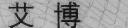
调整效果过程如下:


噫,感觉模拟出来的图像还是跟身份证差太多,字体感觉有问题。
调整了背景与字体颜色赋值方案,更改高斯模糊半径为1

更改高斯模糊半径为0.5(但其实加完模糊之后底纹不太清晰了,不太满意,其实有个思路是选中字体空间,区域高斯模糊,但是。。。字体空间怎么选,搜不到不做了23333)
身份证灰度图原图:
以上就是python模拟“自然环境”下生成身份证姓名部分图片的全部过程,自适应二值化算法可能改篇写了。
就像我之前跟一个朋友说过的,我不太觉得自己是个正规的程序员,需要的东西都是从网上搜索的,离搜索引擎啥都干不了,就是个搜索器合成器23333。嘛,用完代码回头再回忆都用到了了哪些博文也是个有趣的过程23333。
哦对了,组长说我生成的图效果不错23333
# coding=utf-8import osimport randomfrom uuid import uuid1import ImageFilterimport timefrom PIL import Imageimport ImageDrawimport ImageEnhanceimport ImageFontimport colorsysfrom PIL import Image, ImageFilterclass MyGaussianBlur(ImageFilter.Filter):name = "GaussianBlur"def __init__(self, radius=2, bounds=None):self.radius = radiusself.bounds = boundsdef filter(self, image):if self.bounds:clips = image.crop(self.bounds).gaussian_blur(self.radius)image.paste(clips, self.bounds)return imageelse:return image.gaussian_blur(self.radius)'''添加一个文字水印,png图层合并方式为身份证底纹印姓名'''# FONT = ['/Library/Fonts/Lantinghei.ttc',# '/System/Library/Fonts/STHeiti Light.ttc',# '/System/Library/Fonts/STHeiti Medium.ttc',# '/System/Library/Fonts/STHeiti Thin.ttc',# '/System/Library/Fonts/STHeiti UltraLight.ttc',# '/Library/Fonts/华文黑体.ttf',# '/Library/Fonts/华文细黑.ttf',# '/Library/Fonts/AdobeHeitiStd-Regular.otf',# ]FONT = ['/Library/Fonts/华文细黑.ttf']BACK_IMG = []def get_back_list(back_dir):for file_name in os.listdir(back_dir):file_path = os.path.join(back_dir, file_name)BACK_IMG.append(file_path)def text_watermark(back_dir, text, out_dir, out_grey_dir, angle=0):get_back_list(back_dir)img = Image.open(random.choice(BACK_IMG))# opacity = random.uniform(0.6, 1.7) # 原字体亮度调整系数# 图片亮度调整系数opacity = random.uniform(0.3, 1.0)watermark = Image.new('RGBA', img.size)size = 26font_path = random.choice(FONT)n_font = ImageFont.truetype(font_path, size)n_width, n_height = n_font.getsize(text)text_box = min(watermark.size[0], watermark.size[1])while n_width + n_height < text_box:size += 2n_font = ImageFont.truetype(FONT, size=size)n_width, n_height = n_font.getsize(text) # 文字逐渐放大,但是要小于图片的宽高最小值text_width = 8text_height = (watermark.size[1] - n_height) / 2draw = ImageDraw.Draw(watermark, 'RGBA') # 在水印层加画笔# 调整背景色明暗度img = ImageEnhance.Brightness(img).enhance(opacity)# 获得一个更适应背景色的字体色back_color, text_color = get_dominant_color(img, 0.3)if len(text) > 2:draw.text((text_width, text_height),text, font=n_font, fill=text_color)else:# 对双字名的字间距调整draw.text((text_width, text_height),text[0], font=n_font, fill=text_color)draw.text((text_width + 42, text_height),text[1], font=n_font, fill=text_color)watermark = watermark.rotate(angle, Image.BICUBIC)alpha = watermark.split()[3]# alpha = ImageEnhance.Brightness(alpha).enhance(opacity)watermark.putalpha(alpha)# file_name = text + font_path.decode('utf-8').split('/')[-1] + '.jpg'file_name = text + '_' + str(opacity) + text_color + back_color + '_' + str(uuid1()) + '.jpg'out_file_path = os.path.join(out_dir, file_name)# Image.composite(watermark, img, watermark).filter(ImageFilter.BLUR).save(out_file_path, 'JPEG')Image.composite(watermark, img, watermark).filter(MyGaussianBlur(radius=0.5)).save(out_file_path, 'JPEG')# img = Image.composite(watermark, img, watermark)# img.save(out_file_path, 'JPEG')out_grey_path = os.path.join(out_grey_dir, file_name)img_to_grey(out_file_path, out_grey_path)print u"文字水印成功"def rgb_to_hex(rgb):return '#%02x%02x%02x' % rgbdef get_dominant_color(image, adaptive):# 颜色模式转换,以便输出rgb颜色值image = image.convert('RGBA')# 生成缩略图,减少计算量image.thumbnail((200, 200))max_score = Nonedominant_color = Nonefor count, (r, g, b, a) in image.getcolors(image.size[0] * image.size[1]):# 跳过纯黑色if a == 0:continuesaturation = colorsys.rgb_to_hsv(r / 255.0, g / 255.0, b / 255.0)[1]y = min(abs(r * 2104 + g * 4130 + b * 802 + 4096 + 131072) >> 13, 235)y = (y - 16.0) / (235 - 16)# 忽略高亮色if y > 0.9:continue# Calculate the score, preferring highly saturated colors.# Add 0.1 to the saturation so we don't completely ignore grayscale# colors by multiplying the count by zero, but still give them a low# weight.score = (saturation + 0.1) * countif score > max_score:max_score = score# adaptive是个环境适应的参数, 暂定的0.3, 先试试看23333dominant_color = (r, g, b)dominant_color_adapt = (r * adaptive, g * adaptive, b * adaptive)return rgb_to_hex(dominant_color), rgb_to_hex(dominant_color_adapt)def img_to_grey(file_path, grey_path):im = Image.open(file_path).convert('L')# im.show()# time.sleep(5)im.save(grey_path)if __name__ == '__main__':back_dir = '/Users/saber/Documents/Py_test_file/back_for_use'out_dir = '/Users/saber/Documents/Py_test_file/out_img_dir'out_grey_path = '/Users/saber/Documents/Py_test_file/out_grey_dir/test.jpg'img_file = '/Users/saber/Documents/Py_test_file/out_img_dir/华文细黑.ttf.jpg'# text_watermark(back_dir, u'安鹏鹏', out_dir, out_grey_dir)# img_to_grey(img_file, out_grey_path)
[1] Python图像处理库PIL的ImageEnhance模块介绍 ↩
[2] 主题色提取 ↩
[3] 图像主题色提取算法 ↩
[4] RGB、十六进制(HEX)颜色格式互转-Python ↩
[5] w3schools调色板 ↩
[6] Python 图像简单处理(PIL or Pillow) ↩
[7] python利用PIL库使图片高斯模糊 ↩
[8] Python图像处理库PIL的ImageChops模块介绍 ↩
