@Arslan6and6
2016-08-29T02:28:40.000000Z
字数 12954
阅读 703
【作业二十四】殷杰
第十四章、分布式数据库HBase基本使用
---HBase 架构与使用
作业描述:
大数据(Hadoop)数据库HBase 架构、数据读写流程、Java API 使用、与MapReduce 集成
及数据导入,属于实际项目中必须要掌握的基本知识,以下几点大家要注重:
1) HBase 架构图,深入浅出理解,结合HDFS 目录和Zookeeper 中Znode;
2) HBase 中元数据表hbase:meta功能,在企业中遇到问题如何解决
3) HBase Java API基本使用,包含PUT、GET、SCAN及DELETE
4) HBase与MapReduce集成时,Classpath注意及如何从HBase 表中读取数据和写入数据,练习MapReduce 编程
5) 企业中常见的HBase数据迁移的几种方式、importtsv工具使用及如何编写MapReduce
将日志数据转换为 HFile,再通过bulk load加载数据到HBase表中,实现快速的数据导入。
HBase架构深入总结
Master
1、为 region server 分配 region
2、负责region server的负责均衡
3、发现失效的 region server,需要重新分配其上的 region
4、监听zk,基于zookeeper 感应 region server的上下线
5、监听zk,基于zookeeper 来保证 HA
6、不参与客户端数据读写访问
7、负载低(通常情况下可以把它和其他服务器(NN/SNN)整合在一起)
8、无单点故障(SPOF)Region server
1、维护master分配给它的region
2、响应客户端的IO访问请求(读写)
3、处理region的flush、compact、split
4、维护region的cachezookeeper
1、保证集群里面只有一个master(HA)
2、保存了root region的位置(meta),访问入口地址
3、实时监控region server的状态,及时通知region server上下线消息给master
4、存储了hbase的schema,包括哪些table,每个表有哪些列簇HStore存储是HBase存储的核心,由两部分组成,一部分是MemStore,一部分是StoreFile。
MemStore是 Sorted Memory Buffer,用户写入的数据首先会放入MemStore,当MemStore满了以后会Flush成一个StoreFile(底层实现是HFile)。
HLog 文件结构:WAL意为Write ahead log,类似Mysql中的binlog,用来做灾难恢复。Hlog记录数据的所有变更,一旦数据修改,就可以从log中进行恢复。
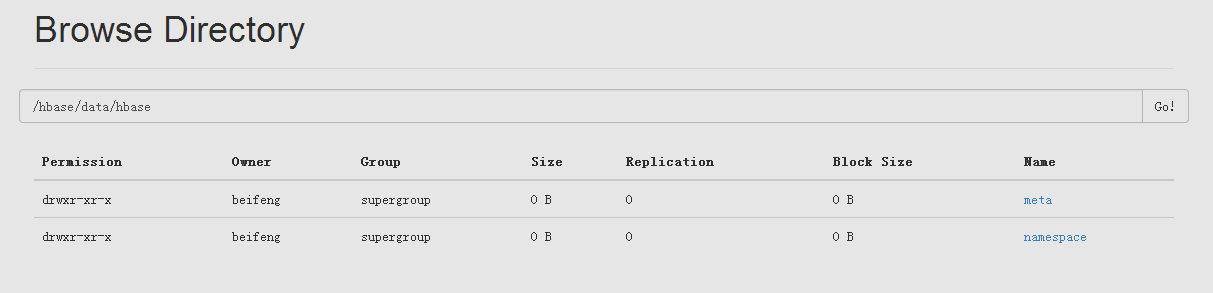
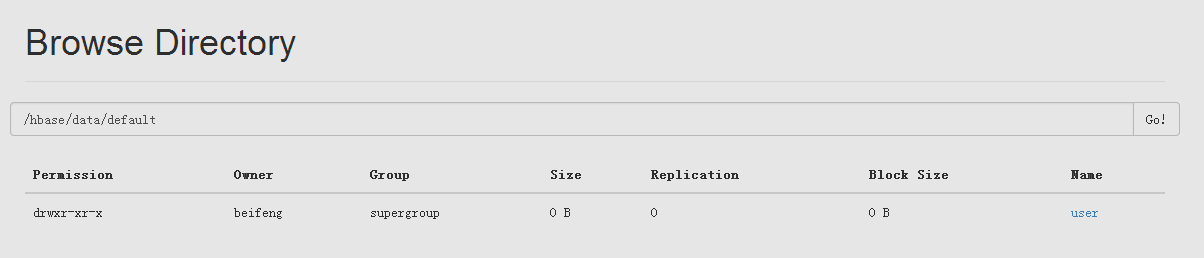
HBase 中元数据表hbase:meta功能
- 用户表由很多region组成,region信息存储在hbase:meta中。
- 用户表的每个region都有key。Client需要先读zookeeper,其实通过meta-region-server找到的是meta表的region,找到后扫描meta表的数据,然后再找到数据再操作。
HBase Java API基本使用,包含PUT、GET、SCAN及DELETE
环境准备
1.新建 Maven Project ,修改 pom.xml 文件,内容如下:
<project xmlns="http://maven.apache.org/POM/4.0.0" xmlns:xsi="http://www.w3.org/2001/XMLSchema-instance"xsi:schemaLocation="http://maven.apache.org/POM/4.0.0 http://maven.apache.org/xsd/maven-4.0.0.xsd"><modelVersion>4.0.0</modelVersion><groupId>org.apache.hbase</groupId><artifactId>beifeng-hbase</artifactId><version>0.0.1-SNAPSHOT</version><packaging>jar</packaging><name>beifeng-hbase</name><url>http://maven.apache.org</url><properties><project.build.sourceEncoding>UTF-8</project.build.sourceEncoding><hadoop.version>2.5.0</hadoop.version><hive.version>0.13.1</hive.version><hbase.version>0.98.6-hadoop2</hbase.version></properties><dependencies><dependency><groupId>junit</groupId><artifactId>junit</artifactId><version>4.10</version><scope>test</scope></dependency><dependency><groupId>org.apache.hadoop</groupId><artifactId>hadoop-client</artifactId><version>2.5.0</version></dependency><dependency><groupId>org.apache.hbase</groupId><artifactId>hbase-server</artifactId><version>${hbase.version}</version></dependency><dependency><groupId>org.apache.hbase</groupId><artifactId>hbase-client</artifactId><version>${hbase.version}</version></dependency></dependencies></project>
2.在 Maven Project 下新建资源文件夹 /src/main/resource 。并导入 hdfs-site.xml core-site.xml hbase-site.xml log4j.properties 4个文件
cp /opt/modules/hadoop-2.5.0-cdh5.3.6/etc/hadoop/hdfs-site.xml /home/beifeng/workspace/beifeng-hbase/src/main/resource/cp /opt/modules/hadoop-2.5.0-cdh5.3.6/etc/hadoop/core-site.xml /home/beifeng/workspace/beifeng-hbase/src/main/resource/cp /opt/modules/hbase-0.98.6-hadoop2/conf/hbase-site.xml /home/beifeng/workspace/beifeng-hbase/src/main/resource/cp /home/beifeng/workspace/studyhdfs/src/main/resource/log4j.properties /home/beifeng/workspace/beifeng-hbase/src/main/resource/
3.将准备好的 repository 文件夹复制到 /home/beifeng/.m2 下,内有准备好的 hbase-client 包
4.更新 Maven Project
java中操作HBase
Configuration类
- 获取配置文件实例对象,使用Configuration类。Hadoop使用了一套独有的配置文件
管理系统,并提供自己的API,即使用org.apache.hadoop.conf.Configuration处理
配置信息。 在使用Java API时,Client端需要知道HBase的配置环境,如存储地址,
ZooKeeper等信息。这些信息通过Configuration对象来封装,可通过如下代码
构建该对象:
Configuration config=HBaseConfiguration.create();在调用HBaseConfiguration.create()方法时,HBase首先会在classpath下查找
hbase-site.xml文件,将里面的信息解析出来封装到Configuration对象中,如
果hbase-site.xml文件不存在,则使用默认的hbase-core.xml文件。
HTable
在HBase中,HTable封装表格对象。
- 使用前先导入import org.apache.hadoop.hbase.client.HTable;
- 接下来对表格的增删改查操作主要通过HTable来完成,构造方法如下:
HTable table=new HTable(config,tableName);
使用Get获取数据
首先导入import org.apache.hadoop.hbase.client.Get;
其次获取行键为某值的表格信息。语法格式如下:
Get get=new Get(rowkey的字节数组);
Get get = new Get(Bytes.toBytes("10001"));
插入、修改数据
在HBase中,实体的修改也是通过Put操作来实现。操作步骤如下:
① 导入Put类import org.apache.hadoop.hbase.client.Put;
② 新建Put对象。语法格式:Put put=new Put(行键对应的字节数组),例:
Put put = new Put(Bytes.toBytes("10003"));
③ 将需要修改的列信息加入put对象。语法格式:put.add(“列族”,”列名”,”
列值”),例:
put.add(Bytes.toBytes("info"), Bytes.toBytes("name"), Bytes.toBytes("zhaoliu"));
put.add(Bytes.toBytes("info"), Bytes.toBytes("age"), Bytes.toBytes("50"));
put.add(Bytes.toBytes("info"), Bytes.toBytes("sex"), Bytes.toBytes("male"));
注意:一段代码中可以添加多个列的信息。
利用scan查询数据,在HBase中,利用scan来实现获取多条数据
- 实现全表扫描,步骤如下:
① 导入IOUtils类:import org.apache.hadoop.io.IOUtils;
导入Scan类:import org.apache.hadoop.hbase.client.Scan;
导入ResultScanner :
import org.apache.hadoop.hbase.client.ResultScanner;
② 新建Scan对象。语法格式:Scan scan=new Scan();
③ 扫描表格得到结果集ResultScanner迭代器接口对象。语法格式:
ResultScanner result=表格对象.getScanner(Scan对象);例题如下:
ResultScanner result = table.getScanner(scan);
④ 遍历结果,ResultScanner是由查询的结果Result对象组成。
for (Result res : result) {Cell[] ress = res.rawCells();for (Cell cell : ress) {System.out.print(Bytes.toString(CellUtil.cloneRow(cell)) + "\t");System.out.print(Bytes.toString(CellUtil.cloneFamily(cell)) + ":");System.out.print(Bytes.toString(CellUtil.cloneQualifier(cell)) + "==>");System.out.println(Bytes.toString(CellUtil.cloneValue(cell)));}
④ 关闭资源、表格。在之前的例题中,我们用 table.close() 方法关闭。本例题中我们系统提供的IOUtils类的closeStream()方法来关闭表格及其它资源。语法格式:
IOUtils.closeStream(对象);
IOUtils.closeStream(result);
IOUtils.closeStream(table);
- 利用Scan有条件的查询
① 利用行键Rowkey设置开始值和结束值查询。使用到以下方法setStartRow()与setStopRow( )方法。
在scan对象新建后加入设置开始值和结束值的方法,
格式:
Scan对象. setStartRow(行键开始值);
Scan对象. setStopRow(行键结束值);
Scan scan = new Scan();
scan.setStartRow(Bytes.toBytes("10002")) ;
scan.setStopRow(Bytes.toBytes("10003")) ;
代码简化:
Scan scan = new Scan(Bytes.toBytes("10002"), Bytes.toBytes("10003"));
② 利用列族筛选。方法如下:利用Scan对象的addFamily()方法通过列族筛选。
Scan scan = new Scan(Bytes.toBytes("10002"), Bytes.toBytes("10003"));
scan.addfamily(Bytes.toBytes("info"));
result = table.getScanner(scan);
③ 利用列筛选。方法如下:利用Scan对象的addColumn(”列族”,“列名”)方
法通过列族筛选。例:
Scan scan = new Scan(Bytes.toBytes("10002"), Bytes.toBytes("10003"));
scan.addColumn(Bytes.toBytes("info"),Bytes.toBytes("name"))
result = table.getScanner(scan);
删除数据
以下删除操作是按rowkey行键来做删除,步骤如下:
① 导入import org.apache.hadoop.hbase.client.Delete;
② 新建Delete对象。语法格式:Delete delete=new Delete(行键对应的字节
数组)
Delete delete = new Delete("10003");
③ 列对象中指明要删除的列信息。常用方法如下:
delete.deleteColumn(“列族”,”列名”)删除某一列
delete.deleteFamily(“列族”)删除整个列族
④ 从表格中删除信息。语法格式:table.delete(delete对象);
⑤ 关闭表格。语法格式:table.close();
HBase与MapReduce集成时,Classpath注意及如何从HBase 表中读取数据和写入数据,练习MapReduce 编程
HBase与MapReduce集成时是需要jar包的,加载步骤如下:
1.可以通过bin/hbase maperduce命令查看。如图所示,为集成需要的jar包。
[beifeng@hadoop-senior hbase-0.98.6-hadoop2]$ bin/hbase mapredcp2016-06-14 16:31:25,275 WARN [main] util.NativeCodeLoader: Unable to load native-hadoop library for your platform... using builtin-java classes where applicable/opt/modules/hbase-0.98.6-hadoop2/lib/hbase-common-0.98.6-hadoop2.jar:/opt/modules/hbase-0.98.6-hadoop2/lib/protobuf-java-2.5.0.jar:/opt/modules/hbase-0.98.6-hadoop2/lib/hbase-client-0.98.6-hadoop2.jar:/opt/modules/hbase-0.98.6-hadoop2/lib/hbase-hadoop-compat-0.98.6-hadoop2.jar:/opt/modules/hbase-0.98.6-hadoop2/lib/hbase-server-0.98.6-hadoop2.jar:/opt/modules/hbase-0.98.6-hadoop2/lib/hbase-protocol-0.98.6-hadoop2.jar:/opt/modules/hbase-0.98.6-hadoop2/lib/high-scale-lib-1.1.1.jar:/opt/modules/hbase-0.98.6-hadoop2/lib/zookeeper-3.4.5.jar:/opt/modules/hbase-0.98.6-hadoop2/lib/guava-12.0.1.jar:/opt/modules/hbase-0.98.6-hadoop2/lib/htrace-core-2.04.jar:/opt/modules/hbase-0.98.6-hadoop2/lib/netty-3.6.6.Final.jar
2.设置HBase、Hadoop环境变量
[beifeng@hadoop-senior hbase-0.98.6-hadoop2]$ export HADOOP_HOME=/opt/modules/hadoop-2.5.0-cdh5.3.6[beifeng@hadoop-senior hbase-0.98.6-hadoop2]$ export HBASE_HOME=/opt/modules/hbase-0.98.6-hadoop2
3.设置Hadoop_classpath环境变量
beifeng@hadoop-senior hbase-0.98.6-hadoop2]$ export HADOOP_CLASSPATH=`$HBASE_HOME/bin/hbase mapredcp`SLF4J: Class path contains multiple SLF4J bindings.SLF4J: Found binding in [jar:file:/opt/modules/hbase-0.98.6-hadoop2/lib/slf4j-log4j12-1.6.4.jar!/org/slf4j/impl/StaticLoggerBinder.class]SLF4J: Found binding in [jar:file:/opt/modules/hadoop-2.5.0-cdh5.3.6/share/hadoop/common/lib/slf4j-log4j12-1.7.5.jar!/org/slf4j/impl/StaticLoggerBinder.class]SLF4J: See http://www.slf4j.org/codes.html#multiple_bindings for an explanation.2016-06-14 16:48:54,685 WARN [main] util.NativeCodeLoader: Unable to load native-hadoop library for your platform... using builtin-java classes where applicable
4.查看jar包可以运行的参数
[beifeng@hadoop-senior hbase-0.98.6-hadoop2]$ /opt/modules/hadoop-2.5.0-cdh5.3.6/bin/yarn jar /opt/modules/hbase-0.98.6-hadoop2/lib/hbase-server-0.98.6-hadoop2.jar
An example program must be given as the first argument.
Valid program names are:
CellCounter: Count cells in HBase table
completebulkload: Complete a bulk data load.
copytable: Export a table from local cluster to peer cluster
export: Write table data to HDFS.
import: Import data written by Export.
importtsv: Import data in TSV format.
rowcounter: Count rows in HBase table
verifyrep: Compare the data from tables in two different clusters. WARNING: It doesn't work for incrementColumnValues'd cells since the timestamp is changed after being appended to the log.
① cellcounter:统计HBASE表中有多少个cells的个数
② rowcounter:统计hbase中有多少条数据
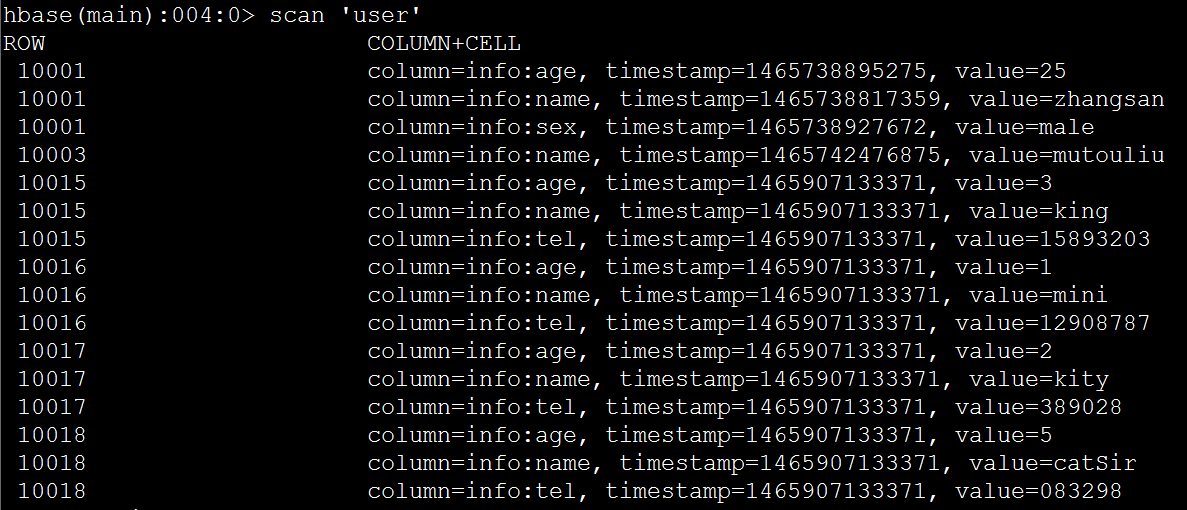
[beifeng@hadoop-senior hbase-0.98.6-hadoop2]$ /opt/modules/hadoop-2.5.0-cdh5.3.6/bin/yarn jar /opt/modules/hbase-0.98.6-hadoop2/lib/hbase-server-0.98.6-hadoop2.jar rowcounter user

③ importtsv :导入TSV(以table键分割的文件)格式的文件
例如:
将内容如下,名称为 in.tsv 的文件上传至 HDFS 根目录下的 input 目录
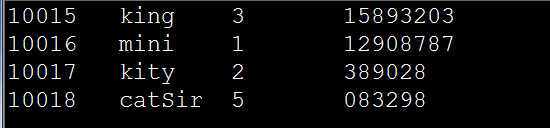
/opt/modules/hadoop-2.5.0-cdh5.3.6/bin/yarn jar /opt/modules/hbase-0.98.6-hadoop2/lib/hbase-server-0.98.6-hadoop2.jar importtsv -Dimporttsv.columns=HBASE_ROW_KEY,info:name,info:age,info:tel user /input/in.tsv
④completebulkload:
tsv --> Hfile(HDFS)
将存储于 HDFS 的 tsv 文件直接转换为 Hfile 格式文件传输到 HDFS ,而不必经过 memstore 、flush 等过程,从而效率更高
举例,修改 in.tsv 文件的行键后重新上传至 HDFS ,执行如下命令:
/opt/modules/hadoop-2.5.0-cdh5.3.6/bin/yarn jar /opt/modules/hbase-0.98.6-hadoop2/lib/hbase-server-0.98.6-hadoop2.jar importtsv -Dimporttsv.bulk.output=/hfileoutput/ -Dimporttsv.columns=HBASE_ROW_KEY,info:name,info:age,info:tel user /input/in.tsv
随后,将 Hfile 文件加载到 HBase 表,
Hfile(HDFS)--> table 命令如下:
/opt/modules/hadoop-2.5.0-cdh5.3.6/bin/yarn jar /opt/modules/hbase-0.98.6-hadoop2/lib/hbase-server-0.98.6-hadoop2.jar completebulkload /hfileoutput/ user

自定义MapReduce HBase
table1 --> HBase table2
package com.beifeng.senior.hadoop.beifenghbase;import java.io.IOException;import org.apache.hadoop.conf.Configuration;import org.apache.hadoop.conf.Configured;import org.apache.hadoop.hbase.Cell;import org.apache.hadoop.hbase.CellUtil;import org.apache.hadoop.hbase.HBaseConfiguration;import org.apache.hadoop.hbase.client.Put;import org.apache.hadoop.hbase.client.Result;import org.apache.hadoop.hbase.client.Scan;import org.apache.hadoop.hbase.io.ImmutableBytesWritable;import org.apache.hadoop.hbase.mapreduce.TableMapReduceUtil;import org.apache.hadoop.hbase.mapreduce.TableMapper;import org.apache.hadoop.hbase.mapreduce.TableReducer;import org.apache.hadoop.hbase.util.Bytes;import org.apache.hadoop.io.NullWritable;import org.apache.hadoop.mapreduce.Job;import org.apache.hadoop.util.Tool;import org.apache.hadoop.util.ToolRunner;public class User2StudentMapReduce extends Configured implements Tool{// step 1: Mapperpublic static class ReadUserMapper //extends TableMapper<ImmutableBytesWritable, Put>{@Overrideprotected void map(ImmutableBytesWritable key, Result value,Context context)throws IOException, InterruptedException {// user: name & age -> student: name & age : put// create PutPut put = new Put(key.get()) ;// add columnfor(Cell cell: value.rawCells()){// add family: infoif("info".equals(Bytes.toString(CellUtil.cloneFamily(cell)))){// add column: nameif("name".equals(Bytes.toString(CellUtil.cloneQualifier(cell)))){put.add(cell) ;// CellUtil.cloneValue(cell)// put.add(family, qualifier, value) ;}// add column: ageelse if("age".equals(Bytes.toString(CellUtil.cloneQualifier(cell)))){put.add(cell) ;}}}// context outputcontext.write(key, put);}}// step 2: Reducerpublic static class WriteStudentReducer //extends TableReducer<ImmutableBytesWritable, Put, NullWritable>{@Overrideprotected void reduce(ImmutableBytesWritable key, Iterable<Put> values,Context context) throws IOException, InterruptedException {for(Put put : values){context.write(NullWritable.get(), put);}}}// step 3: Driverpublic int run(String[] args) throws Exception {// 1) ConfigurationConfiguration conf = this.getConf();// 2) create jobJob job = Job.getInstance(conf, this.getClass().getSimpleName()) ;job.setJarByClass(User2StudentMapReduce.class);// 3) set job// input -> mapper -> shuffle -> reducer -> outputScan scan = new Scan() ;scan.setCacheBlocks(false);scan.setCaching(500); // 1 is the default in Scan, which will be bad for MapReduce jobsTableMapReduceUtil.initTableMapperJob("user", // input tablescan, // Scan instance to control CF and attribute selectionReadUserMapper.class, // mapper classImmutableBytesWritable.class, // mapper output keyPut.class, // mapper output valuejob //);TableMapReduceUtil.initTableReducerJob("student", // output tableWriteStudentReducer.class, // reducer classjob //);job.setNumReduceTasks(1); // at least one, adjust as requiredboolean isSuccess = job.waitForCompletion(true);if (!isSuccess) {throw new IOException("error with job!");}return isSuccess ? 0 : 1;}public static void main(String[] args) throws Exception {Configuration conf = HBaseConfiguration.create();int status = ToolRunner.run(//conf, //new User2StudentMapReduce(), //args //);System.exit(status);}}
