@yanglt7
2018-10-21T15:55:55.000000Z
字数 7443
阅读 956
【Web 集群实战】13_LNMP 之 PHP(FastCGI方式)
Web集群实战
一、PHP 服务的安装准备
1. 检查 Nginx 及 MySQL 的安装情况
1)检查确认 Nginx 及 MySQL 的安装路径
[root@ylt001 mysql]# ls -ld /application/mysql/drwxr-xr-x 13 root root 4096 Sep 21 20:10 /application/mysql/[root@ylt001 mysql]# ls -ld /application/nginx/drwxr-xr-x 11 root root 4096 Sep 17 15:16 /application/nginx/
2) 检查端口及启动情况
[root@ylt001 mysql]# netstat -lntup|grep -E "80|3306"tcp 0 0 0.0.0.0:80 0.0.0.0:* LISTEN 1157/nginx: mastertcp 0 0 0.0.0.0:3306 0.0.0.0:* LISTEN 1258/mysqld
3)测试访问 Nginx 及 MySQL 是否 OK
# 测试 Nginx[root@ylt001 ~]# wget 127.0.0.1......Saving to: ‘index.html’100%[===================================================================================================================================================>] 29 --.-K/s in 0s2018-09-27 13:14:18 (1.51 MB/s) - ‘index.html’ saved [29/29]# 测试 MySQL[root@ylt001 ~]# mysql -u root -pEnter password:Welcome to the MySQL monitor. Commands end with ; or \g.Your MySQL connection id is 1Server version: 5.5.61 MySQL Community Server (GPL)......Type 'help;' or '\h' for help. Type '\c' to clear the current input statement.mysql>
2. 检查安装 PHP 所需的 lib 库
[root@ylt001 ~]# yum install zlib-devel libxml2-devel libjpeg-devel libjpeg-turbo-devel libconv-devel -y[root@ylt001 ~]# rpm -qa zlib-devel libxml2-devel libjpeg-devel libjpeg-turbo-devel libconv-devellibxml2-devel-2.9.1-6.el7_2.3.x86_64zlib-devel-1.2.7-17.el7.x86_64libjpeg-turbo-devel-1.2.90-5.el7.x86_64[root@ylt001 ~]# yum install freetype-devel libpng-devel gd-devel libcurl-devel libxslt-devel -y[root@ylt001 ~]# rpm -qa freetype-devel libpng-devel gd-devel libcurl-devel libxslt-develgd-devel-2.0.35-26.el7.x86_64freetype-devel-2.4.11-15.el7.x86_64libpng-devel-1.5.13-7.el7_2.x86_64libcurl-devel-7.29.0-46.el7.x86_64libxslt-devel-1.1.28-5.el7.x86_64
- 由于 yum 源中没有 libconv-devel,所以需手工编译
[root@ylt001 ~]# cd /home/ylt/tools/[root@ylt001 tools]# wget https://ftp.gnu.org/pub/gnu/libiconv/libiconv-1.15.tar.gz[root@ylt001 tools]# tar zxf libiconv-1.15.tar.gz[root@ylt001 tools]# cd libiconv-1.15[root@ylt001 libiconv-1.15]# ./configure --prefix=/usr/local/libconv[root@ylt001 libiconv-1.15]# make[root@ylt001 libiconv-1.15]# make install[root@ylt001 libiconv-1.15]# cd ../
3. 安装 libmcrypt 库
- 由于 yum 源中没有 libmcrypt-devel,因此需要配置 epel 第三方 yum 源
[root@ylt001 tools]# wget -O /etc/yum.repos.d/epel.repo http://mirrors.aliyun.com/repo/epel-7.repo[root@ylt001 tools]# yum install libmcrypt-devel -y
4. 安装 mhash 加密扩展库
[root@ylt001 tools]# yum install mhash -y
5. 安装 mcrypt 加密扩展库
[root@ylt001 tools]# yum install mcrypt -y
二、开始安装 PHP 服务
1. 获取 PHP 软件包
[root@ylt001 tools]# wget http://cn2.php.net/get/php-7.1.22.tar.gz/from/this/mirror
2. 解压配置 PHP
[root@ylt001 tools]# tar xzf php-7.1.22.tar.gz[root@ylt001 tools]# cd php-7.1.22[root@ylt001 tools]# ./configure --prefix=/application/php-7.1.22 --eanble-mysqlnd --with-pdo-mysql=mysqlnd --with-mysqli=mysqlnd --with-iconv-dir=/usr/local/libiconv --with-freetype-dir --with-jpeg-dir --with-png-dir --with-zlib --with-libxml-dir=/usr --enable-xml --disable-rpath --enable-safe-mode --enable-bcmath --enable-shmop --enable-sysvsem --enable-inline-optimization --with-curl --with-curlwrappers --enable-mbregex --enable-fpm --enable-mbstring --with-mcrypt --with-gd --enable-gd-native-ttf --with-openssl --with-mhash --enable-pcntl --enable-sockets --with-xmlrpc --enable-zip --enable-soap --enable-short-tags --enable-zend-multibyte --enable-static --with-xsl --with-fpm-user=nginx --with-fpm-group=nginx --enable-ftp
3. 编译 PHP
[root@ylt001 php-7.1.22]# ln -s /application/mysql/lib/libmysqlclient.so.18 /usr/lib64/[root@ylt001 php-7.1.22]# touch ext/phar/phar.phar[root@ylt001 php-7.1.22]# make
4. 安装 PHP 生成文件到系统
[root@ylt001 php-7.1.22]# make install
5. 配置 PHP 引擎配置文件 php.ini
- 设置软链接以便访问
[root@ylt001 php-7.1.22]# ln -s /application/php-7.1.22 /application/php[root@ylt001 application]# ll /application/phplrwxrwxrwx 1 root root 24 Sep 26 04:10 /application/php -> /application/php-7.1.22/
- 查看 PHP 配置默认模板文件
[root@ylt001 php-7.1.22]# ls php.ini*php.ini-development php.ini-production
- 拷贝 PHP 配置文件到 PHP 默认目录,并更改文件名称为 php.ini
[root@ylt001 php-7.1.22]# cp php.ini-production /application/php/lib/php.ini[root@ylt001 php-7.1.22]# vim /application/php/lib/php.ini# 将 477 行改成 display_errors = On
6. 配置 PHP 服务的配置文件 php-fpm.conf
[root@ylt001 php-7.1.22]# cd /application/php/etc/[root@ylt001 php-7.1.22]# lspear.conf php-fpm.conf.default php-fpm.d[root@ylt001 etc]# cd php-fpm.d/[root@ylt001 php-fpm.d]# lswww.conf.default[root@ylt001 php-fpm.d]# cp www.conf.default ../php-fpm.conf
7. 启动 PHP 服务
[root@ylt001 php-fpm.d]# /application/php/sbin/php-fpm[root@ylt001 php-fpm.d]# ps -ef|grep php-fpmroot 1973 1 0 19:21 ? 00:00:00 php-fpm: master process (/application/php-7.1.22/etc/php-fpm.conf)nginx 1974 1973 0 19:21 ? 00:00:00 php-fpm: pool wwwnginx 1975 1973 0 19:21 ? 00:00:00 php-fpm: pool wwwroot 1981 1872 0 19:22 pts/0 00:00:00 grep --color=auto php-fpm[root@ylt001 php-fpm.d]# lsof -i :9000COMMAND PID USER FD TYPE DEVICE SIZE/OFF NODE NAMEphp-fpm 1973 root 7u IPv4 24547 0t0 TCP localhost:cslistener (LISTEN)php-fpm 1974 nginx 5u IPv4 24547 0t0 TCP localhost:cslistener (LISTEN)php-fpm 1975 nginx 5u IPv4 24547 0t0 TCP localhost:cslistener (LISTEN)
三、配置 Nginx 支持 PHP 程序访问
1. 修改 Nginx 配置文件
- 查看 Nginx 当前的配置
[root@ylt001 php-fpm.d]# cd /application/nginx/conf/[root@ylt001 conf]# cp nginx.con[root@ylt001 conf]# cat nginx.confworker_processes 1;error_log logs/error.log;events {worker_connections 1024;}http {include mime.types;default_type application/octet-stream;log_format main '$remote_addr - $remote_user [$time_local] "$request" ''$status $body_bytes_sent "$http_referer" ''"$http_user_agent" "$http_x_forwarded_for"';sendfile on;keepalive_timeout 65;include extra/www.conf;include extra/bbs.conf;include extra/blog.conf;include extra/status.conf;}
- PHP 解析,以 blog 为例
[root@ylt001 conf]# cat extra/blog.confserver {listen 80;server_name blog.yangyangyang.org;location / {root html/blog;index index.html index.htm;}location ~ .*\.(php|php7)?$ {root html/blog;fastcgi_pass 127.0.0.1:9000;fastcgi_index index.php;include fastcgi.conf;}}
2. 检查并启动 Nginx
[root@ylt001 conf]# ../sbin/nginx -tnginx: the configuration file /application/nginx-1.14.0//conf/nginx.conf syntax is oknginx: configuration file /application/nginx-1.14.0//conf/nginx.conf test is successful[root@ylt001 conf]# ../sbin/nginx -s reload
3. 测试 LNMP 环境生效情况
1)测试 PHP 解析请求是否 OK
- 进入指定的默认站点目录后,编辑 index.php,添加如下内容
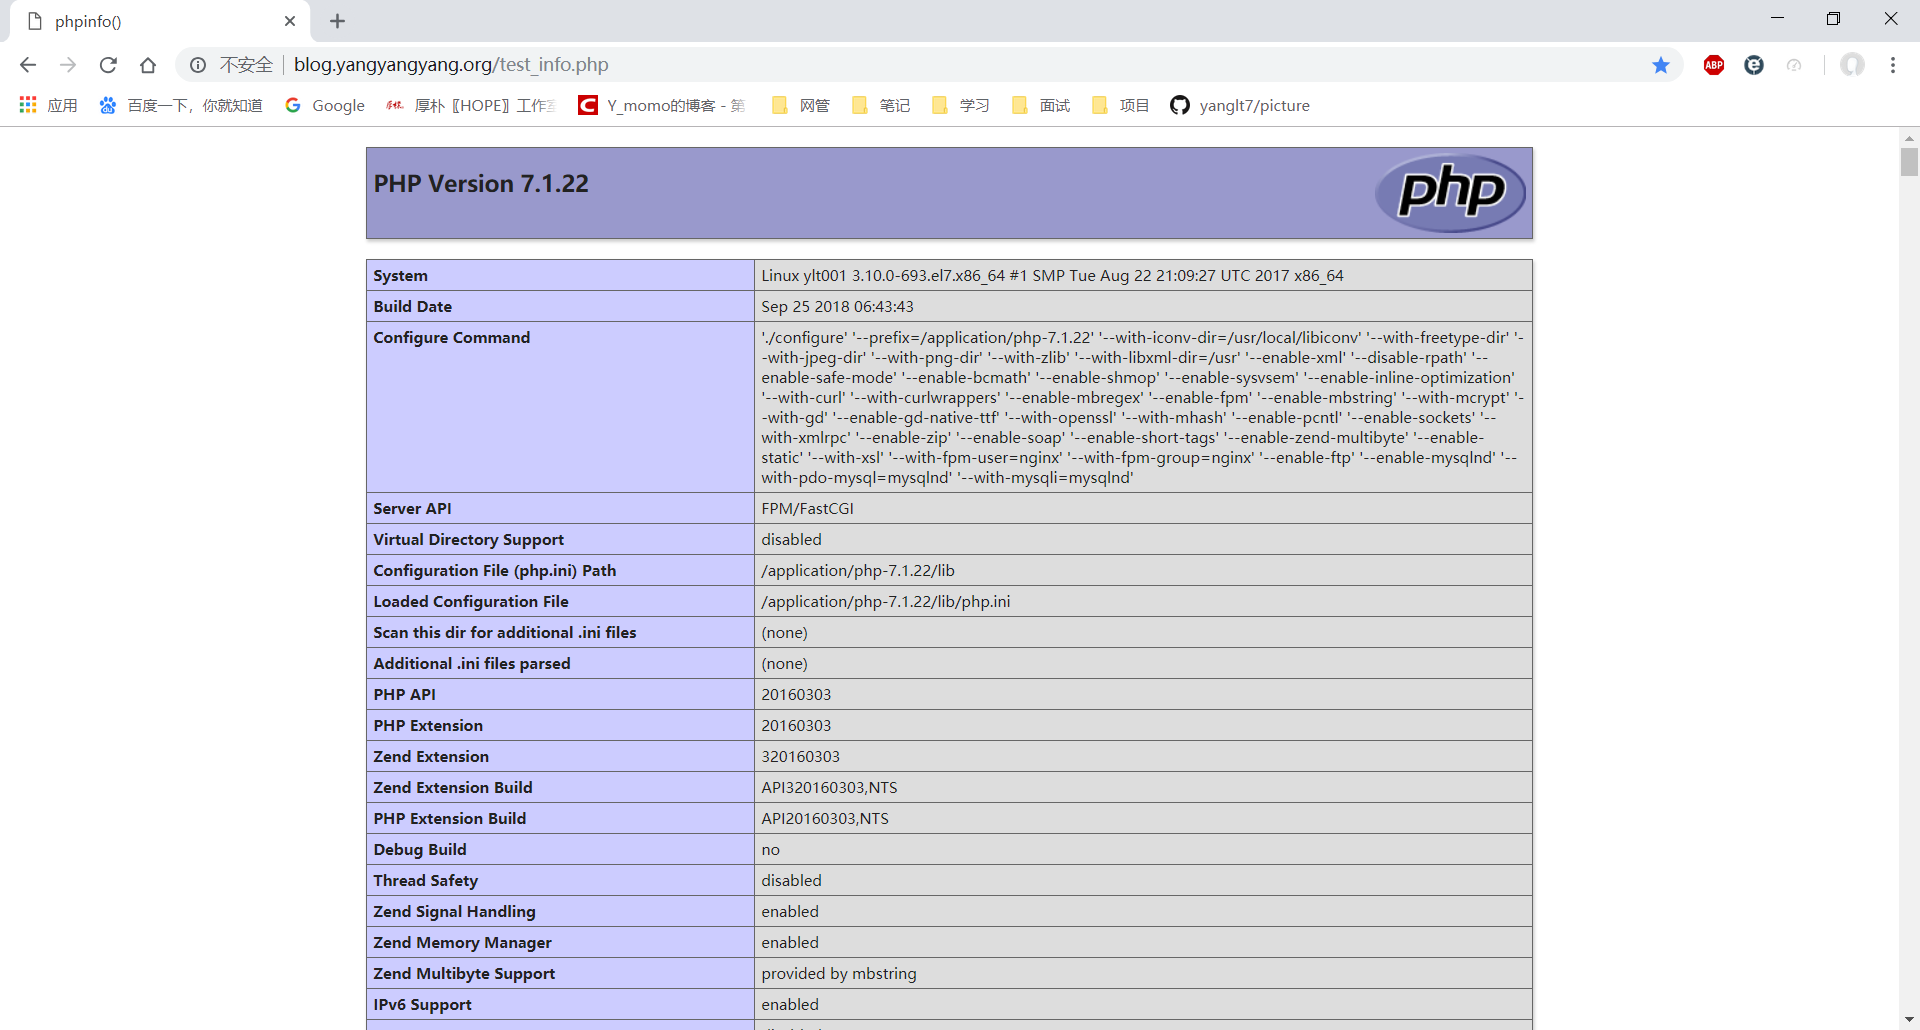
[root@ylt001 conf]# cd ../html/blog/[root@ylt001 blog]# echo "<?php phpinfo(); ?>" >test_info.php[root@ylt001 blog]# cat test_info.php<?php phpinfo(); ?>
- 调整 Windows 下的 host 解析
192.168.2.133 www.yangyangyang.org bbs.yangyangyang.org blog.yangyangyang.org status.yangyangyang.org yangyangyang.org
- 打开浏览器,输入 http://blog.yangyangyang.org/test_info.php,即可打开如图页面
2)针对 Nginx 请求访问 PHP,然后对 PHP 连接 MySQL 的情况进行测试
- 新建 phpdb 数据库
[root@ylt001 blog]# mysql -u root -pEnter password:Welcome to the MySQL monitor. Commands end with ; or \g.Your MySQL connection id is 3Server version: 5.5.61 MySQL Community Server (GPL)......Type 'help;' or '\h' for help. Type '\c' to clear the current input statement.mysql> create database phpdb;mysql> show database;+--------------------+| Database |+--------------------+| information_schema || ftpdb || mysql || performance_schema || phpdb |+--------------------+5 rows in set (0.01 sec)mysql> quitBye[root@ylt001 blog]#
- 编辑 test_mysqli.php,加入如下内容
[root@ylt001 blog]# cat test_mysqli.php<?php/* Database config */$db_host = 'localhost';$db_user = 'root';$db_pass = 'passwd';$db_database = 'phpdb';/* End config */$mysqli = new mysqli($db_host, $db_user, $db_pass, $db_database);/* check connection */if (mysqli_connect_error()) {printf("Connect failed: %s\n", mysqli_connect_error());}else{echo "mysql successful by ylt !";}?>
- 结果如下图所示

