@Team
2018-11-30T16:08:38.000000Z
字数 5720
阅读 4729
手把手教你用keras搭建SRGAN-超分辨率复原
陈扬
论文地址:https://arxiv.org/pdf/1406.2661.pdf
github:https://github.com/chenyang1999/Keras-GAN/blob/master/gan/gan.py
前言
大家好,我是中国海洋大学的陈扬。在遥远的九月份,我开始做了keras的系列教程,现在我主要的研究方向转到了生成对抗网络,生成对抗网络的代码实现和训练机制比分类模型都要复杂和难入门.之前一段时间时间一直在帮璇姐跑cvpr的实验代码,做了蛮多的对比实验,其中我就发现了,keras的代码实现和可阅读性很好,搭生成对抗网络网络GAN就好像搭乐高积木一样有趣哦。不只是demo哦,我还会在接下来的一系列 keras教程中教你搭建Alexnet,Vggnet,Resnet,DCGAN,ACGAN,CGAN,SRGAN,等等实际的模型并且教你如何在GPU服务器 上运行。
SRGAN
什么是生成对抗网络?
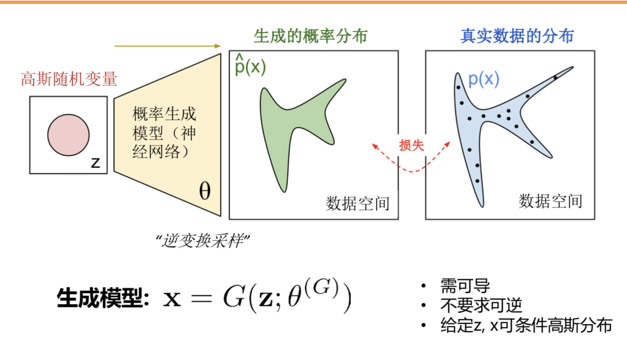
简单的来说,就给定一个噪声z的输入,通过生成器的变换把噪声的概率分布空间尽可能的去拟合真实数据的分布空间.
基本框架:
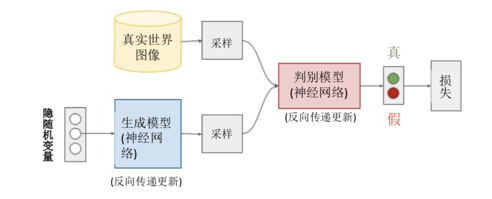
在这里,我们把生成器看的目标看成是要"以假乱真",判别器的目标是要"明辨真假".
核心公式:

这个公式我们要分成两个部分来看:
先看前半部分:
这个公式的意思是,先看加号前面Ex~pdata(x) [logD(x)] ,我们希望D最大,所以log(D(x))应该最大,意味着我的判别器可以很好的识别出,真实世界图像是"true",在看加号后面Ez~pz(z) [log(1-D(G(z)))],要让log尽可能的大,需要的是D(G(z))尽可能的小,意味着我们生成模型的图片应该尽可能的被判别模型视为"FALSE".
再看后半部分部分 ,
,
我们应该让G尽可能的小,加号前面的式子并没有G,所以无关,在看加号后面的式子Ez~pz(z) [log(1-D(G(z)))],要让G尽可能地小,就要D(G(Z))尽可能的大,也就是说本来就一张→噪声生成的图片,判别器却被迷惑了,以为是一张真实世界图片.这就是所谓的以假乱真.
代码实现
生成器:
def build_generator(self):model = Sequential()model.add(Dense(256, input_dim=self.latent_dim))model.add(LeakyReLU(alpha=0.2))model.add(BatchNormalization(momentum=0.8))model.add(Dense(512))model.add(LeakyReLU(alpha=0.2))model.add(BatchNormalization(momentum=0.8))model.add(Dense(1024))model.add(LeakyReLU(alpha=0.2))model.add(BatchNormalization(momentum=0.8))model.add(Dense(np.prod(self.img_shape), activation='tanh'))model.add(Reshape(self.img_shape))model.summary()noise = Input(shape=(self.latent_dim,))img = model(noise)return Model(noise, img)
生成器的输入是一个100维服从高斯分布的向量,输出是一张28*28*1的图片
_________________________________________________________________Layer (type) Output Shape Param #=================================================================input_2 (InputLayer) (None, 100) 0_________________________________________________________________sequential_2 (Sequential) (None, 28, 28, 1) 1493520=================================================================Total params: 1,493,520Trainable params: 1,489,936Non-trainable params: 3,584
判别器
def build_discriminator(self):model = Sequential()model.add(Flatten(input_shape=self.img_shape))model.add(Dense(512))model.add(LeakyReLU(alpha=0.2))model.add(Dense(256))model.add(LeakyReLU(alpha=0.2))model.add(Dense(1, activation='sigmoid'))model.summary()img = Input(shape=self.img_shape)validity = model(img)return Model(img, validity)
判别器的输入是一张28*28*1的图片和一个一维的真假标签,1代表是真实世界图片,0代表的的生成模型生成的图片.
_________________________________________________________________Layer (type) Output Shape Param #=================================================================input_1 (InputLayer) (None, 28, 28, 1) 0_________________________________________________________________sequential_1 (Sequential) (None, 1) 533505=================================================================Total params: 533,505Trainable params: 533,505Non-trainable params: 0
注意了!在SGAN(2104)中,作者并没有用卷积池化等操作,他只是用了最简单的full connection全连接层.
训练
定义模型
def __init__(self):self.img_rows = 28self.img_cols = 28self.channels = 1self.img_shape = (self.img_rows, self.img_cols, self.channels)self.latent_dim = 100optimizer = Adam(0.0002, 0.5)# Build and compile the discriminatorself.discriminator = self.build_discriminator()self.discriminator.summary()self.discriminator.compile(loss='binary_crossentropy',optimizer=optimizer,metrics=['accuracy'])# Build the generatorself.generator = self.build_generator()self.generator.summary ()# The generator takes noise as input and generates imgsz = Input(shape=(self.latent_dim,))img = self.generator(z)# For the combined model we will only train the generatorself.discriminator.trainable = False# The discriminator takes generated images as input and determines validityvalidity = self.discriminator(img)# The combined model (stacked generator and discriminator)# Trains the generator to fool the discriminatorself.combined = Model(z, validity)self.combined.summary()self.combined.compile(loss='binary_crossentropy', optimizer=optimizer
判别器discriminator只训练判别器的参数;生成器的训练是把生成器和判别器两个网络连在一起,但是冻结判别器的学习率,一起组成combined.用的都是binary_crossentropy二分类的交叉熵作为损失函数.
训练部分
def train(self, epochs, batch_size=128, sample_interval=50):# Load the dataset(X_train, _), (_, _) = mnist.load_data()# Rescale -1 to 1X_train = X_train / 127.5 - 1.X_train = np.expand_dims(X_train, axis=3)# Adversarial ground truthsvalid = np.ones((batch_size, 1))fake = np.zeros((batch_size, 1))for epoch in range(epochs):# ---------------------# Train Discriminator# ---------------------# Select a random batch of imagesidx = np.random.randint(0, X_train.shape[0], batch_size)imgs = X_train[idx]noise = np.random.normal(0, 1, (batch_size, self.latent_dim))# Generate a batch of new imagesgen_imgs = self.generator.predict(noise)# Train the discriminatord_loss_real = self.discriminator.train_on_batch(imgs, valid)d_loss_fake = self.discriminator.train_on_batch(gen_imgs, fake)d_loss = 0.5 * np.add(d_loss_real, d_loss_fake)# ---------------------# Train Generator# ---------------------noise = np.random.normal(0, 1, (batch_size, self.latent_dim))# Train the generator (to have the discriminator label samples as valid)g_loss = self.combined.train_on_batch(noise, valid)# Plot the progressprint ("%d [D loss: %f, acc.: %.2f%%] [G loss: %f]" % (epoch, d_loss[0], 100*d_loss[1], g_loss))# If at save interval => save generated image samplesif epoch % sample_interval == 0:self.sample_images(epoch)
先加载数据集,然后每一次训练从数据集里面随机选取batchsize张图片进行训练,训练的时候,真实图片对应的标签是valid=1,生成器生成的图片对应的标签是fake=0;
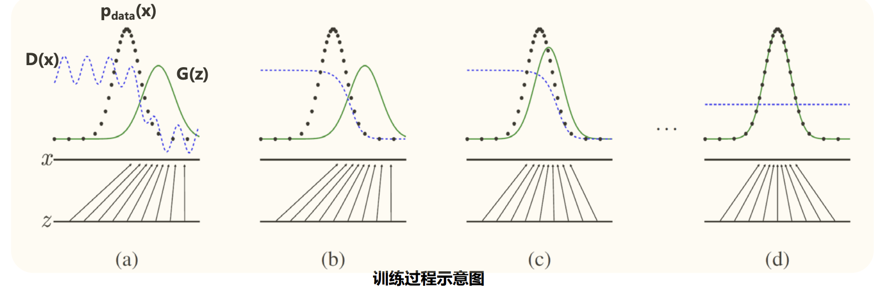
训练的时候,先训练dloss,dloss由真实世界图片和生成图片以及其标签进行训练.在训练判别器的时候,真实世界图片对应真实的标签valid,生成的图片对应fake标签,也就是让判别器"明辨真假"的过程.在训练生成器的时候,我们输入高斯噪声和ground truths(中文翻译叫标注),等于是告诉生成对抗网络,我给你一个"假的"图片,但是是"真的"标签,也就是我们让生成器以假乱真的过程.不断的在"明辨真假"和"以假乱真"的两个过程不断迭代训练,最终,生成器可以很好的"以假乱真",判别器可以很好的"明辨真假".当我们把生成器的图片给"人"看的时候,人就会被"以假乱真"了.
在服务器上训练
在训练了30000epoch后
30000 [D loss: 0.693933, acc.: 57.81%] [G loss: 0.853226]
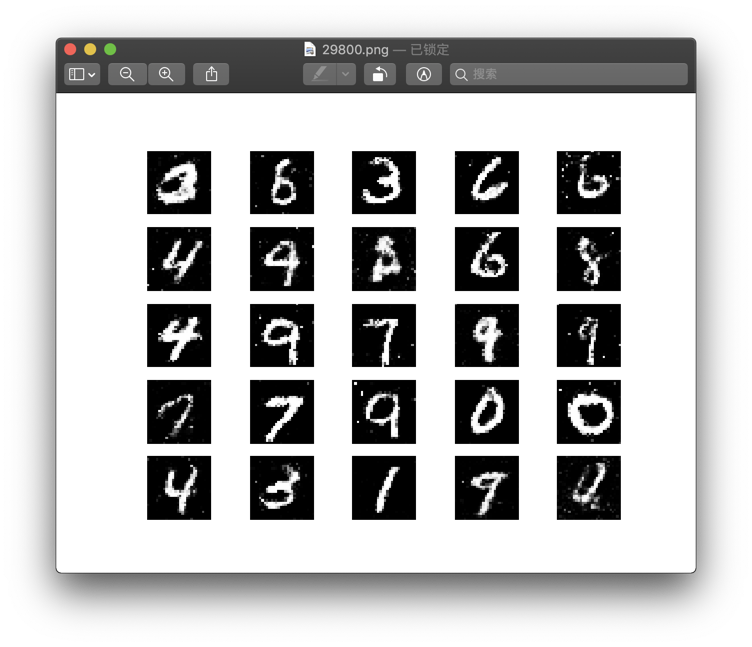
我们看得到,判别器分辨真假的能力接近1/2,相当于已经被生成器以假乱真了.
结束语.
在github上,有完整的gan.py代码,未来我还会出这一集的视频,在bilibili上播放,我希望能通过说的方式,带你从code的角度去理解复杂的生成对抗网络
未来我还出一系列我们研究过程中运用到的对比试验的model,比如DCGAN,ACGAN,CGAN,SRGAN等欢迎大家持续支持我们的公众号.
