@Team
2019-11-24T09:18:14.000000Z
字数 11596
阅读 3140
深入理解风格迁移三部曲(三)--FUNIT
陈扬
FUNIT: Few-Shot Unsupervised Image-to-Image Translation
project:https://nvlabs.github.io/FUNIT/
作者:陈扬
简介
无监督的图像到图像转换方法学习利用图像的非结构化(UNlabel)数据集将给定类中的图像映射到不同类中的类似图像。在ICCV2019上,NVIDIA-Lab发表了Image-to-image最新的研究成果,基于少量类别学习的FUNIT.笔者在CVPR2020的投稿中正好也大量涉及到了image2image的实验,其中样本不均衡是对unpair-image2image任务来说同样是一个很大的问题,而few-shot Learning则是其中一种极端情况.于此同时,paper中令我影响深刻的是作者做了大量的Ablation Study ,充分的实验证明了算法的有效性以及鲁棒性.
前言
在我们展开深入理解FUNIT之前,我们来看一下他的前身UNIT,由NVIDIA-Lab在2017年提出,该文章首次提Image-Image Translation这个概念,将计算机视觉和计算机图形学的许多任务总结进去,分为一对多和多对一的两类转换任务,包括CV里的边缘检测,图像分割,语义标签以及CG里的mapping labels or sparse user inputs to realistic images.
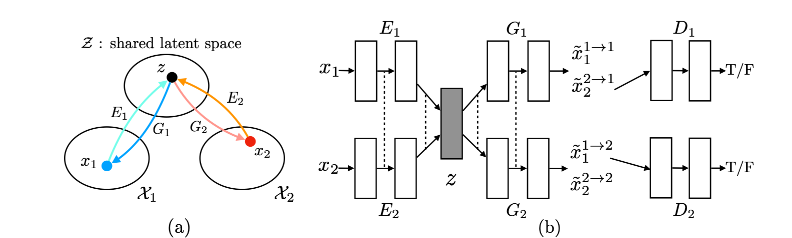
该文章定义了和作为两个图像域.传统的supervised Image-to-image 通过对图像域进行采样,求其联合概率分布
这样,我们得到了两个Domain下image的一致表示,再通过令,从latent space中重构,
因此,我们两个采样下的经过后得到了,再把:
通过Adv_loss对抗学习跨域生成图片的效果.
可能细心的你以及发现了这是不是很类似VAE-GAN吗?是的.
作者通过联合训练4个网络的三个来训练整个网络:
VAE的目标是minimize source domain to latent space's KL diversity and latent space to destination domain's KL diversity(我觉得中文太拗口了,这句话实在是说不来)来最小化变分上界,VAE的定义如下:
对抗:GAN_LOSS被用于确保翻译图像类似图像在目标域.定义如下:
循环一致性:由于shared latent-space假设暗含了循环一致性约束,因此我们在提出的框架中实施循环一致性约束,以进一步规范不适定的无监督图像间转换问题。产生的信息处理流称为循环重建流,定义如下:
训练好的网络,我们可以通过对latent sapce的latent variable重编码,进而把输入图像迁移到各个域中:
few-shot
虽然UNIT以及其变种(cycleGAN等等)已经表现得非常成功,现有的无监督图像到图像转换模型在两个方面受到限制。首先,如果在训练时只给出很少的图像,它们的样本效率低,产生差的转换输出。
其次,学习的模型仅限于在两个类之间转换图像。尽管新任务与原始任务之间存在相似性,但是用于一个转换任务的训练模型不能直接重用于新任务。
例如,即使猫与老虎有很大的相似性,也不能将哈士奇与猫的转换模型重新用于哈士奇 与老虎的转换。
同样,作者通过few-shot学习得到的图像同样可以应用于少样本分类,在Ablation Study中作者做了非常详细的比较,进而验证其有效性.
算法描述
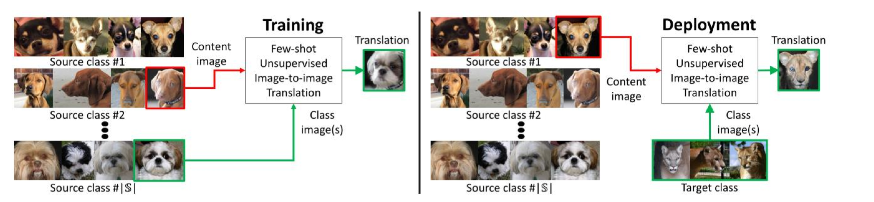
前提假设:为了训练 FUNIT,我们使用来自一组对象类(例如各种动物物种的图像)的图像,称为源类。我们不假设任何两个类别之间配对图像的存在.
使用源类图像来训练多级无监督图像到图像的转换模型。
在测试过程中,我们为模型提供了 一些来自新对象类的图像,称为目标类。该模型必须利用少 数目标图像将任何源类图像转换为目标类的同类图像。
框架由条件图像生成器 G 和多任务对抗判别器 D 组成。它采用一个图像作为输入,我们的生成 器 G 同时采用内容图像 和一组类别图像K:{}作为输入,并通过生成器G产生输出图像:
我们将 G 称为少样本图像转换器。G 将输入内容图像映射到输出图像,使得 x 看起来像属于对象类的图像,并且和具有纹理结构上的相似性。设 和 分别表示源类集和目标类集。训练时,
多任务对抗判别器
判别器 D 通过同时解决多个对抗分类任务来训练。 每个任务是二分类任务,确定输入图像是源类的实际图像还来自 G 生成的转换输出.这个对抗训练实际上是类似前面提到过的,不在赘述.
框架设计
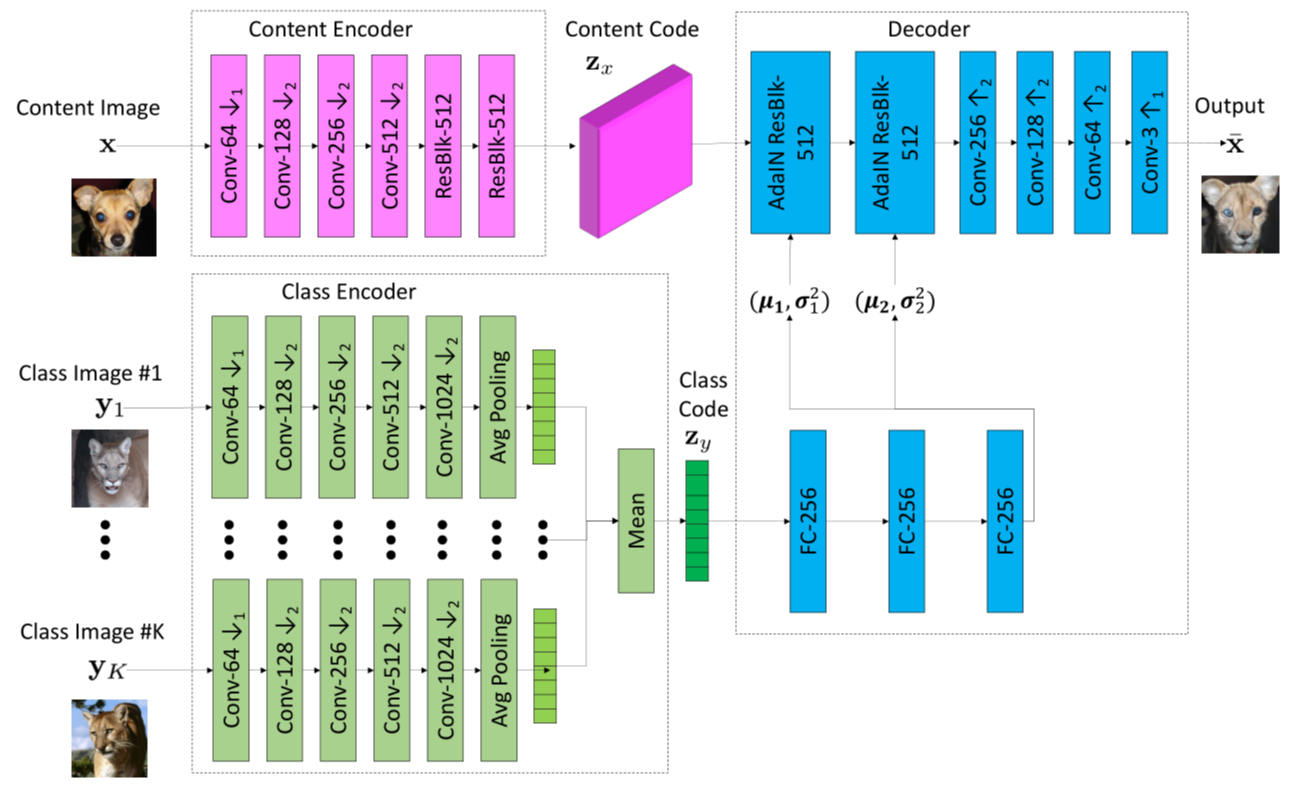
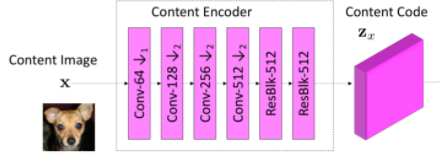
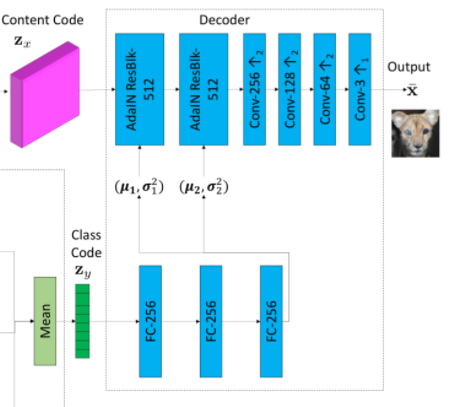
少样本图像转换器由三个子网络组成:内容编码器(Content Encoder),类编码器(Class Encoder)和解码器(Decoder).
内容编码器由几个 2D 卷积层组成,后跟几个ResBlock。它将输入内容图像 x 映射到内容潜码 ,其代表空间特征映射。
class ContentEncoder(nn.Module):def __init__(self, downs, n_res, input_dim, dim, norm, activ, pad_type):super(ContentEncoder, self).__init__()self.model = []self.model += [Conv2dBlock(input_dim, dim, 7, 1, 3,norm=norm,activation=activ,pad_type=pad_type)]for i in range(downs):self.model += [Conv2dBlock(dim, 2 * dim, 4, 2, 1,norm=norm,activation=activ,pad_type=pad_type)]dim *= 2self.model += [ResBlocks(n_res, dim,norm=norm,activation=activ,pad_type=pad_type)]self.model = nn.Sequential(*self.model)self.output_dim = dimdef forward(self, x):return self.model(x)
类编码器由几个 2D 卷积层组成,后面是样本轴平滑操作。具体地说,它首先映射 K个类别图像

class ClassModelEncoder(nn.Module):def __init__(self, downs, ind_im, dim, latent_dim, norm, activ, pad_type):super(ClassModelEncoder, self).__init__()self.model = []self.model += [Conv2dBlock(ind_im, dim, 7, 1, 3,norm=norm,activation=activ,pad_type=pad_type)]for i in range(2):self.model += [Conv2dBlock(dim, 2 * dim, 4, 2, 1,norm=norm,activation=activ,pad_type=pad_type)]dim *= 2for i in range(downs - 2):self.model += [Conv2dBlock(dim, dim, 4, 2, 1,norm=norm,activation=activ,pad_type=pad_type)]self.model += [nn.AdaptiveAvgPool2d(1)]self.model += [nn.Conv2d(dim, latent_dim, 1, 1, 0)]self.model = nn.Sequential(*self.model)self.output_dim = dimdef forward(self, x):return self.model(x)
解码器由几个自适应实例正规化(AdaIN)和残差块Resblock组成,后面跟着一些上 采样卷 积层。 AdaIN 残余 块是使用 AdaIN [18]作为正则化层的残余块。对于每个样本,AdaIN 首先将每个通道中样本的激活函数标准化为零均值和单位方差。然后它会缩放激活使用一组标量和偏置组成的学习仿射变换(通过两层全连接网络FC,使用自适应地计算仿射变换参数)。
class Decoder(nn.Module):def __init__(self, ups, n_res, dim, out_dim, res_norm, activ, pad_type):super(Decoder, self).__init__()self.model = []self.model += [ResBlocks(n_res, dim, res_norm,activ, pad_type=pad_type)]for i in range(ups):self.model += [nn.Upsample(scale_factor=2),Conv2dBlock(dim, dim // 2, 5, 1, 2,norm='in',activation=activ,pad_type=pad_type)]dim //= 2self.model += [Conv2dBlock(dim, out_dim, 7, 1, 3,norm='none',activation='tanh',pad_type=pad_type)]self.model = nn.Sequential(*self.model)def forward(self, x):return self.model(x)class MLP(nn.Module):def __init__(self, in_dim, out_dim, dim, n_blk, norm, activ):super(MLP, self).__init__()self.model = []self.model += [LinearBlock(in_dim, dim, norm=norm, activation=activ)]for i in range(n_blk - 2):self.model += [LinearBlock(dim, dim, norm=norm, activation=activ)]self.model += [LinearBlock(dim, out_dim,norm='none', activation='none')]self.model = nn.Sequential(*self.model)def forward(self, x):return self.model(x.view(x.size(0), -1))
生成器整体代码:
class FewShotGen(nn.Module):def __init__(self, hp):super(FewShotGen, self).__init__()nf = hp['nf']nf_mlp = hp['nf_mlp']down_class = hp['n_downs_class']down_content = hp['n_downs_content']n_mlp_blks = hp['n_mlp_blks']n_res_blks = hp['n_res_blks']latent_dim = hp['latent_dim']self.enc_class_model = ClassModelEncoder(down_class,3,nf,latent_dim,norm='none',activ='relu',pad_type='reflect')self.enc_content = ContentEncoder(down_content,n_res_blks,3,nf,'in',activ='relu',pad_type='reflect')self.dec = Decoder(down_content,n_res_blks,self.enc_content.output_dim,3,res_norm='adain',activ='relu',pad_type='reflect')self.mlp = MLP(latent_dim,get_num_adain_params(self.dec),nf_mlp,n_mlp_blks,norm='none',activ='relu')def forward(self, one_image, model_set):# reconstruct an imagecontent, model_codes = self.encode(one_image, model_set)model_code = torch.mean(model_codes, dim=0).unsqueeze(0)images_trans = self.decode(content, model_code)return images_transdef encode(self, one_image, model_set):# extract content code from the input imagecontent = self.enc_content(one_image)# extract model code from the images in the model setclass_codes = self.enc_class_model(model_set)class_code = torch.mean(class_codes, dim=0).unsqueeze(0)return content, class_codedef decode(self, content, model_code):# decode content and style codes to an imageadain_params = self.mlp(model_code)assign_adain_params(adain_params, self.dec)images = self.dec(content)return images
通过使用这种转换器设计,我们的目标是使用内容编码 器提取具有类不变的潜在表示(例如,对象姿势)并使用类编码器提取类特定的潜在表示(例如,对象外观)。通过经由 AdaIN 层将类别潜码馈送到解码器,我们让类图像控制 全局外观(例如,对象外观),而内容图像确定局部结构(例如,眼睛的位置)。
损失函数的设计
我们通过解决由下式给出的极小极大优化问题来训练所提 出的 FUNIT 框架:
其中, 和分别是 GAN 损失,内容图像重建损失和特征匹配损失。
对抗损失仅使用类的相应二分类预测分数来计算损失。
内容重建损失有助于 G 学习转换模型。 具体地,当对输入内容图像和输入类图像使用相同图像时(在这种情况下 K = 1),损失促使 G 生成与输入相同的输出图像(重构一致性,在cycleGAN在叫identity Loss).
特征匹配损失使训练正常化。 我们首先通过从 D 重新移 动最后一个(预测)层来构造一个特征提取器,称为 。 然后我们使用 从转换输出 和 类图像 中提取特征并最小化 :
实验部分
我非常想重点讲一下实验部分,我看完这篇文章的实验部分做的太好了,给了我在今后的科研中一个非常好的榜样.
重点说一下评价指标啊,在image-to-image这个领域据我所知,肉眼观察法是最好的评价指标,但是他也会带来一些个人的主观性,我们看看作者是如何通过实验说服我的:
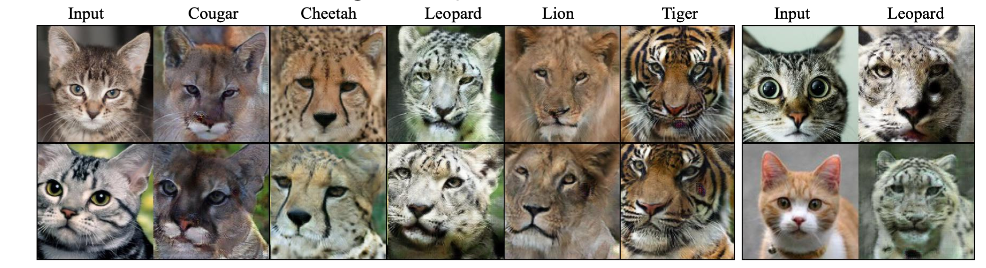
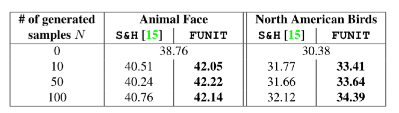
先放一张漂亮的大图:
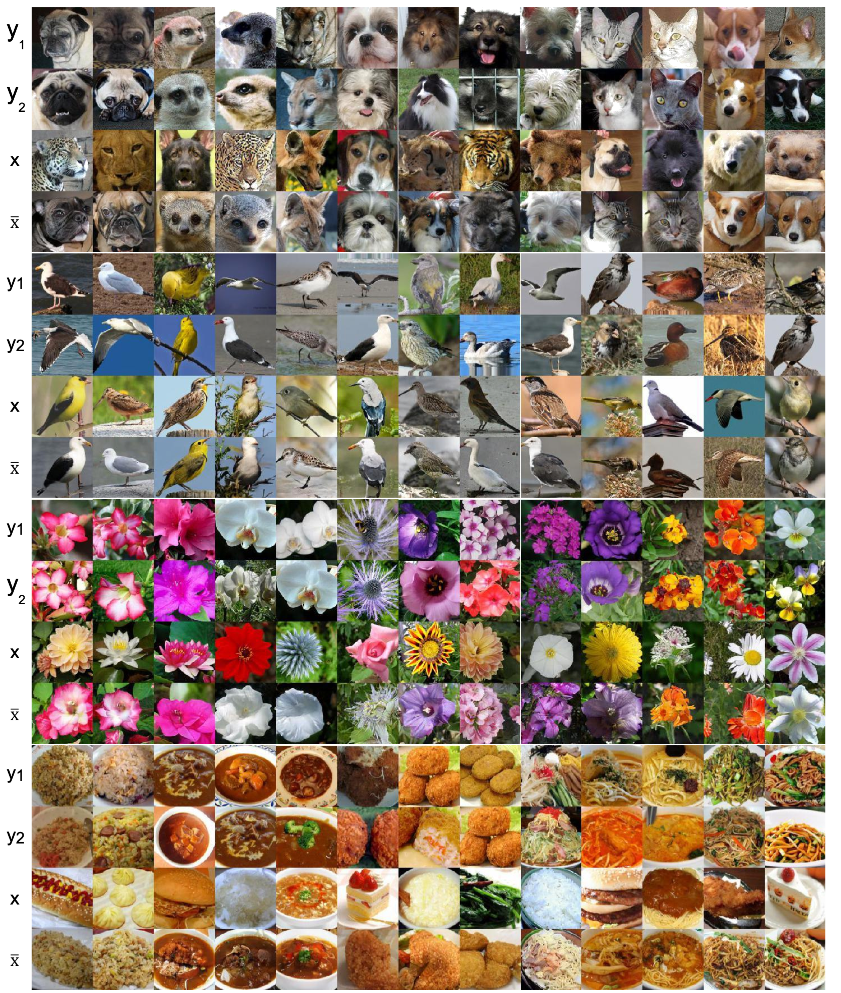
性能指标。作者使用几个标准进行评估。首先,作者测量转换是否类似于目标类的图像。其次,作者检查在转换期间是否保留了类不变内容。第三,作者量化输出图像的写实照片。最后,作者测量该模型是否可用于生成目标类的图像分布。

量化对比:User performance score(肉眼观察法):

少样本分类准确度:
Inception Score(我很困惑这个指标真的有用吗?)和FID(这个确实还有点用):
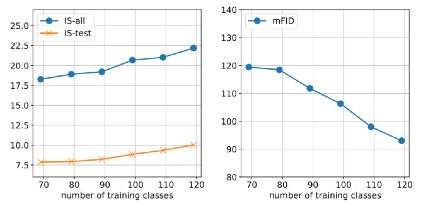
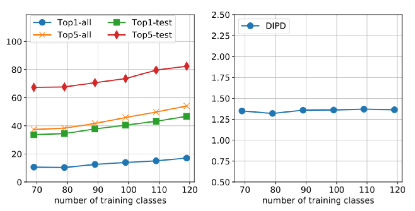
Ablation Study
(都能坚持看到这里了都,我觉得英文说得更明白了😁):
we analyze impact of the content image reconstruction loss weight on the Animal Faces dataset.The table shows that λR = 0.1 provides a good trade-off, and we used it as the default value throughout the paper. Interestingly, a very small weight value λR = 0.01 results in degrading performance on both
content preservation and translation accuracy.


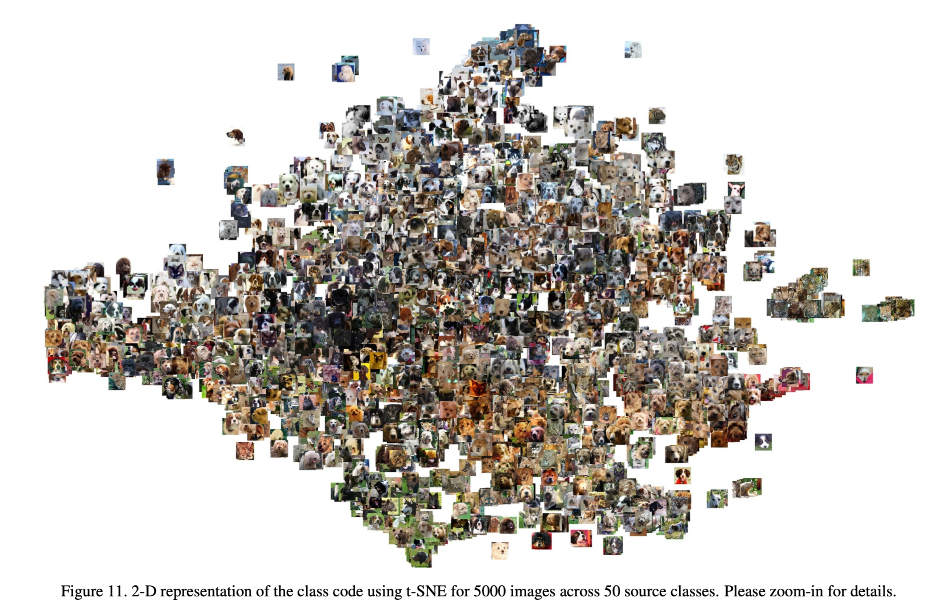
Latent Space Interpolation
we use t-SNE to visualize the class code in a two dimensional space. It can be seen that images from similar classes are grouped together in the class embedding space.
we find that by interpolating between two source classes (Siamese cat and Tiger) we can sometimes generate a target class (Tabby cat) that the model has never observed. This suggests that the class encoder learns a general class-specific representa- tion, thus enabling generalization to novel classes.
总结
这篇文章很好的结合了few-shot解决UNpair image-to-image的样本不均衡的问题,更重要的是其及其接近实际的生产应用环境,是一篇无论是从理论上还是实际应用角度出发来看,都具有重大指导意义的文章,笔者同样很喜欢这个工作.
如果您是一位C9高校的老师,看到了这篇文章,可以在知乎上联系我,笔者目前正就读于中国海洋大学计算机科学与技术专业,发表CCF_C类一作一篇,SCI_1区3作,一篇文章在投,希望有大佬把我领走了(-╹▽╹-).
