@Pigmon
2017-10-10T09:28:03.000000Z
字数 2374
阅读 6057
Unity3D 与 Python 的 Socket 通信简单指南
实习
简介
Udacity Self-driving Simulator 中,Unity 场景和 Tensorflow 是通过 Socket 进行通信的,Unity 将当前摄像头的截图以及车辆状态发送给 Tensorflow,Tensorflow 得出结果后再发回给Unity。
Unity端使用的是一个免费插件 Unity SocketIO;Python 端是 socketio 模块。
下面的例子是最简化的一个通信演示,用以备忘,或者将来有人需要熟悉其过程时可以迅速上手。
过程:
建立连接后,Server (Python 端) 发给 Client (Unity 3D) 一个数字,Client 收到后将其 +1 后发回给Server,Server 再 +1 发给 Client,如此往复。
Unity 关卡
在 Udacity 项目中新建一个 Scene 以后。
(1) 在 Udacity 项目的 Project 目录中选择 Assets - SoketIO - Prefabs,将该目录下的 SocketIO 拖入到场景中,如下图所示。
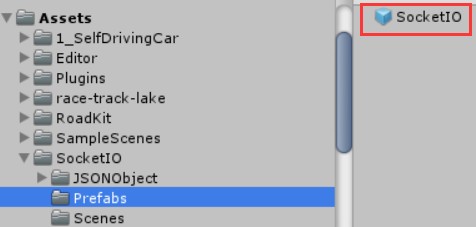
这个目录只要安装了该插件就会有。
(2) 选择刚刚拖入场景的 SocketIO,编辑其 url 属性,加入:
ws://127.0.0.1:4567/socket.io/?EIO=4&transport=websocket
如下图所示:

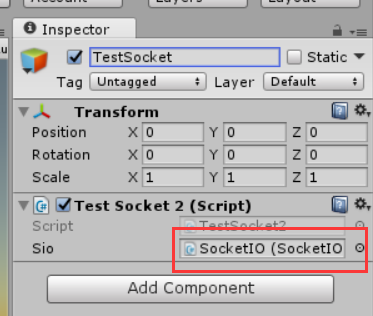
(3) 在场景中加入一个空的 GameObject,命名为如 'TestSocket' 。并为其添加一个新脚本程序。
程序内容:
using System.Collections.Generic;using UnityEngine;using SocketIO;public class TestSocket2 : MonoBehaviour{// 在 Editor 里把 SocketIO 拖过来public SocketIOComponent sio;void Start(){if (sio == null)Debug.LogError("Drop a SocketIOComponent to Me!");// 声明 connect 事件和 server_sent 事件的回调函数sio.On("connect", OnConnect);sio.On("server_sent", OnReceive);}/// <summary>/// connect 事件的回调函数/// </summary>/// <param name="obj"></param>void OnConnect(SocketIOEvent obj){Debug.Log("Connection Open");OnReceive(obj);}/// <summary>/// 接收到 server_sent 事件的回调函数/// </summary>/// <param name="obj">SocketIOEvent</param>void OnReceive(SocketIOEvent obj){// 1. 接收并输出 Server 传递过来的数字JSONObject jsonObject = obj.data;string rcv_nbr = jsonObject.GetField("nbr").str;Debug.Log("Recieved From Server : " + rcv_nbr);// 2. 将数字 +1 并返回给 Servertry{int int_nbr = int.Parse(rcv_nbr);SendToServer(int_nbr + 1);}catch{}}/// <summary>/// 将数字发给 Server/// </summary>/// <param name="_nbr">发送的数字</param>void SendToServer(int _nbr){Dictionary<string, string> data = new Dictionary<string, string>();data["nbr"] = _nbr.ToString();sio.Emit("client_sent", new JSONObject(data));}}
(4) 将 SocketIO 拖入到 TestSocket 的 sio 属性中。
完成后 TestSocket 的属性如下图所示:
Server 端 Python 程序
import socketioimport eventletimport eventlet.wsgifrom flask import Flasksio = socketio.Server()app = Flask(__name__)# "连接建立的回调函数"@sio.on('connect')def on_connect(sid, environ):print("connect ", sid)send_to_client(101)# "接收 Client 事件 (client_sent) 的回调函数"@sio.on('client_sent')def on_revieve(sid, data):if data:print ('From Client : %s' % data['nbr'])send_to_client(int(data['nbr']) + 1)else:print ('Recieved Empty Data!')# "向 Client 发送数字"def send_to_client(_nbr):sio.emit('server_sent',data = {'nbr':_nbr.__str__()},skip_sid=True)if __name__ == '__main__':app = socketio.Middleware(sio, app)eventlet.wsgi.server(eventlet.listen(('', 4567)), app)
执行
先运行 Python 程序,再运行 Unity 的场景。
可以看到服务器端和客户端的输出如下:
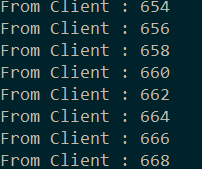
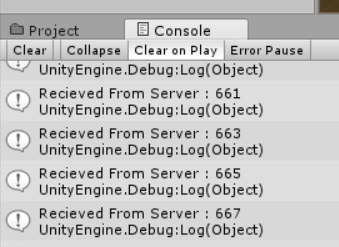
这样即代表运行成功。
