@zhongdao
2018-04-21T07:58:03.000000Z
字数 13864
阅读 6702
Ubuntu 16.04下的Mattermost安装配置
前言
包括3个版本
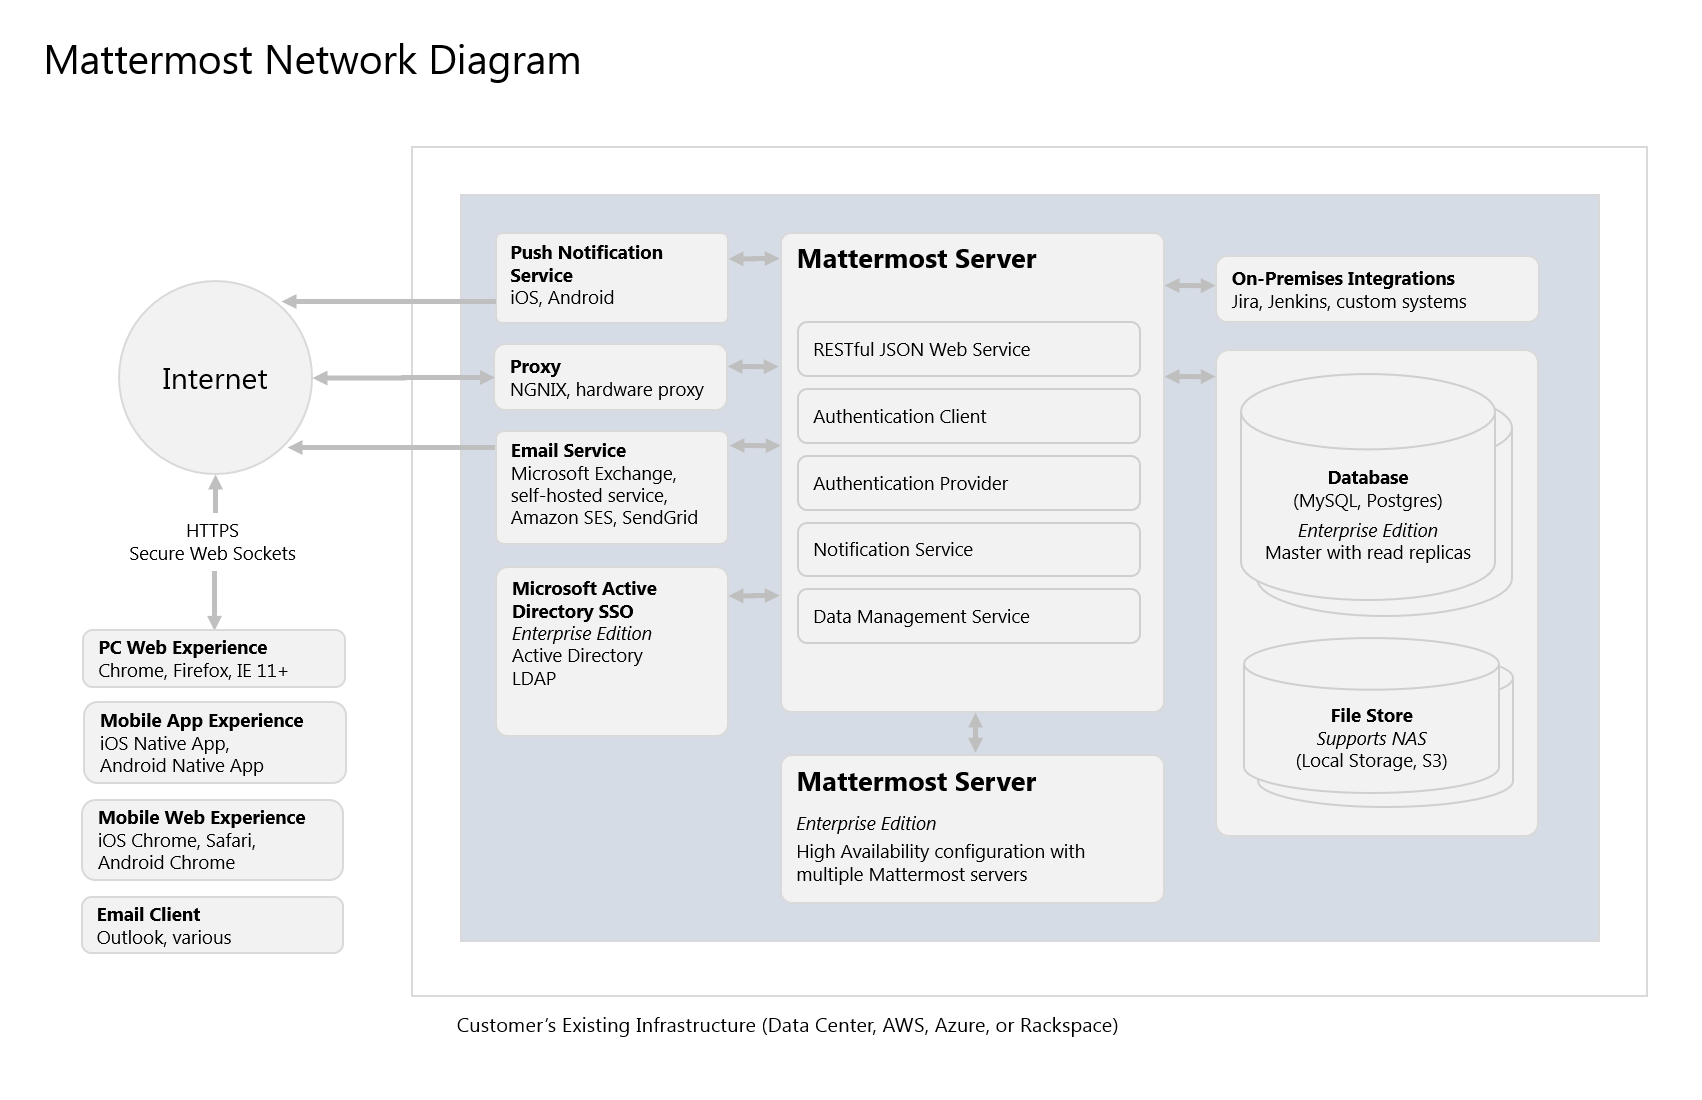
Mattermost 架构
软件要求
客户端软件
PC Web
PC:Windows 7,Windows 8,带IE 11 *的Windows 10,Chrome 43+,Firefox 52+和Edge 40+(或EdgeHTML v15 +)
Mac:OS 10(Safari 9,Chrome 43+)
Linux:Arch 4.0.0(Chrome 43+)
*不支持IE 11 Compatiblity View。
手机 App
iPhone 4s及更高版本与iOS 9+
搭载Android 5+的Android设备
手机 Web
iPhone 4s及更高版本(iOS 9+以上的Safari,Chrome 43+以上)
Android 5及更高版本(Chrome 43+)
服务器软件
Mattermost服务器操作系统
Ubuntu 14.04,Ubuntu 16.04,Debian Jessie,CentOS 6.6+,CentOS 7.1+,RedHat Enterprise Linux 6.6+,RedHat Enterprise Linux 7.1+,Oracle Linux 6.6+,Oracle Linux 7.1+
在兼容Docker的操作系统上使用Mattermost Docker镜像(仍建议使用基于Linux的操作系统)
虽然社区支持Fedora,FreeBSD和Arch Linux,但Mattermost目前不包括对这些平台的生产支持。
数据库软件
MySQL 5.6+
PostgreSQL 9.4+
需要使用中文,日文和韩文进行搜索的部署需要MySQL 5.7.6+以及配置ngram全文分析器。对于搜索两个字符,你还需要设置ft_min_word_len并innodb_ft_min_token_size以2和重启MySQL。详情请参阅CJK讨论。
硬件配置与支撑能力
基于用户行为,CPU,RAM和存储空间的使用可能会有很大差异。对于大于500个用户的部署,在推出全面服务之前,强烈建议大型组织进行小型试用部署,来测试其代表性的使用模式。
硬件大小为团队部署
大多数中小型Mattermost团队可以部署在单台服务器上,并且基于以下规格的注册用户规模:
- 250-500个用户 - 2个vCPU /核心,4 GB RAM和45-90 GB存储空间
- 500-1,000个用户 - 4个vCPU /核心,8 GB RAM和90-180 GB存储空间
- 1,000-2,000用户 - 4-8个vCPU /核心,16-32 GB RAM和180-360 GB存储
备注:
1. 内存要求很大程度上是由文件共享活动高峰所致。建议基于默认50 MB最大文件大小,可以从系统控制台进行调整。更改此数字可能会改变内存要求。
2. 较大的部署应根据代表全面使用情况估算利用率。
3. 存储建议基于存储3年的档案文件共享。
4. 可以使用固态驱动器(SSD)代替磁盘存储以获得更高的并发性。
快速docker一步安装试用
安装
sudo apt install dockerdocker run --name mattermost-preview -d --publish 8065:8065 mattermost/mattermost-preview
访问
访问 http://p2pnet.club:8065/
注意:不是https
停止docker并删除镜像
Stop and remove all docker containers and images
List all containers (only IDs)
docker ps -aq.
Stop all running containers.
docker stop $(docker ps -aq)
Remove all containers.
docker rm $(docker ps -aq)
Remove all images.
docker rmi $(docker images -q)
正式安装配置 Mattermost
Installing Mattermost on Ubuntu 16.04 LTS
用于生产环境的Mattermost系统可以安装在1到3台机器上。
一个完整的安装包括3个组件:代理服务器(proxy server), 数据库服务器,Mattermost服务器。 可以将所有组件都安装在1台机器上,也可以分别装在每个单独的机器上。如果是2个机器,则数据库可以单独装1台。
主要安装步骤:
Installing Ubuntu Server 16.04 LTS
Installing MySQL Database Server/Installing PostgreSQL Database Server
Installing Mattermost Server
Configuring Mattermost Server/Configuring TLS on Mattermost Server
Installing NGINX Server
Configuring NGINX as a proxy for Mattermost Server
Configuring NGINX with SSL and HTTP/2
安装与更新 Ubuntu Server 16.04:
更新升级ubuntu,补上最新的补丁,确保安全。
sudo apt-get updatesudo apt-get upgrade
安装 MySQL Database Server
sudo apt-get install mysql-server
Set password: admin123~~
Log in to MySQL as root.
mysql -u root -pmysql> create user 'mmuser'@'%' identified by 'mmuser-password';mysql> create database mattermost;mysql> grant all privileges on mattermost.* to 'mmuser'@'%';mysql> exit
修改配置,注释掉绑定ip
vi /etc/mysql/mysql.conf.d/mysqld.cnf file
comment out the bind-address = 127.0.0.1 using the # symbol,
重新mysql
systemctl restart mysqlsystemctl status mysql
安装 Mattermost Server
从这里发现最新版本: https://about.mattermost.com/download/
wget https://releases.mattermost.com/4.9.0/mattermost-4.9.0-linux-amd64.tar.gztar -xvzf mattermost*.gzsudo mv mattermost /optsudo mkdir /opt/mattermost/data
注意: 存储目录包含用户上传的所有文件和图像。
添加用户
sudo useradd --system --user-group mattermostsudo chown -R mattermost:mattermost /opt/mattermostsudo chmod -R g+w /opt/mattermost
vi /opt/mattermost/config/config.json.
设置mysql相关的驱动链接信息:
Set "DriverName" to "mysql"
Set "DataSource" to the following value, replacing and with the appropriate values. Also make sure that the database name is mattermost instead of mattermost_test:
"mmuser:@tcp(:3306)/mattermost?charset=utf8mb4,utf8&readTimeout=30s&writeTimeout=30s"
"SqlSettings": {"DriverName": "mysql","DataSource": "mmuser:mmuser-password@tcp(localhost:3306)/mattermost?charset=utf8mb4,utf8\u0026readTimeout=30s\u0026writeTimeout=30s",
cd /opt/mattermostsudo -u mattermost ./bin/platform
终端上CTRL+C中断服务
设置Matter服务
sudo touch /lib/systemd/system/mattermost.service
vi /lib/systemd/system/mattermost.service
[Unit]Description=MattermostAfter=network.targetAfter=mysql.serviceRequires=mysql.service[Service]Type=notifyExecStart=/opt/mattermost/bin/platformTimeoutStartSec=3600Restart=alwaysRestartSec=10WorkingDirectory=/opt/mattermostUser=mattermostGroup=mattermostLimitNOFILE=49152[Install]WantedBy=mysql.service
重启Mattermost服务
sudo systemctl daemon-reloadsudo systemctl status mattermost.servicesudo systemctl start mattermost.service
验证 Mattermost is running.
curl http://localhost:8065
设置自启动
sudo systemctl enable mattermost.service
添加MySql的CJK中文搜索支持
Mysql 5.7+ 支持ngram的分词Parser,进而支持中文搜索。
mysql -u root -p>use mattermostDROP INDEX idx_posts_message_txt ON Posts;CREATE FULLTEXT INDEX idx_posts_message_txt ON Posts (Message) WITH PARSER ngram;exit;
systemctl restart mysql
ngram解析器的默认ngram标记大小为2(bigram), 2的搜索效果就可以不必修改了。
更多信息参考:
https://github.com/mattermost/mattermost-server/issues/2033#issuecomment-183872616
https://dev.mysql.com/doc/refman/5.7/en/fulltext-search-ngram.html
https://dev.mysql.com/doc/refman/5.7/en/fulltext-search.html
配置 Mattermost Server
创建的第一个用户就是管理员
根据域名设置 Site URL.
设置邮件通知 email notifications.
设置smtp邮件发送服务器(hotmail.com)
Hotmail设置样例:
Set SMTP Username to your_email@hotmail.comSet SMTP Password to your_passwordSet SMTP Server to smtp-mail.outlook.comSet SMTP Port to 587Set Connection Security to STARTTLS
设置 file and image 存储位置.
设置亚马逊的邮件服务器
当 hotmail.com 不可以用时,可以自己登陆Amazon的云服务,
Amazon Simple Email Service (Amazon SES)
* 需要验证电子邮件,
* 申请smtp的个人账号
* 通过自己管理的DNS里增加一个特定值的TXT记录来验证域名
* 申请移出sandbox,提高发送限制。
Amazon SES
* Set SMTP Username to [YOUR_SMTP_USERNAME]
* Set SMTP Password to [YOUR_SMTP_PASSWORD]
* Set SMTP Server to email-smtp.us-east-1.amazonaws.com
* Set SMTP Port to 465
* Set Connection Security to TLS
重启服务
sudo systemctl restart mattermost
可以在左侧菜单处,找到团队邀请链接,发给团队成员。
安装 NGINX Server
In a production setting, use a proxy server for greater security and performance of Mattermost.
The main benefits of using a proxy are as follows:
SSL termination
HTTP to HTTPS redirect
Port mapping :80 to :8065
Standard request logs
To install NGINX on Ubuntu Server:
sudo apt-get install nginx
检查nginx运行否
curl http://localhost
You can stop, start, and restart NGINX with the following commands:
sudo service nginx stopsudo service nginx startsudo service nginx restart
配置 NGINX 代理功能
sudo touch /etc/nginx/sites-available/mattermost
vi /etc/nginx/sites-available/mattermost
upstream backend {server 108.160.141.42:8065;}proxy_cache_path /var/cache/nginx levels=1:2 keys_zone=mattermost_cache:10m max_size=3g inactive=120m use_temp_path=off;server {listen 80;server_name mattermost.p2pnet.club;location ~ /api/v[0-9]+/(users/)?websocket$ {proxy_set_header Upgrade $http_upgrade;proxy_set_header Connection "upgrade";client_max_body_size 50M;proxy_set_header Host $http_host;proxy_set_header X-Real-IP $remote_addr;proxy_set_header X-Forwarded-For $proxy_add_x_forwarded_for;proxy_set_header X-Forwarded-Proto $scheme;proxy_set_header X-Frame-Options SAMEORIGIN;proxy_buffers 256 16k;proxy_buffer_size 16k;proxy_read_timeout 600s;proxy_pass http://backend;}location / {client_max_body_size 50M;proxy_set_header Connection "";proxy_set_header Host $http_host;proxy_set_header X-Real-IP $remote_addr;proxy_set_header X-Forwarded-For $proxy_add_x_forwarded_for;proxy_set_header X-Forwarded-Proto $scheme;proxy_set_header X-Frame-Options SAMEORIGIN;proxy_buffers 256 16k;proxy_buffer_size 16k;proxy_read_timeout 600s;proxy_cache mattermost_cache;proxy_cache_revalidate on;proxy_cache_min_uses 2;proxy_cache_use_stale timeout;proxy_cache_lock on;proxy_pass http://backend;}}
sudo rm /etc/nginx/sites-enabled/defaultsudo ln -s /etc/nginx/sites-available/mattermost /etc/nginx/sites-enabled/mattermost
Restart NGINX.
sudo systemctl restart nginx
Verify that you can see Mattermost through the proxy.
curl http://localhost
Now that NGINX is installed and running, you can configure it to use SSL, which allows you to use HTTPS connections and the HTTP/2 protocol.
给 NGINX 加上 SSL 与 HTTP/2
To configure SSL and HTTP/2:
Log in to the server that hosts NGINX and open a terminal window.
Install git.
If you are using Ubuntu or Debian:
sudo apt-get install gitgit clone https://github.com/letsencrypt/letsencryptcd letsencryptsudo systemctl stop nginx
Run netstat to make sure that nothing is listening on port 80.
netstat -na | grep ':80.*LISTEN'
./letsencrypt-auto certonly --standalone -d p2pnet.club -d mattermost.p2pnet.club -d m.p2pnet.club
When prompted, enter your domain name. After the installation is complete, you can find the certificate in the /etc/letsencrypt/live directory.
Saving debug log to /var/log/letsencrypt/letsencrypt.logPlugins selected: Authenticator standalone, Installer NonePlease enter in your domain name(s) (comma and/or space separated) (Enter 'c'to cancel): Please specify --domains, or --installer that will help in domain names autodiscovery, or --cert-name for an existing certificate name.root@mattermost:~/letsencrypt# ./letsencrypt-auto certonly --standaloneSaving debug log to /var/log/letsencrypt/letsencrypt.logPlugins selected: Authenticator standalone, Installer NonePlease enter in your domain name(s) (comma and/or space separated) (Enter 'c'to cancel): mattermost.p2pnet.clubObtaining a new certificatePerforming the following challenges:http-01 challenge for mattermost.p2pnet.clubWaiting for verification...Cleaning up challengesIMPORTANT NOTES:- Congratulations! Your certificate and chain have been saved at:/etc/letsencrypt/live/mattermost.p2pnet.club/fullchain.pemYour key file has been saved at:/etc/letsencrypt/live/mattermost.p2pnet.club/privkey.pemYour cert will expire on 2018-07-19. To obtain a new or tweakedversion of this certificate in the future, simply runletsencrypt-auto again. To non-interactively renew *all* of yourcertificates, run "letsencrypt-auto renew"- If you like Certbot, please consider supporting our work by:Donating to ISRG / Let's Encrypt: https://letsencrypt.org/donateDonating to EFF: https://eff.org/donate-le
编辑 更新
upstream backend {server 108.160.141.42:8065;}proxy_cache_path /var/cache/nginx levels=1:2 keys_zone=mattermost_cache:10m max_size=3g inactive=120m use_temp_path=off;server {listen 80 default_server;server_name m.p2pnet.club ;return 301 https://$server_name$request_uri;}server {listen 443 ssl http2;server_name m.p2pnet.club;ssl on;ssl_certificate /etc/letsencrypt/live/mattermost.p2pnet.club/fullchain.pem;ssl_certificate_key /etc/letsencrypt/live/mattermost.p2pnet.club/privkey.pem;ssl_session_timeout 5m;ssl_protocols TLSv1 TLSv1.1 TLSv1.2;ssl_ciphers 'EECDH+AESGCM:EDH+AESGCM:AES256+EECDH:AES256+EDH';ssl_prefer_server_ciphers on;ssl_session_cache shared:SSL:10m;location ~ /api/v[0-9]+/(users/)?websocket$ {proxy_set_header Upgrade $http_upgrade;proxy_set_header Connection "upgrade";client_max_body_size 50M;proxy_set_header Host $http_host;proxy_set_header X-Real-IP $remote_addr;proxy_set_header X-Forwarded-For $proxy_add_x_forwarded_for;proxy_set_header X-Forwarded-Proto $scheme;proxy_set_header X-Frame-Options SAMEORIGIN;proxy_buffers 256 16k;proxy_buffer_size 16k;proxy_read_timeout 600s;proxy_pass http://backend;}location / {proxy_http_version 1.1;client_max_body_size 50M;proxy_set_header Connection "";proxy_set_header Host $http_host;proxy_set_header X-Real-IP $remote_addr;proxy_set_header X-Forwarded-For $proxy_add_x_forwarded_for;proxy_set_header X-Forwarded-Proto $scheme;proxy_set_header X-Frame-Options SAMEORIGIN;proxy_buffers 256 16k;proxy_buffer_size 16k;proxy_read_timeout 600s;proxy_cache mattermost_cache;proxy_cache_revalidate on;proxy_cache_min_uses 2;proxy_cache_use_stale timeout;proxy_cache_lock on;proxy_pass http://backend;}}
备注:
如果不启用Http2的话,那么就
listen 443 ssl;
重启服务
sudo systemctl restart nginx
Check that your SSL certificate is set up correctly.
Test the SSL certificate by visiting a site such as https://www.ssllabs.com/ssltest/index.html
Configure cron so that the certificate will automatically renew every month.
crontab -e
@monthly /home/ubuntu/letsencrypt/letsencrypt-auto certonly --reinstall --nginx -d m.p2pnet.club && sudo service nginx reload
备份与恢复
备份和灾难恢复
保护您的Mattermost服务器免遭不同类型故障的选择范围从简单备份到复杂的灾难恢复部署和自动化。
备份
您的Mattermost服务器的状态包含在多个数据存储中,需要单独进行备份和恢复,以便在发生故障时完全恢复系统。
为了备份您的Mattermost服务器:
备份数据库
根据您的数据库版本,使用标准的MySQL或PostgreSQL程序备份您的Mattermost数据库。
MySQL备份文档可在线获取。使用页面上的选择器来选择你的MySQL版本。
https://dev.mysql.com/doc/refman/5.7/en/backup-and-recovery.htmlPostgreSQL备份文档可在线获取。使用页面顶部的导航选择您的PostgreSQL版本。
备份存储在中的服务器设置config/config.json。
https://www.postgresql.org/docs/9.5/static/backup-dump.html
备份MySQL5.7数据库过程:
mkdir ~/mbackup/cd ~/mbackup/mysqldump -uroot -padmin123~~ --databases mattermost --single-transaction > mattermost.db.sql
备份配置文件
如果您对Mattermost使用SAML配置,则您的SAML证书文件将保存在config目录中。因此,建议备份整个目录。
cp /opt/mattermost/config/config.json ~/mbackup/
备份用户上传文件
用以下选项之一备份用户存储的文件:
- 如果您使用本地存储使用默认./data目录备份此目录。
- 如果您使用Directory设置中指定的非默认目录使用本地存储config.json,请备份该位置中的文件。
- 如果您将文件存储在S3中,则通常可以将文件保存在没有备份的位置。
tar -zcvf ~/mbackup/data.tgz /opt/mattermost/data
灾难恢复
要从备份还原Mattermost实例,请将数据库,config.json文件和可选的本地存储的用户文件还原到备份它们的位置。
适当的灾难恢复计划将减轻特定风险的好处,从而降低设置灾难恢复基础架构和自动化的成本和复杂性。
有两种常用方法:
自动备份
对Mattermost服务器进行自动备份会在特定时间点提供服务器状态的副本,如果将来发生故障导致数据丢失,则可以恢复该副本。选项包括:自动化定期备份Mattermost服务器,该服务器可能包括上面列出的所有组件或取决于您选择保护的子集。
- 自动从备份恢复服务器,或部署新服务器,以缩短恢复时间。
- 验证备份的自动化已成功生成,可防止备份自动化失败。
- 将备份存储在异地,以防止现场系统的物理损失。
使用备份从故障中恢复通常是手动过程,并且会导致停机。
恢复数据库:
mysql -uroot -padmin123~~ < mattermost.db.sql
恢复配置:
cp ~/mbackup/config.json /opt/mattermost/config/
恢复用户上传的文件:
cd /tar -zxvf ~/mbackup/data.tgz
- 高可用性部署
另一种方法是使用高可用性部署来自动恢复。需要用到Enterprise Edition E20。
客户端下载
https://about.mattermost.com/download/
因为 google play无法访问,手机端下载可以直接从github上下载:
https://github.com/mattermost/mattermost-mobile/releases
访问:
https://mattermost.p2pnet.club/
或者App填写此地址,然后连接。
进入一个已有团队,则需要管理员发一个团队的注册连接,在此连接下注册,后台有开关,设置是否需要邮箱。
例如:
https://mattermost.p2pnet.club/signup_user_complete/?id=wm9g85jtpty7zekidyw9b91pow
简单试用说明
与Rocket.chat对比
与Rocket.chat 相比,手机端可以正常访问,虽然两者都是把数据存储在服务器端,但是Rocket.Chat的手机端在第一次使用时会初始化下载很多文件,占用到100M+的空间。
所以如果要实际团队使用的话,建议还是使用Mattermost.
使用相关概念
另外,对于这种私有云部署, 管理时需要了解的一个基本概念是,一个Mattermost服务器可以创建多个团队,每个团队可以创建多个频道,每个频道可以进入多个人,人和人之间也可以直接加密通讯。
不考虑组织的概念,这里团队的概念相当于微信里的群,不同的频道相当于不同的话题区域,而且历史聊天 记录都存储在服务器上,各个移动端或者pc端登录都能看到一样的信息。
比微信的群具有优势的一点是,即使后来加入的人,也能看到之前在某个频道里讨论的所有聊天历史记录,并且可以下载。
注册时,自己可以建立团队,如果要加入一个团队,则需要管理员邀请,或者收到相应的注册链接进行注册。
如果有人能够将微信登录功能开发出来,那么这个作为团队沟通和共享信息的工具是非常棒的。
试用账号
账户名: user001
密码: user001
服务器: https://m.p2pnet.club/
参考资料
https://docs.mattermost.com/guides/administrator.html
https://docs.mattermost.com/install/install-ubuntu-1604.html#installing-ubuntu-server-16-04-lts
https://dev.mysql.com/doc/refman/5.7/en/backup-and-recovery.html
https://dev.mysql.com/doc/refman/5.7/en/fulltext-search-ngram.html
