@zhongdao
2019-03-14T09:38:54.000000Z
字数 20196
阅读 4935
perl最简实用学习教程
- perl最简实用学习教程
- ubuntu 下安装
- 程序文件
- 注释
- 变量
- 逻辑和循环结构
- 操作比较符
- 正则表达式
- 文件和输入输出
- 子程序
- 常见缩写
- 模块 Modules
- 对象 Objects
- todo
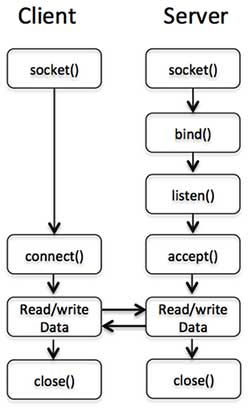
- TCP Client/Server handling multiple Client(s) connections
- 参考资料:
- 常用模块使用
- perl modules 安装汇总
ubuntu 下安装
sudo apt install perl-doc
程序文件
运行
perl progname.pl
文件头
#!/usr/bin/perluse strict;use warnings;
注释
# 单行注释以#号开头
# 多行注释以等号字母开头 等号结束=pod1;pprint ;=cut
变量
变量以$号开头。
合法变量名以英文字母或者下划线起始,后接任意数目的字母、数字或下划线。
变量类型
Perl有三种主要的变量类型:标量、数组和哈希。
Perl has three main variable types: $scalar, @array, and %hash.
标量
标量类型代表单个值:
my $animal = "camel";my $answer = 42;my $display = "You have $answer ${animal}s.\n";
如果列出多于一个变量,那么列表必须放在圆括弧里。
my($nose, @eyes, %teeth);
标量类型值可以是字符串、整型或浮点类型,Perl会根据需要自动进行类型转换。
数组
数组类型代表一列值:
my @animals = ("camel", "llama", "owl");my @numbers = (23, 42, 69);my @mixed = ("camel", 42, 1.23);
使用:
my $second = $animals[1];print $animals[0]; # prints "camel"# sizemy $num_animals = @animals;print "array size: ", scalar(@numbers)," \n";
哈希
哈希类型代表一个键/值对的集合:
my %fruit_color = ("apple", "red", "banana", "yellow");
可以使用空格和“=>”操作符更清晰的定义哈希:
my %fruit_color = (apple => "red",banana => "yellow",);
使用:
$fruit_color{"apple"}; # gives "red"$fruit_color{apple}; # gives "red"
perldata中有标量、数组和哈希更详细的介绍。 (perldoc perldata).
引用 References
my $array_ref = \@array;my $hash_ref = \%hash;my @array_of_arrays = (\@array1, \@array2, \@array3);
# References can be dereferenced by prefixing the appropriate sigil.my @fruits_array = @$fruits;
print "array content: @$array_ref \n";
总结
$为变量; @为数组; %为哈希;
其中数组 和 哈希 都是用"()”来存储数据或者键值对;取值时则采用[]和{}。
逻辑和循环结构
if 逻辑判断
if ( $var ) {...} elsif ( $var eq 'bar' ) {...} else {...}
unless ( condition ) {...}
上面这个比"if (!condition)"更可读。
后置逻辑结构
print "Yow!" if $zippy;print "We have no bananas" unless $bananas;
循环
while
# whilewhile ( condition ) {...}
for 和 foreach
for ($i = 0; $i <= $max; $i++) {...}
for my $i (0 .. $max) {print "index is $i";}
foreach (@array) {print "This element is $_\n";}
foreach my $key (keys %hash) {print $key, ': ', $hash{$key}, "\n";}
操作比较符
Numeric comparison== equality!= inequality< less than> greater than<= less than or equal>= greater than or equalString comparisoneq equalityne inequalitylt less thangt greater thanle less than or equalge greater than or equalBoolean logic&& and|| or! notMiscellaneous= assignment. string concatenationx string multiplication.. range operator (creates a list of numbers or strings)
$a .= "\n"; # same as $a = $a . "\n";
正则表达式
Perl对正则表达式有深入广泛的支持,perlrequick和perlretut等文档有详细介绍。简单来说:
简单匹配
if (/foo/) { ... } # 如果 $_ 包含"foo"逻辑为真if ($a =~ /foo/) { ... } # 如果 $a 包含"foo"逻辑为真
简单替换
$a =~ s/foo/bar/; # 将$a中的foo替换为bar$a =~ s/foo/bar/g; # 将$a中所有的foo替换为bar
一些例子
/^\d+/ string starts with one or more digits/^$/ nothing in the string (start and end areadjacent)/(\d\s){3}/ three digits, each followed by a whitespacecharacter (eg "3 4 5 ")/(a.)+/ matches a string in which every odd-numberedletter is a (eg "abacadaf")
# a cheap and nasty way to break an email address up into partsif ($email =~ /([^@]+)@(.+)/) {print "Username is $1\n";print "Hostname is $2\n";}
文件和输入输出
可以使用“open()”函数打开文件用于输入输出。
open(my $in, "<", "input.txt") or die "Can't open input.txt: $!";open(my $out, ">", "output.txt") or die "Can't open output.txt: $!";open(my $log, ">>", "my.log") or die "Can't open my.log: $!";
可以用"<>"操作符读取一个打开的文件句柄。 在标量语境下会读取一行,在列表环境下会将整个文件读入并将每一行赋给列表的一个元素:
my $line = <$in>;my @lines = <$in>;
常见于while循环中
while (<$in>) { # assigns each line in turn to $_print "Just read in this line: $_";}
子程序
&表示子程序;(通常调用时可以直接写子程序名,也可以加上&程序名)
子程序范例
sub logger {my $logmessage = shift;open my $logfile, ">>", "my.log" or die "Could not open my.log: $!";print $logfile $logmessage;}
sub square {my $num = shift;my $result = $num * $num;return $result;}
调用子程序
现在可以像内置函数一样调用子程序:
logger("We have a logger subroutine!");
$sq = square(8);
shift 与 子程序参数 @_
What's that "shift"? Well, the arguments to a subroutine are available tous as a special array called @_ (see perlvar for more on that). Thedefault argument to the "shift" function just happens to be @_. So "my$logmessage = shift;" shifts the first item off the list of arguments andassigns it to $logmessage.
shift的作用是,子程序的参数是一个数组变量 @_ , shift移动数组中的第一个项,赋予相应变量。
We can manipulate @_ in other ways too:
my ($logmessage, $priority) = @_; # commonmy $logmessage = $_[0]; # uncommon, and ugly
子程序参数的复制与修改
@nums = (1.4, 3.5, 6.7);@ints = int_all(@nums); # 未改变@numssub int_all{my @retlist = @_; # 安全复制for my $n (@retlist) { $n = int($n) }return @retlist;}print "nums: @nums\n"; # 1.4 3.5 6.7print "ints: @ints\n"; # 1 3 6trunc_em(@nums); # 改变了@numssub trunc_em {for (@_) { $_ = int($_) }}print "nums: @nums\n"; # 1 3 6
返回数组或哈希
返回数组或哈希的引用
#正常的数组元素访问是 $array[i], 哈希的元素访问时 $hash{element}, 当是reference时,则需要使用$array_ref->[i], 以及 $hash_ref->{element}my ($array_ref, $hash_ref) = somefunc();sub somefunc {my @array = ( 1,2,3);my %hash = ( 'a' => 1, 'b' => 2, 'c' => 3);return (\@array, \%hash);}print "$array_ref->[1]\n"; # 2print $hash_ref->{'a'}." \n"; # 1
为了正常使用哈希,需要再做一次转换
my ($hash_ref) = somefunc();my %hash = %$hash_ref;sub somefunc {my %hash = ( 'a' => 1, 'b' => 2, 'c' => 3);return (\%hash);}print join(',',%hash)."\n";
常见缩写
没有指定变量时的默认变量:
<STDIN> 等于 <>$_ 是很多perl函数的默认变量
while(<>){print;}
等同于
while($_ = <STDIN>){print $_;}
另外一个例子:
while ( <> ) { eval if !/^#/ }
等同于
while ($_ = <>) { eval $_ if !($_ =~ / ^#/) }
模块 Modules
A module is a set of Perl code, usually subroutines, which can be used
in other Perl code. It is usually stored in a file with the extension
.pm so that Perl can find it.
See perlmod for more details on modules
模块样例
MyModule.pm
package MyModule;use strict;use warnings;sub trim {my $string = shift;$string =~ s/^\s+//;$string =~ s/\s+$//;return $string;}1; # return 1;
模块调用
use MyModule;MyModule::trim($string);
使用Perl模块 Modules
my $string = " ok ";use MyModule;$string = MyModule::trim($string);print "string: $string\n";
Perl模块提供一系列特性来帮助你避免重新发明轮子,CPAN是下载模块的好地方( http://www.cpan.org/ )。Perl发行版本身也包含很多流行的模块。
perlfaq有很多常见问题和相应回答,也经常有对优秀CPAN模块的推荐介绍。
对象 Objects
Objects in Perl are just references that know which class (package) they belong to, so that methods (subroutines) called on it can be found there.
对象样例
MyCounter.pm
package MyCounter;use strict;use warnings;sub new {my $class = shift;my $self = {count => 0};return bless $self, $class;}sub count {my $self = shift;return $self->{count};}sub increment {my $self = shift;$self->{count}++;}1;
对象调用
use MyCounter;my $counter = MyCounter->new;print $counter->count, "\n"; # 0$counter->increment;print $counter->count, "\n"; # 1
todo
class & package 中的特定语法
OO Perl
OO Perl is relatively simple and is implemented using references which
know what sort of object they are based on Perl's concept of packages.
However, OO Perl is largely beyond the scope of this document. Read
perlootut and perlobj.
To learn how to install modules you download from CPAN, read
perlmodinstall.

To learn how to use a particular module, use "perldoc Module::Name".
Typically you will want to "use Module::Name", which will then give you
access to exported functions or an OO interface to the module.
TCP Client/Server handling multiple Client(s) connections
https://stackoverflow.com/questions/4856964/perl-tcp-server-handling-multiple-client-connections
https://docstore.mik.ua/orelly/perl2/advprog/ch12_03.htm
https://www.perlmonks.org/?node_id=1089749
select用法
选择RBITS,WBITS,EBITS,TIMEOUT
这将使用指定的位掩码调用select(2)系统调用,可以使用fileno和 vec构建这些位掩码:
https://perldoc.perl.org/functions/select.html
http://www.man7.org/linux/man-pages/man2/select.2.html
参考资料:
Learn X in Y minutes Where X=perl
https://learnxinyminutes.com/docs/perl/
https://learnxinyminutes.com/docs/zh-cn/perl-cn/
X分钟速成Y ,其中 Y=perl
https://www.kancloud.cn/kancloud/learnxinyminutes/58940
perl built-in : perldoc perlintro
常用模块使用
输出中文
同时终端上也配置成中文
my $str="中文";print FH encode("utf-8",decode("utf-8",$str));
常见变量
$|设置为1, 表示关闭缓冲区。意味着刷新通道;一些web服务器需要这个设置,脚本的输出以及出现在web服务器上。
$| = 1;
eval 捕获运行异常 与 $@
来自最后一个eval的错误
$@
my $json_out = eval { decode_json($json) };if ($@){print "decode_json failed, invalid json. error:$@\n";} else {print " decode ok!\n";}
字符变量的字节长度
https://perldoc.perl.org/bytes.html
use bytes;... chr(...); # or bytes::chr... index(...); # or bytes::index... length(...); # or bytes::length... ord(...); # or bytes::ord... rindex(...); # or bytes::rindex... substr(...); # or bytes::substrno bytes;
perldoc -f lengthlength EXPRlength Returns the length in characters of the value of EXPR. If EXPR isomitted, returns length of $_. Note that this cannot be used on anentire array or hash to find out how many elements these have. Forthat, use "scalar @array" and "scalar keys %hash" respectively.Note the characters: if the EXPR is in Unicode, you will get the num-ber of characters, not the number of bytes. To get the length inbytes, use "do { use bytes; length(EXPR) }", see bytes.
# 'China' in Simplified Chinese# 中 国# Unicode U+4E2D U+56FD# UTF-8 E4 B8 AD E5 9B BDsub bytelen {require bytes;return bytes::length($_[0]);}print length "中国";print "\n";print bytelen "中国";print "\n";use utf8;print "after use utf8\n";print length "中国";print "\n";use bytes;print bytes::length "中国";print "\n";
66after use utf826
设置缺省参数值的一个方法
sub lotsaArgs {my $arg1 = 'default';$arg1 = shift if @_;my $arg2 = 'default';$arg2 = shift if @_;my $arg3 = 'default';$arg3 = shift if @_;my $arg4 = 'default';$arg4 = shift if @_;...}
warn & die & Carp 模块
http://www.runoob.com/perl/perl-error-handling.html
warn 函数
warn 函数用于触发一个警告信息,不会有其他操作,输出到STDERR(标准输出文件),通常用于给用户提示:
chdir('/etc') or warn "无法切换目录";
die 函数
die 函数类似于 warn, 但它会执行退出。一般用作错误信息的输出:
chdir('/etc') or die "无法切换目录";
Carp 对比
标准 Carp 模块提供了 warn() 和 die() 函数的替代方法,它们在提供错误定位方面提供更多信息,而且更加友好。当在模块中使用时,错误消息中包含模块名称和行号。
| 函数名称 | 类比 | 作用 |
|---|---|---|
| carp | warn | 类似于 warn 函数,通常会将该信息发送到 STDERR |
| cluck | warn | 提供了从产生错误处的栈回溯追踪。 |
| croak | die | croak() 与 die() 一样,可以结束脚本。 |
| confess | die | confess() 与 die() 类似,但提供了从产生错误处的栈回溯追踪。 |
confess举例
package T;require Exporter;@ISA = qw/Exporter/;@EXPORT = qw/function/;use Carp;sub function {confess "Error in module!";}1;
在脚本调用以下程序:
use T;function();
执行以上程序,输出结果为:
Error in module! at T.pm line 9T::function() called at test.pl line 2
信号SIG与僵尸进程
https://www.jb51.net/article/65715.htm
https://blog.csdn.net/zrm2012/article/details/51955496
[Perl]REAPER:
https://www.jianshu.com/p/7783abbf89f1
https://www.jianshu.com/p/297a0f555918
在linux中的信号,信号其实就是编程里俗称的中断,它使监视与控制其他进程变为有可能。中断信号(signal,又简称为信号)用来通知进程发 生了异步事件。进程之间可以互相通过系统调用kill发送软中断信号。内核也可以因为内部事件而给进程发送信号,通知进程发生了某个事件。注意,信号只是 用来通知某进程发生了什么事件,并不给该进程传递任何数据。
SIG实例代码
Perl 提供了%SIG 这个特殊的默认HASH.调用需要使用到系统保留全局HASH数组%SIG,即使用’$SIG{信号名}’截取信号,相当于,在perl程序中出现这个信 号时,执行我们自己定义某段代码(子函数)的地址值(定义信号响应函数),这代码就是截取这个信息后要执行的结果了。
#!/usr/bin/perl$SIG{TERM}=$SIG{INT}=\&yoursub;my $i=1;while(1){sleep1;$i=$i+1;print$i."\n";}sub yoursub{print" exit ... \n";exit 0;}
禁止ctrl+c (ctrl+c 会产生一个INT信号给当前程序) 来关闭当前程序
sub INT_handler {print("Don't Interrupt!\n");}$SIG{'INT'} = 'INT_handler'; #another way is $SIG{'INT'} = \&INT_handler ;for ($x = 0; $x < 10; $x++) {print("$x\n");sleep 1;}
一个常用的用法使用$SIG{ALRM},设置等待超时一般都这样做:
local $SIG{ALRM} = sub{alarm 0; die "TIMEOUT";};#超时处理过程eval{alarm(10);#设定10秒钟后如果下面的代码没处理完,则进入超时处理过程$input=<>;#处理过程alarm(0);#如果处理完了,取消超时处理设置};if($@=~/TIMEOUT/){ print "time out!\n";}
收割僵死进程 (reaping )
$SIG{CHLD} = 'IGNORE'; ## Children reaped by system$SIG{CHLD} = 'DEFAULT'; ## System defined$SIG{CHLD} = &REAPER; ## do REAPER if SIGCHLD catched
当一个进程退出的时候,内核向它的父进程发送一个 CHLD 信号然后该进程就成为一个僵死进程(zombie,注:这是一个技术术语),直到父进程调用 wait 或者 waitpid。如果你在 Perl 里面启动新进程用的不是 fork,那么 Perl 就会替你收割这些僵死进程,但是如果你用的是一个 fork,那么就得自己做清理工作。在许多(但不是全部)内核上,自动收割的最简单办法就是把 $SIG{CHLD} 设置为 'IGNORE'。
$SIG{CHLD} = 'IGNORE';
另一个更简单(但也更乏味)的方法是你自己收割它们。因为在你开始处理的时候,可能有不止一个子进程已经完蛋了,所以,你必须在一个循 环里收割你的子进程直到没有更多为止:
use POSIX ":sys_wait_h";sub REAPER {1 until waitpid(-1, WNOHANG) == -1)}
想根据需要运行这些代码,你要么可以给它设置 CHLD 信号:
$SIG{CHLD} =\&REAPER;
杀死所有子进程
有时我们要杀死所有的子进程,需要用到向进程组发送信息
{local$SIG{HUP}='IGNORE';# 排除自己kill(HUP,-$$);#通知自己的进程组}
socket 套接字
http://www.runoob.com/perl/perl-socket-programming.html
套接字编程样例
#!/usr/bin/perl -wuse strict;use Socket; # For constants like AF_INET and SOCK_STREAMuse IO::Select;$| = 1;my($proto, $port , $sock , $s , @ready , $so , $addrinfo , $client , $inp);$proto = getprotobyname('tcp'); #get the tcp protocol# 1. create a socket handle (descriptor)socket($sock, AF_INET, SOCK_STREAM, $proto)or die "could not create socket : $!";# 2. bind to local port$port = $ARGV[0];bind($sock , sockaddr_in($port, INADDR_ANY))or die "bind failed : $!";listen($sock , 10);print "Server is now listening ...\n";#accept incoming connections and talk to clients$s = IO::Select->new();$s->add($sock);while(1){@ready = $s->can_read(0);foreach $so(@ready){#new connection readif($so == $sock){my($client);$addrinfo = accept($client , $sock);my($port, $iaddr) = sockaddr_in($addrinfo);my $name = gethostbyaddr($iaddr, AF_INET);print "Connection accepted from $name : $port \n";#send some message to the clientsend($client , "Hello client how are you\n" , 0);$s->add($client);}# existing client readelse{chop($inp = <$so>);chop($inp);print "Received -- $inp \n";my $back = processclient($inp);send($so, "replay: $back \n",0);}}}#close the socketclose($sock);exit(0);sub processclient {my $input = shift;if ($input eq "xxx" ){my $filename = "file54M.dat.torrent";my @result = readpipe("curl -s http://localhost:2780/ |grep $filename -A 2 | awk \'{ FS=\">\"; print \$NF }\'");print $result[-1];return $result[-1];} else {return "not!\n";}}
调用
telnet localhost 8888inputOK: inputxxxOK: 100%
http server daemon
use HTTP::Daemon;use HTTP::Status;my $d = HTTP::Daemon->new(LocalAddr => 'localhost', LocalPort => '8080') || die;print "Please contact me at: <URL:", $d->url, ">\n";while (my $c = $d->accept) {while (my $r = $c->get_request) {if ($r->method eq 'POST' and $r->uri->path eq "/pass") {use JSON;use Data::Dumper;my $json = decode_json($r->content);print Dumper $json;my $response = HTTP::Response->new(200);$response->content("html result test!");$c->send_response($response);}elsif ($r->method eq 'GET' and $r->uri->path eq "/pass2") {# remember, this is *not* recommended practice :-)$c->send_file_response("/etc/passwd");}else {$c->send_error(RC_FORBIDDEN)}}$c->close;undef($c);}
客户端调用:
curl -H "Content-Type: application/json" -X POST --data '{"userID":10001}' http://localhost:8080/pass
又一个http server例子
#!/usr/bin/env perl -s -wluse strict;use HTTP::Daemon;use HTTP::Headers;use HTTP::Response;sub help {print "$0 -port=<port-number>";}our $port;our $addr = "localhost";$port = 9000 unless defined $port;my $server = HTTP::Daemon->new(LocalAddr => $addr,LocalPort => $port,Listen => 1,Reuse => 1,);die "$0: Could not setup server" unless $server;print "$0: http://$addr:$port Accepting clients";while (my $client = $server->accept()) {print "$0: Client received";$client->autoflush(1);my $request = $client->get_request;print "$0: Client's Request Received";print "$0: Request: " . $request->method;if ($request->method eq 'GET') {my $header = HTTP::Headers->new;$header->date( time );$header->server("$0");$header->content_type('text/html');my $content = "<!doctype html><html><head><title>Hello World</title></head><body><h1>Hello World!</h1></body></html>";my $response = HTTP::Response->new(200);$response->content($content);$response->header("Content-Type" => "text/html");$client->send_response($response);}print "$0: Closed";$client->close;undef($client);}
install
wget https://cpan.metacpan.org/authors/id/G/GA/GAAS/HTTP-Daemon-6.01.tar.gztar -zxvf HTTP-Daemon-6.01.tar.gzcd HTTP-Daemon-6.01sudo perl Makefile.PLsudo makesudo make install
http Get & Post
https://blog.csdn.net/hardworkba/article/details/41383577
Get
use LWP::UserAgent;my $ua = LWP::UserAgent->new;my $server_endpoint = "http://192.168.1.1:8000/service";# set custom HTTP request header fieldsmy $req = HTTP::Request->new(GET => $server_endpoint);$req->header('content-type' => 'application/json');$req->header('x-auth-token' => 'kfksj48sdfj4jd9d');my $resp = $ua->request($req);if ($resp->is_success) {my $message = $resp->decoded_content;print "Received reply: $message\n";}else {print "HTTP GET error code: ", $resp->code, "\n";print "HTTP GET error message: ", $resp->message, "\n";}
Post
use LWP::UserAgent;my $ua = LWP::UserAgent->new;my $server_endpoint = "http://192.168.1.1:8000/service";# set custom HTTP request header fieldsmy $req = HTTP::Request->new(POST => $server_endpoint);$req->header('content-type' => 'application/json');$req->header('x-auth-token' => 'kfksj48sdfj4jd9d');# add POST data to HTTP request bodymy $post_data = '{ "name": "Dan", "address": "NY" }';$req->content($post_data);my $resp = $ua->request($req);if ($resp->is_success) {my $message = $resp->decoded_content;print "Received reply: $message\n";}else {print "HTTP POST error code: ", $resp->code, "\n";print "HTTP POST error message: ", $resp->message, "\n";}
install
wget https://cpan.metacpan.org/authors/id/O/OA/OALDERS/HTTP-Message-6.18.tar.gztar -zxvf HTTP-Message-6.18.tar.gzcd HTTP-Message-6.18sudo perl Makefile.PLsudo makesudo make install
如何避免关闭TCP连接时的地址占用问题
Bind: Address Already in Use
Or How to Avoid this Error when Closing TCP Connections
https://hea-www.harvard.edu/~fine/Tech/addrinuse.html
Hostname
use strict;use warnings;use Socket;use Sys::Hostname;my $host=hostname;print "Host name: ".$host."\n";my $name=gethostbyname($host);my $ip= inet_ntoa($name);print $ip."\n";my $remoteHost= gethostbyname("baidu.com");my $remoteIp= inet_ntoa($remoteHost);print $remoteIp,"\n";
process
执行一个程序,以及传入相应参数
$datadir="/root/test";chdir($datadir) or warn "无法切换目录";system("pwd");#$param = "-x /root/test/file11M.dat.torrent";$param = "-x ~/test/file11M.dat.torrent ";$param = "-x file11M.dat.torrent ";system("ctorrent $param");
获取system的执行结果到变量
my $filename = "file54M.dat.torrent";my @result = readpipe("curl -s http://localhost:2780/ |grep $filename -A 2 | awk \'{ FS=\">\"; print \$NF }\'");print @result;
通过子程序执行
$param = " /root/test/file11M.dat.torrent";if(!defined($pid = fork())) {# fork 发生错误返回 undefdie "无法创建子进程: $!";}elsif ($pid == 0) {print "通过子进程输出\n";exec("ctorrent $param") || die "无法输出日期: $!";} else {# 在父进程中print "通过父进程输出\n";$ret = waitpid($pid, 0);print "完成的进程ID: $ret\n";}1;
Json
JSON 教程
http://wiki.jikexueyuan.com/project/json/overview.html
http://wiki.jikexueyuan.com/project/json/with-perl.html
https://www.tutorialspoint.com/json/json_perl_example.htm
https://metacpan.org/pod/release/MAKAMAKA/JSON-2.53/lib/JSON.pm
| Function | Comments |
|---|---|
| encode_json | 把perl的哈希或数组引用的数据结构转变成 utf8编码的json |
| decode_json | 把utf8编码的json文本编码成perl的hash或数组引用结构 |
use JSON; # imports encode_json, decode_json, to_json and from_json.# simple and fast interfaces (expect/generate UTF-8)$utf8_encoded_json_text = encode_json $perl_hash_or_arrayref;$perl_hash_or_arrayref = decode_json $utf8_encoded_json_text;# The function call is functionally identical to:$json_text = JSON->new->utf8->encode($perl_scalar);$perl_scalar = JSON->new->utf8->decode($json_text);
install
wget https://cpan.metacpan.org/authors/id/I/IS/ISHIGAKI/JSON-2.97001.tar.gztar -zxvf JSON-2.97001.tar.gzcd JSON-2.97001sudo perl Makefile.PLsudo makesudo make install
wget https://cpan.metacpan.org/authors/id/M/MA/MAKAMAKA/JSON-2.53.tar.gz$tar xvfz JSON-2.53.tar.gz$cd JSON-2.53$perl Makefile.PL$make$make install
example
#!/usr/bin/perluse JSON;my %rec_hash = ('a' => 1, 'b' => 2, 'c' => 3, 'd' => 4, 'e' => 5);my $json = encode_json \%rec_hash;print "$json\n";
字节及 pack && unpack
https://perldoc.perl.org/perlpacktut.html
https://blog.csdn.net/fireroll/article/details/10942217
https://blog.csdn.net/eroswang/article/details/2032564
https://blog.csdn.net/zhaoyangjian724/article/details/53791403
pack && unpack defination
The pack function converts values to a byte sequence containing representations according to a given specification, the so-called "template" argument.
unpack is the reverse process, deriving some values from the contents of a string of bytes.
pack函数把值按照给定的规格模板参数转换成字节序。
unpack是相反过程,把字节序反向导出相应的值。
常见的大小端字节序,字节长度与消息
my $msg = "a";# length_msg in big endian , n for 16 bit and N for 32 bit integers. (length_msg . msg);use bytes;# 编码为大端字节序的长度和消息本身my $buf = pack( 'N', bytes::length( $msg ) ). $msg;# 解码大端字节序的长度和消息本身my @data = unpack 'NA*', $buf;
$foo = pack("s2",1,2);# "\001\000\002\000" on little-endian# "\000\001\000\002" on big-endian
字符,字节与encode_json, decode_json
字符<-decode_json<-字节字符->encode_json->字节字节 -> decode ->字符串 ->encode ->字节$response->decoded_content是字符$response->content是字节字符<-decode_json<-字节字符->encode_json->字节
my $str = "xxxxbbbb";my @arr=unpack("x4A*",$str); #略过头4个字节print $arr[0]; # 打印bbbb
perl modules 安装汇总
安装方法1
HTTP::Request
wget https://cpan.metacpan.org/authors/id/O/OA/OALDERS/HTTP-Message-6.18.tar.gztar -zxvf HTTP-Message-6.18.tar.gzcd HTTP-Message-6.18sudo perl Makefile.PLsudo makesudo make install
安装方法2
# 无需提示,自动安装cpanmexport PERL_MM_USE_DEFAULT=1cpan App::cpanminuscpanm HTTP::Daemoncpanm JSONcpanm LWP::UserAgent
删除包的方法
https://www.perl.com/article/3/2013/3/27/How-to-cleanly-uninstall-a-Perl-module/
https://stackoverflow.com/questions/7777252/uninstall-all-perl-modules-installed-by-cpan
apt install libcpanplus-perl
# uninstall_perl_module.pl from PerlTricks.comuse 5.14.2;use ExtUtils::Installed;use ExtUtils::Packlist;# Exit unless a module name was passeddie ("Error: no Module::Name passed as an argument. E.G.\n\t perl $0 Module::Name\n") unless $#ARGV == 0;my $module = shift @ARGV;my $installed_modules = ExtUtils::Installed->new;# iterate through and try to delete every file associated with the moduleforeach my $file ($installed_modules->files($module)) {print "removing $file\n";unlink $file or warn "could not remove $file: $!\n";}# delete the module packfilemy $packfile = $installed_modules->packlist($module)->packlist_file;print "removing $packfile\n";unlink $packfile or warn "could not remove $packfile: $!\n";# delete the module directories if they are emptyforeach my $dir (sort($installed_modules->directory_tree($module))) {print("removing $dir\n");rmdir $dir or warn "could not remove $dir: $!\n";}
for module in $(perldoc -t perllocal | grep "Module" | cut -d\" -f3);doecho $module#cpanp uninstall $moduleperl uninstall_perl_module.pl $moduledone
